
Samsung и Cookies
На этом сайте используются файлы cookie. Нажимая ПРИНЯТЬ или продолжая просмотр сайта, вы разрешаете их использование.
Подробнее
В настоящий момент товары недоступны для заказа на samsung.com/ru
В настоящий момент товары недоступны для заказа на samsung.com/ru
Выберите свое местоположение и язык.
Перейти к контенту
![]()
Русские электронные инструкции по эксплуатации
Постоянно обновляемый большой каталог документации по эксплуатации и использованию современных устройств и оборудования на русском языке. Бесплатное скачивание файлов.
Поиск:
Главная
♥ В закладки
Просмотр инструкции в pdf


/HW-R650.jpeg)
Инструкция по эксплуатации саундбара Samsung HW-R650.
Скачать инструкцию к саундбару Samsung HW-R650 (20,43 МБ)

Инструкции по эксплуатации саундбаров (звуковых панелей) Samsung
« Инструкция к встраиваемой электрической варочной панели Ricci KS-T46602IR2
» Инструкция к встраиваемой электрической варочной панели Samsung C61R1ADMST
Вам также может быть интересно

Инструкция к стиральной машине Samsung WW90J6410CW1

Инструкция к стиральной машине Samsung WW60J42E0HSOLD

Инструкция к холодильнику Samsung RS63R5571F8

Инструкция к смартфону Samsung Galaxy A31 64GB White

Инструкция к умным часам Samsung Galaxy Watch 42 mm Rose Gold
.jpg)
Инструкция к смартфону Samsung Galaxy A21s 64GB Black (SM-A217F-DSN)

Инструкция к стиральной машине Samsung WF1802XEY

Инструкция к микроволновой печи Samsung MS23T5018AK
Добавить комментарий
Имя *
Email *
Сайт
Комментарий


![]()


Сохранить моё имя, email и адрес сайта в этом браузере для последующих моих комментариев.
- Добавить инструкцию
- Заказать инструкцию
- Политика конфиденциальности
Samsung HW-R650/ZA Soundbar — Use Manual — Use Guide PDF.
Documents: Go to download!
User Manual
- User Manual — (English)
Warranty
- Warranty — (English)
- PRODUCT OVERVIEW
- CONNECTING TO YOUR TV
- CONNECTING AN EXTERNAL DEVICE
- USING THE REMOTE CONTROL
- INSTALLING THE WALL MOUNT
- SOFTWARE UPDATE
- TROUBLESHOOTING
Table of contents
User manual Soundbar
PRODUCT OVERVIEW
Front Panel / Right Side Panel of the Soundbar
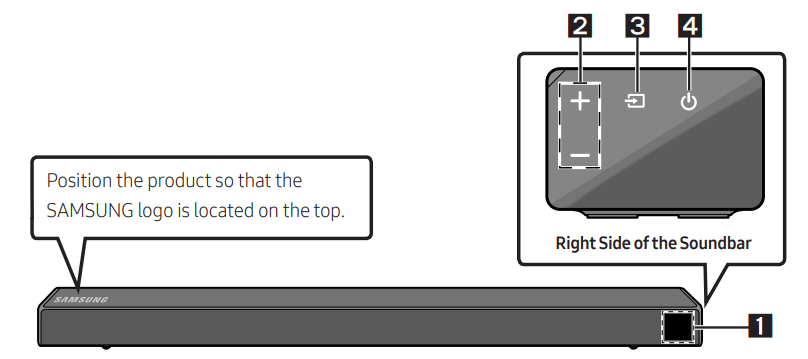

• When you plug in the AC cord, the power button will begin working in 4 to 6 seconds.
• When you turn on this unit, there will be a 4 to 5 second delay before it produces sound.
• If you want to enjoy sound only from the Soundbar, you must turn off the TV’s speakers in the Audio Setup menu of your TV. Refer to the owner’s manual supplied with your TV.
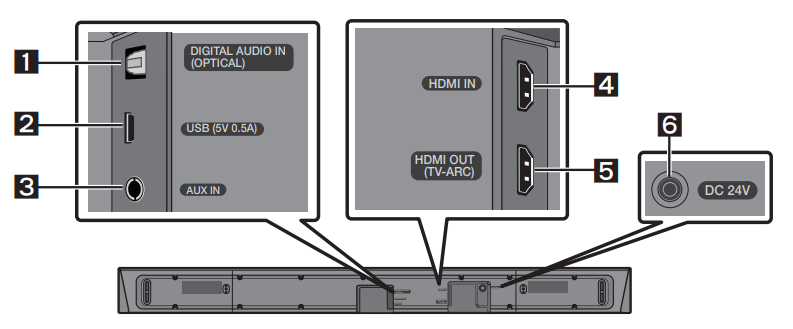
Bottom Panel of the Soundbar
• When disconnecting the power cable of the AC/DC power adaptor from a wall outlet, pull the plug. Do not pull the cable.
• Do not connect this unit or other components to an AC outlet until all connections between components are complete.
CONNECTING THE SOUNDBAR
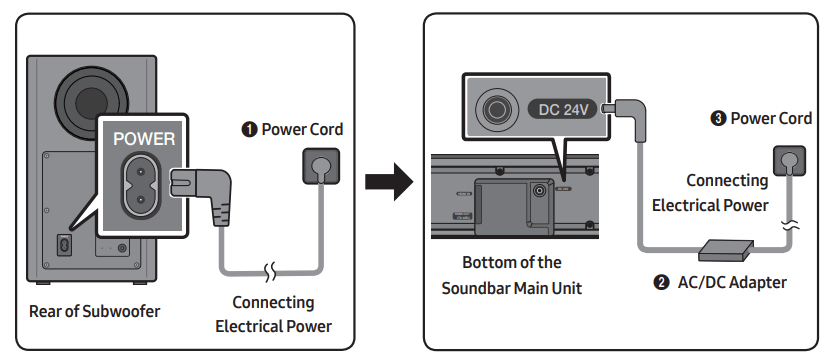
Connecting Electrical Power
Use the power components (1, 2, 3) to connect the Subwoofer and Soundbar to an electrical outlet in the following order:
- Connect the power cord to the Subwoofer.
- Connect the power output cable to the power adapter, and then to the Soundbar.
- Connect the power cord to a wall socket.
See the illustrations below.
- For more information about the required electrical power and power consumption, refer to the label attached to the product. (Label: Bottom of the Soundbar Main Unit)
• Make sure to rest the AC/DC Adapter flat on a table or the floor. If you place the AC/DC Adapter so that it is hanging with the AC cord input facing upwards, water or other foreign substances could enter the Adapter and cause the Adapter to malfunction.
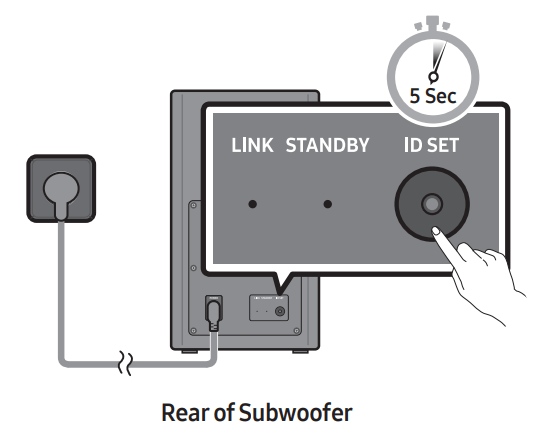
Manually connecting the Subwoofer if automatic connection fails
Before performing the manual connection procedure below:
- Check whether the power cables for the Soundbar and subwoofer are connected properly.
- Make sure that the Soundbar is turned on.
1. Press and hold ID SET on the rear of the subwoofer for at least 5 seconds.
- The red indicator on the rear of the subwoofer turns off and the blue indicator blinks
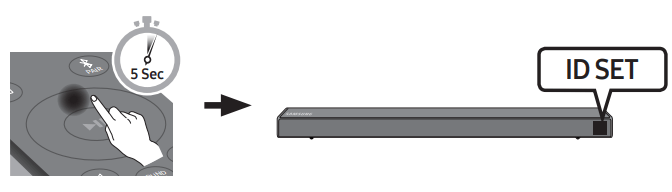
2. Press and hold the Up button on the remote control for at least 5 seconds.
• The ID SET message appears on the display of the Soundbar for a moment, and then it disappears.
• The Soundbar will automatically power on when ID SET is complete.
3. Check if the LINK LED is solid blue (connection complete).
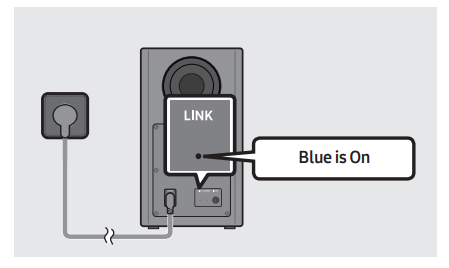
The LINK LED indicator stops blinking and glows a solid blue when a connection is established between the Soundbar and the Wireless Subwoofer.
NOTES
- Do not connect the power cord of this product or your TV to a wall outlet until all connections between components are complete.
- Before moving or installing this product, be sure to turn off the power and disconnect the power cord.
- If the main unit is powered off, the wireless subwoofer will go into stand-by mode and the STANDBY LED on the rear of the sub-woofer will turn red after blinking in blue several times.
- If you use a device that uses the same frequency (5.8GHz) as the Soundbar near the Soundbar, interference may cause some sound interruption.
- The maximum transmission distance of the main unit’s wireless signal is about 32.8 ft, but may vary depending on your operating environment. If a steel-concrete or metallic wall is between the main unit and the wireless subwoofer, the system may not operate at all because the wireless signal cannot penetrate metal.
PRECAUTIONS
- Wireless receiving antennas are built into the wireless subwoofer. Keep the unit away from water and moisture.
- For optimal listening performance, make sure that the area around the wireless subwoofer and the Wireless Receiver Module (sold separately) is clear of any obstructions.
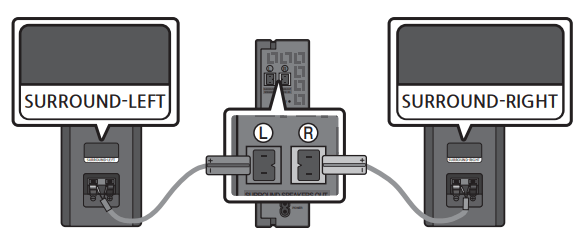
Connecting an SWA-8500S (Sold Separately) to your Soundbar
Expand to true wireless surround sound by connecting the Samsung Wireless Rear Speaker Kit (SWA-8500S, sold separately) to your Soundbar.
1. Connect the Wireless Receiver Module to 2 Surround Speakers.
- The speaker cables are color coded.
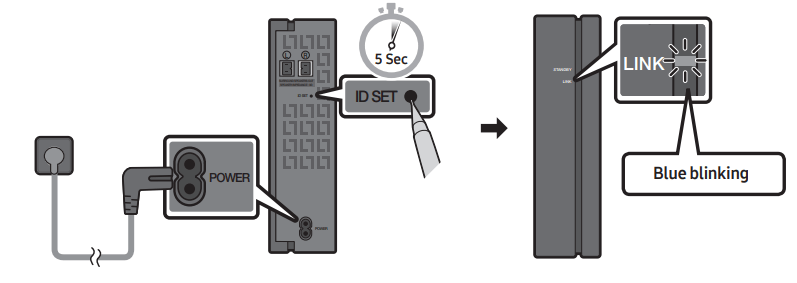
2. Check the standby status of the Wireless Receiver Module after plugging it into an electrical outlet.
- The LINK LED indicator (blue LED) on the Wireless Receiver Module blinks. If the LED does not blink, press the ID SET button on the back of the Wireless Receiver Module with a pen tip for 5~6 seconds until the LINK LED indicator blinks (in Blue). For more about the LED, please refer to the SWA-8500S user manual.
3. Press and hold the Up button on the remote control for at least 5 seconds.
- The ID SET message appears on the display of the Soundbar for a moment, and then it disappears.
- The Soundbar will automatically power on when ID SET is complete.

CAUTION
• If your Soundbar was playing music when it connects to the SWA-8500S, you may hear some stuttering from the woofer as the connection finalizes.
4. Check if the LINK LED is solid blue (connection complete).
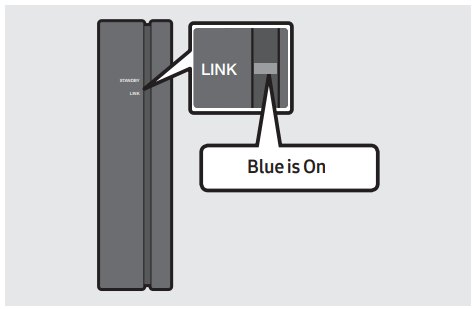
The LINK LED indicator stops blinking and glows a solid blue when a connection is established between the Soundbar and the Wireless Receiver Module.
5. If the SWA-8500S is not connected, repeat the procedure from Step 2.
CONNECTING TO YOUR TV
Hear TV sound from your Soundbar through wired or wireless connections.
• When the Soundbar is connected to selected Samsung TVs, the Soundbar can be controlled using the TV’s remote control.
– This feature is supported by 2017 and later Samsung Smart TVs that support Bluetooth when you connect the Soundbar to the TV using an optical cable.
– This function also allows you to use the TV menu to adjust the sound field and various settings as well as the volume and mute.
Method 1. Connecting with a Cable
When the audio in a broadcast is encoded in Dolby Digital and the “Digital Output Audio Format” on your TV is set to PCM, we recommend that you change the setting to Dolby Digital. When the setting on the TV is changed, you will experience better sound quality. (The TV menu may use different words for Dolby Digital and PCM depending on the TV manufacturer.)
Connecting using an Optical Cable
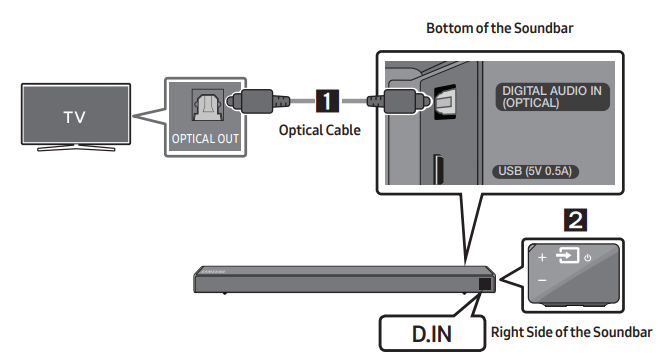
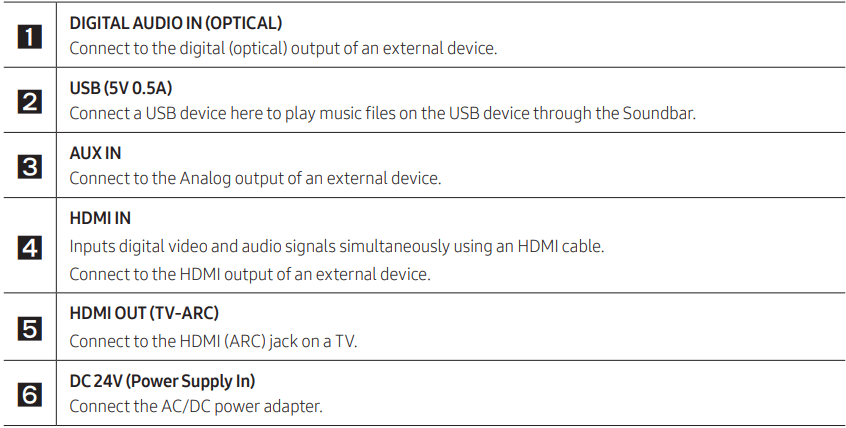
1. Connect the DIGITAL AUDIO IN (OPTICAL) jack on the Soundbar to the OPTICAL OUT jack of the TV with a digital optical cable.
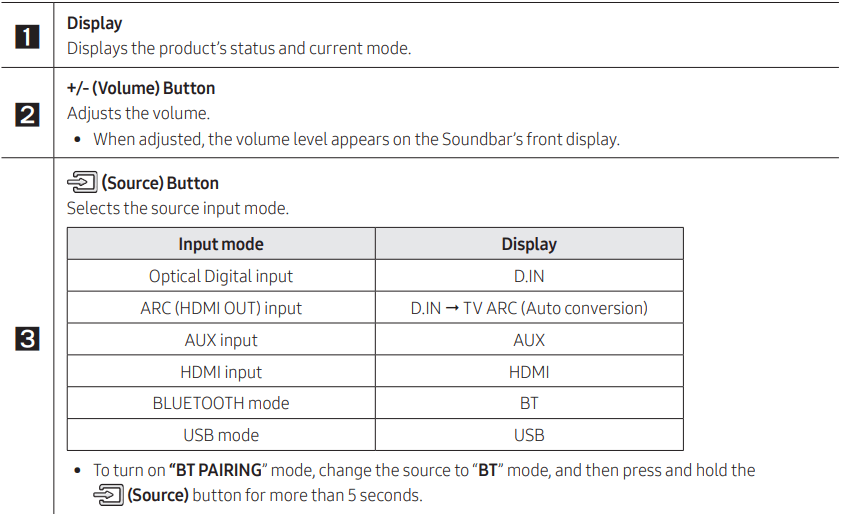
2. Press the  (Source) button on the right side panel or remote control, and then select the “D.IN” mode.
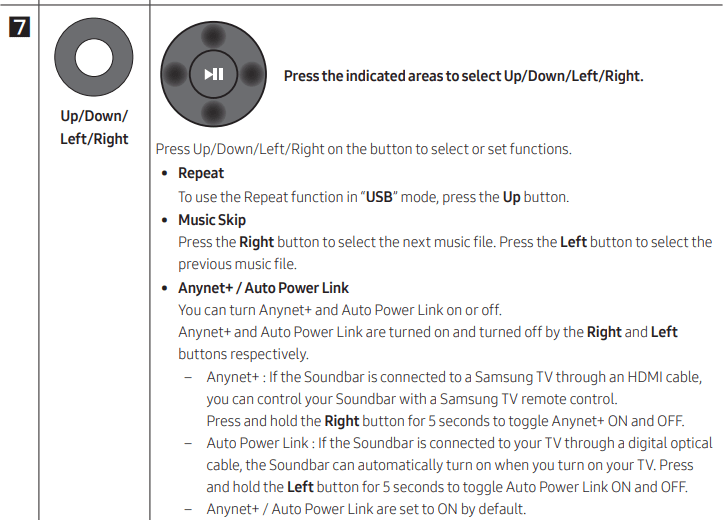
Auto Power Link
Auto Power Link automatically turns on the Soundbar when the TV is turned on.
- Connect the Soundbar and a TV with a digital optical cable.
- Press the Left button on the remote control for 5 seconds to turn Auto Power Link on or off.
- Auto Power Link is set to ON by default. ( To turn off this function, hold the Left button on the remote for 5 seconds.)
- Depending on the connected device, Auto Power Link may not function.
- This function is only available in the “D.IN” mode.
Connecting a TV using an HDMI Cable
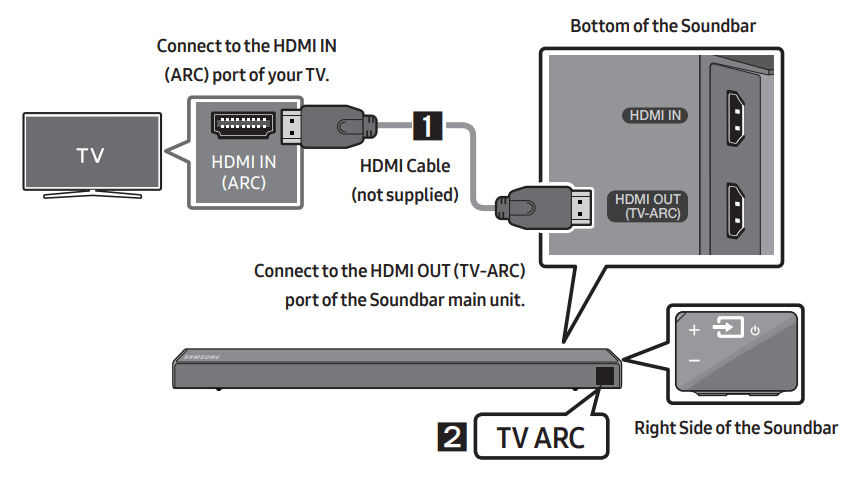
1. With the Soundbar and TV turned on, connect the HDMI cable (not supplied) as shown in the figure.
2. “TV ARC” appears in the display window of the Soundbar main unit and the Soundbar plays TV sound.
• If TV sound is inaudible, press the (Source) button on the remote control or on the right side of the Soundbar to switch to “D.IN” mode. The screen displays “D.IN” and “TV ARC” in sequence, and TV sound is played.
• If “TV ARC” does not appear in the display window of the Soundbar main unit, confirm that the HDMI cable (not supplied) is connected to the correct port.
• Use the volume buttons on the TV’s remote control to change the volume on the Soundbar.
NOTES
- HDMI is an interface that enables the digital transmission of video and audio data with just a single connector.
- If the TV provides an ARC port, connect the HDMI cable to the HDMI IN (ARC) port.
- We recommend you use a coreless HDMI cable if possible. If you use a cored HDMI cable, use one whose diameter is less than 0.55 inches.
- Anynet+ must be turned on.
- This function is not available if the HDMI cable does not support ARC.
Method 2. Connecting Wirelessly
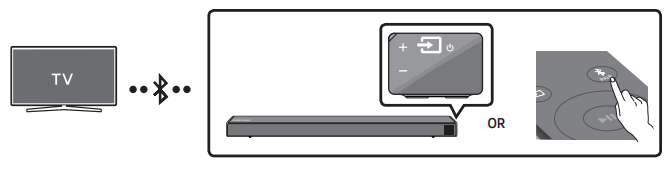
Connecting a TV via Bluetooth
When a TV is connected using Bluetooth, you can hear stereo sound without the hassle of cabling.
• Only one TV can be connected at a time.
The initial connection
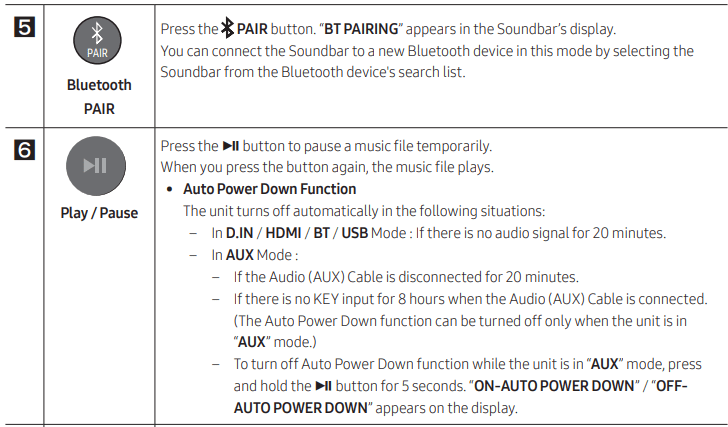
1. Press the  PAIR button on the remote control to enter the “BT PAIRING” mode. (OR)
a. Press the (Source) button on the right side panel and then select “BT”. “BT” changes to “BT READY” in a few seconds automatically if there is no Bluetooth device connected to the Soundbar.
b. When “BT READY” appears, press and hold the (Source) button on the right side panel of the Soundbar for more than 5 seconds to display “BT PAIRING”.
2. Select Bluetooth mode on the TV. (For more information, see the TV’s manual.)
3. Select “[AV] Samsung Soundbar R6-Series” from the list on TV’s screen. An available Soundbar is indicated with “Need Pairing” or “Paired” on the TV’s Bluetooth device list. To connect the TV to the Soundbar, select the message, and then establish a connection.
• When the TV is connected, [TV Name] → “BT” appears on the Soundbar’s front display.
4. You can now hear TV sound from the Soundbar.
If the device fails to connect
- If a previously connected Soundbar listing (e.g. “[AV] Samsung Soundbar R6-Series”) appears in the list, delete it.
- Then repeat steps 1 through 3.
NOTE
- After you have connected the Soundbar to your TV the first time, use the “BT READY” mode to reconnect.
Disconnecting the Soundbar from the TV
Press the (Source) button on the right side panel or on the remote control and switch to any mode but “BT”.
- Disconnecting takes time because the TV must receive a response from the Soundbar. (The time required may differ, depending on the TV model.)
- To cancel the automatic Bluetooth connection between the Soundbar and TV, press the
 (Play/Pause) button on the remote control for 5 seconds with the Soundbar in “BT READY” status. (Toggle On → Off)
 (Play/Pause) button on the remote control for 5 seconds with the Soundbar in “BT READY” status. (Toggle On → Off)
What is the difference between BT READY and BT PAIRING?
NOTES
- If asked for a PIN code when connecting a Bluetooth device, enter <0000>.
- In Bluetooth connection mode, the Bluetooth connection will be lost if the distance between the Soundbar and the Bluetooth device exceeds 32.8 ft.
- The Soundbar automatically turns off after 20 minutes in the Ready state.
- The Soundbar may not perform Bluetooth search or connection correctly under the following circumstances:
- If there is a strong electrical field around the Soundbar.
- If several Bluetooth devices are simultaneously paired with the Soundbar.
- If the Bluetooth device is turned off, not in place, or malfunctions.
- Electronic devices may cause radio interference. Devices that generate electromagnetic waves must be kept away from the Soundbar main unit — e.g., microwaves, wireless LAN devices, etc.
CONNECTING AN EXTERNAL DEVICE
Connect to an external device via a wired or wireless network to play the external device’s sound through the Soundbar.
Connecting using an Optical or Analog Audio (AUX) Cable
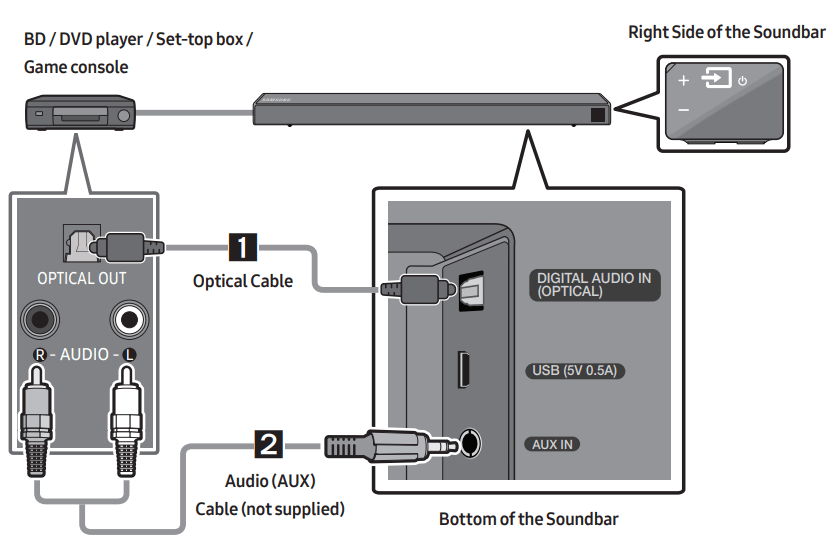
- Optical Cable
- Connect DIGITAL AUDIO IN (OPTICAL) on the main unit to the OPTICAL OUT jack of the Source Device using a digital optical cable.
- Select “D.IN” mode by pressing the (Source) button on the right side panel or on the remote control.
- Audio (AUX) Cable
- Connect AUX IN (Audio) on the main unit to the AUDIO OUT jack of the Source Device using an audio cable.
- Select “AUX” mode by pressing the (Source) button on the right side panel or on the remote control.
Connecting using an HDMI Cable
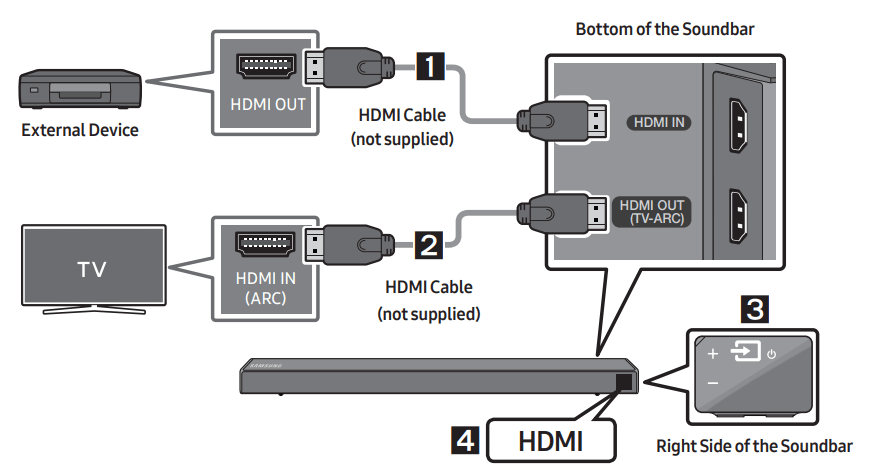
1. Connect an HDMI cable (not supplied) from the HDMI IN jack on the back of the product to the HDMI OUT jack on your digital device.
2. Connect an HDMI cable (not supplied) from the HDMI OUT (TV-ARC) jack on the back of the product to the HDMI IN jack on your TV.
3. Press the (Source) button on the right side panel or on the remote control, and then select “HDMI”.
4. “HDMI” mode is displayed on the Soundbar display panel and sound plays.
USING THE REMOTE CONTROL
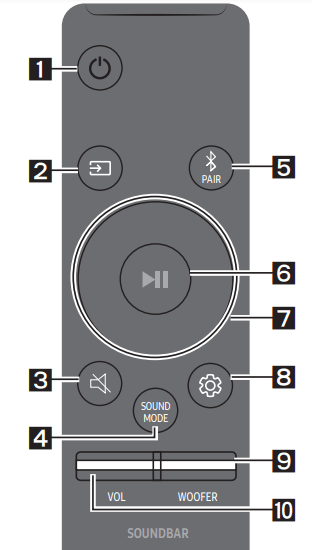
How to Use the Remote Control

Adjusting the Soundbar volume with a TV remote control
If you have a Samsung TV, you can adjust the Soundbar’s volume using the IR remote control that came with your Samsung TV. First use the TV menu to set the TV audio on your Samsung TV to external speakers, then use your Samsung remote to control the Soundbar’s volume. For more information, see the TV’s user manual. The default mode for this function is control by a Samsung TV remote. If your TV is not a Samsung TV, follow the directions below to change the settings of this function.
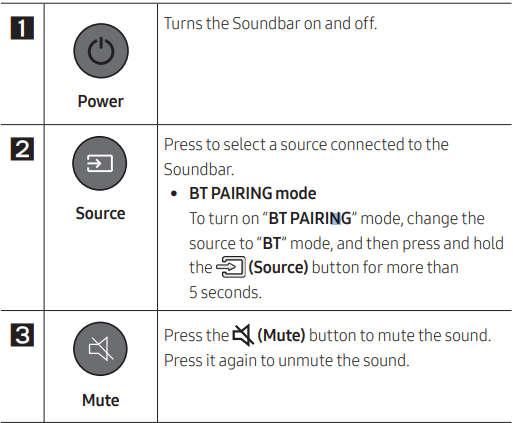
1. Turn Off the Soundbar.
2. If you do not want to use this function, push up and hold the WOOFER button for 5 seconds repeatedly until “OFF-TV REMOTE” appears in the display.
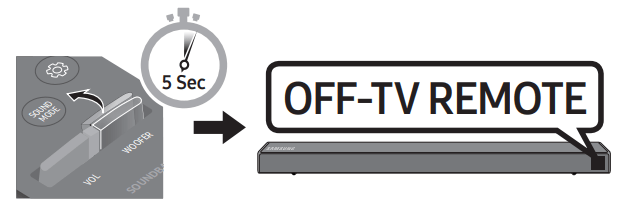
3. If you want to control the Soundbar with your TV’s remote, push up and hold the WOOFER button for 5 seconds repeatedly until “ALL-TV REMOTE” appears in the display. Then, use your TV’s menu to select external speakers.

4. If you want to return the Soundbar to the default mode (control by a Samsung TV remote), push up and hold the WOOFER button for 5 seconds repeatedly until “SAMSUNG-TV REMOTE” appears in the display.
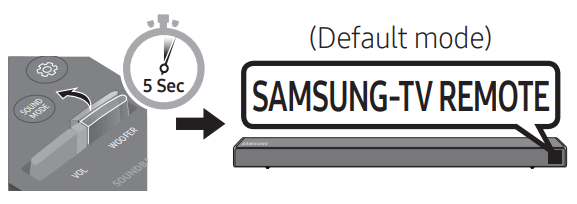
– Each time you push the WOOFER button up and hold it for 5 seconds, the mode switches in the following order: “SAMSUNG-TV REMOTE” (Default mode) → “OFF‑TV REMOTE” → “ALL‑TV REMOTE”.
– This function may not be available, depending on the remote control.
– Manufacturers supporting this function: VIZIO, LG, Sony, Sharp, PHILIPS, PANASONIC, TOSHIBA, GRUNDIG, Hisense, RCA
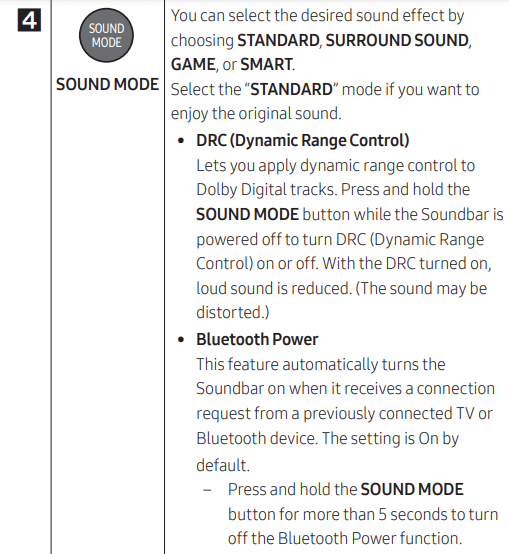
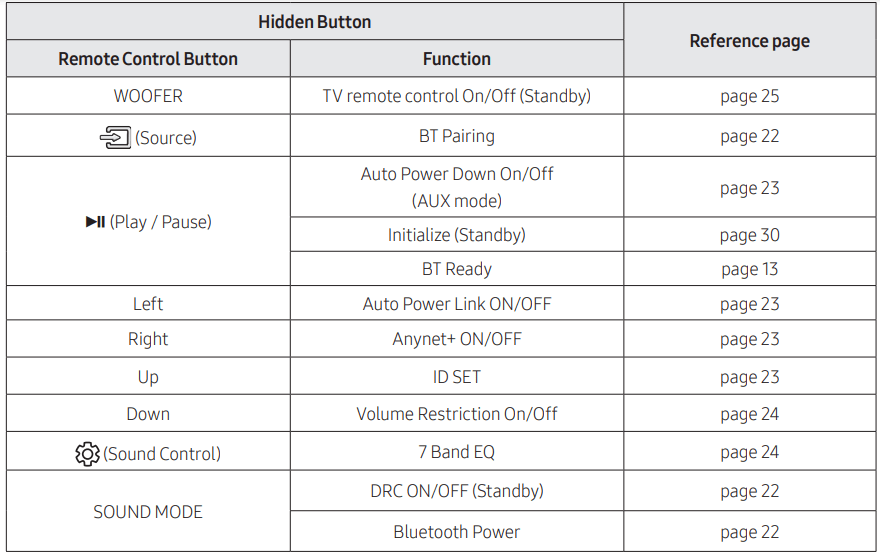
Using the Hidden Buttons (Buttons with more than one function)
Output specifications forthe different sound effect modes
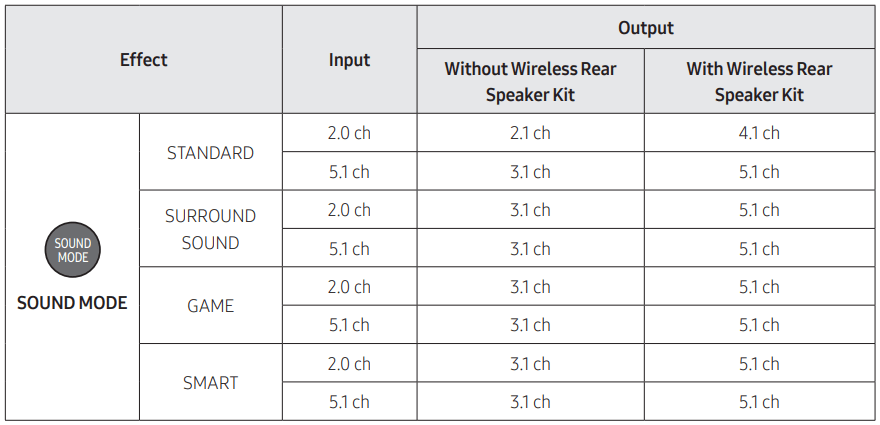
• The Samsung Wireless Rear Speaker Kit can be purchased separately. To purchase a Kit, contact the vendor you purchased the Soundbar from.
INSTALLING THE WALL MOUNT
Installation Precautions
• Install on a vertical wall only.
• Do not install in a place with high temperature or humidity.
• Verify whether the wall is strong enough to support the product’s weight. If not, reinforce the wall or choose another installation point.
• Purchase and use the fixing screws or anchors appropriate for the kind of wall you have (plaster board, iron board, wood, etc.). If possible, fix the support screws into wall studs.
• Purchase wall mounting screws according to the type and thickness of the wall you want to mount the Soundbar on.
– Diameter: M5
– Length: 1 3/8 inches or longer recommended.
• Connect cables from the unit to external devices before you install the Soundbar on the wall.
• Make sure the unit is turned off and unplugged before you install it. Otherwise, it may cause an electric shock.
Wallmount Components
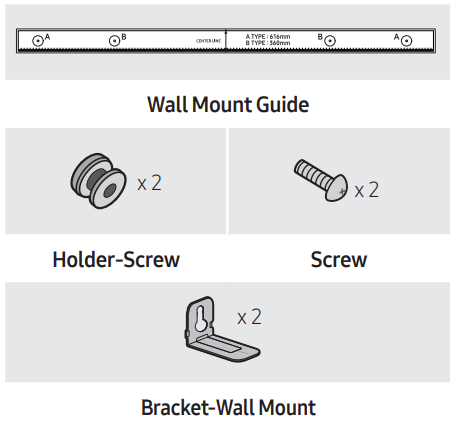
1. Place the Wall Mount Guide against the wall surface.
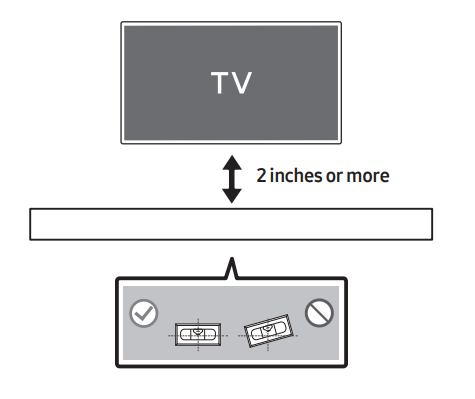
• The Wall Mount Guide must be level.
• If your TV is mounted on the wall, install the Soundbar at least 2 inches (5 cm) below the TV.
2. Align the Wall Mount Guide’s Center Line with the center of your TV (if you are mounting the Soundbar below your TV), and then fix the Wall Mount Guide to the wall using tape.
• If you are not mounting below a TV, place the Center Line in the center of the installation area.

3. Push a pen tip or sharpened pencil tip through the center of the A-TYPE images on each end of the Guide to mark the holes for the supporting screws, and then remove the Wall Mount Guide.

4. Using an appropriately sized drill bit, drill a hole in the wall at each marking.
• If the markings do not correspond to the positions of studs, make sure you insert appropriate anchors or mollies into the holes before you insert the support screws. If you use anchors or mollies, make sure the holes you drill are large enough for the anchors or mollies you use.
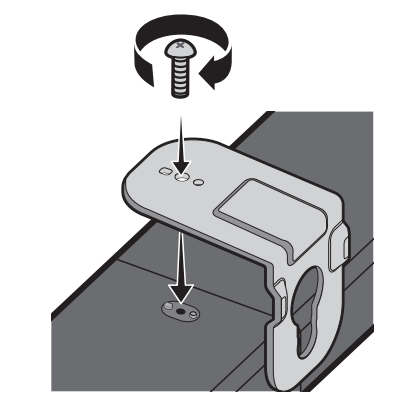
5. Push a screw (not supplied) through each Holder-Screw, and then screw each screw firmly into a support screw hole.

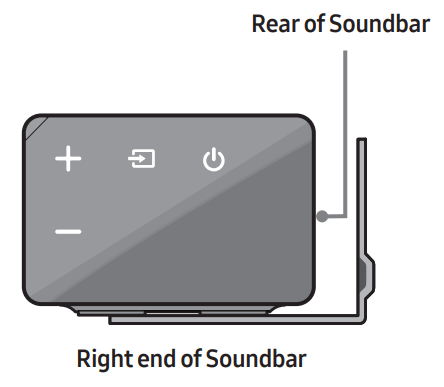
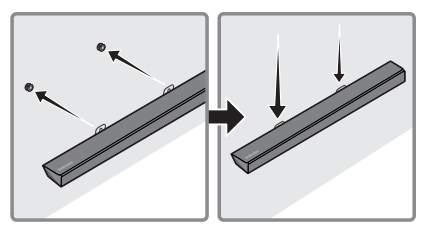
6. Install the 2 Bracket-Wall Mounts in the correct orientation on the bottom of the Soundbar using 2 Screws.
• When assembling, make sure the hanger part of the Bracket-Wall Mounts are located behind the rear of the Soundbar
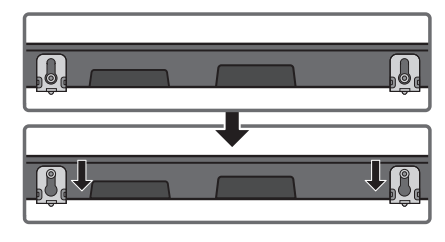
7. Install the Soundbar with the attached Bracket-Wall Mounts by hanging the Bracket-Wall Mounts on the Holder-Screws on the wall.
8. Slide the Soundbar down as shown below so that the Bracket-Wall Mounts rest securely on the Holder-Screws.
• Insert the Holder-Screws into the wide (bottom) part of the Bracket-Wall Mounts, and then slide the Bracket-Wall Mounts down so that the Bracket-Wall Mounts rest securely on the Holder-Screws.
SOFTWARE UPDATE
Samsung may offer updates for the Soundbar’s system firmware in the future.
If an update is offered, you can update the firmware by connecting a USB device with the firmware update stored on it to the USB port on your Soundbar. Then, enter or select the model number of your Soundbar, select the Software & Apps option, and then Downloads. Note that the option names can vary. For updating instructions, see the next page.
Updating Procedure
Important: The updating function erases all user settings. We recommend you write down your settings so that you can easily reset them after the update. Note that updating the firmware resets the subwoofer connection too.
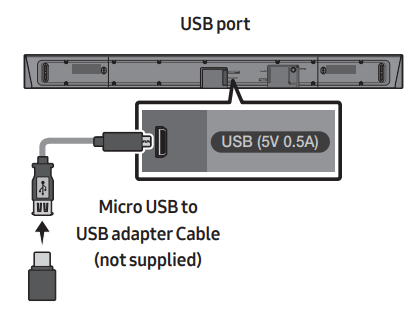
- Connect a Micro USB to USB adapter cable with a male USB 2.0 Micro USB plug (Type B) on one end and a standard female 2.0 USB jack (Type A) on the other end to the micro USB jack on your Soundbar.
- The Micro USB to USB adapter cable is sold separately. To purchase, contact a Samsung Service Center or Samsung Customer Care.
- Follow the steps below to download the product software: Go to the Samsung website at (samsung.com) -> search for the model name — select the customer support option (the option name is subject to change)
- Save the downloaded software to a USB stick and select “Extract Here” to unzip the folder.
- Turn off the Soundbar and connect the USB stick containing the software update to the female port on a Micro USB adapter cable. Connect the cable to the USB port on the Soundbar.
- Turn on the Soundbar. Within 3 minutes, “UPDATE” is displayed and updating begins.
- When the update finishes, the Soundbar turns off. Press the button on the remote control for 5 seconds. “INIT” appears on the display and then the Soundbar turns off. The update is complete.
- This product has a DUAL BOOT function. If the firmware fails to update, you can update the firmware again.
- Reset your settings.
 button on the remote control for 5 seconds. “INIT” appears on the display and then the Soundbar turns off. The update is complete.
If UPDATE is not displayed
- Turn off the Soundbar, disconnect and then reconnect the USB storage device that contains the update files to the Soundbar’s USB port.
- Disconnect the Soundbar’s power cord, reconnect it, and then turn on the Soundbar.
NOTES
- The firmware update may not work properly if audio files supported by the Soundbar are stored in the USB storage device.
- Do not disconnect the power or remove the USB device while updates are being applied. The main unit will turn off automatically after completing the firmware update.
- After the update is completed, the user setup in the Soundbar is initialized so you can reset your settings. We recommend you write down your settings so that you can easily reset them after the update. Note that updating firmware resets the subwoofer connection too. If the connection to the subwoofer is not re-established automatically after the update, refer to page 6. If the software update fails, check if the USB stick is defective.
- Mac OS users should use MS-DOS (FAT) as the USB format.
- Updating via USB may not be available, depending on the USB storage device manufacturer.
TROUBLESHOOTING
Before seeking assistance, check the following.
The unit will not turn on.
Is the power cord plugged into the outlet?
- Connect the power plug to the outlet.
A function does not work when the button is pressed.
Is there static electricity in the air?
- Disconnect the power plug and connect it again.
Sound dropouts occur in BT mode.
- See the Bluetooth connection sections on pages 12 and 18.
Sound is not produced.
Is the Mute function on?
- Press the VOL button to cancel the function.
Is the volume set to minimum?
- Adjust the Volume.
The remote control does not work.
Are the batteries drained?
- Replace with new batteries.
Is the distance between the remote control and Soundbar main unit too far?
Move the remote control closer to the Soundbar main unit.
The red LED on the subwoofer blinks and the subwoofer is not producing sound.
This issue can occur if the subwoofer is not connected to the Soundbar main unit.
- Try to connect your subwoofer again. (See page 6.)
The subwoofer drones and vibrates noticeably.
Try to adjust the vibration of your subwoofer.
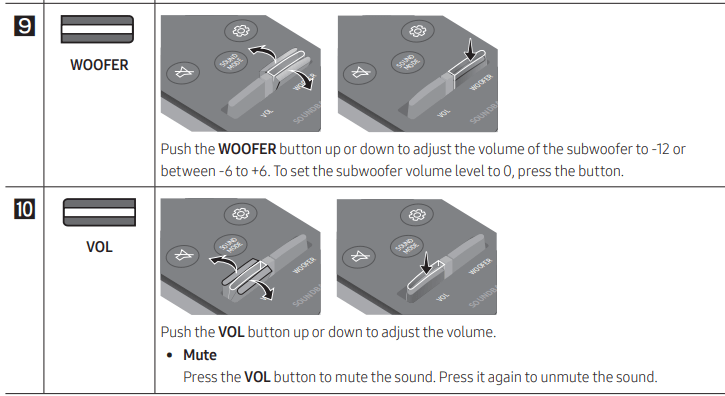
- Push the WOOFER button on your remote control up or down to adjust the subwoofer volume. (to -12, or between -6 ~ +6).
See other models: SM-G975UZWAVZW SM-G973UZIAXAA SM-G973UZBEXAA SM-G973UZKAATT SM-G975UZKAVZW
 |
[Page 1] Samsung HW-R650 FULL MANUAL Imagine the possibilities Thank you for purchasing this Samsung product. To receive more complete service, please register your product at www.samsung.com/register HW-R650 |
 |
[Page 2] Samsung HW-R650 ENG — ii SAFETY INFORMATION SAFETY WARNINGS TO REDUCE THE RISK OF ELECTRIC SHOCK, DO NOT REMOVE THE COVER (OR BACK). NO USER-SERVICEABLE PARTS ARE INSIDE. REFER SERVICING TO QUALIFIED SERVICE PERSONNEL. Refer to the table below for an explanation… |
 |
[Page 3] Samsung HW-R650 ENG — iii PRECAUTIONS 1. Ensure that the AC power supply in your house complies with the power requirements listed on the identication sticker located on the bottom of your product. Install your product horizontally, on a suitable base (furn… |
 |
[Page 4] Samsung HW-R650 ENG — iv CONTENTS 01 Checking the Components 2 Inserting Batteries before using the Remote Control (AA batteries X 2) ————————- 2 02 Product Overview 3 Front Panel / Right Side Panel of the Soundbar ————————… |
 |
[Page 5] Samsung HW-R650 ENG — v 07 Connecting a Mobile Device 18 Connecting via Bluetooth ————————- 18 Using the Samsung Audio Remote App ————————- 21 – Installing the Samsung Audio Remote App ————————- 21 … |
 |
[Page 6] Samsung HW-R650 ENG — 2 01 CHECKING THE COMPONENTS VOL WOOFER SOUNDBAR SOUND MODE PAIR Soundbar Main Unit Subwoofer Remote Control / Batteries 1 2 3 Power Cord (Subwoofer) AC/DC Adapter (Main Unit) Power Cord (AC/DC Adapter) Optical Cable x 2 x 2 Wall Mount Gu… |
 |
[Page 7] Samsung HW-R650 ENG — 3 02 PRODUCT OVERVIEW Front Panel / Right Side Panel of the Soundbar Position the product so that the SAMSUNG logo is located on the top. Right Side of the Soundbar Display Displays the product’s status and current… |
 |
[Page 8] Samsung HW-R650 ENG — 4 Bottom Panel of the Soundbar HDMI IN HDMI OUT (TV-ARC) USB (5V 0.5A) AUX IN DIGITAL AUDIO IN (OPTICAL) DC 24V HDMI OUT (TV-ARC) HDMI IN DC 24V HDMI OUT (TV-ARC) USB (5V 0.5A) AUX IN HDMI IN DIGITAL AUDIO IN (OPTICAL) �… |
 |
[Page 9] Samsung HW-R650 ENG — 5 03 CONNECTING THE SOUNDBAR Connecting Electrical Power Use the power components (1, 2 , 3 ) to connect the Subwoofer and Soundbar to an electrical outlet in the following order: 1 Connect the power cord to the Subwoofer. 2 Connect the po… |
 |
[Page 10] Samsung HW-R650 ENG — 6 Connecting the Soundbar to the Subwoofer When the subwoofer is connected, you can enjoy rich bass sound. Automatic connection between the Subwoofer and the Soundbar When you turn the power on after connecting the power cables to the Soundbar … |
 |
[Page 11] Samsung HW-R650 ENG — 7 Manually connecting the Subwoofer if automatic connection fails Before performing the manual connection procedure below: • Check whether the power cables for the Soundbar and subwoofer are connected properly. • Make sure that the Soundb… |
 |
[Page 12] Samsung HW-R650 ENG — 8 NOTES • Do not connect the power cord of this product or your TV to a wall outlet until all connections between components are complete. • Before moving or installing this product, be sure to turn off the power and disconnect the power… |
 |
[Page 13] Samsung HW-R650 ENG — 9 2. Check the standby status of the Wireless Receiver Module after plugging it into an electrical outlet. • The LINK LED indicator (blue LED) on the Wireless Receiver Module blinks. If the LED does not blink, press the ID SET button on th… |
 |
[Page 14] Samsung HW-R650 ENG — 10 04 CONNECTING TO YOUR TV Hear TV sound from your Soundbar through wired or wireless connections. • When the Soundbar is connected to selected Samsung TVs, the Soundbar can be controlled using the TV’s remote control. – This feature… |
 |
[Page 15] Samsung HW-R650 ENG — 11 Auto Power Link Auto Power Link automatically turns on the Soundbar when the TV is turned on. 1. Connect the Soundbar and a TV with a digital optical cable. 2. Press the Left button on the remote control for 5 seconds to turn Auto Power L… |
 |
[Page 16] Samsung HW-R650 ENG — 12 NOTES • HDMI is an interface that enables the digital transmission of video and audio data with just a single connector. • If the TV provides an ARC port, connect the HDMI cable to the HDMI IN (ARC) port. • We recommend you use a c… |
 |
[Page 17] Samsung HW-R650 ENG — 13 If the device fails to connect • If a previously connected Soundbar listing (e.g. “[AV] Samsung Soundbar R6-Series”) appears in the list, delete it. • Then repeat steps 1 through 3. NOTE • After you have connected the Soundbar … |
 |
[Page 18] Samsung HW-R650 ENG — 14 05 CONNECTING AN EXTERNAL DEVICE Connect to an external device via a wired or wireless network to play the external device’s sound through the Soundbar. Connecting using an Optical or Analogue Audio (AUX) Cable HDMI OUT (TV-ARC) USB (5V… |
 |
[Page 19] Samsung HW-R650 ENG — 15 Connecting using an HDMI Cable HDMI OUT HDMI OUT (TV-ARC) HDMI IN HDMI IN (ARC) HDMI Cable (not supplied) HDMI Cable (not supplied) Bottom of the Soundbar External Device Right Side of the Soundbar HDMI 1. Connect an… |
 |
[Page 20] Samsung HW-R650 ENG — 16 06 CONNECTING A USB STORAGE DEVICE You can play music les located on USB storage devices through the Soundbar. HDMI IN HDMI OUT (TV-ARC) USB (5V 0.5A) AUX IN DIGITAL AUDIO IN (OPTICAL) DC 24V USB (5V 0.5A) Display USB port Micro USB to … |
 |
[Page 21] Samsung HW-R650 ENG — 17 File Format Type Compatibility list Extension Codec Sampling Rate Bitrate *.mp3 MPEG 1 Layer2 16kHz ~ 48kHz 80kbps~320kbps MPEG 1 Layer3 16kHz ~ 48kHz 80kbps~320kbps MPEG 2 Layer3 16kHz ~ 48kHz 80kbps~320kbps MPEG 2.5 Layer3 16kHz ~ 48kHz 80… |
 |
[Page 22] Samsung HW-R650 ENG — 18 07 CONNECTING A MOBILE DEVICE Connecting via Bluetooth When a mobile device is connected using Bluetooth, you can hear stereo sound without the hassle of cabling. • You cannot connect more than one Bluetooth device at a time. SOUND MODE… |
 |
[Page 23] Samsung HW-R650 ENG — 19 What is the difference between BT READY and BT PAIRING? • BT READY : In this mode, you can search for previously connected TVs or connect a previously connected mobile device to the Soundbar. • BT PAIRING : In this mode, you can conne… |
 |
[Page 24] Samsung HW-R650 ENG — 20 Disconnecting the Bluetooth device from a Soundbar You can disconnect a Bluetooth device from the Soundbar. For instructions, see the Bluetooth device’s user manual. • The Soundbar will be disconnected. • When the Soundbar is discon… |
 |
[Page 25] Samsung HW-R650 ENG — 21 Using the Samsung Audio Remote App Installing the Samsung Audio Remote App To control the Soundbar with your smart device and the Samsung Audio Remote app, download the Samsung Audio Remote app from the Google Play store. Market search : Sa… |
 |
[Page 26] Samsung HW-R650 ENG — 22 08 USING THE REMOTE CONTROL How to Use the Remote Control VOL WOOFER SOUNDBAR SOUND MODE PAIR Power VOL WOOFER SOUND MODE PAIR Turns the Soundbar on and off. VOL WOOFER SOUND MODE… |
 |
[Page 27] Samsung HW-R650 ENG — 23 VOL WOOFER SOUND MODE PAIR Bluetooth PAIR Press the PAIR button. “BT PAIRING” appears in the Soundbar’s display. You can connect the Soundbar to a new Bluetooth device in this mode by selecting the Soundbar from the Blueto… |
 |
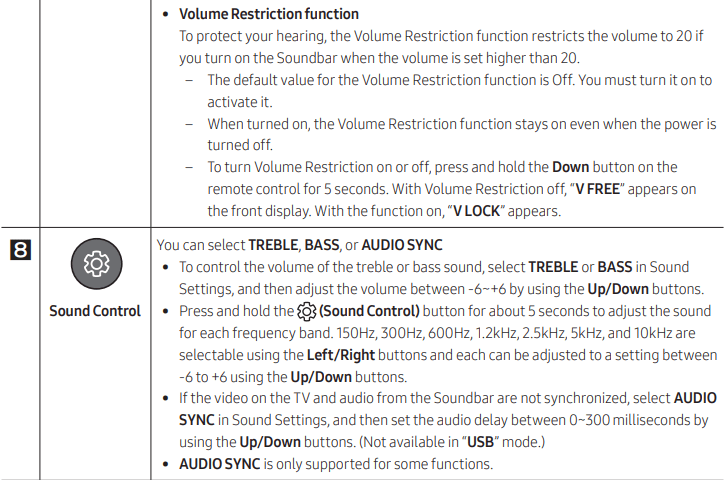
[Page 28] Samsung HW-R650 ENG — 24 • Volume Restriction function To protect your hearing, the Volume Restriction function restricts the volume to 20 if you turn on the Soundbar when the volume is set higher than 20. – The default value for the Volume Restriction funct… |
 |
[Page 29] Samsung HW-R650 ENG — 25 Adjusting the Soundbar volume with a TV remote control If you have a Samsung TV, you can adjust the Soundbar’s volume using the IR remote control that came with your Samsung TV. First use the TV menu to set the TV audio on your Samsung… |
 |
[Page 30] Samsung HW-R650 ENG — 26 Using the Hidden Buttons (Buttons with more than one function) Hidden Button Reference page Remote Control Button Function WOOFER TV remote control On/Off (Standby) page 25 (Source) BT Pairing page 22 p (Play / Pause) Auto Power Down On/Off… |
 |
[Page 31] Samsung HW-R650 ENG — 27 09 INSTALLING THE WALL MOUNT Installation Precautions • Install on a vertical wall only. • Do not install in a place with high temperature or humidity. • Verify whether the wall is strong enough to support the product’s weight… |
 |
[Page 32] Samsung HW-R650 ENG — 28 2. Align the Wall Mount Guide’s Centre Line with the centre of your TV (if you are mounting the Soundbar below your TV), and then x the Wall Mount Guide to the wall using tape. • If you are not mounting below a TV, place the Ce… |
 |
[Page 33] Samsung HW-R650 ENG — 29 7. Install the Soundbar with the attached Bracket-Wall Mounts by hanging the Bracket-Wall Mounts on the Holder-Screws on the wall. 8. Slide the Soundbar down as shown below so that the Bracket-Wall Mounts rest securely on the Holder-S… |
 |
[Page 34] Samsung HW-R650 ENG — 30 Updating Procedure Important: The updating function erases all user settings. We recommend you write down your settings so that you can easily reset them after the update. Note that updating the rmware resets the subwoofer connection … |
 |
[Page 35] Samsung HW-R650 ENG — 31 11 TROUBLESHOOTING Before seeking assistance, check the following. The unit will not turn on. Is the power cord plugged into the outlet? ; Connect the power plug to the outlet. A function does not work when the button is pressed. Is there … |
 |
[Page 36] Samsung HW-R650 ENG — 32 12 LICENCE Manufactured under license from Dolby Laboratories. Dolby, Dolby Audio, Pro Logic, and the double-D symbol are trademarks of Dolby Laboratories. For DTS patents, see http://patents.dts.com. Manufactured under license from D… |
 |
[Page 37] Samsung HW-R650 ENG — 33 15 SPECIFICATIONS AND GUIDE Specications Model Name HW-R650 USB 5V/0.5A Weight 2.9 kg Dimensions (W x H x D) 1060.0 x 59.0 x 87.5 mm Operating Temperature Range +5°C to +35°C Operating Humidity Range 10 % ~ 75 % AMPLIFIER Rated Outp… |
 |
[Page 38] Samsung HW-R650 ENG — 34 • Hereby, Samsung Electronics, declares that this equipment is in compliance with Directive 2014/53/EU. The full text of the EU declaration of conformity is available at the following internet address: http://www.samsung.com go to Sup… |
 |
[Page 39] Samsung HW-R650 DEU — ii SICHERHEITSINFORMATIONEN HINWEISE ZUR SICHERHEIT ZUR VERMEIDUNG VON STROMSCHLÄGEN DARF DIESES GERÄT NICHT GEÖFFNET WERDEN. ES ENTHÄLT KEINE BAUTEILE, DIE VOM BENUTZER GEWARTET ODER REPARIERT WERDEN KÖNNEN. WARTUNGS- UND REPARATURA… |
 |
[Page 40] Samsung HW-R650 DEU — iii HINWEISE 1. Stellen Sie sicher, dass die Stromversorgung in Ihrem Haushalt den auf dem Etikett auf der Unterseite des Geräts angegebenen Anforderungen entspricht. Stellen Sie Ihr Produkt horizontal auf einer geeigneten Unterlage (Mö… |
 |
[Page 41] Samsung HW-R650 DEU — iv INHALT 01 Überprüfen der Komponenten 2 Einlegen der Batterien vor der Verwendung der Fernbedienung (AA-Batterien X 2) ————————- 2 02 Produktübersicht 3 Vorderseite / Rechte Seite der Soundbar ——————… |
 |
[Page 42] Samsung HW-R650 DEU — v 07 Anschliessen eines Mobilgeräts 18 Anschließen per Bluetooth ————————- 18 Samsung Audio Remote App verwenden ————————- 21 – Installieren der Samsung Audio Remote App ———————-… |
 |
[Page 43] Samsung HW-R650 DEU — 2 01 ÜBERPRÜFEN DER KOMPONENTEN VOL WOOFER SOUNDBAR SOUND MODE PAIR Soundbar-Hauptgerät Subwoofer Fernbedienung / Batterien 1 2 3 Stromkabel (Subwoofer) Netzadapter (Hauptgerät) Stromkabel (Netzadapter) Optisches Kabel x 2 x 2 Monta… |
 |
[Page 44] Samsung HW-R650 DEU — 3 02 PRODUKTÜBERSICHT Vorderseite / Rechte Seite der Soundbar Positionieren Sie das Produkt so, dass sich das SAMSUNG Logo auf der Oberseite bendet. Rechte Seite der Soundbar Anzeige Zeigt den Status und den akt… |
 |
[Page 45] Samsung HW-R650 DEU — 4 Unterseite der Soundbar HDMI IN HDMI OUT (TV-ARC) USB (5V 0.5A) AUX IN DIGITAL AUDIO IN (OPTICAL) DC 24V HDMI OUT (TV-ARC) HDMI IN DC 24V HDMI OUT (TV-ARC) USB (5V 0.5A) AUX IN HDMI IN DIGITAL AUDIO IN (OPTICAL) �… |
 |
[Page 46] Samsung HW-R650 DEU — 5 03 ANSCHLIESSEN DER SOUNDBAR Stromanschluss Verwenden Sie die Stromkomponenten (1, 2, 3), um den Subwoofer und die Soundbar in der folgenden Reihenfolge an die Stromversorgung anzuschließen: 1 Schließen Sie das Stromkabel an den Subwoofer… |
 |
[Page 47] Samsung HW-R650 DEU — 6 Verbinden der Soundbar mit dem Subwoofer Wenn der Subwoofer verbunden ist, können Sie einen vollen Bass-Ton genießen. Automatische Verbindung zwischen Subwoofer und Soundbar Wenn Sie den Strom einschalten, nachdem Sie die Stromkabel an die … |
 |
[Page 48] Samsung HW-R650 DEU — 7 Manuelles Verbinden des Subwoofers bei Fehlschlagen der automatischen Verbindung Vor dem Ausführen der folgenden Verbindungsschritte: • Überprüfen Sie, ob die Stromkabel der Soundbar und des Subwoofers richtig angeschlossen sind. • S… |
 |
[Page 49] Samsung HW-R650 DEU — 8 HINWEISE • Schließen Sie das Stromkabel dieses Produkts oder Ihr TV-Gerät nicht an eine Steckdose an, bis alle Anschlüsse zwischen den Teilen hergestellt sind. • Stellen Sie vor dem Verschieben oder Aufstellen des Produkts sicher, d… |
 |
[Page 50] Samsung HW-R650 DEU — 9 2. Überprüfen Sie den Standby-Status des drahtlosen Empfangsmoduls, nachdem es an eine Steckdose angeschlossen worden ist. • Die LINK LED-Anzeige (blaue LED-Lampe) auf dem drahtlosen Empfängermodul blinkt. Wenn die LED nicht blinkt, … |
 |
[Page 51] Samsung HW-R650 DEU — 10 04 ANSCHLUSS AN IHR FERNSEHGERÄT Hören Sie den TV-Ton durch kabelgebundene oder kabellose Verbindungen über Ihre Soundbar. • Wenn die Soundbar an einen ausgewählten Samsung TV angeschlossen ist, kann die Soundbar über die Fernbedie… |
 |
[Page 52] Samsung HW-R650 DEU — 11 Auto Power Link Auto Power Link wird automatisch eingeschaltet, wenn der Fernseher eingeschaltet wird. 1. Verbinden Sie die Soundbar über ein optisches Digitalkabel mit einem Fernseher. 2. Halten Sie die Taste Links auf der Fernbedienung … |
 |
[Page 53] Samsung HW-R650 DEU — 12 HINWEISE • HDMI ist eine Schnittstelle, die die digitale Übertragung von Video- und Audiodaten mit einem einzigen Anschluss ermöglicht. • Wenn das TV-Gerät über einen ARC-Anschluss verfügt, verbinden Sie das HDMI-Kabel mit dem H… |
 |
[Page 54] Samsung HW-R650 DEU — 13 Falls das Gerät nicht verbunden werden kann • Falls die Auistung der zuvor verbundenen Soundbar (z. B. „[AV] Samsung Soundbar R6-Series“) in der Liste erscheint, löschen Sie sie. • Wiederholen Sie dann die Schritte 1 bis 3. H… |
 |
[Page 55] Samsung HW-R650 DEU — 14 05 VERBINDUNG MIT EINEM EXTERNEN GERAT HERSTELLEN Über ein kabelgebundenes oder kabelloses Netzwerk mit einem externen Gerät verbinden, um den Ton des externen Geräts über die Soundbar wiederzugeben. Verbindung mit einem optischen ode… |
 |
[Page 56] Samsung HW-R650 DEU — 15 Über ein HDMI-Kabel verbinden HDMI OUT HDMI OUT (TV-ARC) HDMI IN HDMI IN (ARC) HDMI-Kabel (nicht mitgeliefert) HDMI-Kabel (nicht mitgeliefert) Unterseite der Soundbar Externes Gerät Rechte Seite der Soundbar HDMI 1…. |
 |
[Page 57] Samsung HW-R650 DEU — 16 06 VERBINDEN EINES USB SPEICHERGERÄTS Sie können Musikdateien, die sich auf Speichergeräten benden, über die Soundbar wiedergeben. HDMI IN HDMI OUT (TV-ARC) USB (5V 0.5A) AUX IN DIGITAL AUDIO IN (OPTICAL) DC 24V USB (5V 0.5A) Anzeige… |
 |
[Page 58] Samsung HW-R650 DEU — 17 Kompatibilitätsliste Verlängerung Codec Samplingrate Bitrate *.mp3 MPEG 1 Layer2 16kHz ~ 48kHz 80 ~ 320kbps MPEG 1 Layer3 16kHz ~ 48kHz 80 ~ 320kbps MPEG 2 Layer3 16kHz ~ 48kHz 80 ~ 320kbps MPEG 2.5 Layer3 16kHz ~ 48kHz 80 ~ 320kbps *.wma … |
 |
[Page 59] Samsung HW-R650 DEU — 18 07 ANSCHLIESSEN EINES MOBILGERÄTS Anschließen per Bluetooth Wenn ein Mobilgerät über Bluetooth verbunden wird, können Sie einen Stereoton ohne lästige Kabel hören. • Sie können nicht mehr als ein Bluetooth-Gerät gleichzeitig ve… |
 |
[Page 60] Samsung HW-R650 DEU — 19 Was ist der Unterschied zwischen BT READY und BT PAIRING? • BT READY : In diesem Modus können Sie nach zuvor verbundenen Fernsehern suchen oder ein zuvor verbundenes Mobilgerät mit der Soundbar verbinden. • BT PAIRING : In diesem Mo… |
 |
[Page 61] Samsung HW-R650 DEU — 20 Das Bluetooth-Gerät von der Soundbar trennen Sie können die Verbindung zwischen dem Bluetooth-Gerät und Soundbar trennen. Die Anleitung hierzu nden Sie in der Bedienungsanleitung des Bluetooth-Geräts. • Verbindung zum Soundbar wir… |
 |
[Page 62] Samsung HW-R650 DEU — 21 Samsung Audio Remote App verwenden Installieren der Samsung Audio Remote App Um die Soundbar mit Ihrem Smartphone oder Tablet sowie der Samsung Audio Remote App zu steuern, laden Sie die App aus dem Google Play Store herunter. Im Play Store… |
 |
[Page 63] Samsung HW-R650 DEU — 22 08 VERWENDEN DER FERNBEDIENUNG So verwenden Sie die Fernbedienung VOL WOOFER SOUNDBAR SOUND MODE PAIR Strom VOL BASS SOUND MODE PAIR Schaltet die Soundbar ein und aus. VOL BASS SO… |
 |
[Page 64] Samsung HW-R650 DEU — 23 VOL BASS SOUND MODE PAIR Bluetooth PAIR Drücken Sie die PAIR-Taste. Im Soundbar-Display wird „BT PAIRING“ angezeigt. In diesem Modus können Sie die Soundbar mit einem neuen Bluetooth-Gerät verbinden, indem Sie die Soundbar … |
 |
[Page 65] Samsung HW-R650 DEU — 24 • Lautstärkebeschränkungsfunktion Um Ihr Gehör zu schützen, beschränkt die Lautstärkebegrenzungsfunktion die Lautstärke auf 20, wenn Sie die Soundbar einschalten und die Lautstärke höher als 20eingestellt ist. – Der Stan… |
 |
[Page 66] Samsung HW-R650 DEU — 25 Anpassen der Soundbar-Lautstärke mit einer TV-Fernbedienung Bei einem Samsung TV kann die Lautstärke der Soundbar mit der IR-Fernbedienung, die im Lieferumfang des Samsung TV enthalten ist, eingestellt werden. Stellen Sie zuerst den F… |
 |
[Page 67] Samsung HW-R650 DEU — 26 Verwenden der verborgenen Tasten (Tasten mit mehr als einer funktion) Verborgene Taste Referenzseite Fernbedienungstaste Funktion WOOFER TV-Fernbedienung Ein/Aus (Standby) Seite 25 (Quelle) BT-Kopplung Seite 22 p (Wiedergabe / Pause) Auto … |
 |
[Page 68] Samsung HW-R650 DEU — 27 09 INSTALLIEREN DER WANDHALTERUNG Vorsichtsmaßnahmen für die Installation • Installieren Sie nur an einer vertikalen Wand. • Installieren Sie nicht an einem Ort mit hoher Temperatur oder Feuchtigkeit. • Überprüfen Sie, ob di… |
 |
[Page 69] Samsung HW-R650 DEU — 28 2. Richten Sie die Mittellinie der Montagehilfe für die Wandhalterung auf die Mitte des Fernsehers aus (wenn Sie die Soundbar unter dem Fernseher montieren) und befestigen Sie dann die Montagehilfe für die Wandhalterung mit Klebeband… |
 |
[Page 70] Samsung HW-R650 DEU — 29 7. Montieren Sie die Soundbar mithilfe der befestigten Wandhalterungen, indem Sie die Wandhalterungen an die Aufhängungsschrauben an der Wand hängen. 8. Schieben Sie die Soundbar wie nachfolgend dargestellt nach unten, sodass die W… |
 |
[Page 71] Samsung HW-R650 DEU — 30 Updateverfahren Wichtig: Die Aktualisierungsfunktion löscht alle Benutzereinstellungen. Wir empfehlen Ihnen, Ihre Einstellungen aufzuschreiben, damit Sie sie nach der Aktualisierung einfach wieder einstellen können. Beachten Sie, dass … |
 |
[Page 72] Samsung HW-R650 DEU — 31 11 FEHLERBEHEBUNG Bevor Sie sich an den Kundendienst wenden, überprüfen Sie bitte die folgenden Punkte. Das Gerät wird nicht eingeschaltet. Ist das Stromkabel an die Steckdose angeschlossen? ; Schließen Sie den Netzstecker an die Stec… |
 |
[Page 73] Samsung HW-R650 DEU — 32 12 LIZENZ Manufactured under license from Dolby Laboratories. Dolby, Dolby Audio, Pro Logic, and the double-D symbol are trademarks of Dolby Laboratories. For DTS patents, see http://patents.dts.com. Manufactured under license from DT… |
 |
[Page 74] Samsung HW-R650 DEU — 33 15 SPEZIFIKATIONEN UND LEITFADEN Technische daten Modellname HW-R650 USB 5V/0,5A Gewicht 2,9 kg Abmessungen (B × H × T) 1060,0 x 59,0 x 87,5 mm Betriebstemperatur +5°C bis +35°C Zulässige Luftfeuchtigkeit 10 % ~ 75 % VERSTÄRKER Nennau… |
 |
[Page 75] Samsung HW-R650 DEU — 34 • Samsung Electronics erklärt hiermit, dass dieses Gerät der Richtlinie 2014/53/EU entspricht. Der vollständige Text der EU-Konformitätserklärung ist unter folgender Internetadresse abrufbar: http://www.samsung.com geben Sie unte… |
 |
[Page 76] Samsung HW-R650 DUT — ii VEILIGHEIDSINFORMATIE Veiligheidsinstructies OPEN NOOIT DE BEHUIZING VAN DIT APPARAAT, WANT DAN LOOPT U HET GEVAAR EEN ELEKTRISCHE SCHOK TE KRIJGEN. DE BEHUIZING BEVAT GEEN ONDERDELEN DIE U ZELF KUNT REPAREREN. LAAT ONDERHOUD OVER AAN D… |
 |
[Page 77] Samsung HW-R650 DUT — iii VOORZORGSMAATREGELEN 1. Zorg ervoor dat de wisselstroomvoorziening in uw huis voldoet aan de stroomvereisten die zijn vermeld op het identicatie-etiket op de onderkant van het product. Plaats de speler horizontaal op een geschikte … |
 |
[Page 78] Samsung HW-R650 DUT — iv INHOUD 01 De Componenten Controleren 2 Batterijen plaatsen vóór het gebruik van de afstandsbediening (AA-batterijen X 2) ————————- 2 02 Productenoverzicht 3 Voorpaneel/Rechterpaneel van de Soundbar ————-… |
 |
[Page 79] Samsung HW-R650 DUT — v 07 Een Mobiel Apparaat Verbinden 18 Verbinden via Bluetooth ————————- 18 De Samsung Audio Remote App gebruiken ————————- 21 – Het installeren van de Samsung Audio Remote App ——————… |
 |
[Page 80] Samsung HW-R650 DUT — 2 01 DE COMPONENTEN CONTROLEREN VOL WOOFER SOUNDBAR SOUND MODE PAIR Hoofdeenheid van de Soundbar Subwoofer Afstandsbediening/batterijen 1 2 3 Netsnoer (Subwoofer) Lichtnetadapter (Hoofdunit) Netsnoer (Lichtnetadapter) Optische kabel x … |
 |
[Page 81] Samsung HW-R650 DUT — 3 02 PRODUCTENOVERZICHT Voorpaneel/Rechterpaneel van de Soundbar Plaats het product zodat het logo van SAMSUNG bovenaan staat. Rechterkant van de Soundbar Scherm Geeft de productstatus en actuele modus weer. +/-… |
 |
[Page 82] Samsung HW-R650 DUT — 4 Onderpaneel van de Soundbar HDMI IN HDMI OUT (TV-ARC) USB (5V 0.5A) AUX IN DIGITAL AUDIO IN (OPTICAL) DC 24V HDMI OUT (TV-ARC) HDMI IN DC 24V HDMI OUT (TV-ARC) USB (5V 0.5A) AUX IN HDMI IN DIGITAL AUDIO IN (OPTICAL) … |
 |
[Page 83] Samsung HW-R650 DUT — 5 03 DE SOUNDBAR AANSLUITEN De elektriciteit aansluiten Gebruik de stroomcomponenten ( 1, 2 , 3) om de Subwoofer en Soundbar op een stopcontact aan te sluiten in deze volgorde: 1 Sluit het netsnoer aan op de Subwoofer. 2 Sluit de kabel van d… |
 |
[Page 84] Samsung HW-R650 DUT — 6 De Soundbar op de subwoofer aansluiten Wanneer de subwoofer is aangesloten, geniet u van rijke lage tonen. Automatische verbinding tussen de subwoofer en de Soundbar Wanneer u de stroom inschakelt nadat u de stroomkabels op de Soundbar en sub… |
 |
[Page 85] Samsung HW-R650 DUT — 7 De subwoofer handmatig verbinden als de automatische verbinding mislukt Voordat u onderstaande procedure voor de handmatige verbinding uitvoert: • Controleer of de stroomsnoeren voor de Soundbar en subwoofer goed zijn aangesloten. • Zor… |
 |
[Page 86] Samsung HW-R650 DUT — 8 OPMERKINGEN • Steek de stroomkabel van dit product of uw tv pas in een stopcontact als alle componenten zijn aangesloten. • Zet dit product eerst uit en koppel de stroomkabel los voordat u het verplaatst of installeert. • Als de hoo… |
 |
[Page 87] Samsung HW-R650 DUT — 9 2. Controleer de stand-bystatus van de Draadloze ontvangermodule nadat u de stekker in het stopcontact hebt gestoken. • Het indicatielampje LINK LED (blauwe LED) op de Draadloze ontvangermodule knippert. Als de LED niet knippert, houd d… |
 |
[Page 88] Samsung HW-R650 DUT — 10 04 VERBINDEN MET UW TV Luister naar het geluid van uw tv op de Soundbar via bedrade of draadloze verbindingen. • Wanneer de Soundbar is verbonden met een geselecteerde Samsung TV, kan de Soundbar worden bediend met de afstandsbediening … |
 |
[Page 89] Samsung HW-R650 DUT — 11 Auto Power Link De Auto Power Link schakelt de Soundbar automatisch in wanneer de tv is ingeschakeld. 1. De Soundbar en een tv aansluiten met een digitale optische kabel. 2. Druk gedurende 5 seconden op de knop Links op de afstandsbedienin… |
 |
[Page 90] Samsung HW-R650 DUT — 12 OPMERKINGEN • HDMI is een interface die video- en audiogegevens digitaal doorgeeft via slechts één connector. • Als de tv een ARC-poort bevat, sluit u de HDMI-kabel aan op de HDMI IN (ARC)-poort. • Het wordt aanbevolen om een HDMI… |
 |
[Page 91] Samsung HW-R650 DUT — 13 Als het apparaat geen verbinding tot stand kan brengen • Als de eerder verbonden Soundbar (bv. ‘[AV] Samsung Soundbar R6-Series’ in de lijst verschijnt, verwijder hem dan. • Herhaal vervolgens stappen 1 tot en met 3. OPMERKING … |
 |
[Page 92] Samsung HW-R650 DUT — 14 05 VERBINDEN MET EEN EXTERN APPARAAT Verbind met een extern apparaat via een bedraad of draadloos netwerk om het geluid van het externe apparaat via de Soundbar af te spelen. Verbinden met een optische of analoge audiokabel (AUX) HDMI OUT … |
 |
[Page 93] Samsung HW-R650 DUT — 15 Verbinden met een HDMI-kabel HDMI OUT HDMI OUT (TV-ARC) HDMI IN HDMI IN (ARC) HDMI-kabel (niet meegeleverd) HDMI-kabel (niet meegeleverd) Onderkant van de Soundbar Extern apparaat Rechterkant van de Soundbar HDMI 1. … |
 |
[Page 94] Samsung HW-R650 DUT — 16 06 EEN USB-OPSLAGAPPARAAT AANSLUITEN U kunt muziekbestanden op USB-opslagapparaten afspelen via de Soundbar. HDMI IN HDMI OUT (TV-ARC) USB (5V 0.5A) AUX IN DIGITAL AUDIO IN (OPTICAL) DC 24V USB (5V 0.5A) Scherm USB-poort Micro-USB-naar- US… |
 |
[Page 95] Samsung HW-R650 DUT — 17 Compatibiliteitslijst Extensie Codec Samplingfrequentie Bitrate *.mp3 MPEG 1 Layer2 16kHz ~ 48kHz 80 ~ 320kbps MPEG 1 Layer3 16kHz ~ 48kHz 80 ~ 320kbps MPEG 2 Layer3 16kHz ~ 48kHz 80 ~ 320kbps MPEG 2.5 Layer3 16kHz ~ 48kHz 80 ~ 320kbps *.wma… |
 |
[Page 96] Samsung HW-R650 DUT — 18 07 EEN MOBIEL APPARAAT VERBINDEN Verbinden via Bluetooth Wanneer een mobiel apparaat met Bluetooth is verbonden, kunt u stereogeluid beluisteren zonder gedoe met kabels. • U kunt niet meer dan één Bluetooth-apparaat tegelijk verbinden… |
 |
[Page 97] Samsung HW-R650 DUT — 19 Wat is het verschil tussen BT READY en BT PAIRING? • BT READY : In deze modus kunt u zoeken naar eerder verbonden tv’s of een eerder verbonden mobiel apparaat met de Soundbar verbinden. • BT PAIRING : In deze modus kunt u een nieuw… |
 |
[Page 98] Samsung HW-R650 DUT — 20 Het Bluetooth-apparaat loskoppelen van een Soundbar U kunt de verbinding tussen het Bluetooth-apparaat en Soundbar verbreken. Raadpleeg de gebruiksaanwijzing van het Bluetooth-apparaat voor instructies. • De verbinding met Soundbar wordt… |
 |
[Page 99] Samsung HW-R650 DUT — 21 De Samsung Audio Remote App gebruiken Het installeren van de Samsung Audio Remote App Om de Soundbar met uw smart device en de Samsung Audio Remote app te bedienen, download de Samsung Audio Remote app van Google Play Store. Zoekactie markt… |
 |
[Page 100] Samsung HW-R650 DUT — 22 08 DE AFSTANDSBEDIENING GEBRUIKEN Hoe de afstandsbediening gebruiken VOL WOOFER SOUNDBAR SOUND MODE PAIR Stroom VOL BASS SOUND MODE PAIR Hiermee schakelt u de Soundbar in en uit. … |
3.0
Rated 3.0 out of 5
3.0 out of 5 stars (based on 1 review)
Your overall rating
SAMSUNG HW-R650 (01) PDF MANUAL
Click here to download SAMSUNG HW-R650 (01) PDF MANUAL
SAMSUNG HW-R650 (01) PDF MANUAL
FREE ENGLISH PDF
OPERATING INSTRUCTIONS
USER GUIDE – USER MANUAL
OWNER GUIDE – OWNER MANUAL
REFERENCE GUIDE – REFERENCE MANUAL
INSTRUCTION GUIDE – INSTRUCTION MANUAL
Your overall rating
- YouTube
SAMSUNG HW-R650 (01) PDF MANUAL
SAMSUNG HW-R650 (01) PDF MANUAL