
Use this guide to import, upscale, and enhance your first video.
Import Your File
There are two ways to bring files into Topaz Video AI.
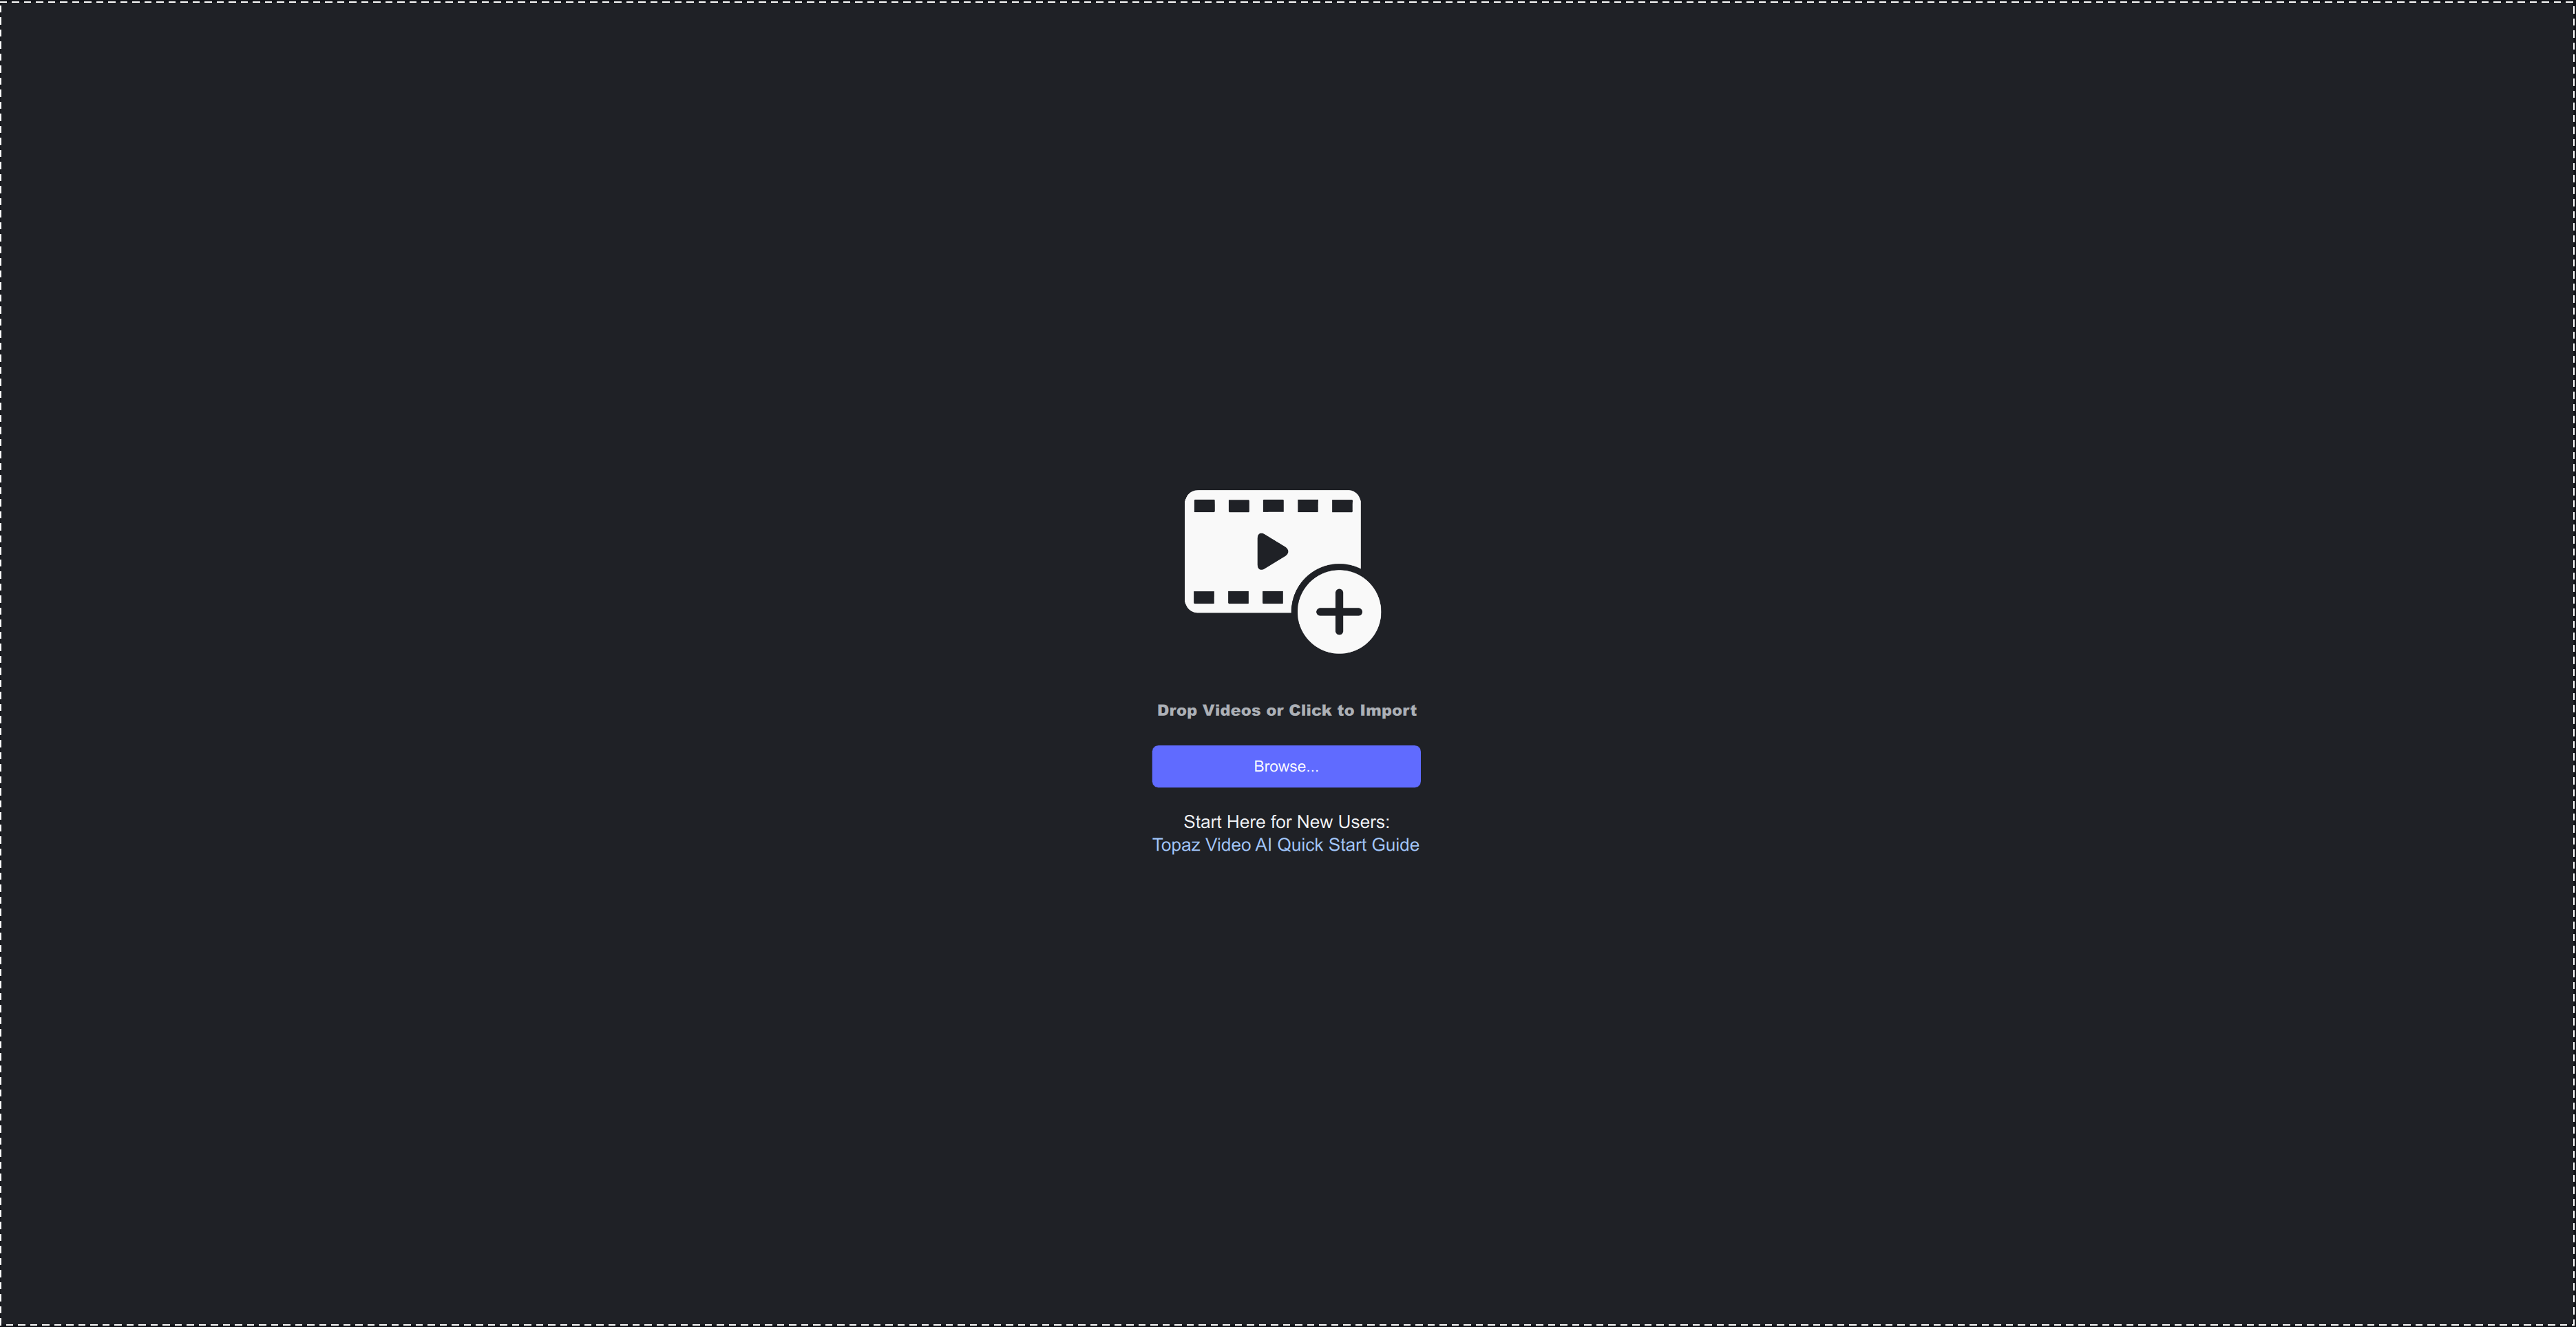
- Open the app and select Browse.
- Drag-and-drop files directly into the app.
Import an Image Sequence
- Make sure all frames are in one folder.
- Check that frames in consecutive order.
- At least 5 frames must be in the sequence.
Get the result you want out of the app by using the settings in the sidebar.
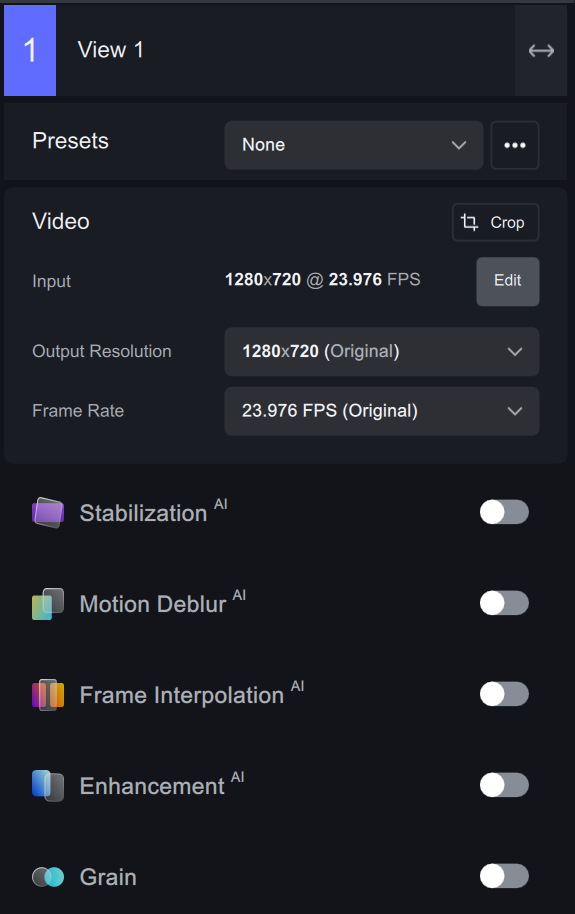
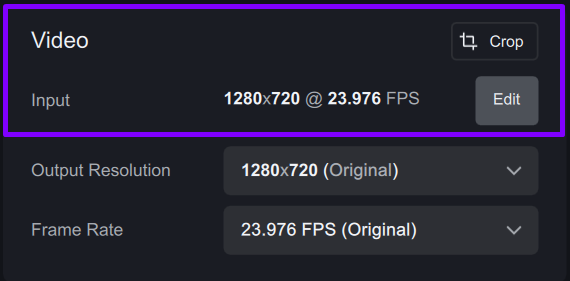
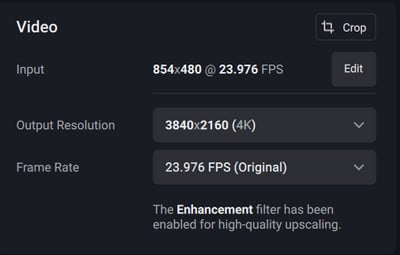
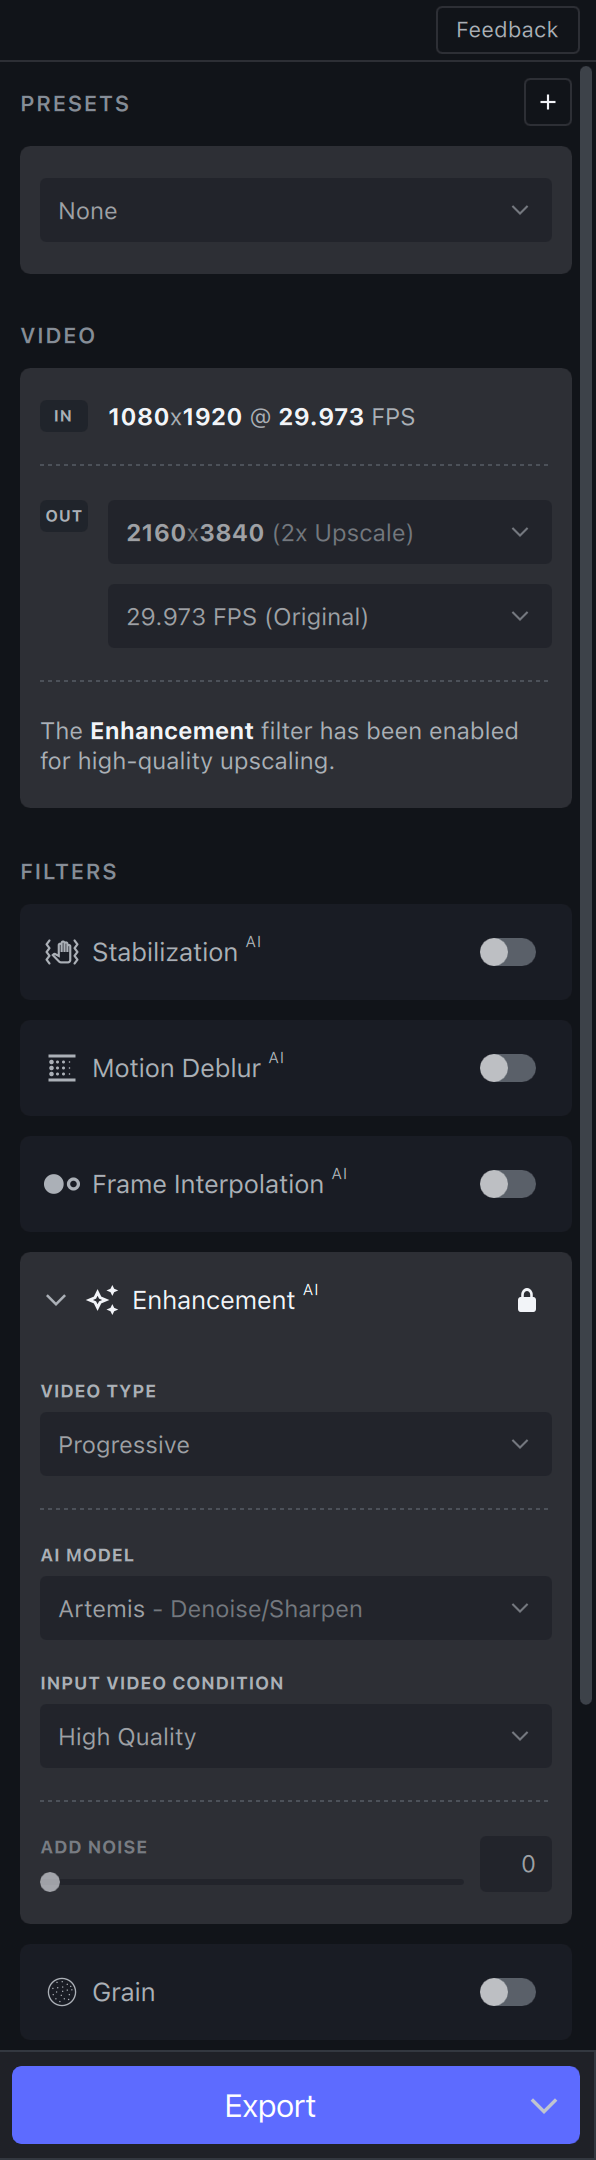
The «Video-In» menu will display the input file’s resolution, aspect ratio, and frame rate. This area also includes controls for the Crop tool.
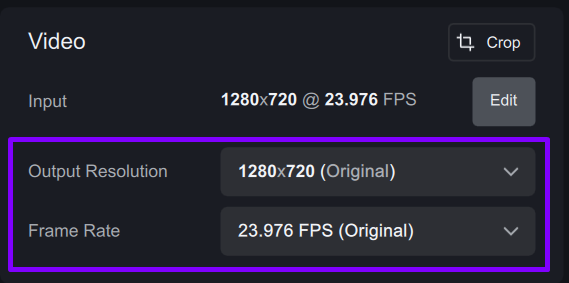
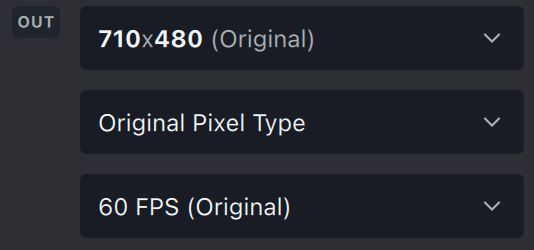
The «Video Out» menu allows you to alter the output file’s resolution and frame rate.
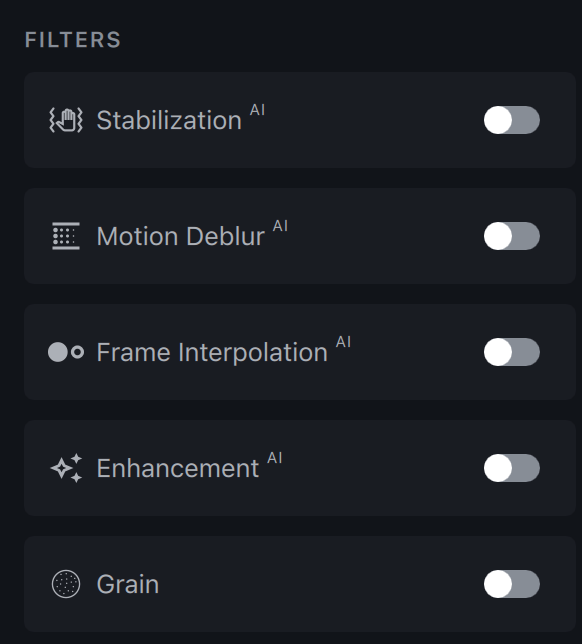
Filters
Each Topaz Video AI filter has been trained for a specific situation, such as deinterlacing, adjusting the frame rate, or creating a slow-motion output.
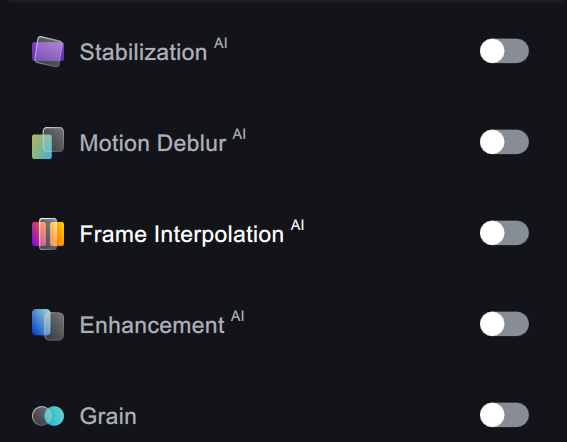
Use the toggle switch to enable the filter(s) you wish to use. We recommend using one to two per file.
Learn more about Topaz Video AI filters.
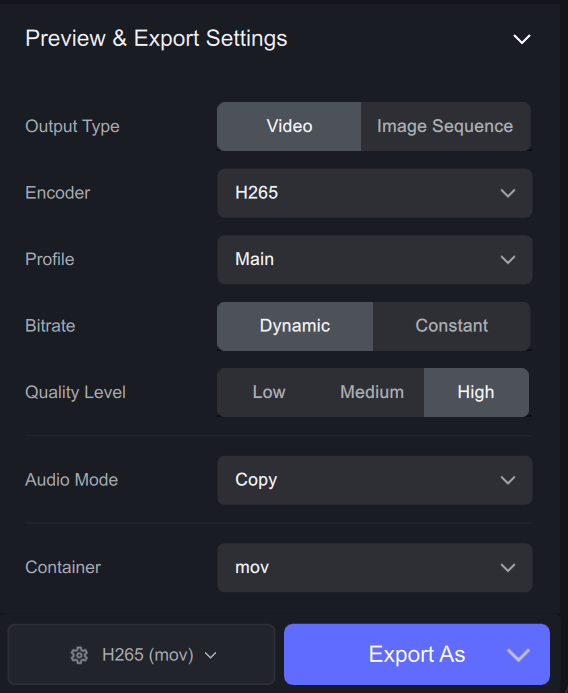
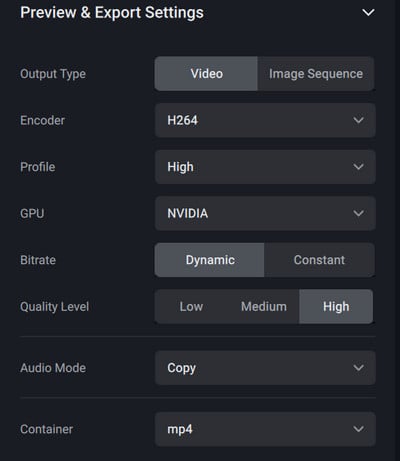
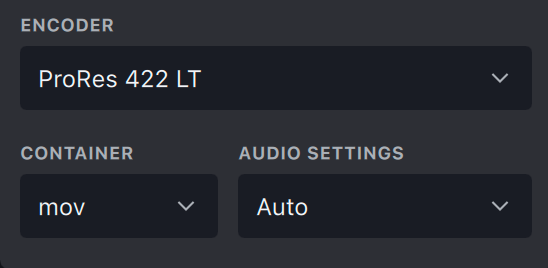
The Output Settings menu will allow you to select the export Encoder, Container, and audio settings.
Learn more about Topaz Video AI’s Encoders and Containers.
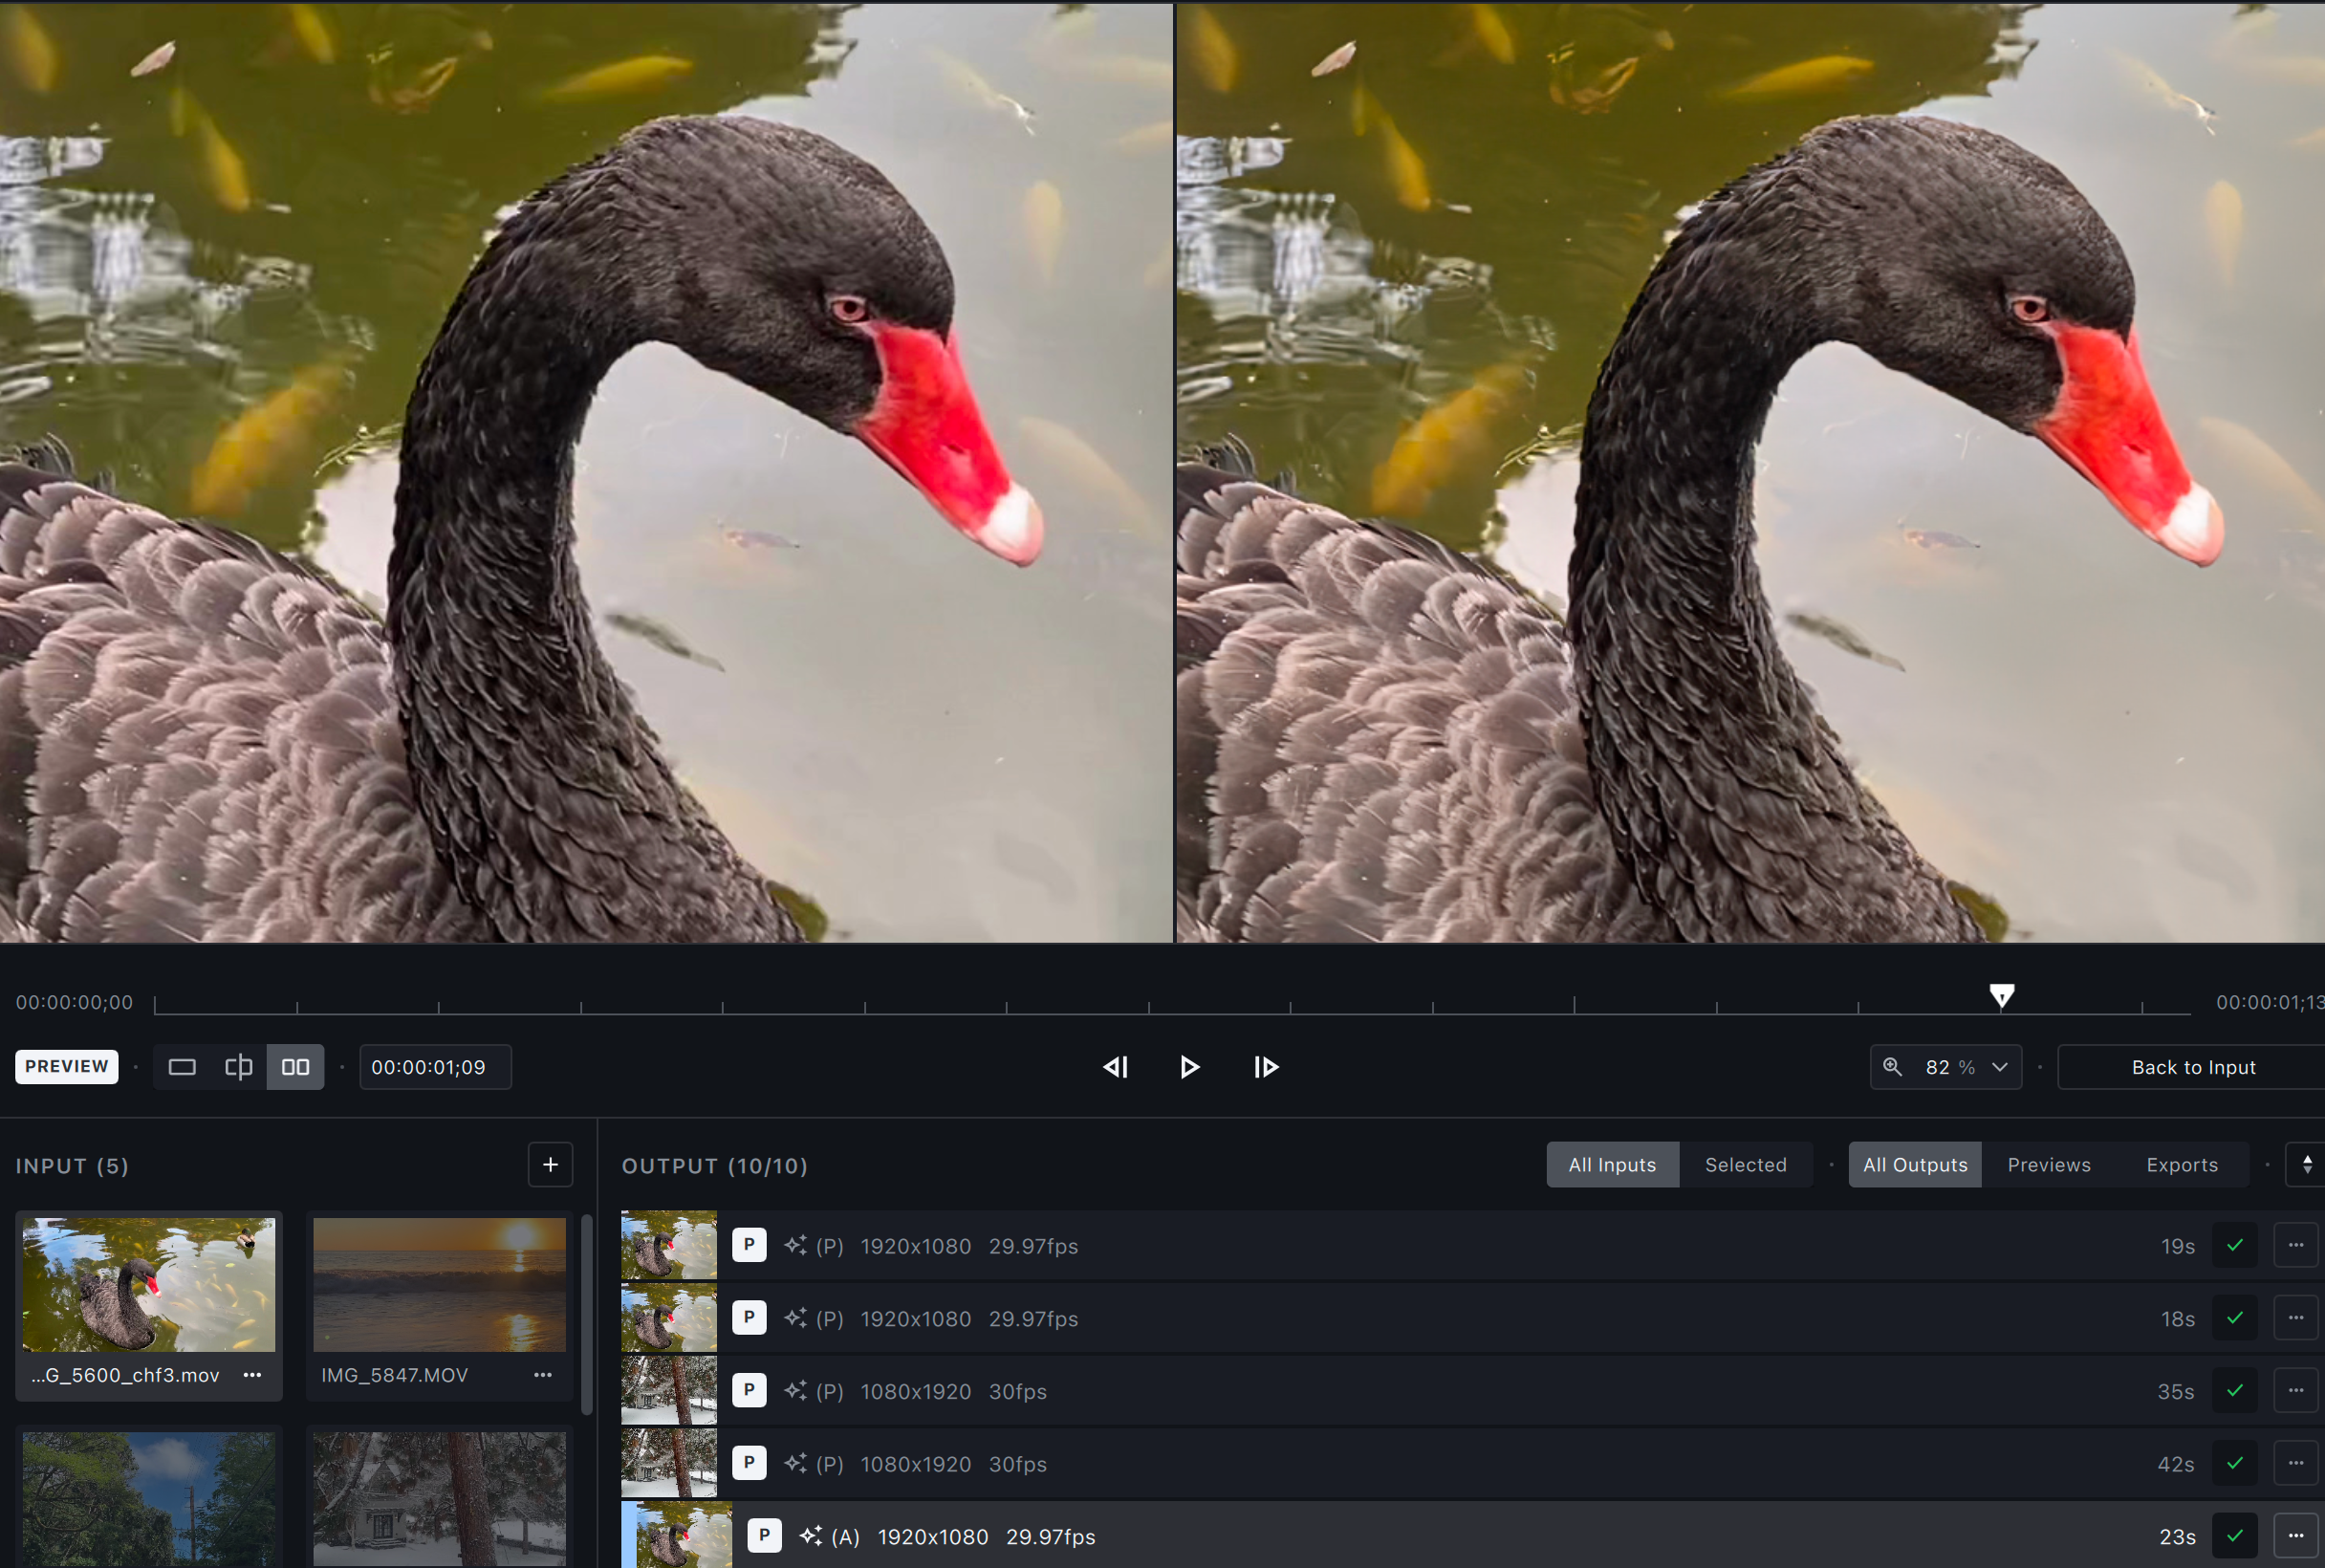
Preview Your File
To generate a preview, select the desired resolution, filters, and output settings and press the purple Preview button.
Select up to 15 seconds to preview. Adjust the view and zoom to inspect the results.
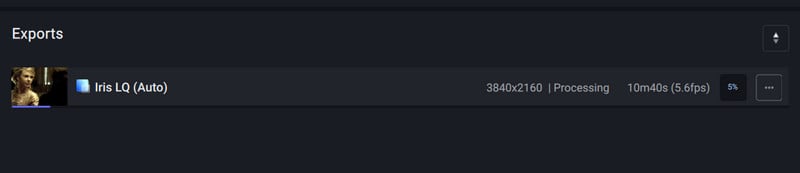
You can generate as many previews as you need. Progress for each preview will be displayed in the Previews library.
- A progress bar and an ETA will appear for each file.
- A green check mark indicates that the preview is complete.
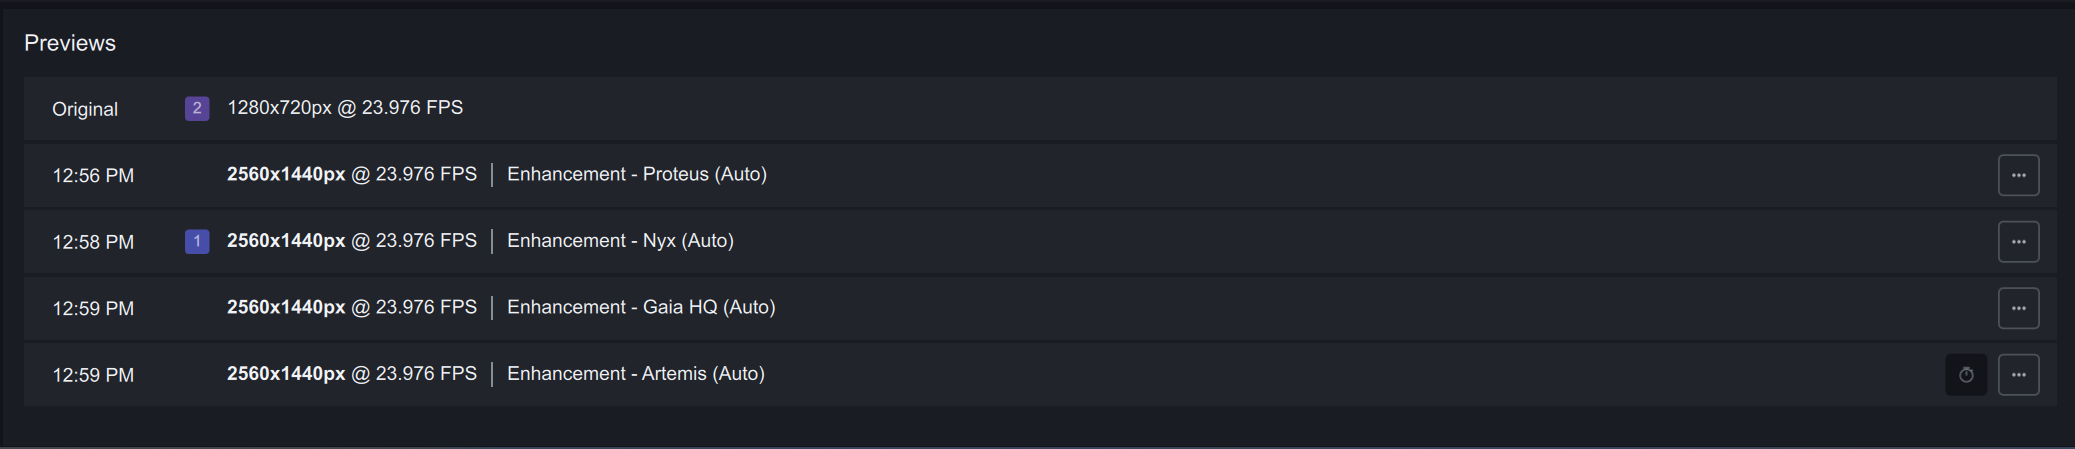
To view the Preview using your default video player, double-click on the preview or use the triple dot menu to open an external player.
Export Your File
Once you have found the best settings for your file and you have inspected the preview, you are ready to Export.
By default, the exported file will be saved to the input file’s location. You can select the carrot next to Export to choose Export As to change the save location.
The Export button will work on the currently selected view.
What’s Next?
Congratulations on improving your first video! Learn how to use Topaz Video AI filters, encoders, and more!
![]()
Features
![]()
Filters
Useful Tips to Improve the Quality of Your Videos and Photos
-
Home
- Articles
- How to Enhance Video Quality with Topaz
- Post On: October 24, 2023
When it comes to enhancing video quality, you may find yourself pondering two fundamental questions: What is the best way to enhance video quality? And which video quality enhancer stands out from the rest? Among the available options, Topaz Video AI is one of the best video quality enhancers, favored by numerous users encountering the situations outlined below:
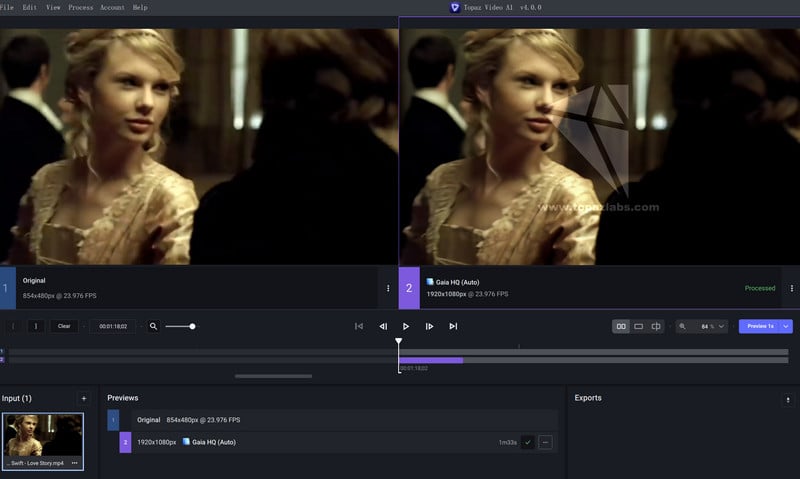
1. You downloaded the low-resolution videos that lack visual quality from platforms like YouTube. Take, for instance, Taylor Swift’s «Love Story» music video, filmed back in 2008. The currently available version is limited to a mere 480p resolution. However, thanks to video quality enhancers, we now have access to stunning 4K remastered versions.
Let’s enjoy the 4K remastered version of Taylor Swift’s «Love Story» and Michael Jackson’s «We Are The World».
2. You recently copied digital versions of family VHS tapes, DVDs or VCDs, but the output video turned out to be very fuzzy, noisy, interlaced, and low resolution. You are seeking a good video quality enhancer that can magically transform them into high quality.
For those who come across the situations mentioned above and seeking to enhance video quality using Topaz Video AI, keep reading to discover this most comprehensive tutorial for more valuable insights and guidance. Here we take V4.0.0 as the demonstration.
- Topaz Video AI: Everything You Need to Know Before Getting Started
- Step-by-Step Tutorial on How to Enhance Video Quality with Topaz Video AI
- Preview the Video Enhancement Effect Produced by Topaz Video AI
- Final Words: Should You Select Topaz Video AI?
1. Hardware Requirements
2. Trial
3. Price
4. Main Interface
5. AI Filters
6. AI Models
Topaz Video AI: Everything You Need to Know Before Getting Started
To begin our exploration of how to enhance video quality by using Topaz Video AI, let’s first get to know the program’s user interface and familiarize ourselves with its AI Filters and their corresponding AI Models. By doing this, you will gain a comprehensive understanding of the main features before diving into the techniques for enhancing video quality.
1. System and Hardware Requirements
Before get started, please make sure your Windows has a dedicated GPU (NVIDIA GTX 900 or higher, AMD Radeon 400 or higher, Intel UHD 600 Graphics or higher) with at least 4GB GPU memory, or your Mac has M1 or M2 chip.
Topaz Video Enhancer AI supports both Windows 10, or 11 and macOS Catalina 10.15 or higher.
2. Trial
The demo version will export the video with a watermark.
3. Price
$299, one-time payment, plus the upgrade fee for each year.
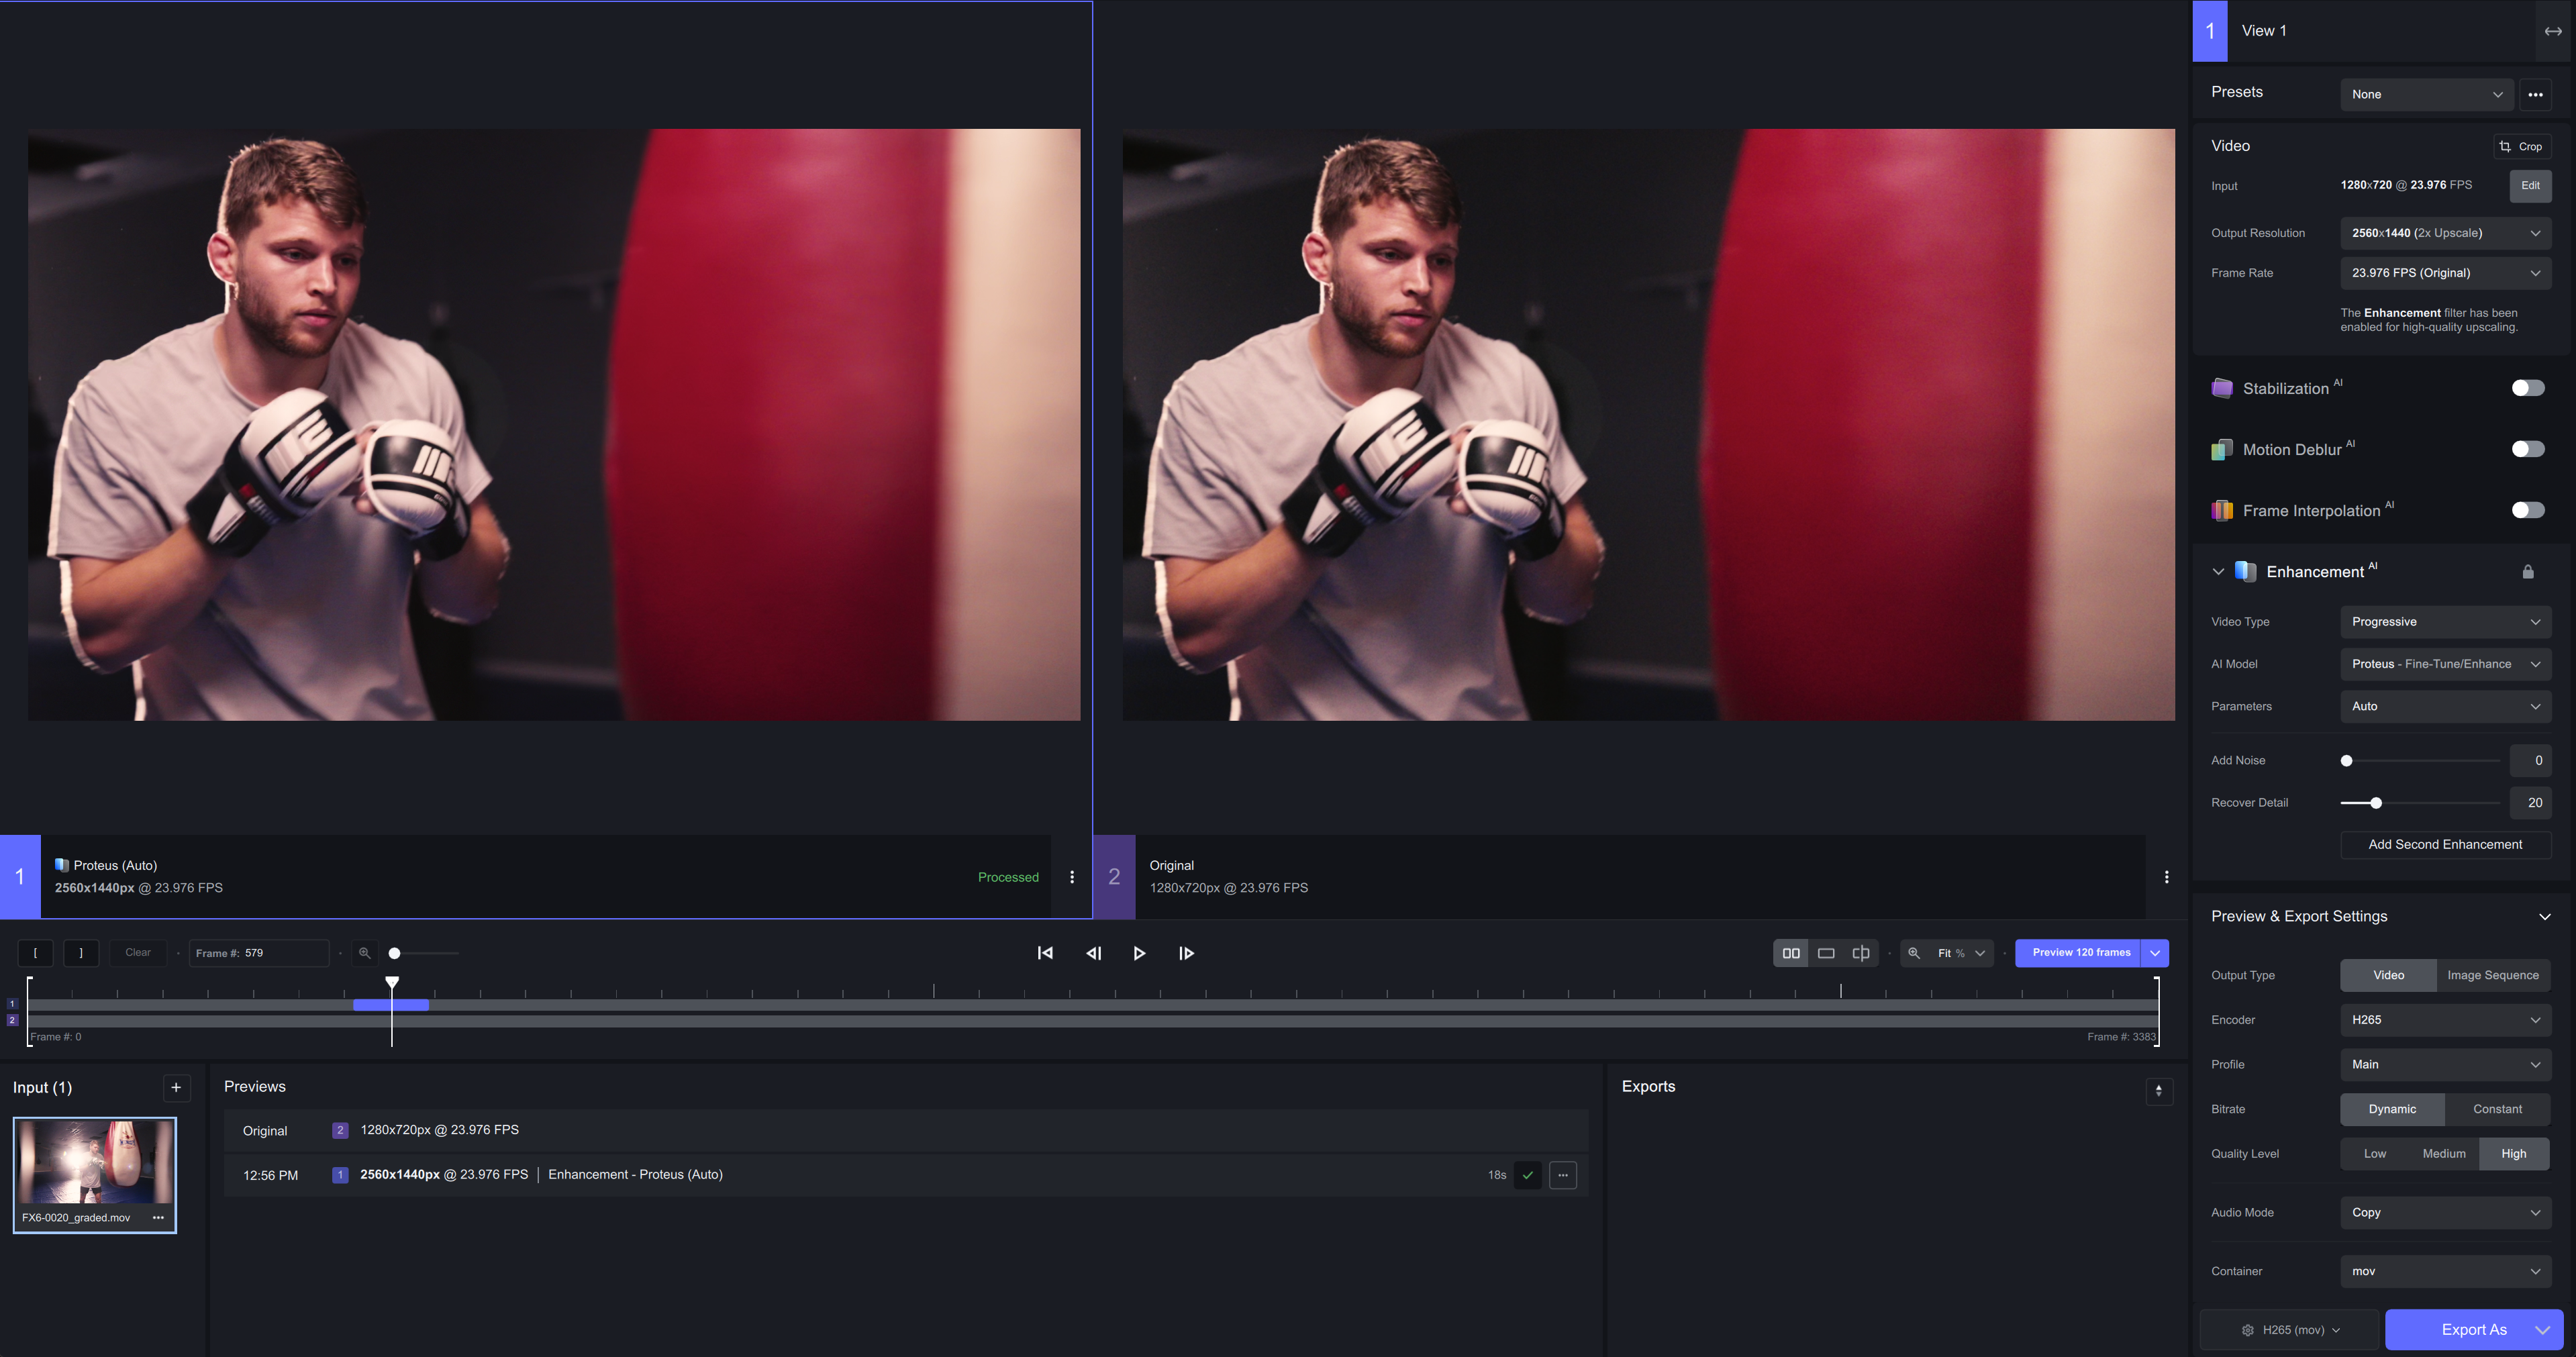
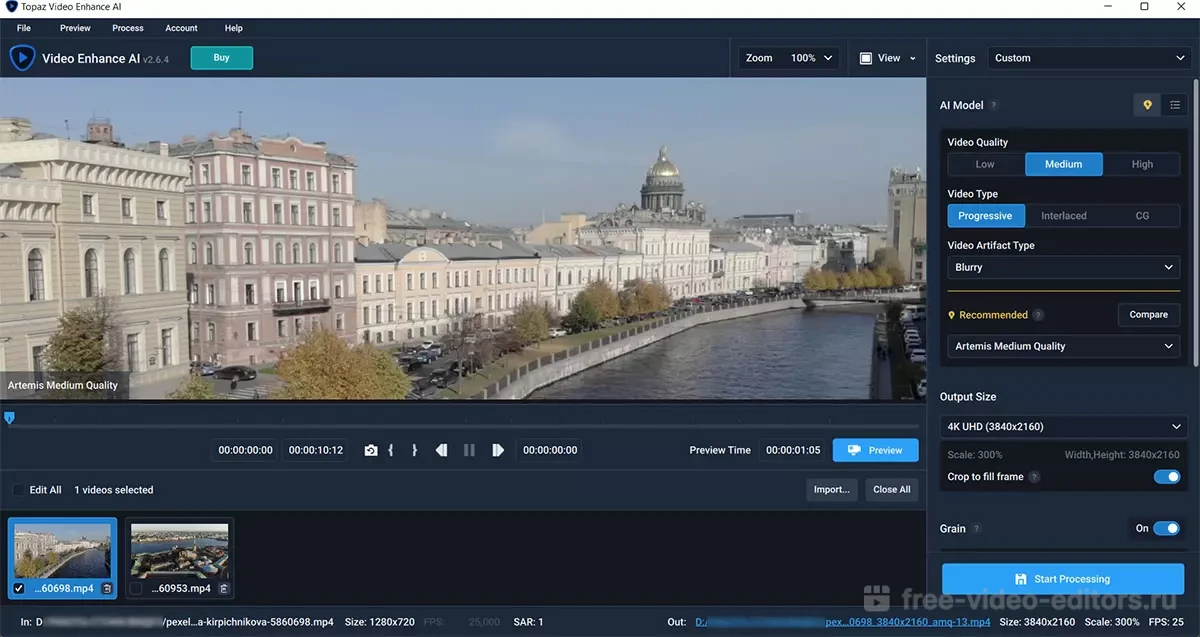
4. Main Interface: Detailed Explanation
After importing a video, you will see the interface as shown below. It seems a little bit confusing at first glance but it is still easy to get started. The interface was more complicated before V3.0.0.
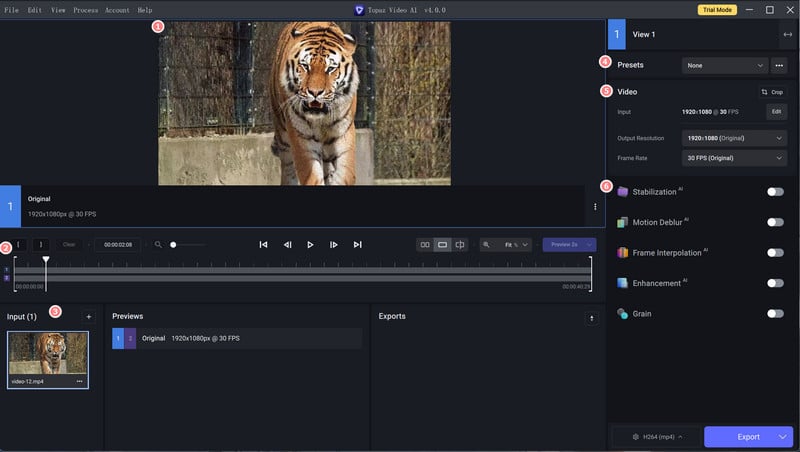
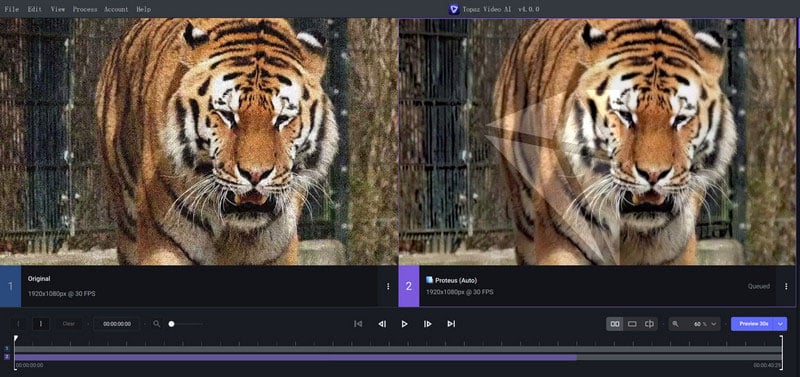
① Video playback and preview window: you can play the original video here, or preview the effect between the original and enhanced video.
② Video editing tool: you can trim video by frame.
③ Video input window: you can click + to add more video files or remove current video.
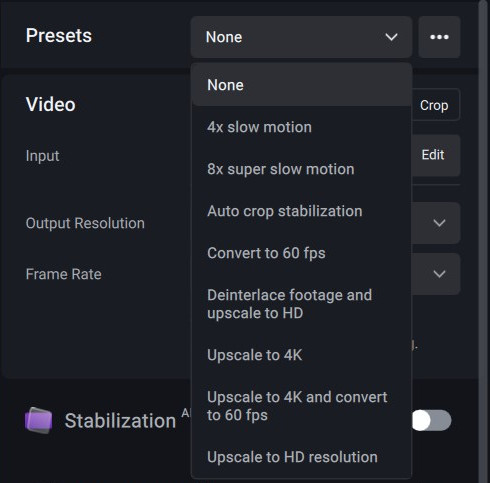
④ Presets: 8 different ready-made presets allow you to process video without any configuration.
⑤ Video-In and Video-Out menu: the «Video-in» menu displays the input video’s resolution, aspect ratio, and frame rate, while the «Video-Out» menu allows you to alter the output video’s resolution and frame rate.
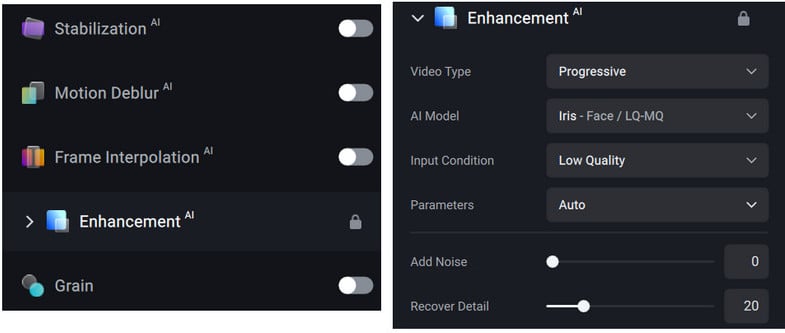
⑥ Filters: 5 filters tailored for your different video enhancement needs (4 AI filters and 1 non-AI filter).
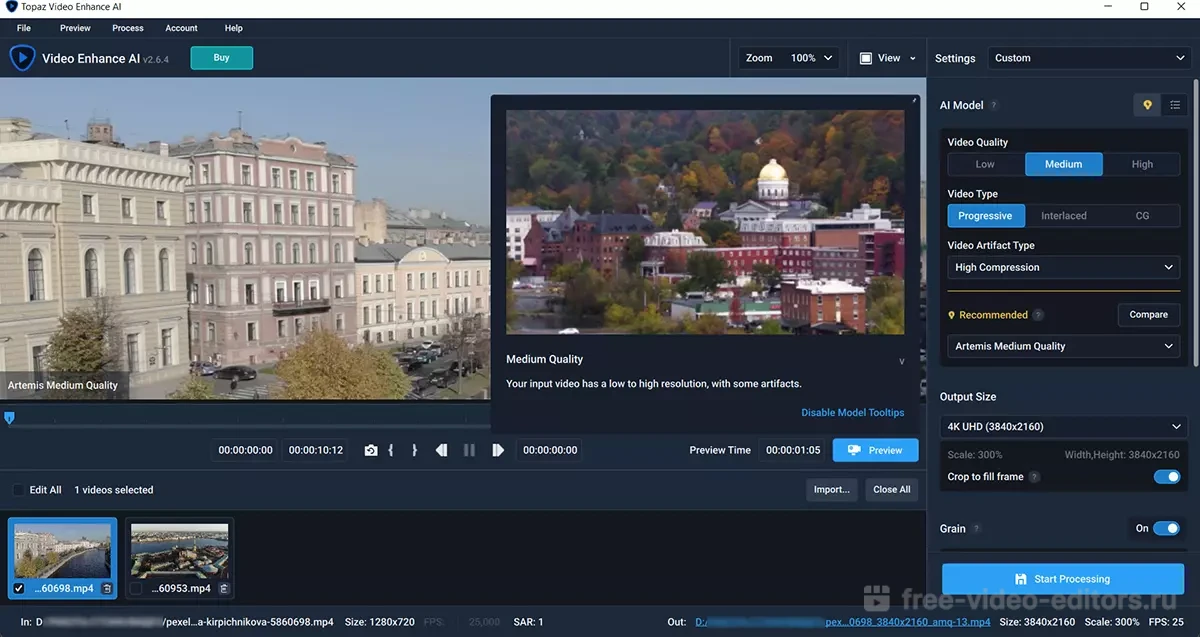
5. AI Filters
Stabilization: The stabilization model, first introduced in V3.0.0, can reduce shaky or jittery motion that often results from an unstable camera.
Motion Deblur: Reduce motion blur by camera shake.
Frame Interpolation: Create new frames for FPS conversion or slow motion effect. For example, you can select this filter to convert FTS from 30 to 60 or create 2x, 4x, or 8x slow motion.
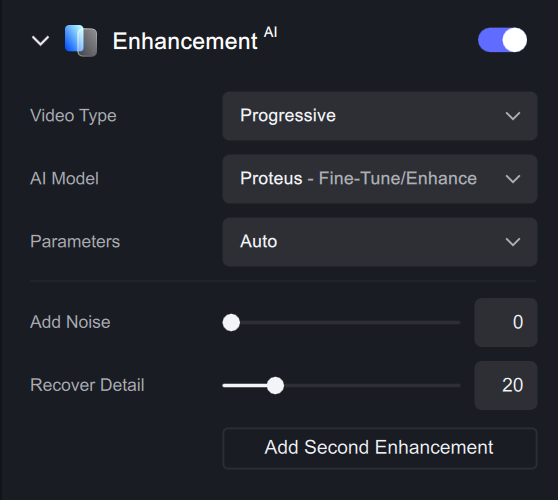
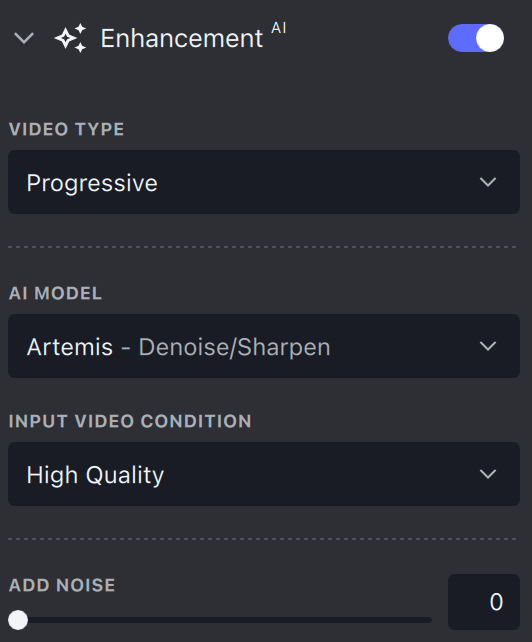
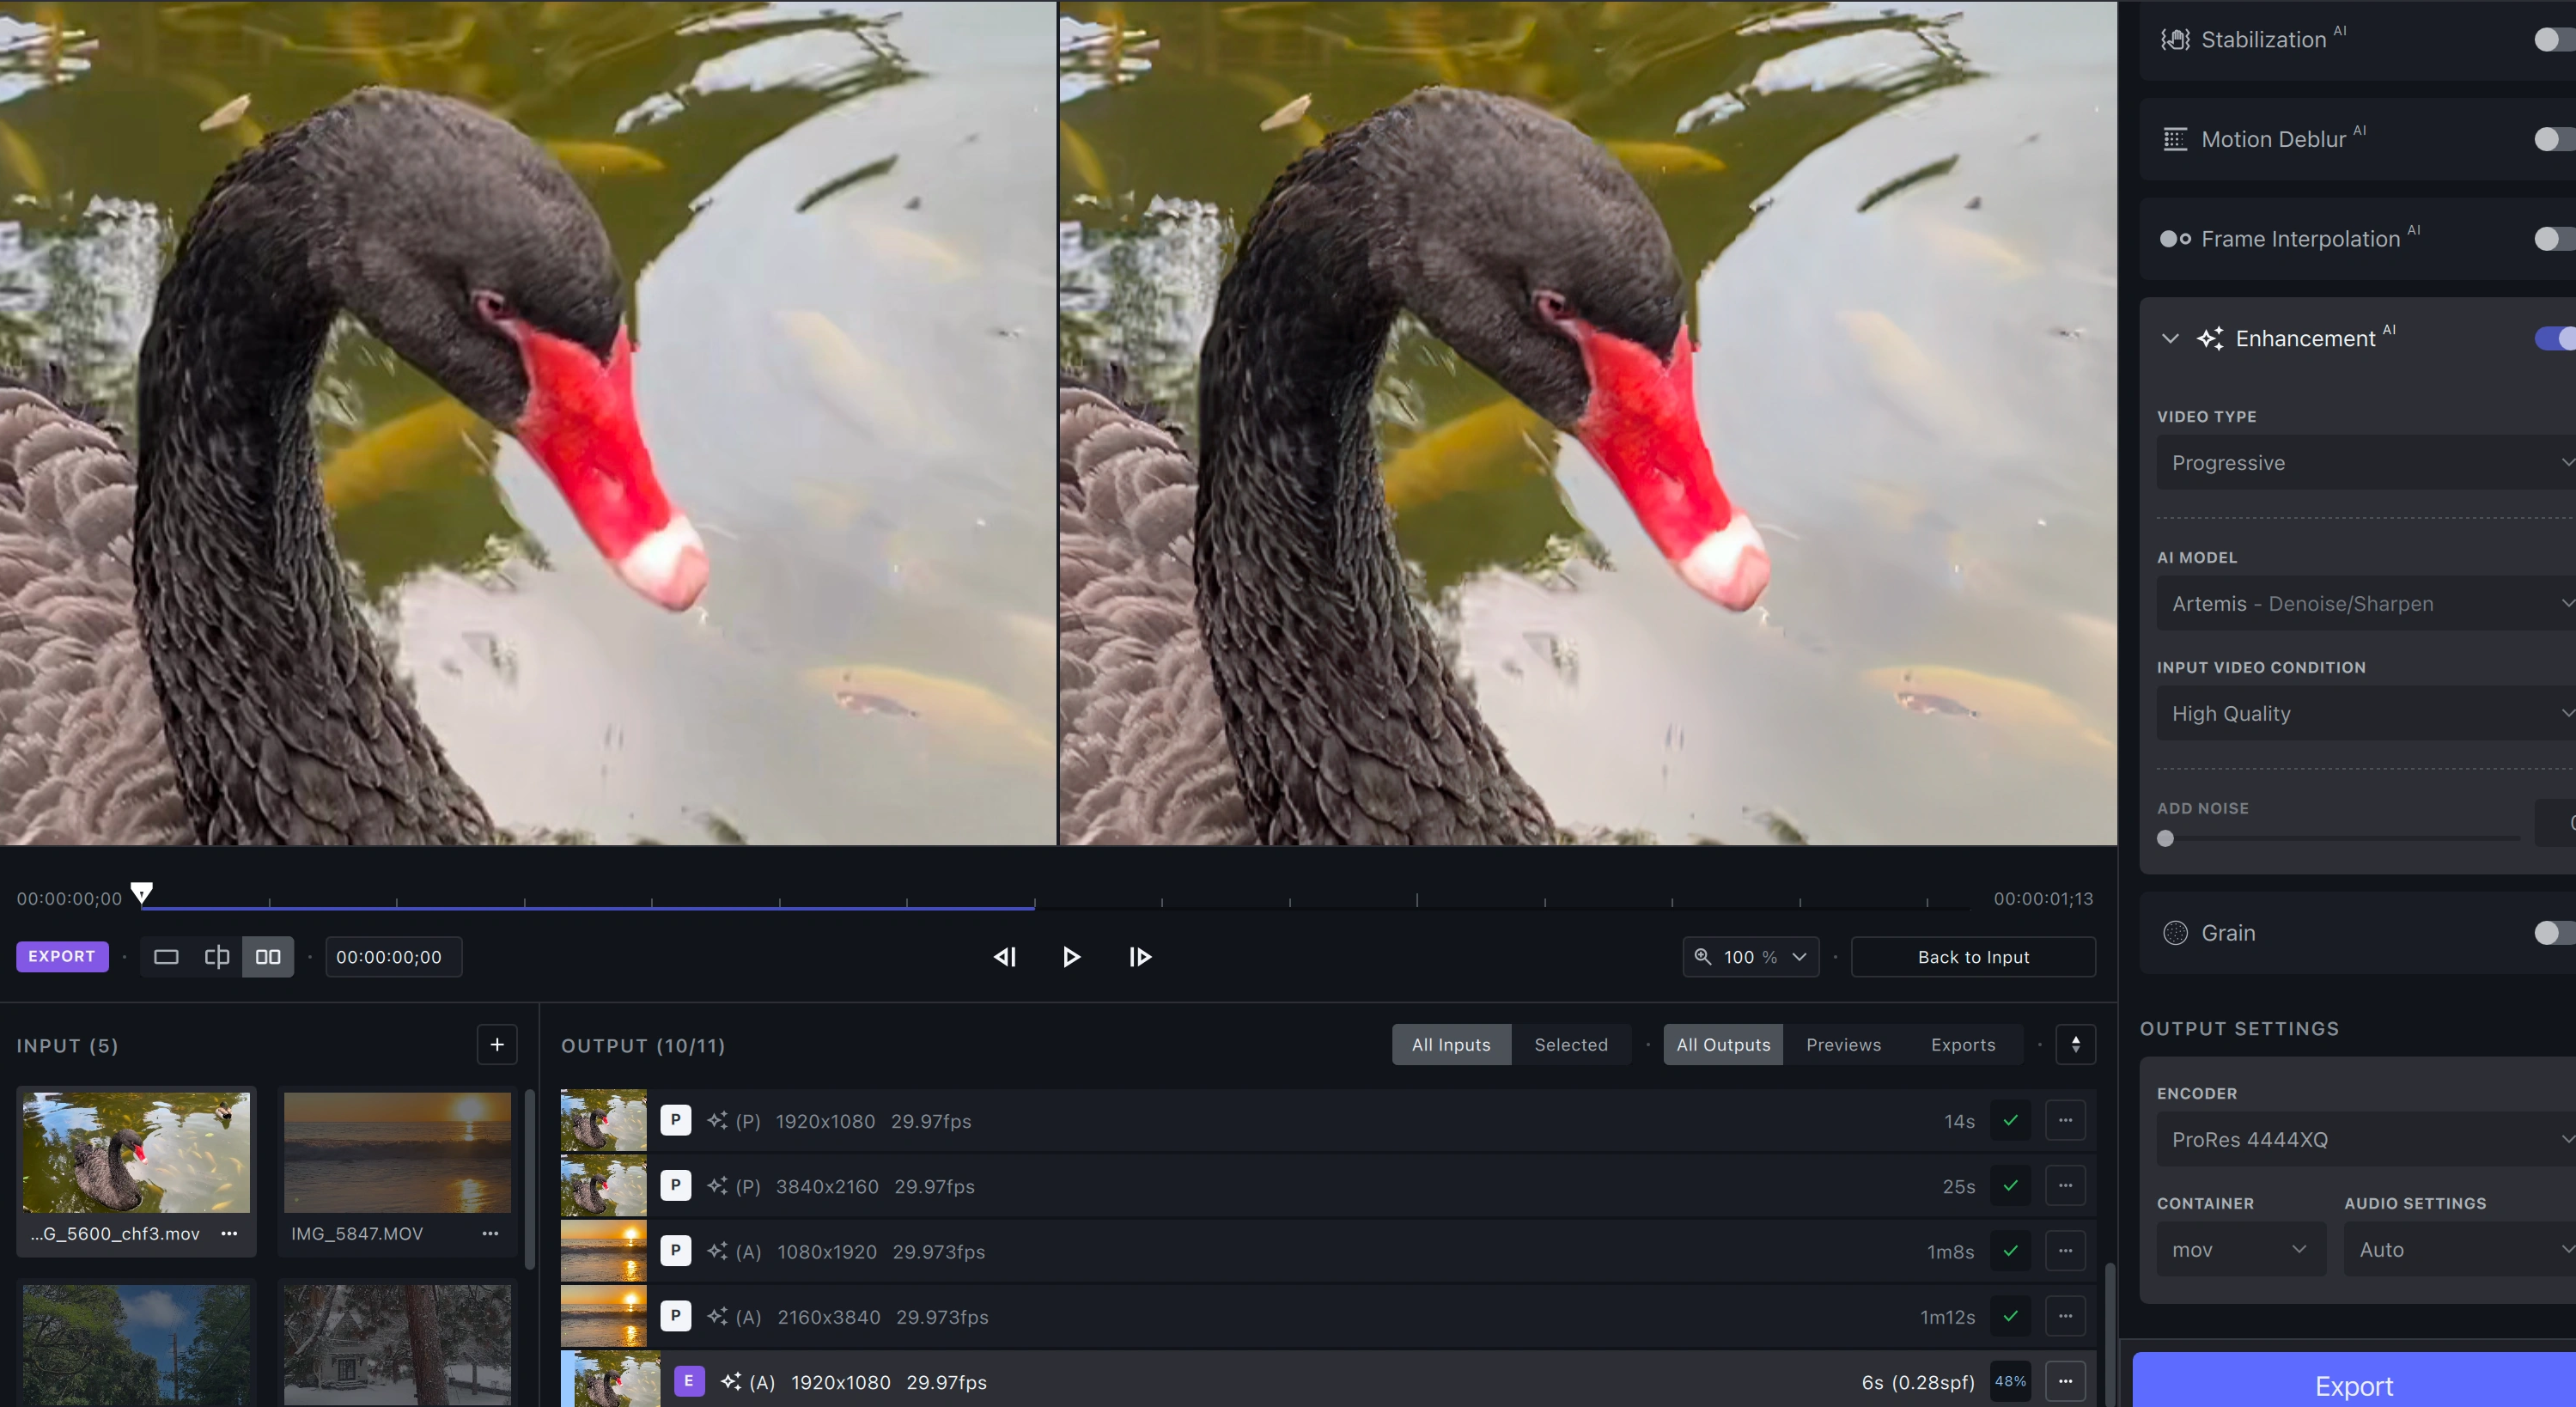
Enhancement: Improve the visual quality of the video. This filter is tailored to improve the quality of three kinds of videos, including progressive, interlaced, and interlaced progressive video. If you are not sure which one you should choose, please refer to the following explanation.
① Progressive: if your video sources are listed with the letter p, for example, 480p, 720p, or 1080p, you can select the video type as «Progressive».
② Interlaced: If your video sources are listed with the letter i, for example, 480i, 720i, or 1080i, you can select the video type as «Interlaced». Interlaced video displays obvious lines on the screen.
③ Interlaced progressive: As for the Interlaced Progressive, it can be only used if your video sources have been previously converted to progressive without de-interlacing it at the time.
④ Grain is an extra option you can use to add visual texture to make the output video less smooth plastic AI look.
6. AI Models
Topaz Video AI V4.0.0 offers 9 AI models in total. It removes some outdated models and organizes all models by AI filters since V3.0.0, thus allowing its users can choose the right AI models more easily than before. If you are still trying to figure out the difference between the models and have no idea about what model to use, you can look at the explanations for each model.
Proteus — Enhance MQ: Upscale and sharpen middle-quality video, fix compression artifacts, remove noise, and anti-alias/deblur.
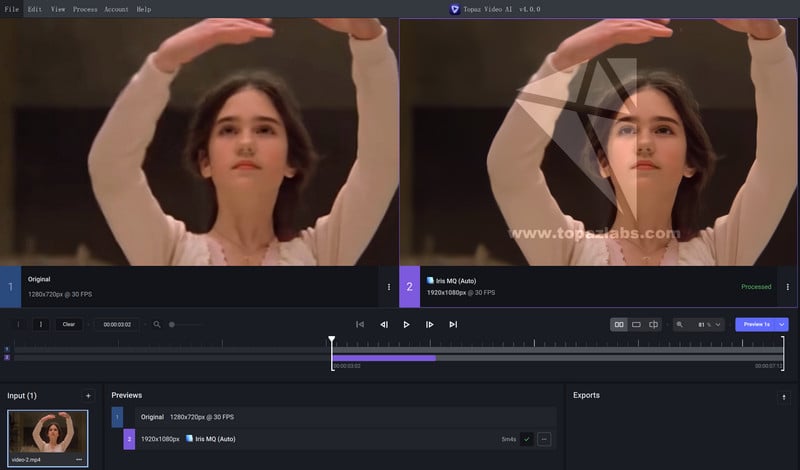
Iris — Face /LQ/MQ: Iris is Topaz’s first face enhancement AI model, released in June 2023. It is recommended for very low-resolution and medium-resolution videos and works best on interlaced, noisy, or compressed footage with degraded faces.
Nyx — HQ Denoise: The denoise model reduces noise and fixes compression artifacts. It is optimized for denoising high-resolution videos captured in dark lighting conditions with high ISO settings.
Artemis — Denoise/Sharpen: Enhance and upscale low-quality videos with high noise or severe compression artifacts, and produce smooth video output with much less detail flicker.
Gaia — Upscale HQ: Upscale video footage to HD and 4K resolution.
Theia — Details/Fidelity: Upscale or sharpen input video with more details, with parameters (sharpen, fix compression, reduce noise) for fine-tuning.
Themis: Pairs well with the Stabilization model to reduce camera shake and jerkiness.
Apollo: The Apollo model can create slow-motion effects in videos that do not have non-mechanical movements, so it is better for video with more non-linear (less predictable) motion.
Chronos: The slow motion/FPS conversion model to convert frame rates. It gives the best results with linear motion video.
Step-by-Step Tutorial on How to Enhance Video Quality with Topaz Video AI
Let’s ready to read this step-by-step guidance for using Topaz Video AI to enhance your video quality effectively, whether you’re already a user or considering the trial version.
Step 1: Download and Install
Download the installation package based on your computer’s operating system.
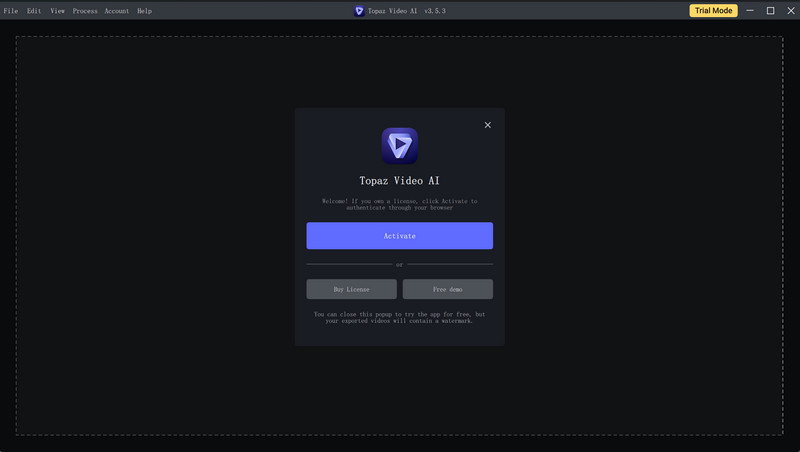
Please wait while the Setup Wizard installs Topaz Video AI. Once the installation is complete, launch Topaz Video AI to step in the welcome interface in which you can select to activate the program so as to access the full version or try the app for free.
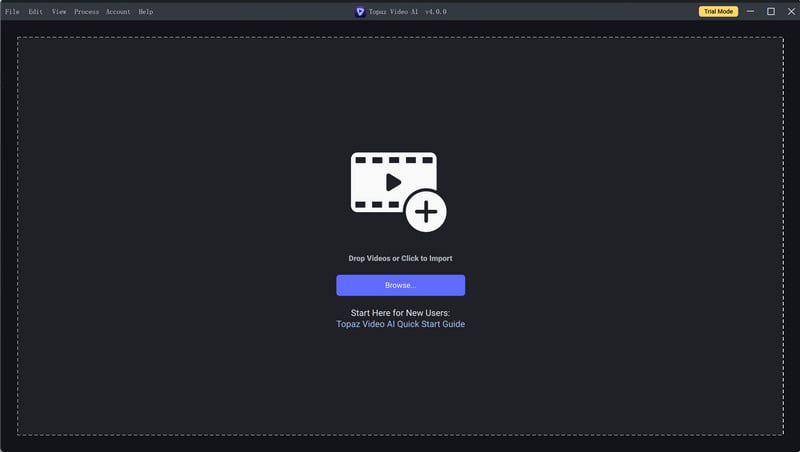
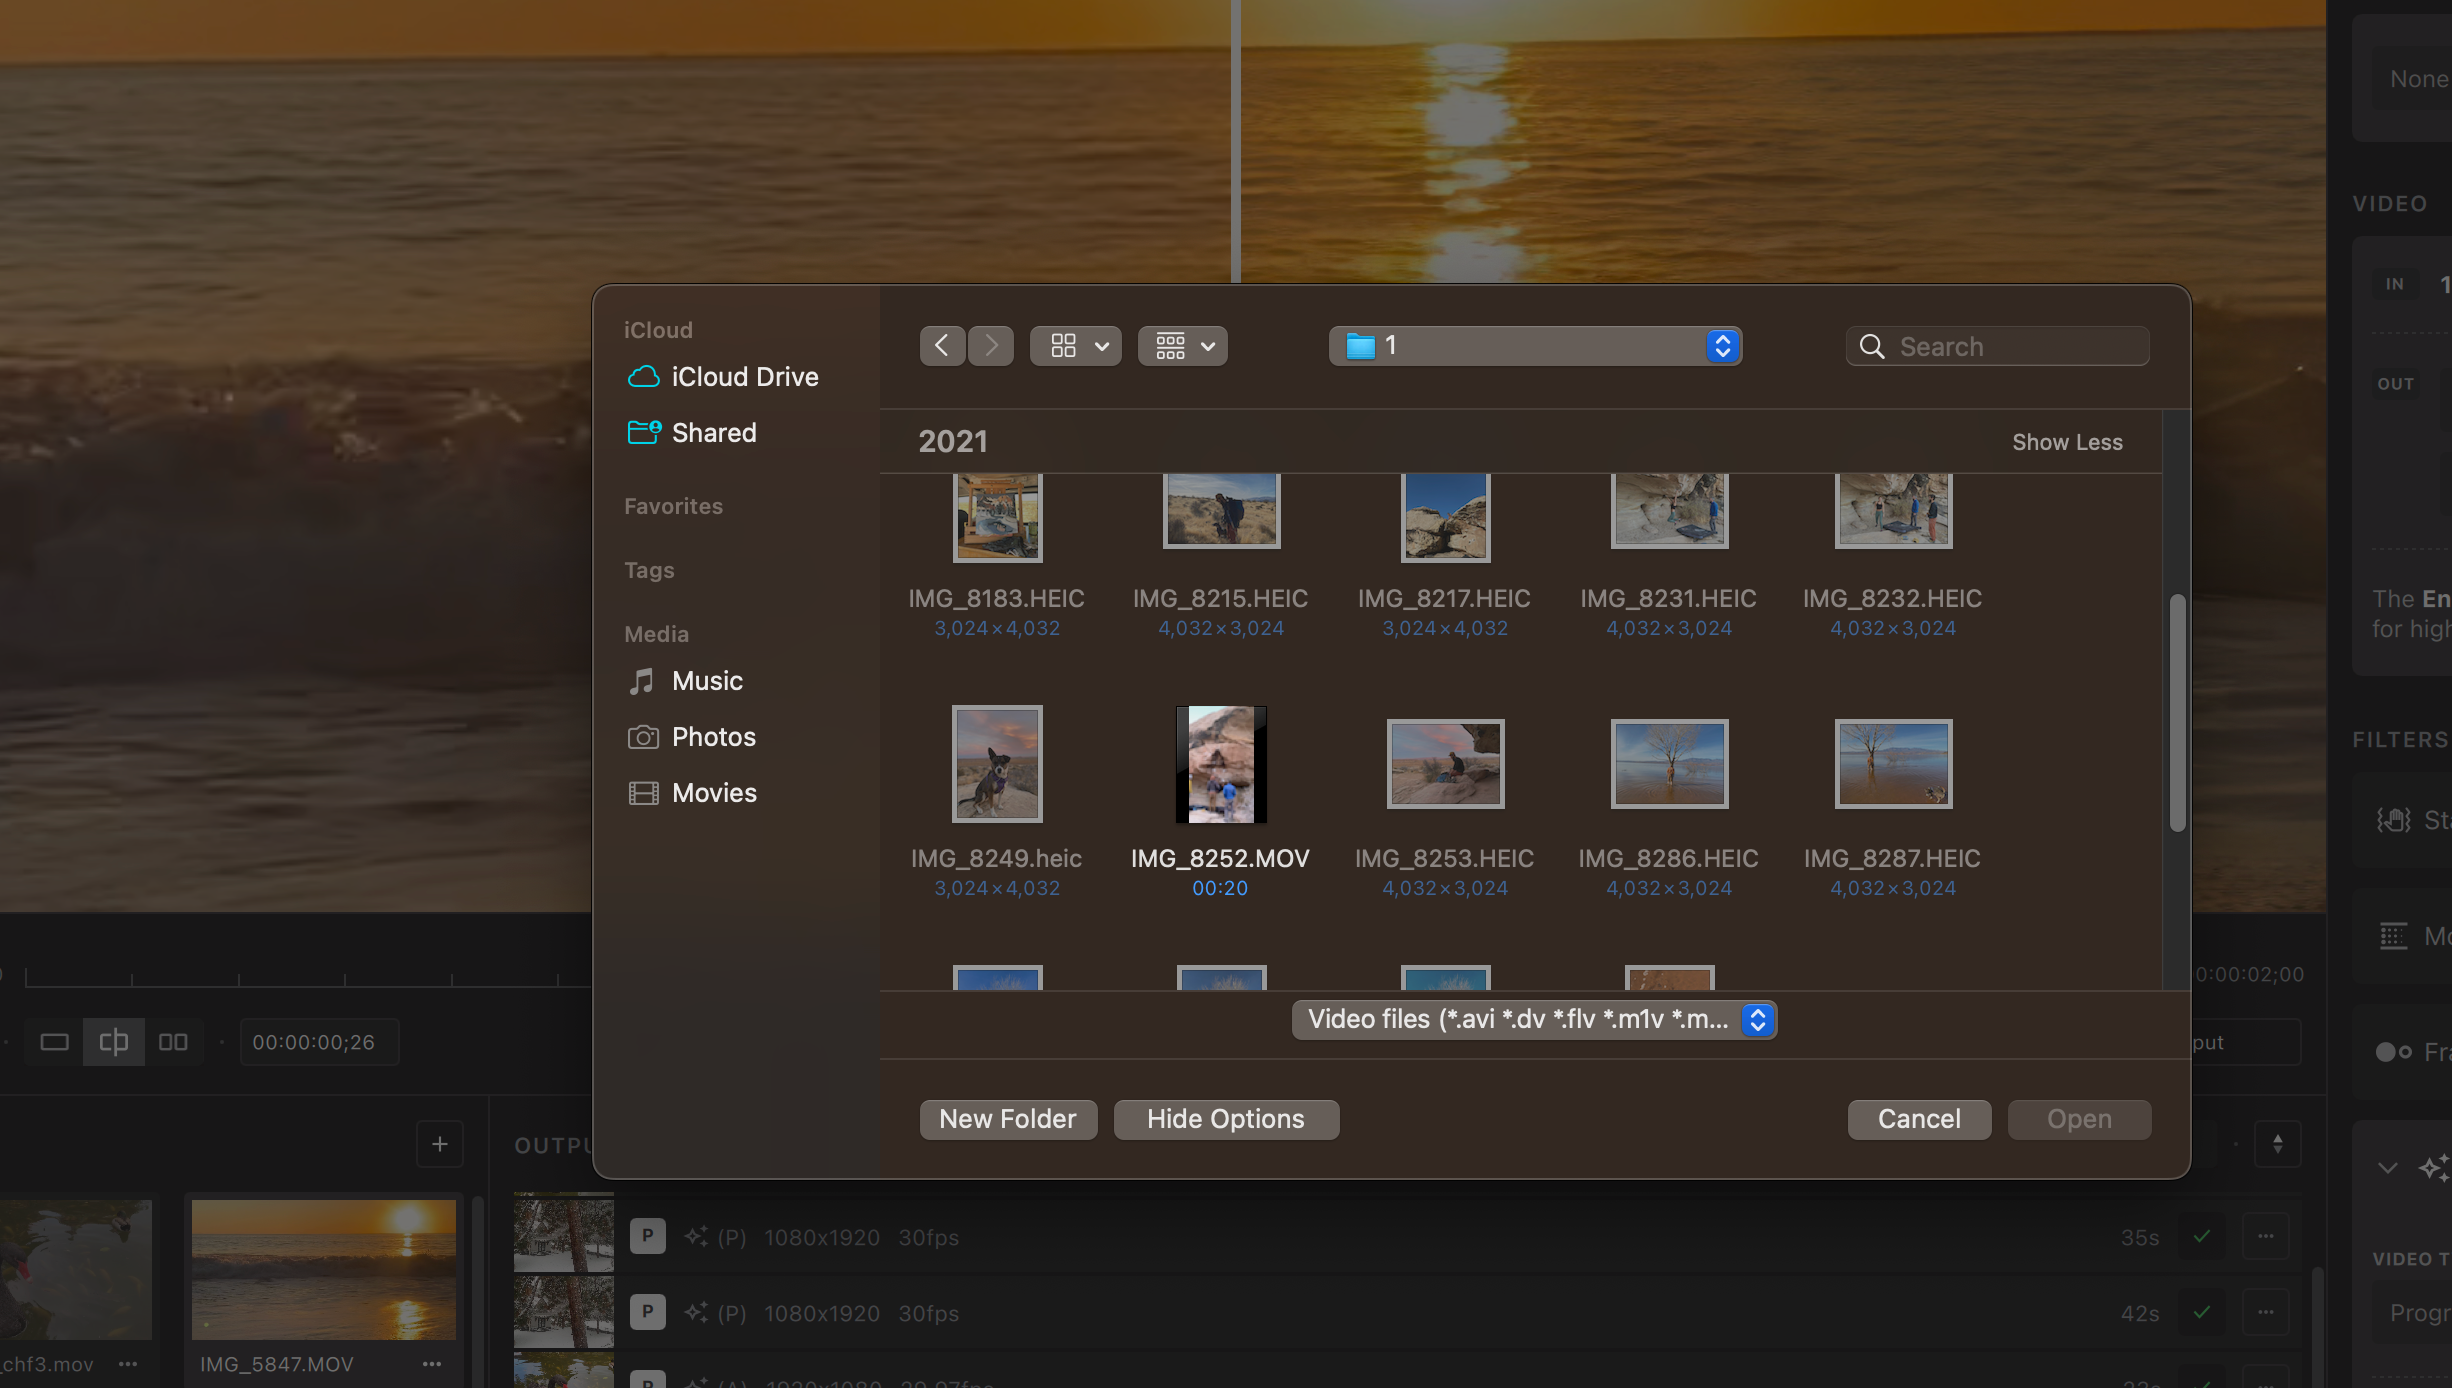
Step 2: Browse to Import a Video File
There are two ways to import videos into Topaz Video AI: select «Browse» or drag-and-drop files directly into the program.
Step 3: Select the AI Filters and AI Models You Prefer
There are two ways to select the AI filters before rendering:
1. Select a Preset:
The PRESET is designed to simplify program setup for an easier testing experience.
Select a Preset: From the Presets window, choose a preset that fully fits your requirements. Here we take «Upscale to 4K» as an example. By choosing «Upscale to 4K» as the preset, the corresponding enhancement filters, output resolution, and output format will be activated automatically.
Once you have made your selection, you can proceed to click the «Preview» button or view the improvements between before and after, or click the «Export» button to initiate the video export process.
Tips: You also have the ability to add a new Preset independently, empowering you to customize your own experience.
2. Manual Configuration
If you are already familiar with the program, you can take control of the program by manually choosing AI filters, AI Models, Video Type, and tailoring the output (resolution, bitrate, quality level, format, and more) to your exact preferences.
By organizing each AI filter with customizable and fine-tuning options, you have the flexibility to simultaneously select multiple filters. For instance, you can upscale video to 4K and convert it to 60 FPS by selecting both Frame Interpolation and Enhancement as the AI filters.
Step 4: Customize the Output Settings (Output Resolution, Frame Rate, and More Output Settings)
To configure the AI Filters and AI Models, you have two options: selecting a Preset or manually adjusting the settings yourself. Once you’ve made your selection, click the button next to «Export As» to open the output settings window. Here, you can customize various aspects including the Encoder, Profile, GPU, Bitrate, Quality Level, Audio Mode, and Container.
At last, don’t forget to select your preferred output resolution and frame rate if you manually choose the AI Filters and AI Models. This step is crucial to ensure that you achieve the desired results for your project.
Tips: To ensure optimal compatibility with media players, Windows users should opt for MP4 as the container and H.264 as the encoder. On the other hand, Mac users should select MOV as the container, and choose between H.264 or ProRes as the encoder. Following these guidelines will guarantee the proper playback of the output media files.
Step 5: Preview the Enhancement Effect
After all configuration is done, you shall start the preview of the enhancement effect to make sure the outcome is what you expected. Generally, previewing 30 frames should tell you the obvious improvements between before and after. Here we pick up the default option «Preview 2s» to start the preview.
Note: Choosing a longer preview time will result in increased loading time to process the request. It’s important to keep this in mind as you make your selection.

Step 6: Start Exporting the Enhancement Video
If the outcome is as great as you expected, click the «Export As» button to start rendering the video.
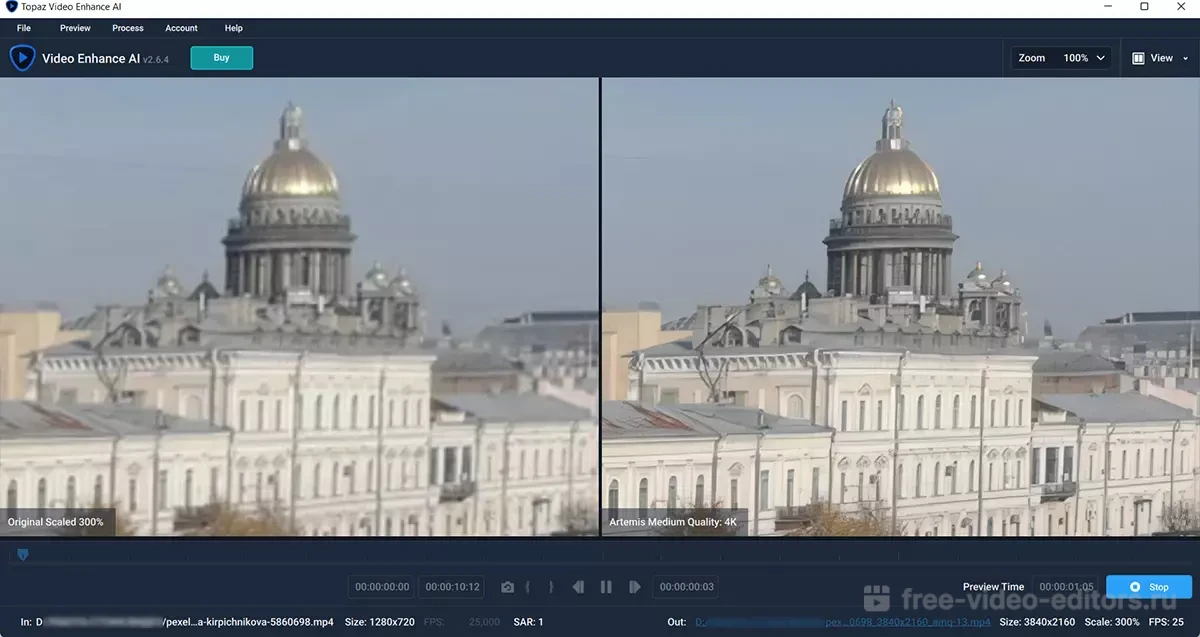
Preview the Video Enhancement Effect Produced by Topaz Video AI
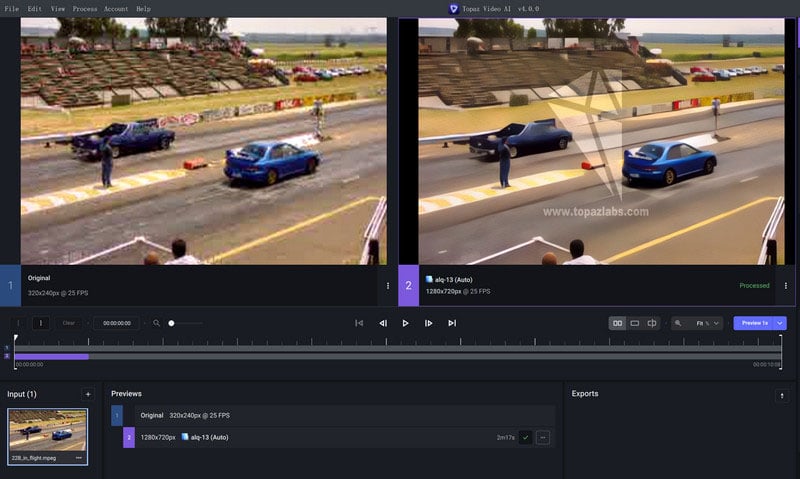
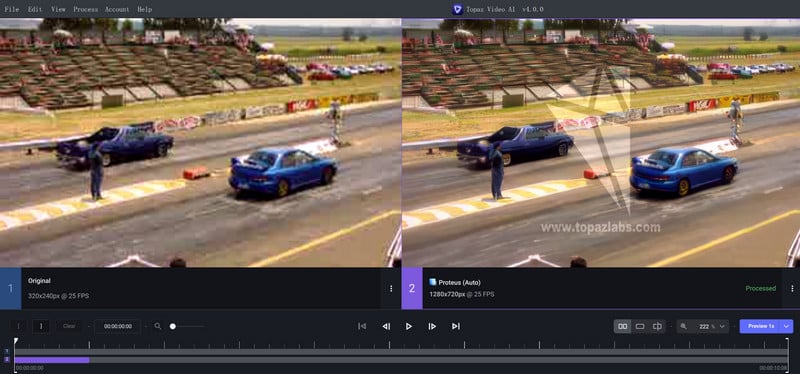
Now that we have covered nearly everything you need to know before starting the video quality enhancement by Topaz Video AI, the quality that Topaz can output is no exception, as well as your first concern before opting for it. In this part, we will demonstrate the quality comparison between before and after. We will use as many as source footage as possible for a comprehensive and convincing comparison.
Proteus — Enhance MQ: To denoise medium quality video.
Outcome: Remove noise from the video, with details kept.
Artemis — Denoise/Sharpen: To denoise low quality video.
Outcome: Too smooth, unnatural, and less details.
Tips: To improve the denoising effect for this low-quality video, and keep more details, you may try to switch the model to Proteus — Enhance MQ.
Iris — Face /LQ/MQ: For Face recovery & Refinement.
Outcome: Can make the blurry faces clearer than before, with natural output.
Gaia — Upscale HQ: Upscale video footage (640×360) to HD (1920×1080).
Outcome: Crisp HD quality, the parrot feathers turned out to be clearer.

Gaia — Upscale 4K: Upscale video footage (854X480) to 4K (3840×2160).
Outcome: Naturally, but no obvious improvements visually.
Tips: Switched the model to Proteus — Enhance MQ can get better results.

Final Words: Should You Select Topaz Video AI?
Honestly, Topaz Video AI is a great video enhancement software that is worthy of your trial. The greatest points are the good enhanced quality and more fine-tuning options available. The product also does a good job of increasing/changing the frame rate. The drawback is that it is a bit hard to figure out how to actually use AI models to improve an older video. In other words, it takes more time to understand the options and do many rendered previews. What’s more, the product takes a bit longer time to load the preview effect, even though we selected preview 1s.
Obviously, Topaz Video AI is an impressive video enhancement software that is definitely worth trying out. It offers several notable advantages, such as enhanced video quality and a wide range of fine-tuning options. Moreover, the product also does a good job of increasing/changing the frame rate.
On the downside, it can be a little challenging to navigate and utilize the AI models for improving video quality, which may require additional time and multiple rendered previews. Additionally, the preview effect takes slightly longer to load, despite selecting the 1-second preview option.
Overall, Topaz Video AI provides powerful features that can significantly enhance video quality, while offering room for improvement in terms of usability and preview loading speed.
Finally, if you find Topaz Video AI too complex to figure out, consider giving AVCLabs Video Enhancer AI a try. Its user-friendly interface and advanced capabilities make it a great alternative. You can read this in-depth review for AVCLab Video Enhancer AI.


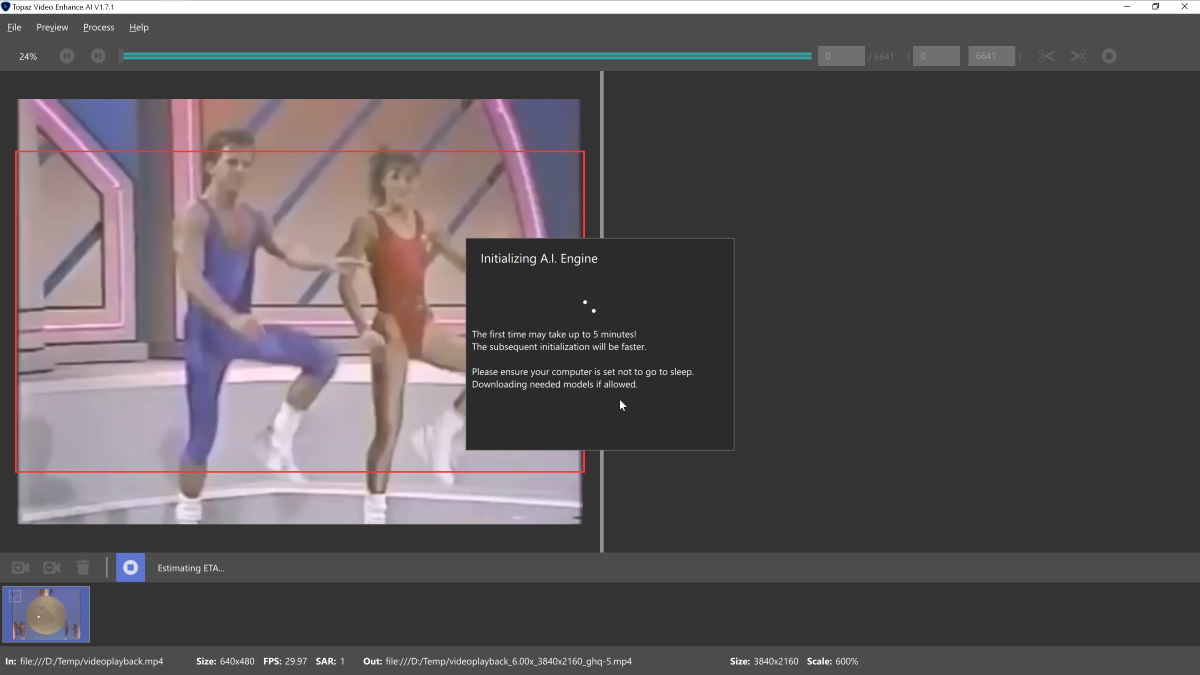
Наверняка вы видели в сети видео типа Нью-Йорк 40-ых в цвете и 4K. А когда хотели сделать так же со своими видео из детского сада, выяснилось, что нужны какие-то там нейросети. А я расскажу, как сделать это почти в один клик.
Topaz Video Enhance AI — приложение для Windows и macOS, которое легко помогает произвести апскейл видео до 8K без потери качества, а даже с его улучшением.
Теория
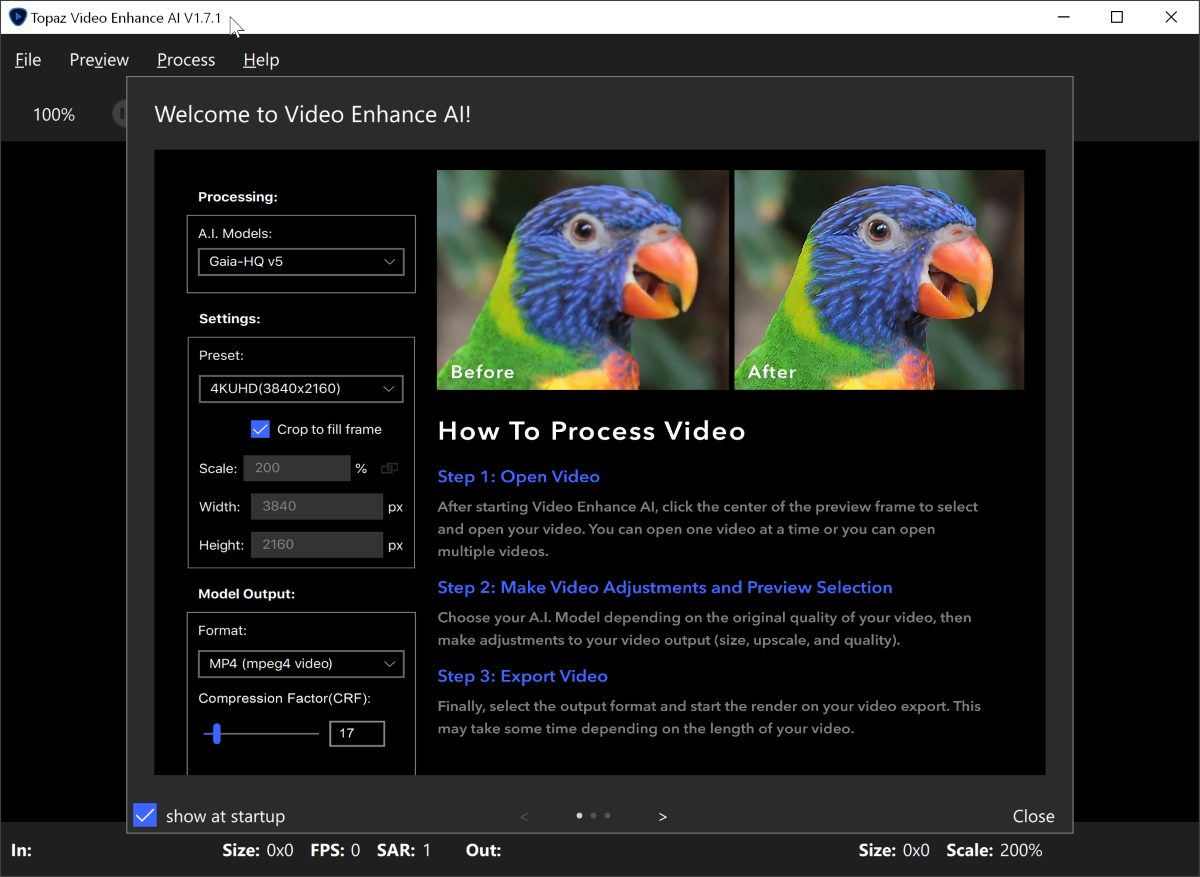
При первом запуске приложения вас ожидает экран с обучением из трёх шагов. По сути, для улучшения видео требуется всего три действия: открыть видео, выбрать желаемые параметры, сохранить видео.
И на самом деле именно так просто всё и происходит. Для примера я скачал вот это видео с YouTube в разрешении 480P, и добавил его в Topaz Video Enhance AI.
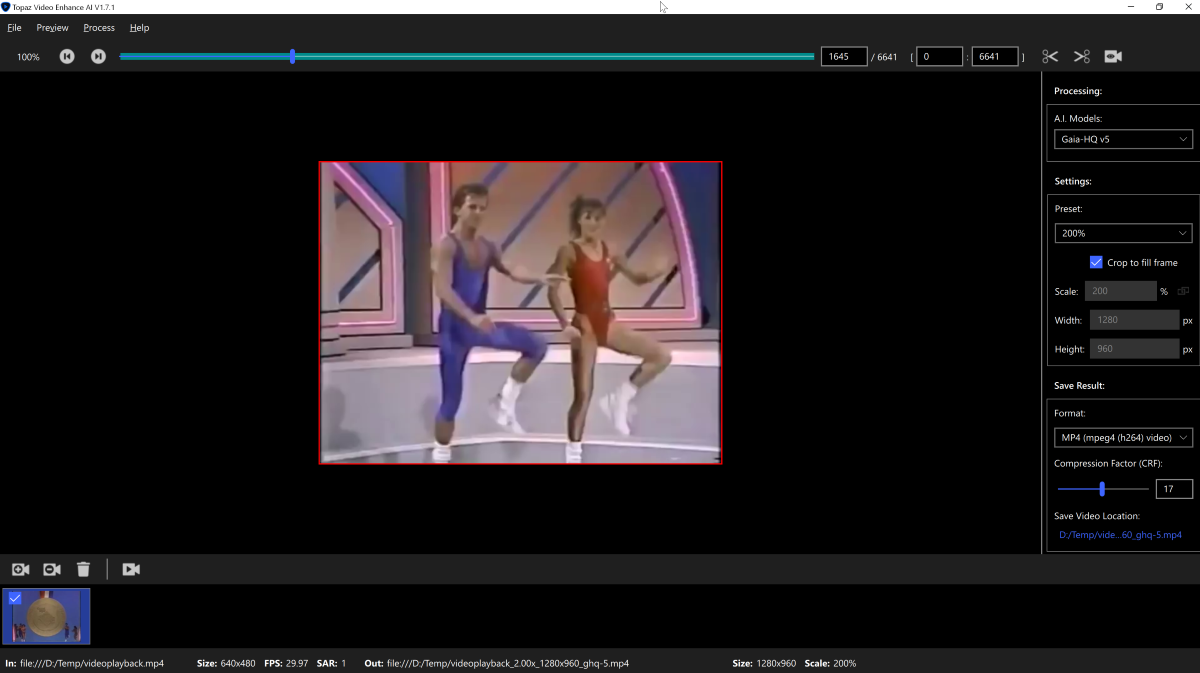
На следующем этапе нужно задать параметры для апскейла видео.
В разделе Processing можно выбрать одну из шести нейросетей, которая будет обрабатывать видео. В чём разница между ними, я не буду рассказывать — в приложении всё написано.
Setting отвечает за качество видео на выходе. Можно выбрать разрешение в процентах, ввести свои или выбрать значения — вплоть до 8K.
В разделе Format нужно выбрать формат файла на выходе и путь сохранения.
Дополнительно можно обрезать видео и выбрать видеокарту, с которой будете работать.
После настройки всех параметров остаётся нажать Start Processing, и в выбранной папке через какое-то время появится улучшенная версия видео.
Практика
На практике всё не так радужно, и результат полностью зависит от мощности вашего компьютера. Сделать из видео (длительностью даже в 10 секунд) шедевр в 8K на слабом железе не получится ни при каких условиях.
На своём компьютере с Intel Core i7 и 32 Гб оперативы я так и не смог сделать даже апскейла до 1080p. Процесс шёл либо ооооооооочень медленно, либо не шёл вообще, либо постоянно начинался заново.
Вероятно, если бы я занимался этим не для поста на сайте, а для дела, я бы всё-таки добился результата. Но мне лень, поэтому вот вам пример с сайта разработчика.
Лицензия на Topaz Video Enhance AI стоила на момент написания поста $200, при этом на пробу даётся 30-дневная версия без каких-либо ограничений. Поэтому в первую очередь я рекомендую просто попробовать демку, и понять, надо ли оно вам вообще.
А сказать, работает ли приложение, я не могу. У меня не получилось…
Скачать
Теги:
Обзор
Windows
macOS
Topaz Video Enhance AI
Цитата
Подскажите пожалуйста лучший алгоритм для обработки старых 240-480р видео.
Если видео с чересстрочной развёрткой, записанное с аналоговых видеовходов (телевизоров, видеокамер, dvd и т.д.) в разрешениях 480i, 576i и менее.
Тогда наверно подойдёт модель Dione Interlaced TV v3
Если видео с чересстрочной развёрткой и записанное в цифре, в хорошем качестве 480i, 576i, 720i, 1028i, тогда лучше использовать модель Dione Interlaced Robust v3.
Примеры видео, с исходным разрешение 544×576, 720×576 увеличенных на 200% через эту модель: #1, #2, #3, #4, #5, #6, #7 (учтите, что Youtube ухудшает качество, исходик был немного лучше)
Устраняется не только чересстрочная развёртка, а так же зернистость и артефакты. Для придания естественности, надо экспериментировать с параметрами Amount и Size, в закладке Grain Setting. В моём случае использовались дефолтные параметры настройки Amount 1.8 и Size 1.0.
Для современных цифровых видео (без чересстрочной развёртки), неплохие результаты даёт модель Gaia High Quality
Примеры увеличения DVB-S mpeg2 видео в разрешениях 544×576 — 720×576, с помощью этой модели, в старой версии Topaz Video Enchance AI: #1, #2, #3, #4
Кое где можно заметить эффект гребёнки, так как чересстрочная развёртка не устраняется в этой модели, а исходники с чересстрочной развёрткой. Но старые видео, записанные с цифры — подойдут для этой модели, если видео не имеет динамических сцен и в основном всё снято крупным планом.
Многие хвалят модель Artemis, но с обработкой MPEG2 DVB-S видеофайлов, записанных с спутника, у меня получались только плачевные результаты.
Интересно услышать, какие вы используете настройки.
![]()
Topaz Video Enhance AI

5.0
Оценок: 4
(Ваша: )
Скачать бесплатно![]()
 Для Windows 11, 10, 8, 7
Обзор Topaz Video Enhance AI
Topaz Video Enhance AI – удобная программа для автоматического улучшения качества видео с помощью функций на основе искусственного интеллекта. Она позволяет быстро увеличить разрешение кадра, убрать цифровые шумы, сделать эффект «замедленной съемки» и многое другое. Topaz Video Enhance AI 2.6.4 скачать бесплатно на русском языке можно по проверенной ссылке с нашего сайта.
Редактор подходит новичкам, так как выполняет обработку в автоматическом режиме. Пользователь может выбрать готовые настройки из списка. Софт содержит пресеты для:
- увеличения разрешения кадра до 4K;
- удаления шумов и помех в старых видео;
- создания эффекта «замедленной съемки» за счет установки частоты кадров на 60.
Самостоятельно пользователь может указать желаемое разрешение, FPS, тип видеозаписи, добавить зернистость. За счет ручных настроек можно:
- перевести ролики с разрешением 480p, 720p и 1080p в клипы 4K или 8K без снижения качества и потери детализации;
- приблизить определенный участок видео без добавления шумов и размытия;
- удалить полосы в старых видеоклипах, оцифрованных с кассеты.
Обратите внимание, что официальная версия программы представлена только на английском языке. Вы сможете загрузить переведенную RePack-версию с торрента или скачать отдельно русификатор. Однако файлы из непроверенных источников могут подвергнуть ваше устройство опасности. Многие torrent-сервисы не проверяют опубликованные материалы, и они могут содержать вирусы, трояны и другие вредоносные объекты.
Topaz Video Enhance подходит только для улучшения качества видеоролика и удаления любых цифровых
недочетов: шумов, артефактов сжатия и т.д. В софте нет инструментов для обрезки клипа, объединения
нескольких файлов, наложения музыки. Если вы ищете редактор, который позволит обработать картинку
и сделать красивый ролик, воспользуйтесь приложением ВидеоМОНТАЖ.

Как улучшить качество видео в Topaz Video Enhance AI

Особенности Topaz Video Enhance

Автоматическая обработка видео
Редактирование выполняет обученная нейронная сеть. Она убирает недочеты без участия пользователя и восстанавливает любые детали в кадре. Например, если в ролике было много шумов на лице человека, то ИИ самостоятельно сгладит кожу, подберет подходящую текстуру на замену помехам и применит резкость к носу, губам и т.д.

Изменение частоты кадров
Данный параметр влияет на плавность картинки и скорость перехода от одной сцены к другой. За счет настройки FPS вы сможете создать ролик с эффектом «slow motion» или ускорить видео. Софт автоматически генерирует дополнительные схожие кадры и позволяет увеличить значение частоты с 24 до 60.
![]()
Удаление шумов
Topaz Video Enhance AI позволяет устранить цифровые шумы, которые могли возникнуть в роликах, снятых в ночное время, записанных на телефон и т.д.

Отключение аудио
В редакторе можно заглушить исходный звук. Благодаря этой опции при изменении скорости видеоряда вы не получите видео- и аудиодорожки, которые рассинхронизированы.

Предварительный просмотр результата
Перед сохранением работы вы сможете воспроизвести видео во встроенном плеере и оценить итог преобразования. Рядом с обработанным клипом будет отображаться оригинал, чтобы пользователь мог детально сравнить две картинки.

Поддержка популярных форматов
Вы сможете импортировать видеоролики MP4, AVI, MKV, FLV и другие. Экспортировать файлы можно MP4 и MOV или в качестве последовательности изображений JPG, PNG, TIFF.

Пакетная обработка
В редактор можно загрузить несколько файлов одновременно и установить для них одинаковые параметры редактирования. Рендеринг обычно занимает продолжительное время, поэтому вы сможете оставить ПК включенным и позволить софту преобразовать два и более видео без вашего участия.

Загрузка дополнительных предустановок
Если предложенных профилей улучшения видео недостаточно, то вы сможете импортировать пресеты с ПК. Файлы можно найти на официальном сайте или в сообществах пользователей.

Выбор оборудования для рендеринга
Для преобразования роликов можно использовать как графический процессор, так и CPU. Также вы сможете регулировать максимальный процент используемой памяти, чтобы не нагружать видеокарту.
Плюсы и минусы Топаз Видео Энхансер
✔️ Плюсы:
- изменение интерфейса ПО: указание подходящей темы, цвета фона и т.д.;
- установка пользовательских горячих клавиш;
- инструкции внутри софта и подсказки к каждой опции;
- скачать Topaz Video Enhancer можно бесплатно с ограничениями.
❌ Минусы:
- для скачивания пробной версии требуется указать адрес электронной почты;
- в демонстрационном пакете поверх видео накладывается водяной знак;
- для работы без сбоев требуется мощный ПК с 16 ГБ ОЗУ и 6 ГБ видеопамяти.
Системные требования Topaz Video Enhance
Лицензия: условно-бесплатная
Версия: v2.6.4
ОС: Windows 11, 10 / Mac OS
Русский язык: нет
Размер дистрибутива: 221 MB
Скачать Topaz Video Enhance бесплатно
 Для Windows 11, 10, 8, 7
Рекомендуем

Простой аналог Topaz Video Enhance AI — ВидеоМОНТАЖ
![]()
Topaz Video Enhance AI

русский интерфейс

каталог титров, мелодий, стикеров
объединение и обрезка роликов
замена фона и стабилизация видео
совместимость с Windows 8, 7, Vista, XP
Use this guide to import, upscale, and enhance your first video.
Import Your File
There are two ways to bring files into Topaz Video AI.
- Open the app and select Browse.
- Drag-and-drop files directly into the app.
Import an Image Sequence
- Make sure all frames are in one folder.
- Check that frames in consecutive order.
- At least 5 frames must be in the sequence.
Get the result you want out of the app by using the settings in the sidebar.
The «Video-In» menu will display the input file’s resolution, aspect ratio, and frame rate.

The «Video Out» menu allows you to alter the output file’s resolution and frame rate.
Filters
Each Topaz Video AI filter has been trained for a specific situation, such as deinterlacing, adjusting the frame rate, or creating a slow-motion output.
Use the toggle switch to enable the filter(s) you wish to use. We recommend using one to two per file.
Learn more about Topaz Video AI filters.
The Output Settings menu will allow you to select the export Encoder, Container, and audio settings.
Learn more about Topaz Video AI’s Encoders and Containers.
Preview Your File
To generate a preview, select the desired resolution, filters, and output settings and press the purple Preview button.
Select up to 15 seconds to preview. Adjust the view and zoom to inspect the results.

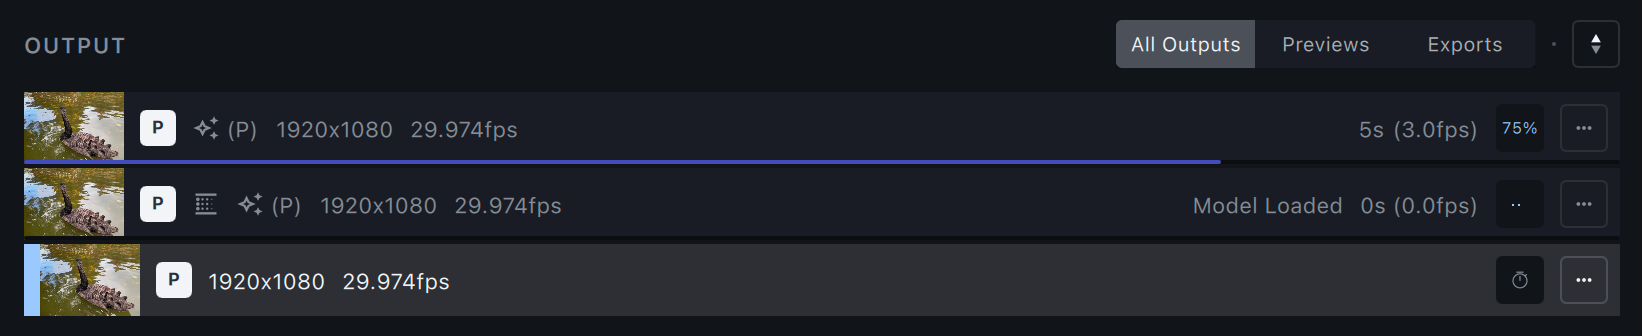
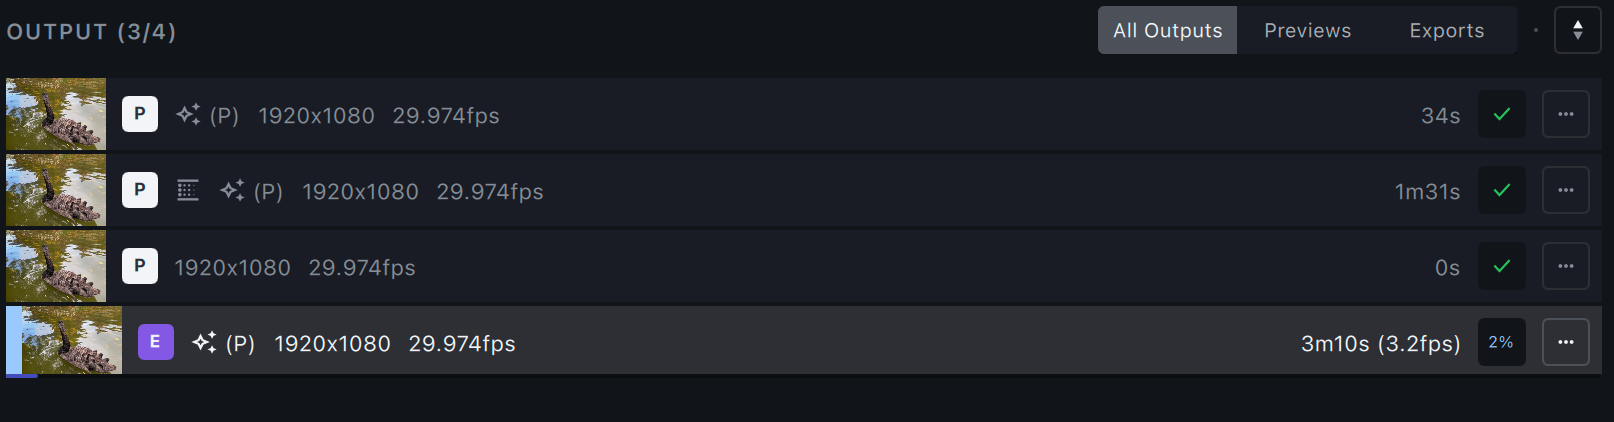
You can generate as many previews as you need. Progress for each preview will be displayed in the Output library.
- A purple progress bar and an ETA will appear for each file.
- A green check mark indicates that the preview is complete.
To view the Preview using your default video player, double-click on the preview or use the triple dot menu to open an external player.
Export Your File
Once you have found the best settings for your file and you have inspected the preview, you are ready to Export.
By default, the exported file will be saved to the input file’s location. You can select the carrot next to Export to choose Export As to change the save location.
- Save As is not available when batch exporting.
- You can differentiate between the previews and exports by taking a look at the icon on the left side of the Output library. P for Preview and E for Export.
What’s Next?
Congratulations on improving your first video! Learn how to use Topaz Video AI filters, encoders, and more!
![]()
Features
![]()
User Guides
-

-
March 4 2021, 21:57
- ИИ
- Кино
- Cancel
Решил тут поиграться с увеличением разрешения. Взял нашего Маугли, т.к. оказывается его нормальный ремастеринг не делали.
Увеличивал покадрово до 4К, т.е. на 400% с помощью алгоритма Артемида версии 11. Он именно для таких материалов предназначен. Скорость 1,5 кад/сек.
Забавно смотреть за происходящим, т.к. ты видишь как строиться кадр и что и как перемещается. Интересно.
Параллельно можно работать, но комп дико греется.
Отработав первый блок VOB’а с ДВД пока остановился (40 тысяч кадров, 326 гигабайт).
Вторым шагом — прогоняю через Topaz DeNoise AI, чтобы убрать шум. Пока сделал 50 секунд.
4К уменьшил до FullHD, чтобы скрасть недостатки сильного увеличения.
Результат можете глянуть:
Оригинал DVD 720х576 https://disk.yandex.ru/d/W71alDwaF2uZCg
И увеличение до FullHD через 4К, первые 50 секунд без звука https://disk.yandex.ru/i/B5mbNL4lt6e9bw
As technological advancements continue to move forward at breakneck speed, the tools available for video enhancement have taken a leap forward. Among these tools, Topaz Video Enhance AI stands out with its ability to upscale, denoise, and restore footage using advanced artificial intelligence (AI) algorithms.
In this comprehensive guide, we’ll delve into the intricacies of Topaz Video Enhance AI, providing a step-by-step tutorial on how to make the most out of this cutting-edge software.
Exploring Topaz Video Enhance AI
Topaz Video Enhance AI is a standalone software that uses machine learning (ML) to intelligently upscale, clean, and rejuvenate footage. It’s a versatile tool that can transform low-resolution videos into high-resolution masterpieces, making it an invaluable asset for video editors and filmmakers.
System requirements
To run Topaz Video Enhance AI smoothly, you’ll need to meet certain system and hardware requirements:
- Operating system: For Windows users, the software supports Windows 10 and 11 (build 19041 v2004 and above). For Mac users, the software requires macOS 10.14 Mojave and above for CPU support and macOS 10.15 Catalina and above for GPU support.
- Processor: The software requires an Intel HD 5000 iGPU or any AMD CPU from 2016 or above.
- System memory: At least 8GB of system memory is needed, although 16GB is recommended for optimal performance.
- Graphics card: An Intel HD 5000 (on CPU DirectX 12, compatible with all Windows and Mac 10.15 and above) is required.
- Dedicated graphics memory: A minimum of 2GB is needed, but 8GB is recommended for better performance.
Check out a thorough comparison between Topaz Photo AI and Gigapixel. Make an informed call on the best software.
Understanding the basics of Topaz Video Enhance AI is one thing, but knowing how to use it effectively is another. Here’s a step-by-step guide on how to use this advanced tool:
Step 1: Importing videos
Begin by clicking the center of the screen. This will pop up a dialogue box, allowing you to select the videos you wish to enhance. You can either select multiple videos or drag and drop them directly into the app. Additionally, the selected videos will be visible at the bottom of the screen.
Step 2: Choosing AI processing models
Once your videos are imported, it’s time to choose the appropriate AI models for enhancement. The software offers various AI Processing models that you can choose from based on your specific needs.
Step 3: Output settings
Next, adjust the output settings according to your preference. The software offers in-built standards for output, or you can create custom settings. You can also choose to extract and save your video as a picture or video sequence.
Step 4: Setting output name
By default, the output name will be displayed along with the height, width, and scale of the output video. You can customize this by unchecking the “Use default output name” box and entering your desired output name.
Step 5: Previewing the output
Before you proceed with the final output, you can generate a 30-frame rendered preview of your video. This allows you to check the enhancements before processing the entire video.
Check out our detailed review of Synthesia AI– an amazing video editing AI tool and learn about its features and alternatives today!

How to use Topaz Video Enhance AI
Step 6: Trimming the output
To save on processing time, you can trim only the parts of the video you need. Simply drag the slider along the video’s timeline to select the start and end timestamps. The highlighted portion of your timeline will be processed as the enhanced output.
Step 7: Final output processing
Finally, click on the “Start Processing” button to initiate the video processing. Your video will be displayed frame by frame until the processing is completed.
Delve into the top five ai video editing tools and make the best investments on your editing journey today!
What can Topaz Video Enhance AI do?
Topaz Video Enhance AI is an all-in-one tool that can perform a variety of tasks:
- Upscale footage: One of the software’s most potent features is its ability to upscale videos from SD or HD to 4K or even 8K. Upscaling through the application’s Proteus AI Model offers numerous parameters that users can adjust to enhance their videos.
- Denoise footage: Topaz Video Enhance AI is also effective at removing noise from high ISO footage. By increasing the “Reduce Noise” parameter, users can quickly eliminate unwanted noise in their videos
- Increase frame rates: The software can convert the frame rate of a video from 25fps to 3fps. Users can customize the frame rate settings within the app.
- Deinterlace videos: The software is proficient at deinterlacing videos, resulting in a smooth, natural finish with few or no artifacts in the final output.
- Restoration of old footage: Topaz Video Enhance AI can restore old or inferior-quality footage, improving its resolution and overall quality. However, the effectiveness of this feature can be different depending on the original footage quality.
Dive into a world of creative possibilities and bring your storytelling to life with AI-powered video editing tools.

Using the power of AI video tools
Wrapping up
Topaz Video Enhance AI is a potent tool for video editing and post-production. With its advanced AI capabilities, it can upscale, denoise, and restore footage, providing stunning results.
Whether you’re an experienced video editor or a novice, this software can help you transform your videos into high-resolution masterpieces. Take the time to explore and experiment with its features and its impressive results.
По мере того, как технологические достижения продолжают двигаться вперед с головокружительной скоростью, инструменты, доступные для улучшения видео, сделали скачок вперед. Среди этих инструментов Topaz Video Enhance AI выделяется своей способностью повышать масштаб, шумоподавлять и восстанавливать отснятый материал с использованием передовых алгоритмов искусственного интеллекта (ИИ).
В этом подробном руководстве мы углубимся в тонкости Topaz Video Enhance AI, предоставив пошаговое руководство о том, как максимально эффективно использовать это передовое программное обеспечение.
Topaz Video Enhance AI — это автономное программное обеспечение, которое использует машинное обучение (ML) для интеллектуального масштабирования, очистки и омоложения отснятого материала. Это универсальный инструмент, который может превратить видео с низким разрешением в шедевры с высоким разрешением, что делает его бесценным помощником для видеоредакторов и кинематографистов.
Системные Требования
Для бесперебойной работы Topaz Video Enhance AI вам необходимо выполнить определенные системные и аппаратные требования:
- Операционная система: для пользователей Windows программное обеспечение поддерживает Windows 10 и 11 (сборка 19041 v2004 и выше). Для пользователей Mac программное обеспечение требует macOS 10.14 Mojave и выше для поддержки ЦП и macOS 10.15 Catalina и выше для поддержки ГП.
- Процессор: для программного обеспечения требуется iGPU Intel HD 5000 или любой процессор AMD 2016 года выпуска или более поздней версии.
- Системная память: требуется не менее 8 ГБ системной памяти, хотя для оптимальной производительности рекомендуется 16 ГБ.
- Видеокарта: требуется Intel HD 5000 (на процессоре DirectX 12, совместимая со всеми Windows и Mac 10.15 и выше).
- Выделенная графическая память: требуется минимум 2 ГБ, но для повышения производительности рекомендуется 8 ГБ.
Ознакомьтесь с тщательным сравнением Topaz Photo AI и Gigapixel. Сделайте информированный звонок о лучшем программном обеспечении.
Как использовать Topaz Video Enhance AI: руководство
Понимание основ Topaz Video Enhance AI — это одно, а умение эффективно его использовать — совсем другое. Вот пошаговое руководство по использованию этого расширенного инструмента:
Шаг 1. Импорт видео
Начните с нажатия в центре экрана. Появится диалоговое окно, позволяющее вам выбрать видео, которые вы хотите улучшить. Вы можете выбрать несколько видео или перетащить их прямо в приложение. Кроме того, выбранные видео будут видны внизу экрана.
Шаг 2. Выбор моделей обработки ИИ
После импорта видео пришло время выбрать подходящие модели ИИ для улучшения. Программное обеспечение предлагает различные модели обработки ИИ, которые вы можете выбрать в зависимости от ваших конкретных потребностей.
Шаг 3: Настройки вывода
Затем настройте параметры вывода в соответствии с вашими предпочтениями. Программное обеспечение предлагает встроенные стандарты для вывода, или вы можете создавать собственные настройки. Вы также можете извлечь и сохранить видео в виде изображения или видеоряда.
Шаг 4: Установка имени выхода
По умолчанию выходное имя будет отображаться вместе с высотой, шириной и масштабом выходного видео. Вы можете настроить это, сняв флажок «Использовать имя вывода по умолчанию» и введя желаемое имя вывода.
Шаг 5: Предварительный просмотр вывода
Прежде чем приступить к окончательному выводу, вы можете создать 30-кадровый предварительный просмотр вашего видео. Это позволяет проверить улучшения перед обработкой всего видео.
Ознакомьтесь с нашим подробным обзором Synthesia AI — удивительного инструмента искусственного интеллекта для редактирования видео и узнайте о его функциях и альтернативах уже сегодня!
Как использовать Topaz Video Enhance AI
Шаг 6: Обрезка вывода
Чтобы сэкономить время на обработку, вы можете обрезать только те части видео, которые вам нужны. Просто перетащите ползунок вдоль временной шкалы видео, чтобы выбрать временные метки начала и окончания. Выделенная часть вашей временной шкалы будет обработана как расширенный вывод.
Шаг 7: Окончательная обработка вывода
Наконец, нажмите кнопку «Начать обработку», чтобы начать обработку видео. Ваше видео будет отображаться кадр за кадром, пока обработка не будет завершена.
Погрузитесь в пятерку лучших инструментов для редактирования видео с искусственным интеллектом и сделайте лучшие инвестиции в свое путешествие по редактированию уже сегодня!
Что может сделать Topaz Video Enhance AI?
Topaz Video Enhance AI — это универсальный инструмент, который может выполнять множество задач:
- Кадры высокого качества: одной из самых мощных функций программного обеспечения является его способность масштабировать видео с SD или HD до 4K или даже 8K. Масштабирование с помощью модели искусственного интеллекта Proteus приложения предлагает множество параметров, которые пользователи могут настроить для улучшения своих видео.
- Удаление шума из видеоматериала: Topaz Video Enhance AI также эффективно удаляет шум из кадра с высоким значением ISO. Увеличивая параметр «Уменьшить шум», пользователи могут быстро устранить нежелательный шум в своих видео.
- Увеличьте частоту кадров: программное обеспечение может преобразовать частоту кадров видео с 25 кадров в секунду до 3 кадров в секунду. Пользователи могут настроить параметры частоты кадров в приложении.
- Деинтерлейсинг видео: программное обеспечение отлично справляется с деинтерлейсингом видео, в результате чего получается плавное, естественное изображение с небольшим количеством артефактов или без них на конечном выходе.
- Восстановление старых кадров: Topaz Video Enhance AI может восстанавливать старые кадры или кадры низкого качества, улучшая их разрешение и общее качество. Однако эффективность этой функции может различаться в зависимости от качества исходного видеоряда.
Погрузитесь в мир творческих возможностей и воплотите свои истории в жизнь с помощью инструментов для редактирования видео на базе искусственного интеллекта.
Использование возможностей видеоинструментов ИИ
Подведение итогов
Topaz Video Enhance AI — мощный инструмент для редактирования и постобработки видео. Благодаря своим расширенным возможностям искусственного интеллекта он может повышать масштаб, шумоподавлять и восстанавливать отснятый материал, обеспечивая потрясающие результаты.
Являетесь ли вы опытным видеоредактором или новичком, это программное обеспечение поможет вам превратить ваши видео в шедевры высокого разрешения. Потратьте время, чтобы изучить и поэкспериментировать с его функциями и впечатляющими результатами.
Цитата
Подскажите пожалуйста лучший алгоритм для обработки старых 240-480р видео.
Если видео с чересстрочной развёрткой, записанное с аналоговых видеовходов (телевизоров, видеокамер, dvd и т.д.) в разрешениях 480i, 576i и менее.
Тогда наверно подойдёт модель Dione Interlaced TV v3
Если видео с чересстрочной развёрткой и записанное в цифре, в хорошем качестве 480i, 576i, 720i, 1028i, тогда лучше использовать модель Dione Interlaced Robust v3.
Примеры видео, с исходным разрешение 544×576, 720×576 увеличенных на 200% через эту модель: #1, #2, #3, #4, #5, #6, #7 (учтите, что Youtube ухудшает качество, исходик был немного лучше)
Устраняется не только чересстрочная развёртка, а так же зернистость и артефакты. Для придания естественности, надо экспериментировать с параметрами Amount и Size, в закладке Grain Setting. В моём случае использовались дефолтные параметры настройки Amount 1.8 и Size 1.0.
Для современных цифровых видео (без чересстрочной развёртки), неплохие результаты даёт модель Gaia High Quality
Примеры увеличения DVB-S mpeg2 видео в разрешениях 544×576 — 720×576, с помощью этой модели, в старой версии Topaz Video Enchance AI: #1, #2, #3, #4
Кое где можно заметить эффект гребёнки, так как чересстрочная развёртка не устраняется в этой модели, а исходники с чересстрочной развёрткой. Но старые видео, записанные с цифры — подойдут для этой модели, если видео не имеет динамических сцен и в основном всё снято крупным планом.
Многие хвалят модель Artemis, но с обработкой MPEG2 DVB-S видеофайлов, записанных с спутника, у меня получались только плачевные результаты.
Интересно услышать, какие вы используете настройки.