
Sicherheitshinweise
!
Verbrühungsgefahr!
DieDüsefürHeißwasser/Dampf8wird
Die Gebrauchsanleitung bitte sorgfältig
sehrheiß.DieDüse8nuramKunststoffgriff
durchlesen, danach handeln und auf
anfassenundnichtaufKörperteilehalten.
bewahren!
DieDüse8kannbeiBezugvonDampfoder
Dieser Espressovollautomat ist für die
HeißwasseramAnfangspritzen.
Verarbeitung haushaltsüblicher Mengen
im Haushalt oder in haushaltsähnlichen,
nichtgewerblichen Anwendungen
Auf einen Blick
bestimmt. Haushaltsähnliche
Anwendungen umfassen z.B. die
Bilder AE
Verwendung in Mitarbeiterküchen von
1 NetzschalterI/0(Ein/Aus)
Läden, Büros, landwirtschaftlichen
Tasteeco
und anderen gewerblichen Betrieben,
3 Bezugstaste5(Kaffeemild)
sowie die Nutzung durch Gäste von
4 BezugstasteK(Kaffeestark)
Pensionen, kleinen Hotels und ähnlichen
5 Tasteh(Dampfaufheizen)
Wohneinrichtungen.
6 Drehknopfg/h
(Heißwasser/Dampfbezug)
!
Stromschlaggefahr!
7 AnzeigeLED
GerätnurgemäßAngabenaufdem
aWasserfüllenH
Typenschildanschließenundbetreiben.
b SchalenleerenI
Nurbenutzen,wennZuleitungundGerät
cServiceprogrammdurchführenS
keineBeschädigungenaufweisen.
dDrehknopfbetätigenJ
GerätnurinInnenräumenbei
8 Düse(fürHeißwasser/Dampf)
Raumtemperaturverwenden.
aKunststoffgriff
Personen(auchKinder)mitverminderten
bHülse
körperlichenSinneswahrnehmungs-oder
cDüsenspitze
geistigenFähigkeitenodermitmangelnder
9 HöhenverstellbarerKaffeeauslauf
ErfahrungundWissen,dasGerätnicht
10 DeckelWassertank
bedienenlassen,außersiewerden
11 AbnehmbarerWassertank
beaufsichtigtoderhatteneineEinweisung
1 BohnenbehältermitAromadeckel
bezüglichdesGebrauchsdesGerätes
13 SchachtReinigungstabletten
durcheinePerson,diefürihreSicherheit
14 Tassenablage(Vorwärmfunktion)
verantwortlichist.
15 SchiebeschalterKaffeemahlgrad
Kinderbeaufsichtigen,umzuverhindern,
16 Abstellgitter
dasssiemitdemGerätspielen.
17 SchalefürKaffeesatz
ImFehlerfallsofortdenNetzsteckerziehen.
18 SchalefürRestwasser
ReparaturenamGerät,wiez.B.eine
19 Schwimmer
beschädigteZuleitungauswechseln,dürfen
0 Kabelfach
nurdurchunserenKundendienstausgeführt
1 TürzurBrüheinheit
werden,umGefährdungenzuvermeiden.
Brüheinheit
GerätoderNetzkabelniemalsinWasser
aDruckknopf(rot)
tauchen.
bGriff
NichtindasMahlwerkgreifen.
TCA 52..
de 2 en 11 fr 20 nl 30 es 40 pt 50 ru 60 it 71 pl 81
A 15 3 2 4 5 1 I 0 20 7a 7b 7c 7d 11 10 14 13 12 6 8 9 21 16-19
B max 11 10 0,5 l C 17 16 18 19 D 8 8a 8b 8c
E 22 22b 22a 22 22b 22a
de 2 Sicherheitshinweise Die Gebrauchsanleitung bitte sorgfältig durchlesen, danach handeln und aufbewahren! Dieser Espressovollautomat ist für die Verarbeitung haushaltsüblicher Mengen im Haushalt oder in haushaltsähnlichen, nicht-gewerblichen Anwendungen bestimmt. Haushaltsähnliche Anwendungen
de Vor dem ersten Gebrauch Allgemeines Nur reines Wasser ohne Kohlensäure und vorzugsweise Espresso- oder Vollautomaten-Bohnenmischungen in die entsprechenden Behälter füllen. Keine glasierten, karamellisierten oder mit sonstigen zuckerhaltigen Zusätzen behandelte Kaffeebohnen verwenden, sie
de 4 Info: Das Gerät ist so programmiert, dass es nach ca. 10 Minuten automatisch in den „eco“-Modus schaltet. Einstellungen und optische Anzeige 3 Bezugstaste 5 Kaffee mild Mit dieser Taste kann milder Kaffee bezogen werden. Die Taste drücken, der Kaffee wird gemahlen, vorgebrüht und läuft in die
de Den Drehknopf 6 auf g/h stellen. Kommt kein Wasser mehr aus der Düse 8, den Drehknopf auf „O“ zurückstellen. Wassertank füllen und das Wasser leitungssystem füllen (siehe „Gerät in Betrieb nehmen/System füllen“). Mahlgrad einstellen Mit dem Schiebeschalter 15 für KaffeeMahlgrad kann die
de 6 Flüssigkeitsmenge dauerhaft ändern Die voreingestellte Menge (ca. 125 ml) für den Bezug einer Tasse milden oder starken Kaffee kann verändert werden. Wichtig: Das Gerät muss im Betriebs Modus sein, diese Funktion ist nicht im „eco“ Modus möglich. Bezugstaste 5 bzw. K solange gedrückt halten,
de Hinweis: Die Düse 8 nach dem Abkühlen sofort reinigen. Getrocknete Rückstände sind schwer zu entfernen. Tipp: Bevorzugt kalte Milch mit einem Fettgehalt von 1,5% verwenden. Dampf zum Getränke erwärmen ! Verbrennungsgefahr Die Düse wird sehr heiß, nur am Kunststoffgriff anfassen. Das Gerät muss
8 Brüheinheit reinigen Die Brüheinheit kann zum Reinigen entnommen werden (Bild E). Taste eco drücken um die automatische Spülung zu starten. Netzschalter 1 auf 0 stellen. Tür 21 zur Brüheinheit 22 öffnen. Den roten Knopf 22a gedrückt halten und den Griff 22b nach oben drehen, bis er hörbar
de Die LED I leuchtet. Schale 17 ausleeren und wieder einsetzen. Die LED Taste h blinkt. Den Wassertank 11 ausleeren, reinigen, bis zur Markierung „max“ mit Wasser füllen und wieder einsetzen. Ein ausreichend großes Gefäß (ca. 0,5 Liter) unter die Düse 8 stellen. Taste h drücken, das Gerät
de 10 Für die Inanspruchnahme von Garantieleistungen ist in jedem Fall die Vorlage des Kaufbeleges erforderlich. Änderungen vorbehalten. Kleine Störungen selbst beheben Störung Ursache Abhilfe Kein Heißwasser- oder Dampfbezug möglich. Düse 8 ist verstopft. Düse 8 reinigen. Zu wenig Schaum oder zu
en 11 Safety instructions Overview Please read these instructions carefully and keep for future reference! This fully automatic espresso machine is designed for preparation of small amounts of coffee for domestic use or for use in non-commercial, householdlike environments, such as staff kitchens
en 12 This appliance can be adjusted for use with different water hardness values (see “Setting the water hardness”). Switching on the appliance Place the appliance on a lat, water resistant surface. Pull enough of the power cord out of the storage compartment and plug it into the electrical
en 4 Coffee dispensing button K (strong coffee) This button is used to dispense strong coffee. When the button is pressed, the coffee is ground, brewed and dispensed into the cup. 5 Steam generation button h The steam button h generates steam for foaming or warming. 6 Steam dispensing dial Hot
en 14 Adjusting the grinding unit Sliding switch 15 adjusts the degree of grinding, from coarse to ine. Warning Adjust the grinding unit only while it is running! Otherwise the appliance may be damaged. Press the strong coffee button K. While the grinding unit is running, move the sliding switch 15
en Reset: Switch the appliance to “eco” mode and remove trays 17 and 18. Press and hold the dispensing buttons 5 and K simultaneously for at least 5 seconds. The LEDs 7a, b, c and d (H, I, S, J) light up briely. Replace the trays 17 and 18 and press the button eco to switch the appliance on again.
16 Steam for heating drinks ! Risk of burns The nozzle gets very hot. Do not touch the metal parts. The appliance must be ready for use. Push the sleeve on the nozzle 8 all the way up. Press the steam button h. The LED will start to lash. i The appliance will now heat up for approx. 20 seconds.
en Service programme: Combined cleaning and descaling process If the “S” LED lights up while the appliance is on, the service programme must be run immediately to clean and descale the appliance. If the service programme is not run as instructed, the appliance may be damaged. Specially developed
en 18 Important: If the service programme is interrupted, e.g. due to a power cut, it is vital that the appliance be rinsed before it is used again. Press the button eco. The eco and steam h LEDs lash. Rinse the water tank 11 thoroughly and ill with fresh water. Press the steam button h. The
en 19 Troubleshooting Problem Possible cause Solution No hot water or steam discharge. Nozzle 8 is blocked. Clean nozzle 8. Foam insuficient or too runny. Sleeve b on nozzle 8 not in correct position. Push down sleeve b on nozzle 8. Milk not suitable for foaming. Use cold low-fat (1,5% fat) milk.
fr 20 Consignes de sécurité Lire attentivement le mode d’emploi, se conformer à ses indications et le conserver à portée de la main ! Cette machine Espresso tout automatique est conçue pour la préparation de quantités usuelles, dans le cadre d’un foyer ou d’un usage non-commercial de type
fr Avant la première utilisation Généralités Utiliser uniquement de l’eau pure, sans gaz carbonique et de préférence un mélange de café en grains pour espresso ou pour percolateur. Remplir le réservoir d’eau et le bac à grains. Ne pas employer de grains de café avec glaçage, caramélisés ou enrobés
fr 22 La machine n’effectue pas de rinçage dans les cas suivants : – il n’a pas été préparé de café avant le passage au mode « eco » – il a été tiré de la vapeur juste avant l’arrêt de la machine. Remarque : La machine est programmée de manière à passer automatiquement en mode « eco » au bout de 10
fr Remarque : si l’utilisateur n’appuie sur aucune touche dans un délai de 90 s, la machine se place en mode de préparation du café sans enregistrer. La dureté de l’eau enregistrée antérieurement est conservée. Lors de la première utilisation ou après un changement du iltre, il faut rincer la
fr 24 Faire passer une nouvelle quantité de liquide Il est possible de faire passer de nouveau une même quantité de café. Pour cela, appuyer encore une fois sur la touche de dosage 5 ou K dans un délai de 3 s après la in de la préparation. Remarque : la percolation a lieu à travers le marc de café
fr i La machine est déjà chaude au bout de 20 s environ. Plonger profondément la buse 8 dans le lait, sans toucher le fond de la tasse. Lorsque la LED J clignote, placer le sélecteur 6 sur g/h. ! Risque de projection de liquide brûlant Après réglage sur g/h il peut y avoir quelques projections de
26 Remarque : Si la machine est mise en marche à froid ou est placée en mode « eco » après préparation de café, elle effectue un rinçage automatique. Elle se nettoie donc de manière autonome. Buse 8 Eau chaude/Vapeur Dévisser la buse 8 du tube de vapeur. Démonter toutes les pièces (Figure D).
fr La LED S commence à clignoter et l’appareil rince 2x par l’écoulement du café. Vider le bac 17 puis le replacer. La LED de la touche h clignote et la H mention « Remplir d’eau » s’allume. Placer une pastille de nettoyage dans la trémie 13. Remplir le réservoir d’eau tiède, ajouter du produit
fr 28 Protection contre le gel Ain d’éviter les dommages provoqués par le gel lors du transport et du stockage, il faut préalablement vider entièrement la machine. La machine doit être en état de marche. Retirer le réservoir d’eau, le vider et le remettre en place. Placer un récipient étroit, de
fr 29 Eliminer soi-même les petites défaillances Défaillance Cause Remède Production d’eau chaude ou Buse 8 obturée. de vapeur impossible. Nettoyer la buse 8. Mousse insufisante ou trop liquide. Positionnement incorrect de la douille b sur la buse 8. Descendre la douille b sur la buse 8. Qualité du
nl 30 Veiligheidsvoorschriften De gebruiksaanwijzing a.u.b. zorgvuldig lezen, ernaar handelen en bewaren! Deze espressoautomaat is bedoeld voor de verwerking van normale huishoudelijke hoeveelheden in huishoudens of vergelijkbare, niet-bedrijfsmatige toepassingen. Hiertoe behoort bijv. het gebruik
nl Voor het eerste gebruik Algemeen Alleen schoon en koolzuurvrij water en bij voorkeur espresso- of bonenmelanges voor volautomatische apparaten in de overeenkomstige reservoirs doen. Geen geglaceerde, gekaramelliseerde of andere met suikerhoudende additieven behandelde kofiebonen gebruiken: deze
nl 32 De temperatuur van de kopjeshouder (voorverwarmfunctie) daalt. Als het apparaat in de “eco”-modus wordt gezet, wordt tevens een automatisch spoelproces gestart. Het apparaat spoelt niet, als: – er voor het overschakelen naar de “eco”modus geen kofie werd gezet; – er kort voor het uitschakelen
nl Opmerking: Als binnen 90 s geen knop wordt ingedrukt, schakelt het apparaat zonder de instelling te bewaren in de gebruiksklare modus. De eerder opgeslagen waterhardheid blijft behouden. Bij het eerste gebruik of na vervanging van het ilter moet het apparaat worden gespoeld. Het waterreservoir
nl 34 De hoeveelheid water permanent wijzigen De vooraf ingestelde hoeveelheid water (ca. 125 ml) om een kopje milde of sterke kofie te zetten, kan worden gewijzigd. Belangrijk: Het apparaat moet zich in de bedrijfsmodus bevinden. In de “eco”-modus is deze functie niet mogelijk. De knop 5 of K zo
nl Het proces beëindigen door de draaiknop 6 terug op “O” te zetten. i Om opnieuw melk op te schuimen, op de knop h drukken en het proces volledig herhalen. Opmerking: Het pijpje 8 na afkoeling onmiddellijk reinigen. Opgedroogde resten zijn namelijk moeilijk te verwijderen. Tip: Bij voorkeur koude
36 De netschakelaar 1 op 0 zetten. De deur 21 van de bereidingseenheid 22 openen. De rode knop 22a ingedrukt houden en het handvat 22b naar boven draaien, tot het hoorbaar vastklikt. De bereidingseenheid 22 bij het handvat voorzichtig wegnemen en onder stromend water zonder spoelmiddel reinigen.
nl De LED J knippert. Een voldoende groot en hoog opvangreservoir (ca. 0,5 l) onder het pijpje 8 plaatsen. De draaiknop 6 op g/h zetten en het apparaat vervolgt het ontkalkingsproces. Duur: ca. 5 minuten. De ontkalkingsvloeistof loopt in het opvangreservoir. De LED I licht op. De schaal 17
38 Garantie Voor dit apparaat gelden de garantievoorwaarden die worden uitgegeven door de vertegenwoordiging van ons bedrijf in het land van aankoop. De leverancier, bij wie u het apparaat heeft gekocht, geeft u hierover graag meer informatie. Om aanspraak te maken op de garantie heeft u altijd uw
nl 39 Kleine storingen zelf oplossen Storing Oorzaak Oplossing Er kan geen heet water of stoom worden gemaakt. Het pijpje 8 is verstopt. Het pijpje 8 reinigen. Te weinig schuim of vloeibaar schuim. De huls b op het pijpje 8 niet in de juiste positie. De huls b op het pijpje 8 naar onderen schuiven.
es 40 Advertencias de seguridad Lea cuidadosamente las instrucciones de uso antes de poner el aparato en funcionamiento y consérvelas después en un lugar seguro. Esta cafetera automática de café espresso ha sido diseñada para la preparación de pequeñas cantidades de café para uso doméstico o en
es Preparación del aparato antes de usarlo por primera vez Aspectos generales Llene los recipientes respectivos únicamente con agua pura sin gas y preferiblemente con mezclas de granos de café aptas para máquinas automáticas o para café espresso. Evite el uso de granos glaseados, caramelizados o
es 42 En el modo «eco» el consumo de energía de la máquina es menor. La tecla eco parpadea en verde en el modo «eco». La temperatura de la bandeja portatazas (función de precalentamiento) baja. Al mismo tiempo, al conmutar al modo «eco» se inicia un proceso de lavado automático. La máquina no
es Presione la tecla eco una sola vez. Los LED ajustados parpadean brevemente y se almacena el grado de dureza seleccionado. Al utilizar el iltro de agua (accesorio adicional nº de pedido 461732) se debe ajustar 1 como grado de dureza. Advertencia: Si no se acciona ninguna tecla durante 90
es 44 i Al pulsar una vez más la tecla 5 o K, se puede detener la máquina antes de tiempo. Cantidad de líquido adicional Se puede volver a extraer la misma cantidad de café. Para ello, una vez inalizado el escaldado y antes de que transcurran 3 seg., vuelva a pulsar la tecla 5 o K. Advertencia: Se
es i A continuación tiene lugar un ciclo de calentamiento de aproximadamente 20 segundos. Sumerja la boquilla 8 en la leche sin tocar el fondo de la taza. En cuanto el LED J parpadee, ponga el botón giratorio 6 en g/h. ! ¡Peligro de quemadura! Al ajustar el botón giratorio en g /h es posible que
46 Advertencia: si la máquina se conecta cuando está en reposo o si se pone en el modo «eco» después de hacer café, se inicia la función de lavado automático. Es decir, la máquina se limpia ella misma. Boquilla 8 para agua caliente/vapor Desenrosque la boquilla 8 del tubo de vapor. Desmonte todas
es El LED de la tecla h parpadea y se ilumina H «Añadir agua». Deposite una pastilla en el recipiente 13. Llene el recipiente para agua con agua tibia, añádale el producto para descalciicar y disuélvalo por completo (cantidad total de líquido 0,5 litros). o Llene el recipiente para agua con el
es 48 Una vez que no salga vapor de la boquilla 8, girar el botón hacia la posición «O». Apagar el aparato. Eliminación A Este aparato ha sido homologado de acuerdo con la ley europea 2002/96/EG para aparatos usados eléctricos y electrónicos (desechos de equipos eléctricos y electrónicos DEEE). La
es 49 Solución de problemas Problema Causa Solución No se puede extraer agua caliente ni vapor. La boquilla 8 está bloqueada. Limpie la boquilla 8. Muy poca espuma o espuma muy líquida. El manguito b de la boquilla 8 no está en la posición correcta. Desplace el manguito b de la boquilla 8 hacia
pt 50 Avisos de Segurança ! Perigo de queimadura Leia e siga as instruções com cuidado e guarde-as num local acessível! Esta máquina de café expresso totalmente automática destina-se ao processamento de volumes habituais ao uso doméstico ou aplicações similares não-comerciais. Aplicações
pt Antes da primeira utilização Geral Encha o reservatório de água unicamente com água fresca e sem gás e, se possível, utilize apenas grãos de café para máquinas de café expresso totalmente automáticas. Não utilize grãos de café que tenham sido caramelizados ou tratados com outros aditivos
pt 52 A passagem para o modo “eco“ activa simultaneamente um ciclo de lavagem automática. O aparelho não lava, se: – antes da passagem para o modo “eco“ não foi tirado nenhum café – pouco antes de desligar se tirou vapor. Nota: O aparelho está programado para passar automaticamente para o modo
pt Nota: Se nenhum botão for pressionado no espaço de 90 segundos, a máquina passa para o modo “eco“ sem memorizar as novas deinições. Neste caso, a dureza da água previamente deinida é mantida. A máquina deverá ser enxaguada quando um iltro é utilizado pela primeira vez e depois de o mudar. Encha
pt 54 Café extra Preparar água quente É possível tirar a mesma quantidade de café uma segunda vez. Pressione o botão para tirar café 5 ou K no espaço de 3 segundo após a infusão estar inalizada. A máquina deverá estar pronta a funcionar. Esta função permite aquecer água para fazer uma chávena de
pt Deverá submergir o bocal 8 bem dentro do leite, mas não permita que toque no fundo da chávena. Assim que a luz J pisque, rode o botão 6 para g/h. ! Perigo de escaldadura Quando o botão 6 é colocado em g/h, o bocal 8 poderá salpicar. O vapor que sai é muito quente e poderá levar os líquidos a
56 pt Nota: Quando se ligar o aparelho frio ou se comutar para o modo “eco“ após tirada de café, o aparelho executa automaticamente um ciclo de lavagem. Ou seja, o sistema realiza uma auto-limpeza. Programa de manutenção: processo combinado de limpeza e descalciicação Bocal 8 para água quente /
pt A S luz começa a piscar e a máquina enxagua 2x através da saída de café. Esvazie e volte a colocar o depósito para borras de café 17. A luz do botão de vapor h pisca e a luz H acende. Coloque uma pastilha de limpeza no canal 13. Encha o reservatório de água com água tépida, adicione o agente
pt 58 Anti congelação Para evitar danos provocados por temperaturas baixas durante o transporte e arrumação, o aparelho deverá ser antecipadamente esvaziado por completo. O aparelho deverá estar pronto a ser utilizado. Remover, esvaziar e recolocar o reservatório de água. Colocar um recipiente
pt 59 Resolução de problemas Problema Possível causa Solução Não há descarga de água quente ou vapor. Bocal 8 está bloqueado. Limpar bocal 8. Espuma insuiciente ou muito aguada. Manga b no bocal 8 não está na posição correcta. Empurrar para baixo a manga b no bocal 8. Leite não apropriado para
ru 60 ) . , , . . ! ! ! / . , , 8. , « — 1 2 3 4 5 6 — 7 », . ! . , A-E , ! , , ( ) , , , Robert Bosch Hausgeräte GmbH ) . 10 11 12 15 16 5 K I S ) J ( , 13 ( ) H a b c 14 , / ) / g/h ( 9 . . I/0 ( h( 8 , , «eco» a b c d . . — . 8, , 8 ) ( /
ru 61 17 18 19 20 21 22 . 8. ( a b ) 6 g/h; . J, , – – , . «eco» . . , 6 «O». eco «eco», , . , . «eco» ( . »). « . , . . «eco», . . 11, . «max». 11 i . , . . , . 1 6 «O». 1 I. 1 . TCA52 7/2009
ru 62 4 , . , . . «eco» . «eco» «eco» . ). «eco» . «eco» H , : «eco» 10 «eco». . , Robert Bosch Hausgeräte GmbH »). , : , S S : I « , . » J 5 . . : I . 3 h( , 7 – , g « «eco» : . , . h ( – h 6 . «eco» . h , . 2 , . 5 . «eco», K g/h J «O»
ru 63 : 90 , . . 4. . . . «0,5 ». 8 ( . 0,5 ). C . (°dH) 1 2 3 4 1-7 8-15 16-23 24-30 6 . (°fH) g/h. 1-13 14-27 28-42 43-54 8 , «O». «eco». h 5 ( . »). . « / 7a H, b I, c S, d J . , 15. h , ; , ! 3 7a,b c (H, I, S). «eco». — . K. , : ; ( . 1. . i 461732) 15 , . : — , . – TCA52 7/2009
ru 64 i 19 18 , 19 5 . K . 18. . 3 . , 5 . . K : . . , . . : . , – . : ( ( . 125 . : ; ), , «eco» . 5 K , 14 . ( . ( ) i ) : 30 – 220 . 9. K ). ( Robert Bosch Hausgeräte GmbH . 5 ( ). . 125 « ). 125 , » («reset»).
ru 65 (Reset): «eco» 17 5 5 K 7a,b,c 18. . . d (H, I, S, J). , . 17 18 «eco». ! , . 8 . . , , ! 1/3. . , h. i 20 8 . 8. , 8 . , . J ! g/h. 6 ! . . g/h . 6 g/h «eco» – 8 , . 8 . «O». 8 . : eco, . g/h. 6 6 . 6 i . , : «O». h . . 8 . TCA52 7/2009
ru 66 : 1,5% . ! ! . ! . . , . 8 h. i 20 8 , . . , . , . . . . . J , g/h. 6 . . 11 . 17 ! 18. 6 . — ( g/h , 6 i . 21 . . — 8 . ). 8 h : «O». , «eco», . . : . . 8 8 / . ( . 8/c Robert Bosch Hausgeräte GmbH . 8 D). .
ru 67 . ( 310451) 310575) ( ( . E). «eco», . 1 0. . 21 22. 22 , ! ! 22b . ! — 22 . . ! i ( 40 . : 22 . 22 , 22b . ) , . . «eco». . 17 : 5 , 5 18. . « S» 2 . «S», . . «S». 17 . TCA52 7/2009
ru 68 « J. , h H ». «O», 6 13 . . , 17, 0,5 ( ). 0,5 : 10 ). h, . , , «eco» . . «eco». . 11 h . . h, I. 17 . . 6 g/h. . J. ( , 8 11, , «max» 8 h, Robert Bosch Hausgeräte GmbH 0,5 ). . . J h . . , 6 : ( g/h, 5 18. «eco» . . J ). I. , , . 8 . 17 ( 18. 0,5 . 10 : «O». . 6
ru 69 . . , « . », . 8 . h. J, , . 6 g/h . . 8 , «O». . A 2002/96/ (waste electrical and electronic equipmentWEEE). . . , TCA52 7/2009
ru 70 8. 8. . , b . b 8. 8 . . 1,5 % . . . . . . , — ( « ( » .« »). . ). . . . . . . ( ). . , . , ( « ». ). eco . S , 22 22. . « ». Robert Bosch Hausgeräte GmbH ,
it Istruzioni di sicurezza Leggere con attenzione e per intero. Conservare le istruzioni per l’uso! Questa macchina per espresso automatica è destinata alla produzione di quantità per l’uso domestico o ad usi simili a quello domestico, quali cucine per piccoli studi, negozi, ufici, aziende agricole
it 72 Al primo utilizzo Informazioni generali Versare nei corrispondenti contenitori solo acqua pulita non addizionata con anidride carbonica e preferibilmente miscele di caffè per macchine automatiche per espresso e caffè. Non usare chicchi di caffè glassati, caramellati o trattati con altri
it Allo stesso tempo, attivando la modalità “eco” si avvia una procedura automatica di lavaggio. L’apparecchio non esegue il lavaggio se: – prima dell’attivazione della modalità “eco” non è avvenuto alcun prelievo di caffè – è stato prelevato del vapore poco prima dello spegnimento. Nota:
74 Premere una volta il tasto eco. I LED impostati si accendono brevemente, la durezza dell’acqua impostata è memorizzata. Se si utilizza il iltro per l’acqua (accessorio speciale con n. ordine 461732) la durezza dell’acqua deve essere impostata su 1. Nota: se non viene attivato alcun tasto entro
it i Premendo nuovamente il tasto di prelievo 5 o K è possibile terminare in anticipo il processo di riscaldamento. Quantità supplementare di caffè Esiste la possibilità di prelevare nuovamente la stessa quantità di caffè. Premere un’altra volta il tasto di prelievo 5 o K entro 3 secondo dopo il
it 76 Premere il tasto h. Il LED del tasto inizia a lampeggiare. i L’apparecchio si riscalda per circa 20 secondi. Immergere il tubo del getto 8 profondamente nel latte, ma senza toccare il fondo della tazza. Quando il LED J lampeggia, posizionare il pulsante 6 su g/h. ! Pericolo di ustioni Dopo
it Tubo del getto 8 per acqua calda/vapore Svitare il tubo del getto 8 dal tubo di vapore. Smontare tutti i pezzi (igura D). Pulire con acqua mista detersivo e con una spazzola morbida. Pulire la parte anteriore della punta dell’ugello 8/c con un ago. Pulire ed asciugare tutti i pezzi. Pulire
it 78 Il LED S inizia a lampeggiare e l’apparecchio eseguire per 2 volte il risciacquo attraverso l’uscita del caffè. Svuotare la vasca 17 e reinserila. Il LED del tasto h lampeggia e si accende H “Riempire acqua”. Inserire una compressa per la pulizia nel vano 13. Riempire il serbatoio
it 79 Misura di protezione dal gelo Per evitare danni provocati dall’azione del freddo durante il trasporto o il deposito, è necessario svuotare completamente l’apparecchio. L’apparecchio deve essere pronto per l’uso. Togliere il serbatoio dell’acqua, svuotarlo e reinserirlo. Posizionare un
it 80 Soluzione di piccoli guasti Guasto Causa Rimedio Impossibile prelevare acqua calda o vapore. Il tubo di getto 8 è otturato. Pulire il tubo di getto 8. Schiuma troppo scarsa o schiuma troppo liquida. Il tubo b sul tubo di getto 8 non è inserito in posizione corretta. Spingere verso il basso il
pl Wskazówki dotycz ce bezpiecze stwa Nale y dokładnie przeczytać instrukcj obsługi, przestrzegać zawartych w niej zalece i zachować j w celu przyszłego u ytkowania! Ta w pełni automatyczna maszyna do robienia espresso została zaprojektowana do przygotowywania małych ilo ci kawy na u ytek domowy
pl 82 Przed pierwszym u yciem Informacje ogólne Do napełniania odpowiednich pojemników nale y u ywać wył cznie czystej wody bez kwasu w glowego oraz (najlepiej) mieszanek kawy do automatów espresso lub tradycyjnych. Nie u ywać kawy ziarnistej, która była lukrowana, karamelizowana lub poddana
pl 83 Natychmiast po przeł czeniu na tryb „eco” zostaje uruchomione automatyczne płukanie. Urz dzenie nie przeprowadza płukania, gdy: – przed przeł czeniem na tryb „eco” nie pobrano kawy, – krótko przed wył czeniem pobrano par . S Wskazówka: Urz dzenie zostało zaprogramowane w taki sposób, e przeł
pl 84 Wskazówka: Je eli w przeci gu 90 sekund nie został naci ni ty aden przycisk, urz dzenie zostaje przeł czone na tryb przygotowywania kawy bez zapisu nowego ustawienia. Zapisany uprzednio stopie twardo ci wody pozostaje niezmieniony. Przy pierwszym u yciu iltru lub po jego zamianie nale y
pl iPowtórne naci ni cie przycisku 5 lub K powoduje przerwanie procesu nalewania kawy. Dodatkowa ilo ć kawy Mo liwe jest powtórne nalewanie tej samej ilo ci kawy. W tym celu nale y powtórnie nacisn ć przycisk 5 lub K w przeci gu 3 sek. po zako czeniu procesu zaparzania. Wskazówka: Do parzenia słu y
pl 86 Zanurz dysz 8 gł boko w mleku, nie dotykaj c dna ili anki. Je eli wska nik LED J miga, nale y ustawić pokr tło 6 w pozycji g/h. ! Niebezpiecze stwo poparzenia! Po ustawieniu pokr tła w pozycji g /h mo liwe jest wytryskiwanie małych kropli. Wydostaj ca si z dyszy para jest bardzo gor ca i mo
pl 87 Wskazówka: Po wł czeniu w zimnym stanie lub po pobraniu kawy urz dzenie zostanie przeł czone na tryb „eco”, wówczas nast pi automatyczne płukanie urz dzenia. W ten sposób system czy ci si samoistnie. Program serwisowy: kombinowany proces odkamieniania i czyszczenia Dysza 8 do gor cej
88 Przytrzymaj przycisk 5 przez co najmniej 5 sek. Wska nik LED S zaczyna migać, a urz dzenie wykonuje 2-krotne płukanie poprzez dystrybutor kawy. Opró nij pojemnik 17 i ustaw go znowu w urz dzeniu. Wska nik LED przycisku h miga i wieci wska nik H „Napełnianie wod ”. Włó do dozownika 13 jedn
pl 89 Ochrona przed mrozem Aby unikn ć uszkodze wskutek zamro enia podczas transportu i przechowywania urz dzenia, nale y poprzednio całkowicie opró nić urz dzenie. Urz dzenie musi być gotowe do pracy. Zdejmij pojemnik na wod , opró nij go i ustaw w urz dzeniu. Ustaw pod dysz 8 du y w ski zbiornik.
pl 90 Samodzielne usuwanie nieznacznych usterek Usterka Przyczyna Sposób usuni cia Nie udaje si przygotowanie gor cej wody lub pary. Dysza 8 jest zapchana. Oczy ć dysz 8. Zbyt mała ilo ć piany lub zbyt płynna piana. Niepoprawne poło enie tulei b na dyszy 8. Przesu tulej b na dyszy 8 w dół.
91
92
Kundendienst-Zentren • Central-Service-Depots • Service Après-Vente • Servizio Assistenza • Centrale Servicestation • Asistencia técnica • Servicevaerkter • Apparatservice • Huolto DE Deutschland, Germany BSH Hausgeräte Service GmbH Zentralwerkstatt Kleine Hausgeräte Trautskirchener Straße 6 – 8
FR France BSH Electroménager S.A.S. SAV Constructeur 50 Rue Ardoin – BP 47 93401 Saint-Ouen cedex Service Dépannage à Domicile: 0 825 398 010 (0,15 € TTC/mn) Service Consommateurs: 0 892 698 010 (0,34 € TTC/mn) Service Pièces Détachées et Accessoires: 0 892 698 009 (0,34 € TTC/mn)
ME Crna Gora, Montenegro Elektronika komerc Ulica Slobode 17 84000 Bijelo polje Tel./Fax: 084 432 575 mailto:elektronikabsh@cg.yu MK Macedonia, Make o Vudelgo Pero Nakov b.b. 1000 Skopje Tel.: 02 2580 064 Tel.: 02 2551 099 mailto:goran@vudelgo.com.mk MT Malta Oxford House Ltd. Notabile Road Mriehel
Garantiebedingungen Gültig in der Bundesrepublik Deutschland Die nachstehenden Bedingungen, die Voraussetzungen und Umfang unserer Garantieleistung umschreiben, lassen die Gewährleistungsverpflichtungen des Verkäufers aus dem Kaufvertrag mit dem Endabnehmer unberührt. Für Produktinformationen sowie
Читайте наши статьи

Эксплуатация кофемашины в зимний период
Что происходит с кофемашиной при длительном нахождении в помещении с низкой температурой? Перевозили кофемашину в багажнике — что теперь от неё ожидать?

Скидка на ремонт кофемашины
Получите 20% скидку на ремонт или обслуживание вашей кофемашины, а также при заказе кофе «Coffee-Everyday» у нас.

Уход за кофемашиной: рекомендации и советы
Как увеличить срок экслуатации вашей кофемашины или кофеварки? Как влияет качество воды на долговечность системы? Как правильно определить момент обсуживания?
![]()
REPAIIR IINSTRUCTIION
Fully-automatic coffeemaker
|
1 |
SAFETY ……………………………………………….. |
2 |
|
1.1 |
Safety instructions…………………………………………………….. |
2 |
|
1.2 |
Repair instructions ……………………………………………………. |
2 |
|
2 |
INSTALLATION…………………………………….. |
3 |
|
2.1 |
Installation ………………………………………………………………… |
3 |
|
2.2 |
Scope of delivery ………………………………………………………. |
3 |
|
3 |
OPERATION…………………………………………. |
4 |
|
3.1 |
Starting the appliance………………………………………………… |
4 |
|
3.2 |
Controls ……………………………………………………………………. |
5 |
|
3.3 |
Displays and operating logic ……………………………………. |
12 |
|
3.4 |
Adjusting water hardness ………………………………………… |
20 |
|
3.5 |
Reducing temperature……………………………………………… |
21 |
|
3.6 |
Reset ………………………………………………………………………. |
21 |
|
3.7 |
Manually cooling the heater……………………………………… |
22 |
|
3.8 |
Service programme …………………………………………………. |
23 |
|
3.9 |
Maintenance and daily cleaning ……………………………….. |
28 |
|
4 |
COMPONENTS……………………………………. |
30 |
|
4.1 |
Flowmeter ……………………………………………………………….. |
30 |
|
4.2 |
Heater and NTC-sensor ……………………………………………. |
31 |
|
4.3 |
Brewing unit ……………………………………………………………. |
33 |
|
4.4 |
Gear unit …………………………………………………………………. |
38 |
|
4.5 |
Steam valve and proximity switch…………………………….. |
42 |
|
4.6 |
Hot water / steam nozzle ………………………………………….. |
43 |
|
4.7 |
Water filter ………………………………………………………………. |
44 |
|
5 |
FUNCTIONS ……………………………………….. |
45 |
|
5.1 |
Construction……………………………………………………………. |
45 |
|
5.2 |
Fluid system ……………………………………………………………. |
47 |
|
5.3 |
Temperature……………………………………………………………. |
48 |
|
6 |
REPAIR ………………………………………………. |
49 |
|
6.1 |
Replacing the brewing unit………………………………………. |
49 |
|
6.2 |
General disassembly……………………………………………….. |
52 |
|
6.3 |
Replacing the pump ………………………………………………… |
55 |
|
6.4 |
Replacing the thermal fuse………………………………………. |
56 |
|
6.5 |
Replacing the heating element and NTC sensor………… |
59 |
|
6.6 |
Replacing the electronics board ………………………………. |
60 |
|
6.7 |
Replacing the power cord………………………………………… |
61 |
|
6.8 |
Replacing the coffee outlet………………………………………. |
62 |
|
6.9 |
Replacing the front panel…………………………………………. |
63 |
|
6.10 |
Replacing steam valve and operating panel ……………… |
64 |
|
6.11 |
Appliance test …………………………………………………………. |
65 |
|
7 |
FAULT DIAGNOSTICS…………………………. |
67 |
|
7.1 |
Incoming goods inspection ……………………………………… |
67 |
|
7.2 |
Incoming goods inspection ……………………………………… |
68 |
|
7.3 |
System and error messages…………………………………….. |
69 |
|
7.4 |
Measuring the coffee temperature ……………………………. |
73 |
|
8 |
TECHNICAL SPECIFICATIONS…………….. |
74 |
|
8.1 |
Rating plate …………………………………………………………….. |
74 |
|
8.2 |
Power……………………………………………………………………… |
75 |
|
8.3 |
Temperatures………………………………………………………….. |
75 |
|
8.4 |
Consumption values (230 V/50 Hz models)……………….. |
76 |
|
8.5 |
Dimensions and weight……………………………………………. |
77 |
|
8.6 |
Filling amounts ……………………………………………………….. |
77 |
|
8.7 |
Components……………………………………………………………. |
78 |
|
58300000123125_ARA_en_d.doc – 09.10.09 |
Seite 1 von 78 |

1 SAFETY
1.1Safety instructions
Danger!
►Repairs may be carried out by a qualified electrician only!
►The user may be put at considerable risk and injured by improper repairs!
►Electric shock may occur if live components are touched inside the appliance!
►Do not touch components in the appliance. Even the modules can be live!
►Before commencing repairs, ALWAYS disconnect the appliance from the power supply!
►If tests have to be conducted while the appliance is live,
ALWAYS use a residual-current-operated circuit-breaker!
►The protective conductor connection must not exceed the standardised values! This is essential for personal safety and appliance function!
►When repairs are complete, perform a test in accordance with
VDE 0701 or the corresponding national regulations!
►Following each repair, conduct a leak and performance test.
1.2Repair instructions
Caution!
►NEVER attempt repairs by randomly replacing components!
►ALWAYS proceed systematically and comply with the technical documentation for the appliance!
►Components become hot during operation. Before commencing repairs, leave the appliance to cool down.
►As a rule, printed-circuit boards are not repaired but are completely replaced with original spare parts. Exceptions are documented separately.
Risk of scalding!
Hot water / steam nozzle or auto-cappuccinatore frothing-up nozzle (optional) become very hot. Take hold of the nozzles by the plastic parts only, not by the metal parts. Keep body parts away from the nozzles and do not aim it to yourself or anyone else.
When steam or hot water is released, the nozzles may initially sputter!
|
58300000123125_ARA_en_d.doc – 09.10.09 |
Seite 2 von 78 |

2 INSTALLATION
2.1Installation
►The installation location must be level and dry.
►Protect the appliance from splash water.
►There must be a minimum filling height of 410 mm.
►Connect and operate the appliance only in accordance with the specifications on the rating plate.
►Operate the appliance indoors and at room temperature only.
►Do not place the appliance on a hot surface (e.g. heating plate) and never use it close to an open flame.
2.2Scope of delivery
Accessories included in packing without extra box:
►2 Detergent-tablets
►Test strip for determining the local water hardness
►2 Descaler-tablets (for 1 descaling process)
►Operating instructions in 7 languages
|
58300000123125_ARA_en_d.doc – 09.10.09 |
Seite 3 von 78 |

3 OPERATION
3.1Starting the appliance
Risk of damage!
Do not use coffee beans which have been glazed, caramelised or treated with other additives containing
sugar. These will damage the grinding unit.
WARNING
Note:
When the appliance is used for the first time or if the appliance has not been used for a prolonged period, the first cup of coffee still does not have the full aroma and should therefore not be drunk.
►Pull the mains plug out of the cord store at the rear of the appliance and connect according to the specifications on the rating plate.
►Remove the water tank and fill with fresh, cold, noncarbonated water. Observe “max” mark.
►Attach water tank straight and press all the way down.
►Fill the bean container with fresh coffee beans. Preferably use espresso beans or bean mixtures for fully automatic machines.
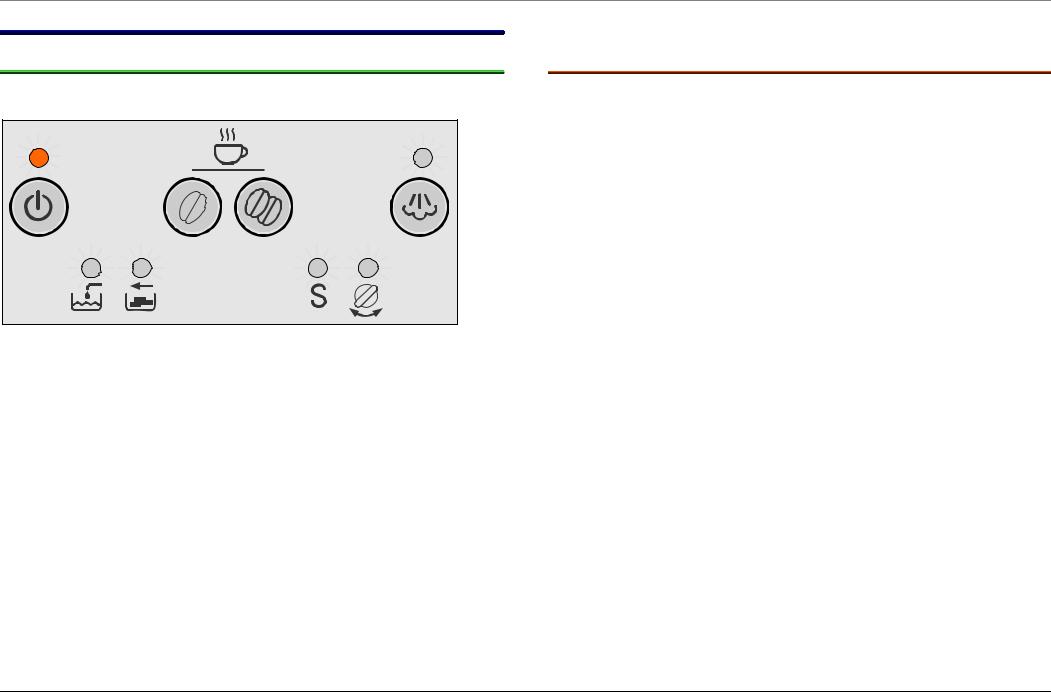
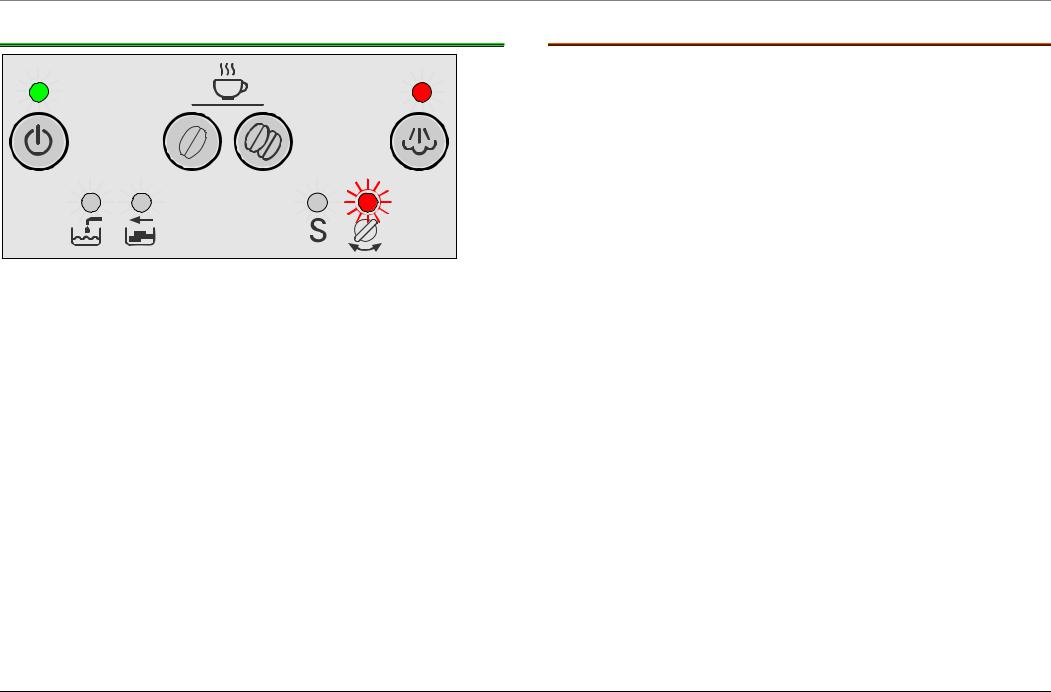
►Set the mains switch at the rear of the appliance to I.
LED above stand-by button lights up dim red.
►Ensure that the rotary knob for drawing steam/hot water is set to O.
►Press Standby button.
3.1.1Self-test
►Brewing module is initialised.
►Appliance heats up to operating temperature.
►Brewing module is moved to brewing position.
►Pump starts running and conveys approx. 50 ml water through the coffee outlet.
Brewing module and coffee outlet are rinsed and heated.
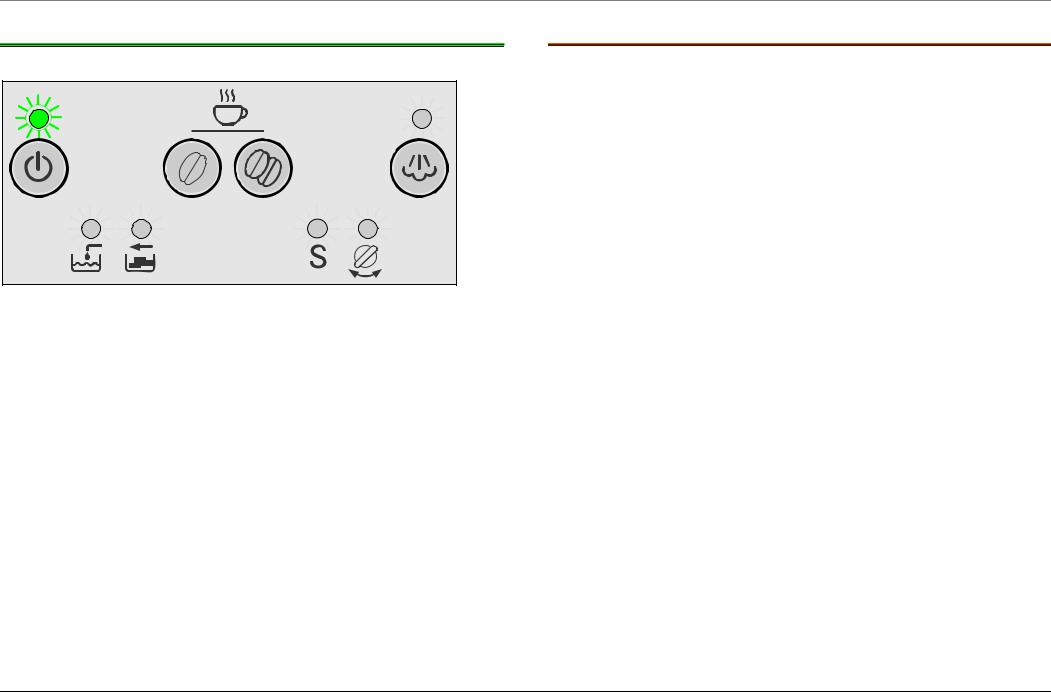
►Brewing module drains and moves to home position
Appliance is ready for use when the LED above the stand-by button is lit green.
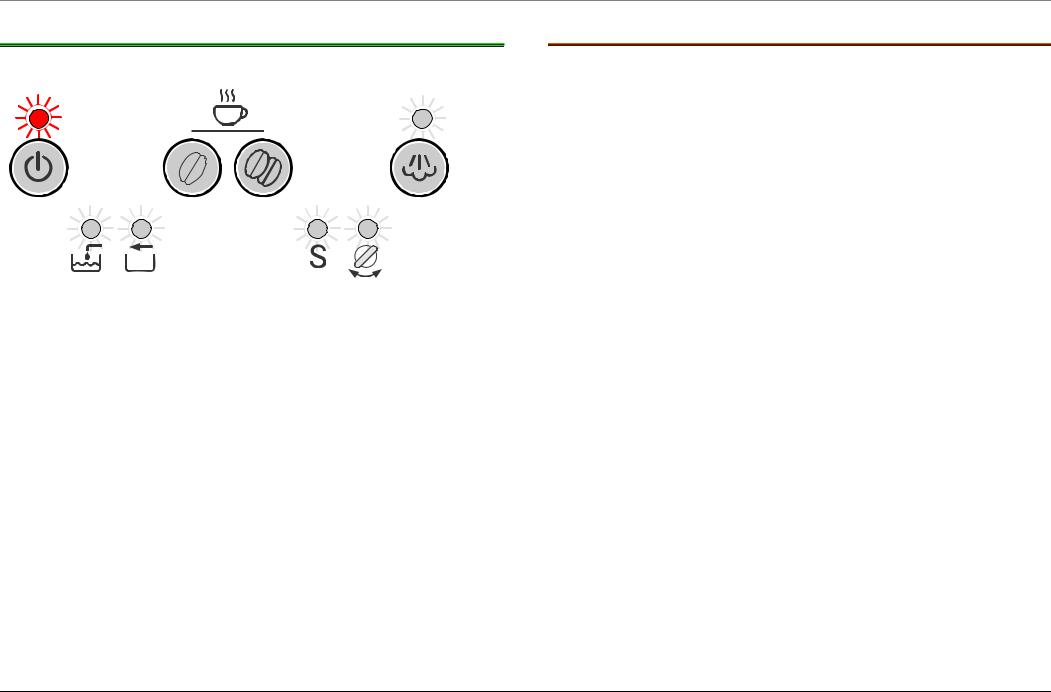
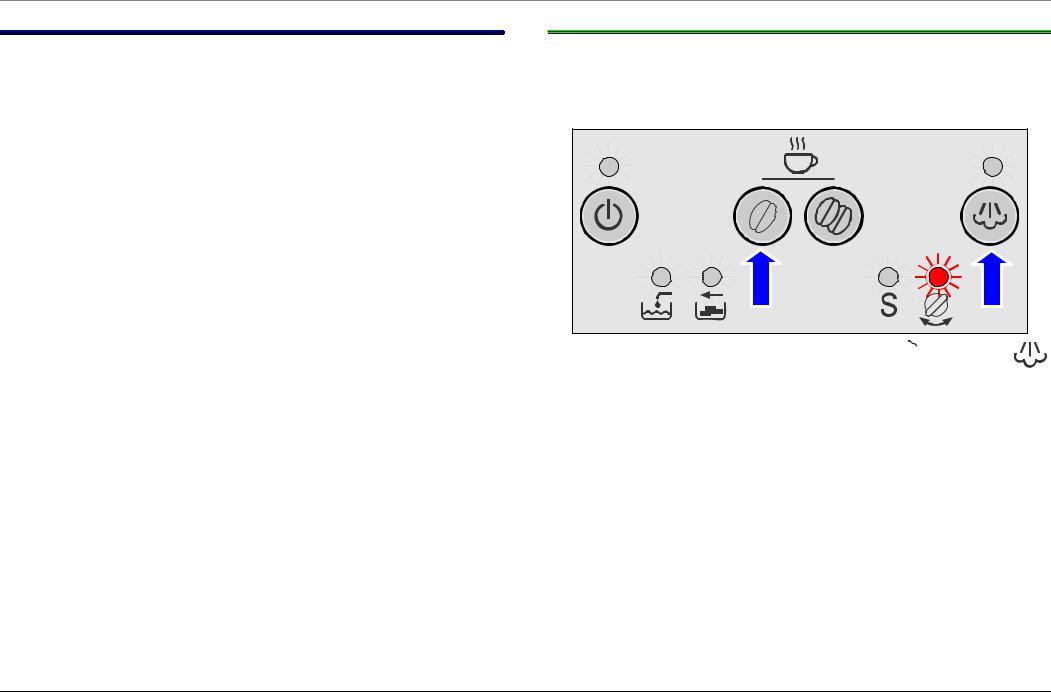
3.1.2Filling the system
When switching on the appliance for the first time and after a service the water pipe system in the appliance must be filled.
LEDs above stand-by button and “Turn steam/hot water valve” flash:
►Place a cup under the hot water/ steam nozzle.
►Set rotary knob for drawing steam/hot water to “Steam”.
A small amount of water is conveyed and the water pipe system is filled.
►Set rotary knob for drawing steam/hot water to “O”.
LED above stand-by button flashes, appliance heats up and is rinsed.
Appliance is ready for use when the LED above the stand-by button is lit green.
|
58300000123125_ARA_en_d.doc – 09.10.09 |
Seite 4 von 78 |

3.2Controls
3.2.1Overview of the controls
1Mains switch I / O
2Standby button
3Coffee on button (mild)
4Coffee on button (strong)
5Steam button
6Hot water/steam production knob
7LED display
aFill water
bEmpty trays
cRun Service programme
dTurn steam/hot water valve
8Steam pipe with frothing nozzle
9Coffee outlet, height-adjustable
10Cover, water tank
11Water tank
12Bean container with aroma protection cover
13Slot for detergent tablets
14Cup shelf with cup heater
15Slide switch, degree of ground coffee
20Store for power cord
21Service flap (access to brewing module)
|
58300000123125_ARA_en_d.doc – 09.10.09 |
Seite 5 von 78 |

3.2.2Overview of the controls
16Drip plate
17Drawer for coffee dregs
18Drip tray
|
19 |
Float for level indicator |
17 |
16 18
19
Note!
The level of the drip tray is indicated via the float through an opening in the drip plate. The level is not monitored electronically!
|
58300000123125_ARA_en_d.doc – 09.10.09 |
Seite 6 von 78 |

3.2.3Controls
1.Mains switch
The mains switch on the rear of the appliance switches the power supply on or off.
When the mains switch has been switched on, the Standby button lights up dim red. The appliance is in standby mode.
Attention!
Risk of damage!
Do not actuate the mains switch during the brewing process. When the appliance is switched on again, malfunctions and damage may occur.
►Do not switch off the appliance with the mains switch until it has been switched off with the
Standby button.
2.Standby button
The Standby button switches on and starts the appliance or switches it from brewing mode to standby.
When the Standby button has been pressed, a self-test runs: The appliance is initialised, heats up and is rinsed. The LED of the
Standby button flashes during this process.
If the LED is lit green, the appliance is ready for use.
Switching on a cold appliance:
When the Standby button has been pressed, the appliance heats up and is rinsed. The button flashes. Coffee cannot be brewed until the button stops flashing.
Switching on a warm appliance:
If the appliance is switched on with the Standby button, a rinsing process or self-test will not occur until the heater has reached the operating temperature. The Standby button is lit constantly. Coffee can be brewed immediately.
The appliance is not rinsed if:
►it was still warm when switched on
or
►there was no coffee from the last brew before the appliance was switched off.
Automatic switch-off:
Appliance automatically switches to standby after 3 hours.
|
58300000123125_ARA_en_d.doc – 09.10.09 |
Seite 7 von 78 |

Controls
3.Coffee on button (mild)
If the coffee on button (mild) is pressed, a coffee brewing process is started with a small amount of ground coffee.
Amount of ground coffee saved permanently: mild =
7.6+/– 1g
►Press 1 x for a cup of mild coffee.
Coffee beans are ground, pre-brewed and conveyed into the cup.
4.Coffee on button (strong)
If the coffee on button (strong) is pressed, a coffee brewing process is started with a large amount of ground coffee.
Amount of ground coffee saved permanently: strong =
12.3+/– 1g
►Press 1 x for a cup of strong coffee.
Coffee beans are ground, pre-brewed and conveyed into the cup.
If the button is pressed again, the coffee brewing process can be interrupted early. The grinding process is ended, the brewing process is stopped, the brewing module is emptied.
The same amount of liquid can also be drawn:
►To do this, press the coffee on button (strong) again within
3 seconds after the end of the brewing process.
The already used ground coffee is brewed.
The factory preset amount of liquid (125 ml) can be changed.
►To do this, press the “on” button and hold down until the required amount of coffee has run through.
Programming range 30–220 ml
|
Reset to factory setting |
► |
Remove drip tray |
|
► |
Simultaneously press Mild + |
|
|
Strong “on” buttons and hold |
||
|
down for 5 second |
||
|
LEDs flash |
||
|
► |
Re-insert drip tray |
|
|
► |
Switch on appliance with |
|
|
standby button |
|
58300000123125_ARA_en_d.doc – 09.10.09 |
Seite 8 von 78 |

Controls
5.Steam button
|
By pressing the |
button, steam is generated for frothing or |
|
heating. |
The appliance heats up for approx. 20 seconds. Then steam can be drawn by rotating hot water/steam production knob.
When the knob has been turned back to O, the steam button must be pressed again before more steam can be drawn.
6.Hot water/steam production knob
Valve with 2 positions
O Coffee brewing process (valve closed)
Hot water/steam production (valve open)
When the hot water/steam production knob has been turned, hot water or steam can be drawn via the steam pipe.
Before steam can be drawn, the steam button must also be pressed.
When the knob has been turned back to O, the steam button must be pressed again before more steam can be drawn.
7.LED display
Lit and flashing LEDs indicate the following:
S S
lit
lit
flashes
lit
flashes
flashes
lit
Water tank is empty and must be filled.
Trays are full: Empty trays and re-insert.
No trays: Re-insert trays.
Service programme must be run:
Service programme is running
Knob must be turned to hot water/steam production.
Knob must be turned to O.
8. Steam pipe with frothing nozzle
Steam pipe can be swivelled 30° to the side.
Standard frothing nozzle for drawing hot water and for drawing steam to heat drinks and froth milk.
|
58300000123125_ARA_en_d.doc – 09.10.09 |
Seite 9 von 78 |

Controls
9.Coffee outlet, height-adjustable
Adjustment range 80 mm–120 mm
10.Cover, water tank
Hinged, connected to upper section of appliance.
11.Water tank
Can be removed at side, 1.8 litre capacity up to “ max” mark. Holder for screw-on water filter (mat. no. 46 1732) available.
12.Bean container with aroma protection cover
Transparent, capacity approx. 700 ml (equivalent to approx. 250 beans)
13.Slot for cleaning tablet
No sensor for cover monitor
14.Cup shelf with cup pre-heater
Passively heated by the waste heat from the coffee heater
Temperature > 37 °C after 20 minutes
15.Slide switch – degree of ground coffee, 3-stage
Risk of damage!
Beans may become jammed in the grinding unit.
|
► Adjust degree of grinding only while the grinding |
||
|
unit is running |
||
|
WARNING |
||
Irrespective of the degree of roasting and the oil content of the coffee beans used, the coffee mill’s degree of grinding must be changed:
|
► |
Light roasting, low oil content |
finer grinding result |
|
► |
Dark roasting, high oil content |
coarser grinding result |
If beans are very oily, a very fine grinding unit setting in conjunction with a large amount of ground coffee may impair the operating sequence!
The new setting does not become noticeable until the second or third cup of coffee.
|
58300000123125_ARA_en_d.doc – 09.10.09 |
Seite 10 von 78 |
![]()
Controls
16.Drip plate
Stainless steel, with opening for float
17.Drawer for coffee dregs
Capacity 12–14 coffee dregs at medium strength
18.Drip tray
Volume until float indicates limit, approx. 0.7 litres
The presence of the drip tray is monitored by a microswitch.
This also occurs in standby.
19.Float for level indicator
The level of the drip tray is indicated via the float through an opening in the drip plate.
The level is not monitored electronically.
20.Store for power cord
Pull out power cord to required length.
21.Service flap
The service flap is locked in position on the right side of the appliance.
To open:
►Take hold of the recessed grip and
►pull the service flap outwards.
|
58300000123125_ARA_en_d.doc – 09.10.09 |
Seite 11 von 78 |
3.3Displays and operating logic
3.3.1Standby
Set mains switch to I
LED button: Standby is lit dim red
LED display: No display
3.3.1.1 Options
|
Press Standby button: |
The appliance is initialised, heats up |
|
and is rinsed |
|
|
Press Coffee mild button: |
No response, appliance is off |
|
Press Coffee mild button for |
Service programme starts |
|
5 seconds: |
|
|
Press Coffee strong button: |
No response, appliance is off |
|
Press the “Steam” button |
No response, appliance is off |
|
Press Steam button for 5 sec.: |
Water hardness setting starts |
|
Setting corresponds to the number |
|
|
of lit LEDs |
Press Coffee strong + Steam buttons for 5 sec.:
Open hot water/steam valve:
Open hot water/steam valve, press Coffee mild + Steam buttons for 5 sec.:
Remove trays:
Remove trays, Press Coffee mild + strong buttons for 5 sec.:
Release brewing unit:
Press Coffee mild + strong + Steam buttons for 5 sec.:
Temperature reduction by 4°
Normal temperature = “Add water” and “Empty trays” LEDs are lit. Press
Coffee strong button = — 4°/ normal
No response, appliance is off
Start appliance test
No response, appliance is off
Works reset for amount of coffee, temperature and water hardness
No response, appliance is off
Service LED flashes alternately with Standby LED buttons (dim red)
Set software bit for initial operation: = Fill system +1. Grinding unit running time +6 sec.
|
58300000123125_ARA_en_d.doc – 09.10.09 |
Seite 12 von 78 |
3.3.2Switching on the appliance
Press Standby button
|
LED button: |
Standby flashes red |
||||||
|
LED display: |
No display |
||||||
|
Appliance: |
The appliance is initialised, heats up and is rinsed |
3.3.2.1 Options
|
Press Standby button: |
Appliance switches to standby |
||
|
Press Coffee mild button: |
No response |
||
|
Press Coffee strong button: |
No response |
||
|
Press the “Steam” button: |
No response |
||
|
Open hot water/steam valve: |
Close steam valve LED is lit |
||
|
Remove trays: |
“Trays |
missing” |
LED flashes, |
|
heating |
up is |
interrupted, |
|
|
brewing unit does not move |
|||
|
Release brewing unit: |
Heating up ends. |
||
|
Service LED flashes alternating |
|||
|
with Standby LED buttons (dim |
|||
|
red) |
|||
|
Lock brewing unit: |
Appliance switches to standby |
|
58300000123125_ARA_en_d.doc – 09.10.09 |
Seite 13 von 78 |

3.3.3Appliance ready to use
|
LED button: |
Standby is lit green |
|||||
|
LED display: |
No display |
|||||
|
Appliance: |
Ready to use |
3.3.3.1Options
Press Standby button: Press Coffee mild button: Press Coffee strong button:
Press the “Steam” button: Open hot water/steam valve: Remove trays:
Appliance switches to standby Brew coffee
Brew coffee
If the Coffee mild or Coffee strong button is pressed again within 3 seconds after the end of the brewing cycle, the same amount of liquid is brewed through the ground coffee already used.
Heat up to steam temperature Draw hot water
Standby button LED is lit, “Trays missing” LED flashes
|
Release brewing unit: |
Service LED flashes alternating |
|
with Standby LED buttons (dim |
|
|
red) |
|
|
Lock brewing unit: |
Appliance switches to standby |
|
58300000123125_ARA_en_d.doc – 09.10.09 |
Seite 14 von 78 |
3.3.4Brewing coffee
Press the Coffee mild or Coffee strong button
LED button: Standby flashes green
LED display: No display Appliance: Brew coffee
3.3.4.1 Options
|
Press Standby button: |
The current coffee brewing process |
|
is stopped, switches to standby. |
|
|
Press Coffee mild button: |
The current coffee brewing process |
|
is stopped, switches to standby. |
|
|
Press Coffee strong button: |
The current coffee brewing process |
|
is stopped, switches to standby. |
|
|
If the Coffee mild or Coffee strong |
|
|
button is pressed again within |
|
|
3 seconds after the end of the |
|
|
brewing cycle, the same amount of |
|
|
liquid is brewed through the ground |
|
|
coffee already used. |
|
|
Press the “Steam” button: |
The current coffee brewing process |
|
is stopped, switches to standby. |
|
|
Open hot water/steam valve: |
The current coffee brewing process |
|
is interrupted, Close steam valve |
|
|
LED is lit, grinding is not |
|
|
interrupted. |
|
|
Remove trays: |
The current coffee brewing process |
|
is interrupted, “Trays missing” LED |
|
|
flashes, grinding is not interrupted. |
|
|
Remove water tank: |
Coffee brewing process is stopped |
|
after approx. 10 seconds, “Add |
|
|
water” LED is lit, Open hot water/ |
|
|
steam valve LED flashes. |
|
|
Adjust filling quantity: |
Active is accepted. |
|
Beans running out: |
Current coffee brewing process is |
|
completed. |
|
58300000123125_ARA_en_d.doc – 09.10.09 |
Seite 15 von 78 |

3.3.5Drawing hot water
Open hot water/steam valve
LED button: Standby flashes green LED display: Hot water/steam valve is lit Appliance: Pump is running, heating on
Convey hot water
3.3.5.1 Options
|
Press Standby button: |
Appliance switches to standby |
|
Press Coffee on button: |
Brewing is stopped, “Close hot |
|
water/steam valve” LED is lit |
|
|
Press coffee strength button: |
Brewing is stopped, “Close hot |
|
water/steam valve” LED is lit |
|
|
Press the “Steam” button: |
Brewing is stopped, “Close hot |
|
water/steam valve” LED is lit |
|
|
Remove trays: |
Brewing is stopped, “Close hot |
|
water/steam valve” LED is lit, |
|
|
“Trays missing” LED flashes |
|
|
Remove water tank: |
Brewing is stopped after approx. |
|
10 sec., “Add water” and “Close |
|
|
hot water/steam valve” LEDs are |
|
|
lit |
|
|
Release brewing unit: |
Brewing is stopped, Service LED |
|
flashes alternating with Standby |
|
|
LED buttons (dim red) |
|
|
Lock brewing unit: |
Appliance switches to standby |
|
58300000123125_ARA_en_d.doc – 09.10.09 |
Seite 16 von 78 |
3.3.6Heating up to steam
Press the “Steam” button
LED button: Standby is lit green, Steam flashes
LED display: No display
Appliance: Heat up to steam temperature
3.3.6.1 Options
|
Press Standby button: |
Heating up is stopped, appliance |
||
|
switches to standby |
|||
|
Press Coffee mild button: |
Heating up is stopped, appliance |
||
|
switches to standby |
|||
|
Press Coffee strong button: |
Heating up is stopped, appliance |
||
|
switches to standby |
|||
|
Press the “Steam” button: |
Heating up is stopped, appliance |
||
|
switches to standby |
|||
|
Open hot water/steam valve: |
Wait until steam temperature has |
||
|
been reached, then draw steam |
|||
|
Remove trays: |
Continues |
heating, |
“Trays |
|
missing” LED flashes |
|||
|
Remove water tank: |
No response |
||
|
Release brewing unit: |
Heating up is stopped, Service |
||
|
LED flashes |
alternating |
with |
|
|
Standby LED buttons (dim red) |
|||
|
Lock brewing unit: |
Appliance switches to standby |
|
58300000123125_ARA_en_d.doc – 09.10.09 |
Seite 17 von 78 |
3.3.7Steam ready
LED button: Standby is lit green, Steam is lit LED display: “Open steam valve” flashes
Appliance: At steam temperature for approx. 1 minute
3.3.7.1 Options
|
Press Standby button: |
Stopped, appliance switches to |
|||||
|
standby |
||||||
|
Press Coffee mild button: |
Stopped, |
appliance |
switches |
to |
||
|
ready to use |
||||||
|
Press Coffee strong button: |
Stopped, |
appliance |
switches |
to |
||
|
ready to use |
||||||
|
Press the “Steam” button: |
Stopped, |
appliance |
switches |
to |
||
|
ready to use |
||||||
|
Open hot water/steam valve: |
Steam is generated, “Close hot |
|||||
|
water/steam valve” LED is lit |
||||||
|
Close hot water/steam valve is lit |
Steam ready ends |
|||||
|
Remove trays: |
Steam |
ready |
continues |
for |
||
|
approx. 1 minute, “Close hot |
||||||
|
water/steam valve” |
and |
“Trays |
||||
|
missing” LEDs flash |
||||||
|
Release brewing unit: |
Steam ready is stopped, Service |
|||||
|
LED flashes |
alternating |
with |
||||
|
Standby LED buttons (dim red) |
||||||
|
Lock brewing unit: |
Appliance switches to standby |
|
58300000123125_ARA_en_d.doc – 09.10.09 |
Seite 18 von 78 |

3.3.8Drawing steam
Open hot water/steam valve
LED button: Standby flashes green, Steam flashes LED display: Open steam valve is lit
Appliance: Pump is running, heating on Convey steam
3.3.8.1 Options
|
Press Standby button: |
Stopped, appliance switches to |
|
standby |
|
|
Press Coffee mild button: |
Brewing is stopped, “Close hot |
|
water/steam valve” LED is lit |
|
|
Press Coffee strong button: |
Brewing is stopped, “Close hot |
|
water/steam valve” LED is lit |
|
|
Press the “Steam” button: |
Brewing is stopped, “Close hot |
|
water/steam valve” LED is lit |
|
|
Close hot water/steam valve is lit |
Stopped, appliance switches to |
|
ready to use |
|
|
Remove trays: |
Brewing is stopped, “Close hot |
|
water/steam valve” LED is lit |
|
|
Remove water tank: |
Brewing is stopped after approx. |
|
30 sec., “Add water” and “Close |
|
|
hot water/steam valve” LEDs are |
|
|
lit |
|
|
Release brewing unit: |
Steam on is stopped, Service |
|
LED flashes alternating with |
|
|
Standby LED buttons (dim red) |
|
|
Lock brewing unit: |
Appliance switches to standby |
|
58300000123125_ARA_en_d.doc – 09.10.09 |
Seite 19 von 78 |

3.4Adjusting water hardness
It is important that the water hardness is set correctly so that the appliance indicates in good time when it requires descaling.
Water hardness 4 has been preset
Determine the water hardness with the enclosed test strip or ask your local water supplier.
 5 s
5 s
Hardness 4
Hardness 3
Hardness 2
Hardness 1
►Switch on the appliance with the mains switch.
Appliance is in standby
►Press Steam button for 5 seconds:
Number of lit LEDs indicates the currently set water hardness.
►Keep pressing Steam button until the buttons for the required water hardness light up.
If no button is pressed within 90 seconds, the appliance switches back to coffee ready without saving the water hardness. The previously set water hardness is retained.
►Press Standby button once.
The set LEDs flash 3 times, the selected water hardness is saved.
Note:
If a water filter is used, water hardness 1 must be set!
|
58300000123125_ARA_en_d.doc – 09.10.09 |
Seite 20 von 78 |

3.5Reducing temperature
Temperature reduction by 4°
►Switch on the appliance with the mains switch.
Appliance is in standby
►Press Coffee strong and Steam buttons for 5 seconds: Normal temperature: Add water and Trays missing LEDs are lit
►Press Coffee strong button to reduce the temperature by 4°
–4°: Add water LED is lit
►Press Standby button once
The set LEDs flash 3 times, the selected water hardness is saved.
If no button is pressed within 90 seconds, the appliance switches back to coffee ready without saving the water hardness. The previously set water hardness is retained.
3.6Reset
►Switch on the appliance with the mains switch.
Appliance is in standby
►Remove drip tray
►Press Coffee mild and Coffee strong buttons for 5 seconds:
The following values are reset to the factory settings:
–Amount of liquid coffee (set to 125 ml)
–Temperature (set to normal)
–Water hardness (set to hardness 4)
All 4 LEDs flash 3 times. Appliance switches back to standby
|
58300000123125_ARA_en_d.doc – 09.10.09 |
Seite 21 von 78 |
3.7Manually cooling the heater
Heater and parts of the tube system become hot during operation. For service activities heater and tube system can be cooled down manually.
►Provide a 0.5 litre collecting vessel
3.7.1Procedure
►Insert mains plug and set mains switch to “I”
Appliance is in standby. The standby button LED is lit dimly red.
►Place collecting vessel under steam nozzle.
►Simultaneously press coffee on MILD  and steam buttons for 5 seconds.
LED above Open steam tap symbol flashes for 5 seconds.
►Open steam tap: (if the steam tap is not opened during this time, the appliance switches back to standby).
Cold water (maximum 0.5 litres) is conveyed out of the steam pipe. It is not reheated, heater is cooled manually.
►Close steam tap.
Pump stops. Appliance switches back to standby. The standby button LED is lit dimly red.
|
58300000123125_ARA_en_d.doc – 09.10.09 |
Seite 22 von 78 |
LED button: LED display:
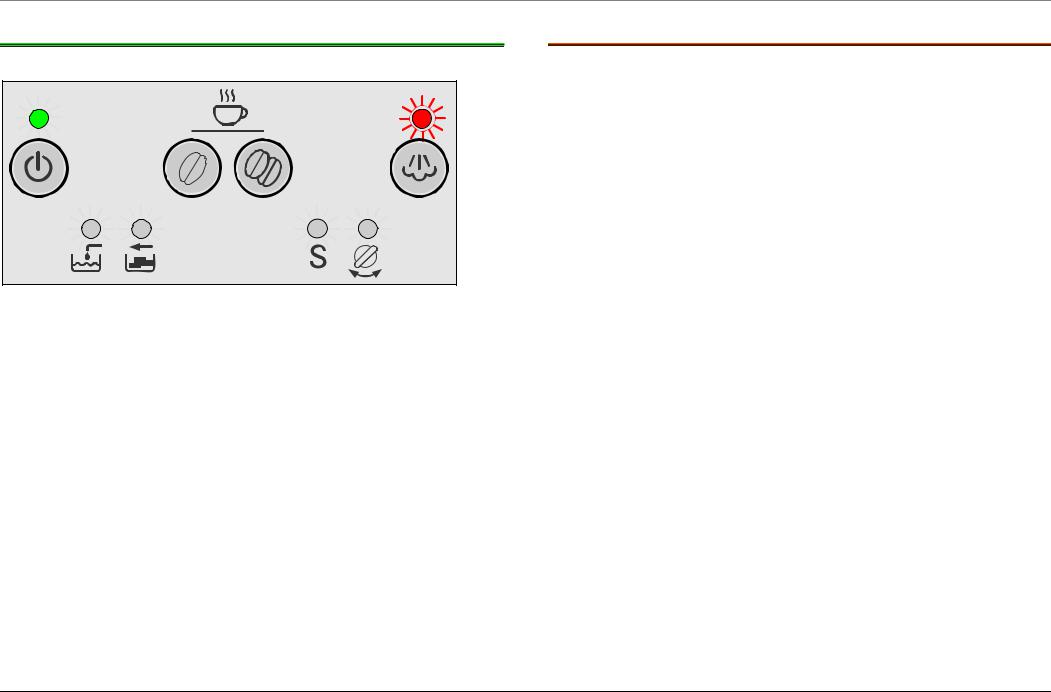
3.8Service programme
The service programme combines the descaling and cleaning process in one cycle.
If S lights up on the display when the appliance is switched on, the service programme must be started.
Use liquid descaling agent, mat. no. 310451, and detergent tablets, mat. no. 310575!
Risk of damage!
► Never interrupt the service programme!
► Never descale the appliance with vinegar or vinegarbased substances.
► Before starting the service programme, remove
WARNING water filter from the water tank!
While the Service programme is running (approx. 40 min.), the S LED flashes.
3.8.1Service alarm
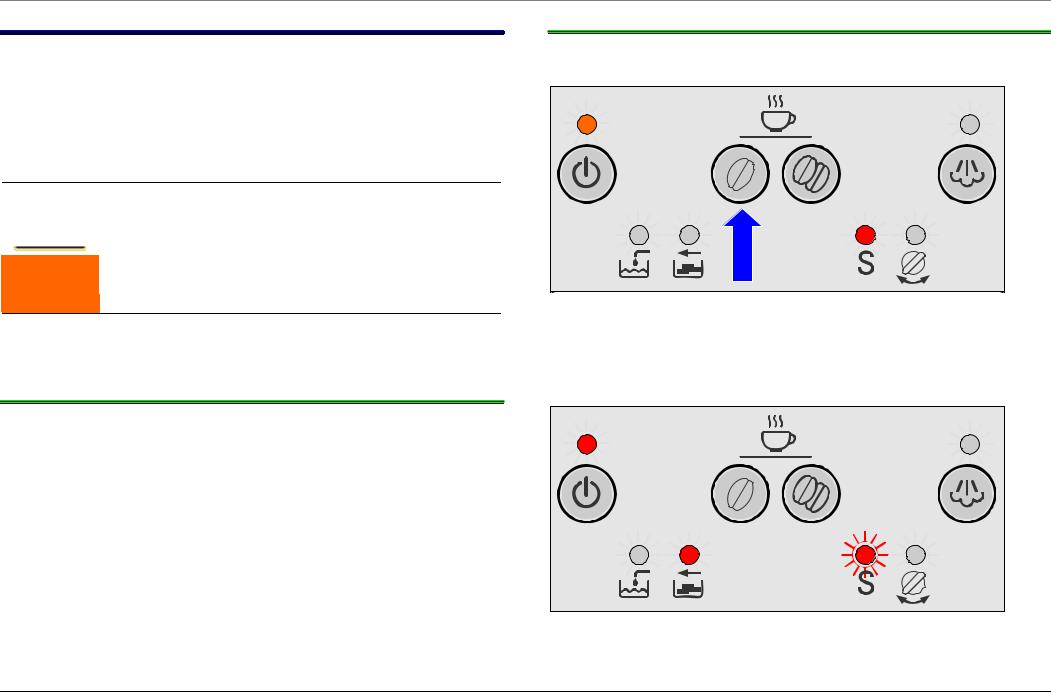
3.8.2Starting the service programme
►To start the Service programme, switch the appliance to standby.
Standby is lit dim red S is lit
► Press Coffee mild button for 5 seconds
The appliance is initialised, heats up and is rinsed.
The Service alarm is displayed after
|
► |
180 coffee brewing processes; irrespective of the coffee |
||
|
strength and cup size (Cleaning alarm) |
|||
|
or |
|||
|
► |
120 l water flow at a water hardness setting of 1 |
||
|
90 l water flow at a water hardness setting of 2 |
|||
|
60 l water flow at a water hardness setting of 3 |
|||
|
30 l water flow at a water hardness setting of 4 |
|||
|
For steam the calculation is as follows: 6.4 seconds of steam |
|||
|
production correspond to 1 dl of hot water production. |
LED button: |
Standby is lit red |
|
|
LED display: |
S flashes, Empty trays is lit |
||
|
58300000123125_ARA_en_d.doc – 09.10.09 |
Seite 23 von 78 |
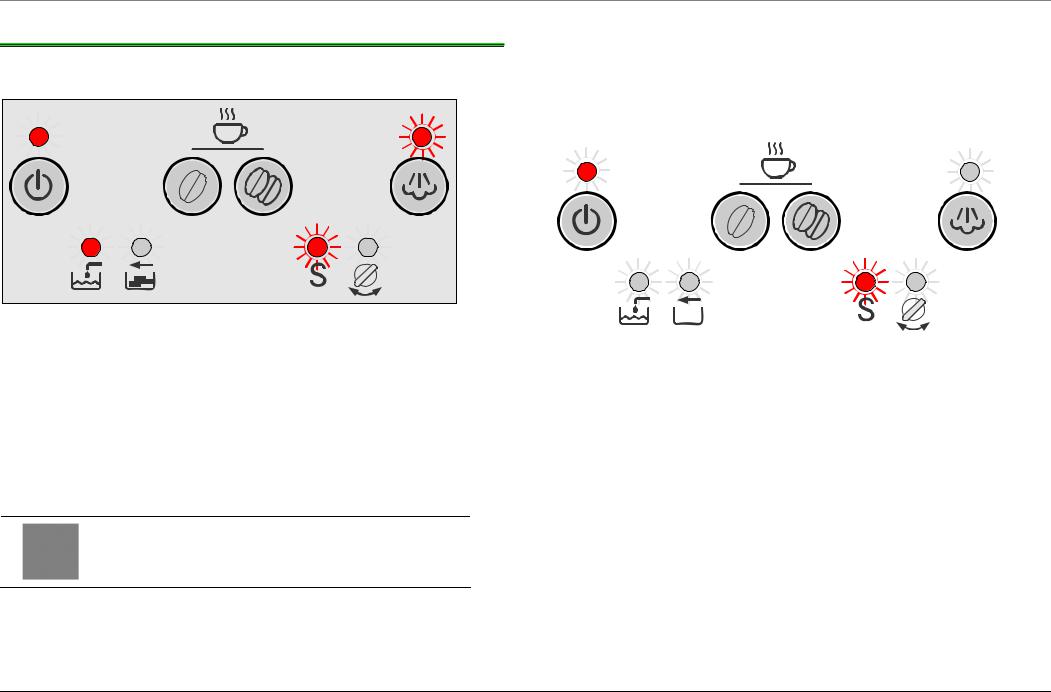
3.8.3Sequence of the Service programme (descaling)
►Remove drip tray with dregs drawer, empty and re-insert (time window > 6 seconds).
LED button: Standby is lit red, Fill water is lit
LED display: S flashes, Steam flashes
►Place one cleaning tablet in the slot
►Fill water tank with lukewarm water, add descaling agent and dissolve completely in water (total amount of liquid = 0.5 litres).
or
►Fill water tank with 0.5 l of ready mixed descaling solution.
If using descaling tablets, add two tablets. Observe the dissolving time of the tablets (approx. 4–6 minutes)!
►Press the steam button
Appliance starts the descaling cycle. Duration approx. 10 minutes.
Service marker is set
|
LED button: |
Standby is lit red |
||||||
|
LED display: |
S flashes |
||||||
|
Liquid outlet via drainage valve: |
1 x 60 ml |
||||||
|
16 x 15 ml |
|||||||
|
Total: |
300 ml |
Descaling via drainage valve ended.
|
58300000123125_ARA_en_d.doc – 09.10.09 |
Seite 24 von 78 |
 Loading…