
VT-1209.indd 1VT-1209.indd 1 11.08.2009 15:20:0311.08.2009 15:20:03
2
VT-1209.indd 2VT-1209.indd 2 11.08.2009 15:20:0511.08.2009 15:20:05
3
VT-1209.indd 3VT-1209.indd 3 11.08.2009 15:20:0511.08.2009 15:20:05

ENGLISH
STEAM IRON
• Close supervision is necessary when chil-
dren or infirm persons are near the unit.
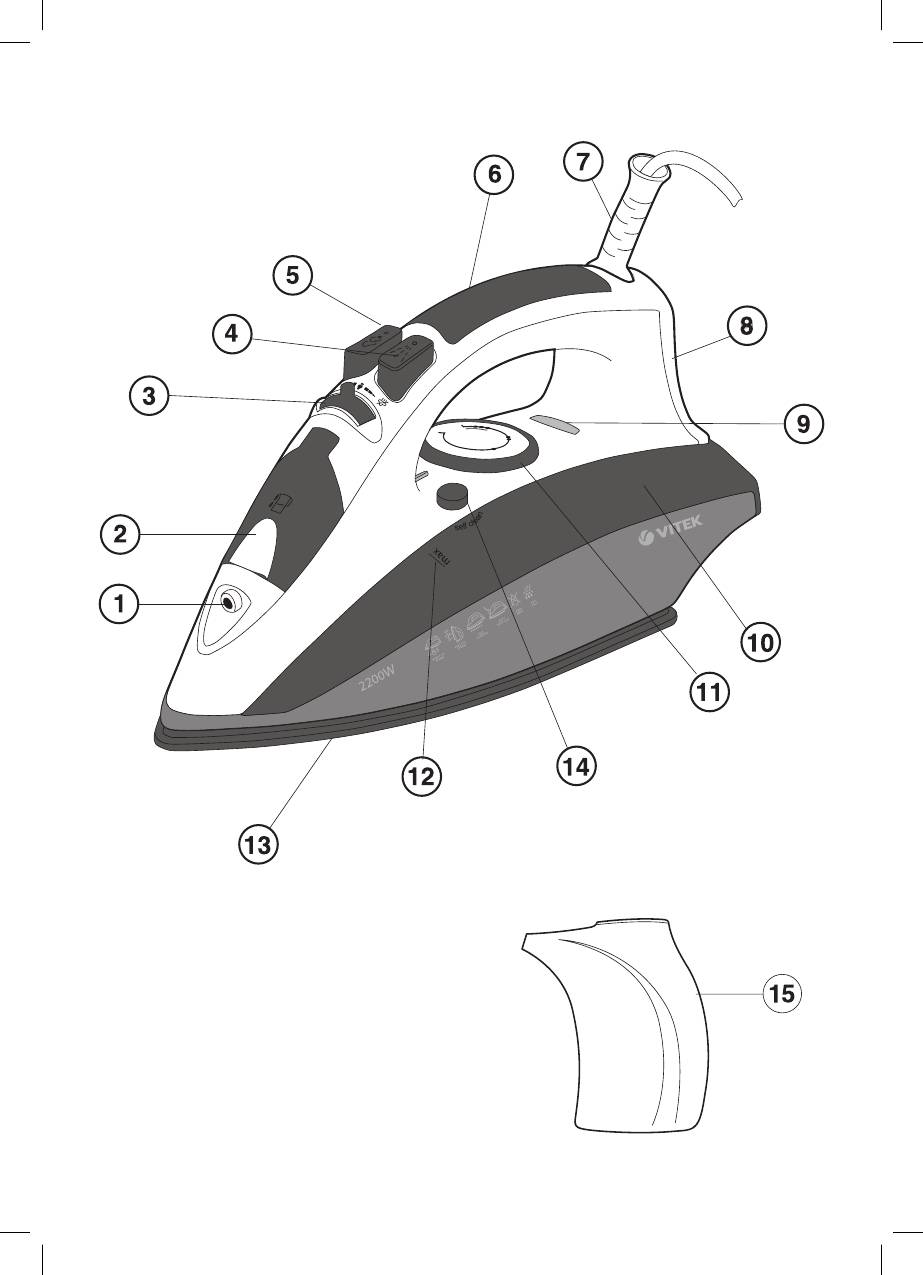
DESCRIPTION
• Never leave the working unit unattend-
1. Water spray nozzle
ed.
2. Water tank lid
• Always unplug the unit if you do not use
3. Steam supply regulator
it.
4. Spray button
• In order to avoid electric shock do not
5. Additional steam release button
immerse the unit into water or other liq-
6. Handle
uids.
7. Power cord protection
• Do not fill the water tank with scented liq-
8. Base
uids, vinegar, starch solution, descaling
9. Heating element on/off indication
reagents, chemical agents etc.
10. Water tank
• Avoid contact with hot surfaces or out-
11. Temperature regulator
going steam of the iron in order to avoid
12. Maximal water level indication
getting burns.
13. Iron soleplate
• Make sure that the power cord is not
14. Self clean button
hanging over the edge of the ironing
15. Measuring cup
board and make sure that it does not
touch heated surfaces.
SAFETY MEASURES
• To unplug the unit always take it by the
Before using the unit, please read the
plug, do not pull by the power cord.
instructions carefully and pay attention
• Before taking the unit away for storage,
to the illustrations.
pour out the remaining water and let the
• Before switching on the unit, make sure
unit cool down.
that your home electricity supply corre-
• Pour out water only after you have un-
sponds to the voltage of current speci-
plugged the unit.
fied on the unit.
• Do not use the unit if the plug or the pow-
• Power cord is equipped with a euro plug;
er cord is damaged or if there are other
insert it into the socket, with secure
damages in the unit.
grounding.
• In order to avoid electric shock do not
• In order to avoid risk of fire do not use
repair the unit yourself. If there are some
adapters while connecting the appliance
damages in the unit apply to the author-
to the outlet.
ized service center.
• In order to avoid overloading of the pow-
er network do not switch on several ap-
BEFORE USAGE
pliances with high power consumption
• Take out the iron from the package and
simultaneously.
remove the protective cartoon covering
• Use the unit only for the intended pur-
from the iron soleplate (13).
poses.
• Make sure that the electrical supply volt-
• Use the iron only on the ironing board.
age corresponds to the iron’s operating
• Place the iron on a flat stable surface.
voltage.
• Always unplug the unit while filling the
water tank with water.
Note:
• While using the unit, make sure that the
The iron’s heating element is broken
water tank lid is firmly closed
in during the first use; it is normal for a
small amount of smoke to be released.
4
VT-1209.indd 4VT-1209.indd 4 11.08.2009 15:20:0511.08.2009 15:20:05

ENGLISH
CHOICE OF WATER
Determination of Fabric type/tempera-
• To fill the water tank use regular tap wa-
ture
ter. If the water is hard then it is recom-
Synthetics, nylon, acryl, polyester
•
mended to mix it with distilled water at a
(low temperature)
ratio of 1:1, if the water is very hard, mix it
••
Silk/wool (medium temperature)
with distilled water at a ratio of 1:2 or use
•••
Cotton/linen (high temperature)
only distilled water.
• This table is only for smooth materials.
Note:
Fabrics of other types (crimped, raised
Do not fill the water tank (10) with
etc.) are best ironed at low temperature.
scented liquids, vinegar, starch solu-
• First sort items by ironing temperature:
tions, descaling reagents, chemical
wool with wool, cotton with cotton etc.
substances etc.
• The iron heats up faster than is cools
down. For this reason it is recommended
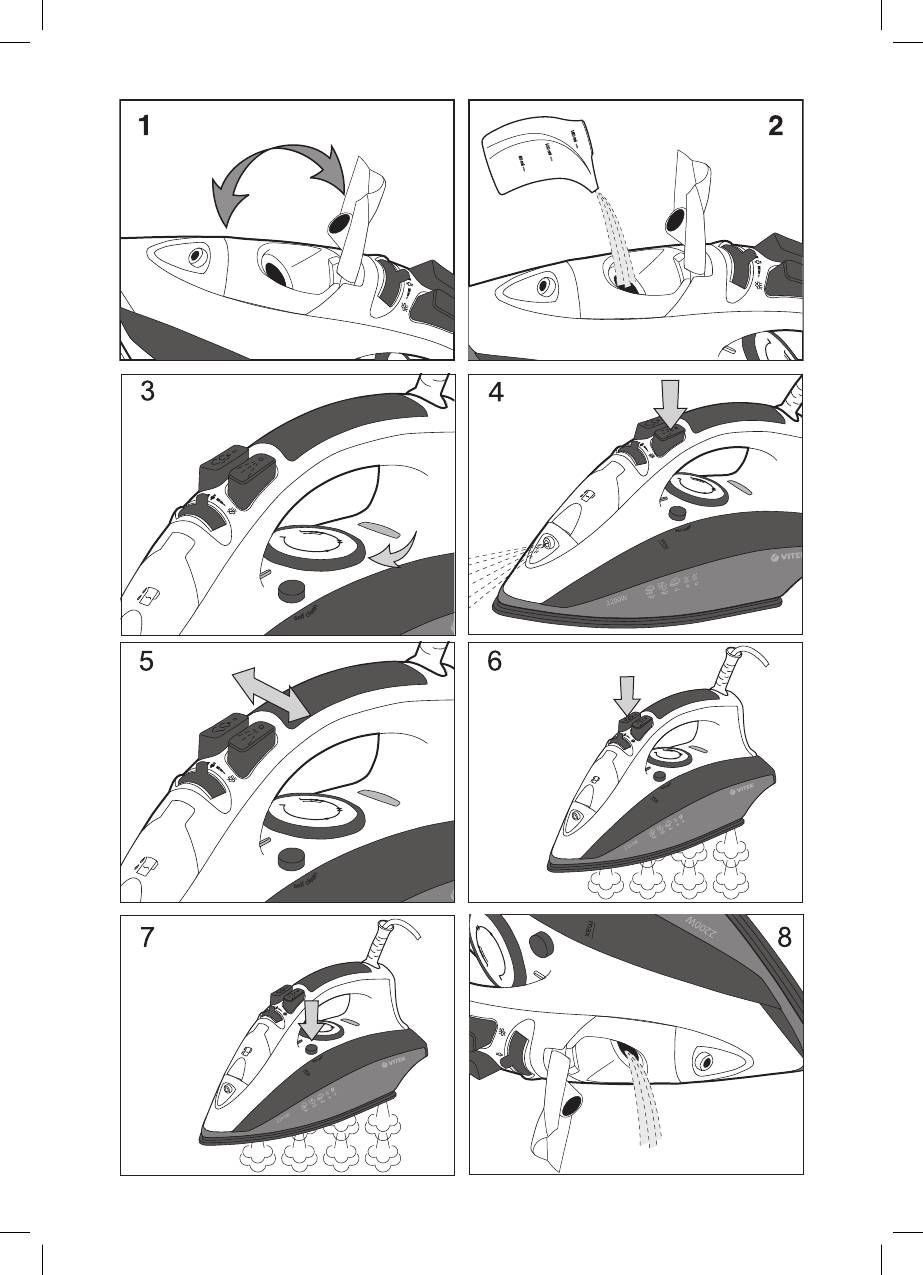
FILLING THE WATER TANK
to begin ironing at low temperature (for
Make sure that the iron is disconnected
instance synthetic fabrics). After that,
from electrical power before filling it with
move to higher temperature ironing.
water.
Cotton and linen should be ironed after
• Set the steam release regulator (3) to the
all the others.
position of steam vapor OFF.
• If an item is made from a mix of fabrics,
• Open the water tank lid (2).
then the iron should be set for the fabric
• Fill the water tank (10) with water. Close
with the lowest ironing to (for instance if
the lid (2).
an item is made from 60% polyester and
40% cotton, it should be ironed at the
Note:
temperature used for ironing polyester
• Do not fill it with water above MAX. in-
“•”).
dication.
• If you cannot define the fabric the item is
• If you need to refill the water tank dur-
made from, find a place on it that is hid-
ing ironing, turn off the iron and un-
den while wearing and, on practice select
plug the power cord from the outlet.
the ironing temperature (always start at
• When you finish ironing, open the
the lowest and gradually raise it until you
water tank lid (2) and pour out the re-
get the desired result.)
maining water.
• Corduroy and other fabrics that start
glossy quickly should be ironed strictly in
IRONING TEMPERATURE
one direction (along the lines) with slight
Before ironing test the heated iron on the
pressure.
old cloth to be sure that the iron soleplate
• To avoid appearance of glossy spots on
(13) and the water tank (10) are clean.
the synthetic and silk fabrics, iron them
• Always check the recommended iron
back-side.
temperature indicated on the tag before
ironing.
SETTING THE IRONING TEMPERATURE
• If the tag does not list the recommended
• Place the iron on the base (8).
ironing temperature, but you know the
• Insert the power plug into the outlet.
type of fabric, then use the following
• Set the temperature regulator (11) to the
table to determine the proper tempera-
required ironing temperature: “•”, “••”,
ture.
“•••” or “max” (depending on the type
5
VT-1209.indd 5VT-1209.indd 5 11.08.2009 15:20:0511.08.2009 15:20:05
Посмотреть инструкция для Vitek VT-1209 BN бесплатно. Руководство относится к категории утюги, 1 человек(а) дали ему среднюю оценку 5.8. Руководство доступно на следующих языках: русский, английский. У вас есть вопрос о Vitek VT-1209 BN или вам нужна помощь? Задайте свой вопрос здесь
Не можете найти ответ на свой вопрос в руководстве? Вы можете найти ответ на свой вопрос ниже, в разделе часто задаваемых вопросов о Vitek VT-1209 BN.
Что означает указанная на утюге мощность?
Утюг с высокой мощностью быстрее нагревается.
Как удалить пятна на подошве утюга?
Намочите ткань в уксусе и на полчаса поставьте утюг на эту ткань, чтобы уксус впитался в пятна. Затем удалите пятна влажной тканью.
Можно ли заливать в утюг водопроводную воду?
Да, в утюге предусмотрено использование водопроводной воды.
Инструкция Vitek VT-1209 BN доступно в русский?
Да, руководствоVitek VT-1209 BN доступно врусский .
Не нашли свой вопрос? Задайте свой вопрос здесь
16
РУССКИЙ
• Вставьте вилку сетевого шнура в ро-
зетку.
• Убедитесь, что в резервуаре (10) до-
статочно воды.
• Поворотом регулятора (11) установи-
те требуемую температуру глаженья:
«•••» или «МАХ», при этом загорится
индикатор (9).
•
Когда температура подошвы утюга
(13) достигнет установленной темпе-
ратуры, индикатор (9) погаснет, можно
приступать к глаженью.
• Регулятором постоянной подачи пара
(3) установите необходимую интен-
сивность парообразования, пар на-
чнет выходить из отверстий подошвы
утюга (13).
• После использования утюга установи-
те регулятор температуры (11) в поло-
жение «MIN», а регулятор постоянной
подачи пара (3) — в положение “подача
пара выключена”.
• Выньте вилку сетевого шнура из ро-
зетки и дождитесь полного остывания
утюга.
ВНИМАНИЕ!
Если во время работы не происходит
постоянной подача пара, проверьте
правильность положения регулятора
температуры (11).
ДОПОЛНИТЕЛЬНАЯ ПОДАЧА ПАРА
Функция дополнительной подачи пара
полезна при разглаживании складок и
может быть использована только при
высокотемпературном режиме глаже-
нья (регулятор температуры (11) в поло-
жении «•••» или «МАХ»).
• При нажатии кнопки дополнительной
подачи пара (5) пар из подошвы утюга
будет выходить более интенсивно.
Примечание: во избежание выте-
кания воды из паровых отверстий
нажимайте кнопку дополнительной
подачи пара (5) с интервалом в 4-5
секунд.
ФУНКЦИЯ АВТОМАТИЧЕСКОГО
ОТКЛЮЧЕНИЯ
Если утюг находится неподвижно около
30 секунд в горизонтальном положении
или около восьми минут в вертикальном
положении, он выключается автомати-
чески.
Для включения утюга просто начните им
гладить.
Примечание: после включения утюга
ранее заданная температура подош-
вы будет восстановлена через неко-
торое время, в зависимости от поло-
жения регулятора температуры.
ОЧИСТКА ПАРОВОЙ КАМЕРЫ
Для увеличения срока службы утюга ре-
комендуется регулярно выполнять очис-
тку паровой камеры, особенно в регио-
нах с «жесткой» водопроводной водой.
• Установите регулятор постоянной по-
дачи пара (3) в крайнее левое положе-
ние — подача пара выключена.
•
Наполните резервуар (10) водой до
отметки «MAX» (12).
• Поставьте утюг на основание (8).
• Вставьте вилку сетевого шнура в ро-
зетку.
• Поворотом регулятора (11) установите
максимальную температуру нагрева
подошвы утюга «МАХ», при этом заго-
рится индикатор (9).
•
Когда температура подошвы утюга
(13) достигнет установленной темпе-
ратуры, индикатор (9) погаснет, можно
проводить очистку паровой камеры.
• Выключите утюг, установив регуля-
тор температуры (11) в положение
«MIN».
• Выньте вилку сетевого шнура из ро-
зетки.
• Расположите утюг горизонтально над
VT-1209.indd 16
VT-1209.indd 16
11.08.2009 15:20:06
11.08.2009 15:20:06
-
Инструкции по эксплуатации
1

Vitek VT-1209 VT инструкция по эксплуатации
(44 страницы)
- Языки:Русский
-
Тип:
PDF -
Размер:
671.45 KB -
Описание:
Утюг
Просмотр
На NoDevice можно скачать инструкцию по эксплуатации для Vitek VT-1209 VT. Руководство пользователя необходимо для ознакомления с правилами установки и эксплуатации Vitek VT-1209 VT. Инструкции по использованию помогут правильно настроить Vitek VT-1209 VT, исправить ошибки и выявить неполадки.