
![]()
Autofocus Speedlight
User’s Manual
En

About the SB-910 and This User’s Manual
Thank you for purchasing the Nikon Speedlight SB-910. To get the most out of your
ASpeedlight, please read this user’s manual thoroughly before use. Keep this manual handy for quick reference.
Preparation
 How to find what you are looking for
|
i |
Table of contents |
(0A-11) |
You can search by item, such as operation method, flash mode or function.
You can search according to objective without knowing the specific name or term of an item.
You can search using the alphabetical index.
This is handy when there is a problem with your Speedlight.
 For your safety
Before using the Speedlight for the first time, read the safety instructions in “For Your Safety” (0A-14 – A-18).
A–2
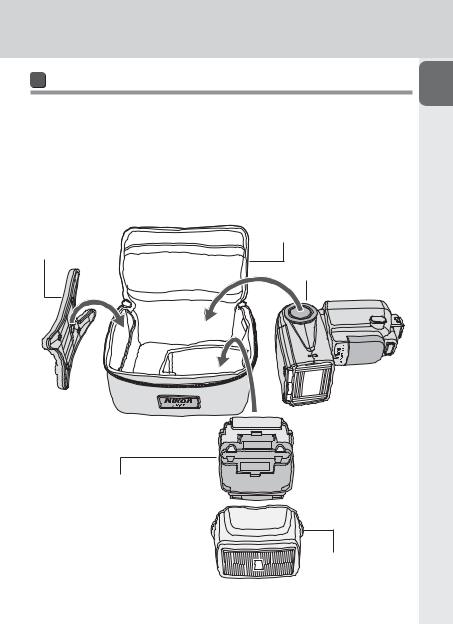
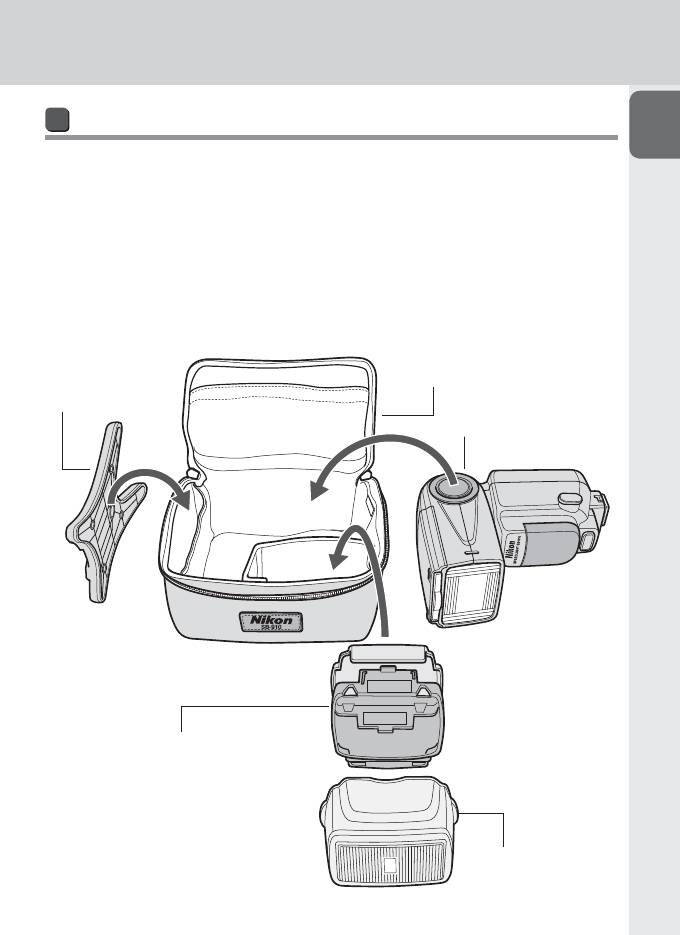
Included items
Check that all items listed below are included with the SB-910. If any items are missing, inform the store where the SB-910 was purchased or the seller immediately.
|
Speedlight Stand AS-21 |
Soft Case SS-910 |
|
Nikon Diffusion Dome SW-13H |
User’s manual (this manual) |
|
Fluorescent Filter SZ-2FL |
A collection of example photos |
|
Incandescent Filter SZ-2TN |
Warranty card |
|
Speedlight Stand |
Soft Case SS-910 |
|
AS-21 |
|
|
SB-910 |
Fluorescent Filter SZ-2FL
Incandescent Filter SZ-2TN
Nikon Diffusion
Dome SW-13H
A–3
About the SB-910 and This User’s Manual
About the SB-910
The SB-910 is a high-performance Speedlight compatible with Nikon Creative Lighting System (CLS) with a guide number of 34/48 (ISO 100/200, m) (111.5/157.5, ft) (at the 35 mm zoom head position in Nikon FX format with standard illumination pattern, 20 °C/68 °F).
CLS-compatible cameras
Nikon digital SLR (Nikon FX/DX format) cameras (except D1 series, D100), F6, COOLPIX cameras (P7100, P7000, P6000)
 About this user’s manual
This manual has been compiled with the assumption that the SB-910 will be used in combination with a camera compatible with CLS and a CPU lens (0A-5). To get the most out of your Speedlight, please read this user’s manual thoroughly before use.
•For use with non-CLS-compatible SLR cameras, see “For Use with Non-CLS- compatible SLR Cameras.” (0F-1)
•For use with i-TTL-compatible COOLPIX cameras (P5100, P5000, E8800, E8400), see “For Use with COOLPIX Cameras.” (0G-1)
•The separate “A collection of example photos” provides an overview of the SB-910’s flash photography capabilities with example photos.
•For camera functions and settings, see the camera user’s manual.
Icons used in this manual
vDescribes a point to which you should pay particular attention in order to avoid Speedlight malfunctions or mistakes.
t Includes information or tips to make Speedlight use easier.
0 Reference to other pages in this manual
A–4
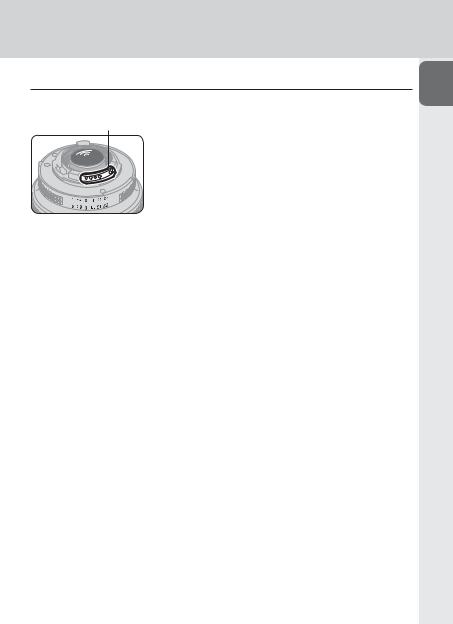
t Tips on identifying CPU NIKKOR lenses
CPU lenses have CPU contacts.
CPU contacts
• The SB-910 cannot be used with IX-Nikkor lenses.
A–5

About the SB-910 and This User’s Manual
Terminology
■ Default settings
Function and mode settings at the time of purchase
■ Nikon Creative Lighting System (CLS)
A lighting system that enables various flash photography functions with improved communication between Nikon Speedlights and cameras
■ Illumination patterns
Control types of light falloff at edges; the SB-910 provides three illumination patterns, standard, even and center-weighted.
■ FX format/DX format
Nikon digital SLR camera image area types (FX format: 36 × 24, DX format: 24 × 16)
■ Guide number (GN)
The amount of light generated by a flash unit; GN = flash-to-subject distance (m or ft) × aperture f-number (ISO 100)
■ Zoom head position
Position of a Speedlight zoom head; the angle of coverage changes as the zoom head position changes.
■ Effective flash output distance
Flash-to-subject distance with correctly adjusted flash output
■Effective flash output distance range
Range of effective flash output distance
■Flash compensation
Intentional flash output change to obtain the desired subject brightness
A–6

■ i-TTL mode
Flash mode in which the Speedlight fires monitor pre-flashes and the camera measures the reflected light and controls the Speedlight flash output
Monitor pre-flashes
Scarcely visible flashes emitted before actual firing that enable the camera to measure the light reflected on a subject
i-TTL balanced fill-flash
i-TTL mode type in which flash output level is adjusted to well-balanced exposure of the main subject and background
Standard i-TTL
i-TTL mode type in which flash output level is adjusted to the correct exposure of the main subject regardless of background brightness
■ Auto aperture flash mode
Non-TTL auto flash mode with aperture priority; the Speedlight measures the reflected flash and controls the flash output according to the reflected flash data and the lens and camera information
■ Non-TTL auto flash mode
Auto flash mode without TTL; the Speedlight measures the reflected flash and controls the flash output according to the reflected flash data
■ Distance-priority manual flash mode
Manual flash mode with distance priority; the flash-to-subject distance is set and the Speedlight flash output level is adjusted in accordance with the camera settings.
■ Manual flash mode
Flash mode in which the flash output level and aperture are manually set to obtain the desired exposure
■ Repeating flash mode
Flash mode in which the Speedlight fires repeatedly during a single exposure to create stroboscopic multiple effects
A–7

About the SB-910 and This User’s Manual
■ Step
AA unit of the shutter speed or aperture change; a change of one step halves/ doubles the amount of light entering the camera
Preparation
■ EV (Exposure Value)
Each increment of 1 in exposure value corresponds to a one-step change in exposure, which is made by halving/doubling shutter speed or aperture
■ Wireless multiple flash-unit photography
Flash photography with multiple wireless flash units simultaneously firing
Master flash unit
The flash unit that commands remote flash units in multiple flash-unit photography
Remote flash unit
A flash unit that fires following commands from the master flash unit
Advanced Wireless Lighting
Wireless multiple flash-unit photography with CLS; multiple remote flash unit groups can be controlled with the master flash unit.
SU-4 type wireless multiple flash-unit photography
Wireless multiple flash-unit photography suited to taking picture of a fastmoving subject; the master and remote flash units fire almost simultaneously because the master flash unit does not emit monitor pre-flashes.
A–8

Q&A Index
You can search for specific explanations according to objective.
Flash photography 1 (with SB-910 mounted on camera)
|
Question |
Key phrase |
0 |
|
|
Which flash mode can I take pictures with? |
Flash modes |
C-1 |
|
|
How can I take pictures in the simplest way? |
Basic operation |
B-6 |
|
|
How can I take formal group shots? |
Illumination pattern: Even |
E-2 |
|
|
How can I take portrait photos emphasizing the |
Illumination pattern: Center- |
E-2 |
|
|
main subject? |
weighted |
||
|
How can I take pictures with soft shadows cast on |
Bounce flash operation |
E-4 |
|
|
a wall? |
|||
|
How can I confirm lighting conditions? |
Modeling illumination |
E-21 |
|
|
How can I take brighter (or darker) pictures of the |
Flash compensation |
E-17 |
|
|
subject? |
|||
|
How can I take pictures under fluorescent light and |
|||
|
incandescent light and balance the lights’ color |
Color compensation filters |
E-12 |
|
|
effects? |
|||
|
How can I take pictures adding specific color to the |
Color filters |
E-12 |
|
|
light of Speedlight? |
|||
|
How can I use autofocus in dim lighting? |
AF-assist illumination |
E-19 |
|
|
How can I take pictures of both the subject and |
Slow sync |
E-25 |
|
|
background at night? |
|||
|
How can I take pictures without the subject’s eyes |
Red-eye reduction |
E-25 |
|
|
appearing red? |
|||
|
How can I take pictures of a moving subject with |
Repeating flash mode |
C-18 |
|
|
stroboscopic multiple-exposure effects? |
|||
|
How can I use the SB-910 with a non-CLS- |
Non-CLS-compatible SLR |
F-1 |
|
|
compatible SLR camera? |
camera |
||
|
How can I use the SB-910 with a COOLPIX camera? |
COOLPIX camera |
G-1 |
|
A–9

Q&A Index
Flash photography 2 (with wireless SB-910)
|
Question |
Key phrase |
0 |
|
|
How do I take pictures using multiple flash units? |
Advanced Wireless Lighting |
D-1 |
|
|
How do I take pictures of a fast-moving subject |
SU-4 type wireless multiple |
D-12 |
|
|
using wireless multiple flash-unit photography? |
flash-unit photography |
||
|
How do I take pictures with the SB-910 and a |
CLS-compatible COOLPIX |
||
|
COOLPIX camera compatible with wireless multiple |
G-1 |
||
|
camera |
|||
|
flash-unit photography? |
|||
 Settings and operations
|
Question |
Key phrase |
0 |
|
|
What kind of batteries do I use in the Speedlight? |
Compatible battery |
B-7 |
|
|
How long is the recycling time and how many flashes |
Min. number of flashes/ |
||
|
recycling time for each battery |
H-21 |
||
|
are possible with each fresh set of batteries? |
type |
||
|
How can I change the settings of functions? |
Custom settings |
B-13 |
|
|
How can I reset various settings? |
Two-button reset |
B-12 |
|
|
How can I lock the dial and buttons of the |
Key lock |
B-4 |
|
|
Speedlight to prevent accidental use? |
|||
|
How can I update the Speedlight firmware? |
Firmware update |
H-9 |
|
A–10
![]()
Table of Contents
|
A |
Preparation |
A |
|
|
About the SB-910 and This User’s Manual |
………………………………………A-2 |
||
|
Q&A Index……………………………………………………………………………….. |
A-9 |
||
|
For Your Safety ……………………………………………………………………….. |
A-14 |
B |
|
|
Check before Use ……………………………………………………………………. |
A-19 |
|
B |
Operation |
|
|
Speedlight Parts………………………………………………………………………… |
B-1 |
|
|
Function Buttons……………………………………………………………………….. |
B-5 |
|
|
Basic Operations ……………………………………………………………………….. |
B-6 |
|
|
Settings and the LCD ……………………………………………………………….. |
B-12 |
|
|
Custom Functions and Settings …………………………………………………. |
B-13 |
|
C |
Flash Modes |
|
|
i-TTL Mode ………………………………………………………………………………. |
C-1 |
|
|
Auto Aperture Flash Mode………………………………………………………….. |
C-5 |
|
|
Non-TTL Auto Flash Mode…………………………………………………………… |
C-8 |
|
|
Distance-priority Manual Flash Mode ………………………………………….. |
C-12 |
|
|
Manual Flash Mode …………………………………………………………………. |
C-15 |
|
|
Repeating Flash Mode………………………………………………………………. |
C-18 |
|
D |
Wireless Multiple Flash-unit Photography |
||
|
SB-910 |
Wireless Multiple Flash-unit Photography Setup …………………… |
D-1 |
G |
|
SB-910 |
Wireless Multiple Flash-unit Functions ………………………………… |
D-4 |
|
|
Setting the Master Flash Unit ………………………………………………………. |
D-6 |
||
|
Setting the Remote Flash Unit ……………………………………………………… |
D-7 |
||
|
Advanced Wireless Lighting ………………………………………………………… |
D-8 |
H |
|
|
SU-4 Type Wireless Multiple Flash-unit Photography………………………. |
D-12 |
||
|
Remote Flash Units ………………………………………………………………….. |
D-17 |
||
|
Checking Status in Wireless Multiple Flash-unit Photography ………….. |
D-20 |
A–11

Table of Contents
|
A |
E |
Functions |
|
|
Switching Illumination Patterns ……………………………………………………. |
E-2 |
||
|
Preparation |
Bounce Flash Operation ……………………………………………………………… |
E-4 |
|
|
• Flash compensation ……………………………………………………………. |
E-17 |
||
|
Taking Close-up Photographs………………………………………………………. |
E-9 |
||
|
Flash Photography with Color Filters …………………………………………… |
E-12 |
||
|
Flash Photography Support Functions………………………………………….. |
E-17 |
||
|
• Power zoom function …………………………………………………………. |
E-18 |
||
|
• AF-assist illumination ………………………………………………………….. |
E-19 |
||
|
• ISO sensitivity manual setting……………………………………………….. |
E-21 |
||
|
• Test firing …………………………………………………………………………. |
E-21 |
||
|
• Modeling illumination…………………………………………………………. |
E-21 |
||
|
• Standby function ……………………………………………………………….. |
E-22 |
||
|
• Thermal cut-out…………………………………………………………………. |
E-23 |
||
|
Functions to Be Set on the Camera …………………………………………….. |
E-24 |
||
|
• Auto FP high-speed sync……………………………………………………… |
E-24 |
||
|
• Flash value lock (FV lock) …………………………………………………….. |
E-25 |
||
|
• Slow sync …………………………………………………………………………. |
E-25 |
||
|
• Red-eye reduction/red-eye reduction slow sync ……………………….. |
E-25 |
||
|
• Rear-curtain sync ……………………………………………………………….. |
E-26 |
||
|
F |
For Use with Non-CLS-compatible SLR Cameras………. |
F-1 |
|
|
G |
For Use with COOLPIX Cameras…………………………………… |
G-1 |
|
A–12

|
A |
|||||
|
H |
Tips on Speedlight Care and Reference Information |
||||
|
Troubleshooting………………………………………………………………………… |
H-1 |
||||
|
Guide Number, Aperture and Flash-to-subject Distance ……………………. |
H-4 |
||||
|
Tips on Speedlight Care ……………………………………………………………… |
H-5 |
B |
|||
|
Notes on Batteries……………………………………………………………………… |
H-7 |
||||
|
About the LCD Panel …………………………………………………………………. |
H-8 |
||||
|
Updating Firmware ……………………………………………………………………. |
H-9 |
C |
|||
|
Optional Accessories………………………………………………………………… |
H-10 |
||||
|
Specifications………………………………………………………………………….. |
H-13 |
||||
|
Index …………………………………………………………………………………….. |
H-22 |
D
E
F
G
H
A–13

For Your Safety
Before using your product, please read the following safety precautions carefully
Aand thoroughly to ensure correct and safe use and to help prevent damage to your Nikon product or injury to yourself or others.
Preparation
For quick reference by those who use the product, please keep these safety instructions near the product.
In this manual, safety instructions are indicated with these symbols:
 WARNING
Disregarding instructions marked with this symbol could result in personal injury, or death and property damage.
 CAUTION
Disregarding instructions marked with this symbol could result in property damage.
 WARNINGS for Speedlights
1.If corrosive liquids seep from the batteries and get in your eyes, immediately wash your eyes with running water and consult with a doctor. Your eyes could be seriously damaged if they are not treated quickly.
2.If corrosive liquids seep from the batteries and come in contact with your skin or clothes, wash immediately with running water. Prolonged contact could injure your skin.
3.Never attempt to disassemble or repair the flash unit by yourself, as this could result in you receiving an electric shock and could also cause the unit to malfunction; such malfunction could lead to personal injury.
4.If the flash unit is dropped and damaged, do not touch any exposed interior metal parts. Such parts, especially the Speedlight’s capacitor and associated parts, could be in a high-charge state and if touched could cause an electric shock. Disconnect the power or remove the batteries and be sure that you do not touch any of the product’s electrical components, and then bring the flash unit to your local Nikon dealer or authorized service center for repair.
5.If you detect heat, smoke or notice a burning smell, immediately stop operation and remove the batteries to prevent the unit from catching on fire or melting. Allow the flash unit to cool down so that you can safely touch it and remove the batteries. Then bring the unit to your local Nikon dealer or authorized service center for repair.
A–14

6.The flash unit should never be submerged in liquid or exposed to rain, saltwater or moisture unless it is properly protected from the liquids and moisture. Underwater use requires a certified underwater housing.
If water or moisture gets inside the unit, this could cause the unit to catch on fire or cause an electric shock. In such instances you should immediately
remove the batteries from the Speedlight and then bring the unit to your local Nikon dealer or authorized service center for repair.
Note: electronic devices that are penetrated by water or moisture are often not economically repairable.
7.Do not use the unit in the presence of flammable or explosive gas. If the flash unit is operated in areas where there is a flammable gas, including propane, gasoline and dust, it could cause an explosion or fire.
8.Do not fire the flash unit directly at the driver of a moving car, as this could temporarily impair the driver’s vision and cause an accident.
9.Do not fire the flash unit directly into the eyes of someone that is at close range, as it could damage the retinas of their eyes. Never fire the flash unit closer than 1 meter from infants.
10.Do not fire the unit while the flash head is touching a person or object.
Such use can result in the person being burned, and/or their clothes igniting from the heat of the flash’s firing.
11.Keep small accessories out of the reach of children to avoid the possibility of the accessory being swallowed. If an accessory is accidentally swallowed, immediately consult with a doctor.
12.Use only the batteries specified in this user’s manual. Batteries other than those specified could leak corrosive liquids, explode or catch on fire or otherwise not perform satisfactorily.
13.Do not mix battery types, brands or old and new batteries, as the batteries could leak corrosive liquids, explode or catch on fire. When using more than one battery in a product, always use identical batteries that were purchased at the same time.
14.Non-rechargeable batteries such as manganese, alkaline and lithium batteries should never be charged in a battery charger because they could leak corrosive liquids, explode or catch on fire.
15.When using standard size (AA, AAA, C, D) or other common rechargeable batteries such as Ni-MH batteries, or when recharging them, be sure to use only the battery charger specified by the battery maker and read the instructions thoroughly. Do not recharge these batteries with their terminals reversed in the charger or before
the batteries have cooled off sufficiently because they could leak corrosive liquids, explode or catch on fire. The same caution also applies to using the rechargeable batteries that may be supplied by the photo product’s manufacturer.
A–15

For Your Safety
 CAUTIONS for Speedlights
1.Do not touch the flash unit with wet hands, as this could cause an electric shock.
2.Keep the flash unit away from children to prevent them from putting the unit in or near their mouth, or otherwise touching a dangerous part of the product; as such contact could cause an electric shock.
3.Do not apply strong physical shocks to the unit, as this could cause a malfunction that could cause the unit to explode or catch on fire.
4.Never use active agents that contain flammable substances such as paint thinner, benzene or paint remover to clean the unit, never use insect deterrent spray on the unit, and never store the unit in locations containing chemicals such as camphor and naphthalene, as this could damage the plastic case, cause a fire or cause an electric shock.
5.Remove any batteries from the unit before storing the unit for a long time to prevent the unit from catching on fire or leaking corrosive liquids.
 WARNINGS for Batteries
1.Never heat or throw batteries into a fire, as this could cause the batteries to leak corrosive liquids, generate heat or explode.
2.Do not short-circuit or disassemble the batteries because this could cause the batteries to leak corrosive liquids, generate heat or explode.
3.Do not mix battery types, brands or old and new batteries, as this could cause the batteries to leak corrosive liquids, generate heat or explode.
4.Do not install batteries in the reverse direction as this could cause the batteries to leak corrosive liquids, generate heat or explode. Even if only one battery is installed in reverse it will cause the Speedlight to malfunction.
5.Be sure to use the battery charger specified by the battery maker to avoid the possibility of batteries leaking corrosive liquids, generating heat or exploding.
6.Do not carry or store batteries along with metallic materials such as necklaces and hair pins because such materials could cause the batteries to short-circuit, leading to battery leakage, heat generation or an explosion. In addition, especially when carrying a quantity of batteries, place them carefully in a storage case that prevents the battery terminals from touching another battery’s terminals because if they touch in reverse order it could also cause the batteries to short-circuit, leading to battery leakage, heat generation or an explosion.
A–16

7.If corrosive liquids seep from the batteries and get in your eyes, immediately wash your eyes with running water and consult with a doctor. Your eyes could be seriously damaged if they are not treated quickly.
8.If corrosive liquids seep from the batteries and come in contact with your skin or clothes, wash immediately with running water. Prolonged contact could injure your skin.
9.Always follow the warnings and instructions printed on the batteries to avoid activities that could cause the batteries to leak corrosive liquids, generate heat or catch on fire.
10.Be sure to use only batteries specified in this user’s manual, to avoid the possibility of batteries leaking corrosive liquids, generating heat or exploding.
11.Never open the casing surrounding batteries or use batteries whose casing has been breached as such batteries could leak corrosive liquids, generate heat or explode.
12.Keep batteries out of the reach of children to help avoid the possibility of them being swallowed. If a battery is accidentally swallowed, immediately consult with a doctor.
13.Batteries should not be submerged in water, exposed to rain, moisture or saltwater unless they are properly protected from the wet environment. If water or moisture gets inside the batteries, this could cause them to leak corrosive liquids or generate heat.
14.Do not use any battery that appears abnormal in any way, including a change in color or shape. Such batteries could leak corrosive liquids or generate heat.
15.Stop recharging rechargeable batteries if you notice that recharging is not completed within the specified time to help prevent the possibility of the battery leaking corrosive liquids or generating heat.
16.When recycling or disposing of batteries, be sure to insulate their terminals with tape. If the battery’s positive and negative terminals shortcircuit after coming into contact with metallic objects, it could cause fire, heat generation or an explosion. Dispose of used batteries in accordance with local government regulations.
17.Non-rechargeable batteries should never be charged in a battery charger because they could leak corrosive liquids or generate heat.
18.Remove dead batteries from your equipment immediately, as they could leak corrosive liquids, generate heat or explode.
19.Be careful when replacing batteries after continuous flash use, because batteries may generate heat during continuous flash photography.
A–17
For Your Safety
 CAUTION for Batteries
Do not throw or apply strong physical shocks to the batteries as this could cause batteries to leak corrosive liquids, generate heat or explode.
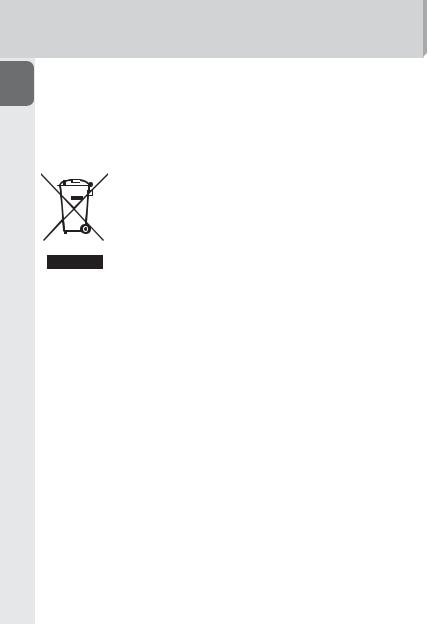
Symbol for separate collection applicable in European countries
This symbol indicates that this product is to be collected separately. The following apply only to users in European countries.
•This product is designated for separate collection at an appropriate collection point. Do not dispose of as household waste.
•For more information, contact the retailer or the local authorities
in charge of waste management.
A–18

Check before Use
 Tips on using the Speedlight
Take trial shots
Take trial shots before photographing important occasions such as weddings or graduations.
Have Nikon spot-check your Speedlight regularly
Nikon recommends that you have your Speedlight serviced by an authorized dealer or service center at least once every two years.
Use your Speedlight with Nikon equipment
The Nikon Speedlight SB-910’s performance has been optimized for use with Nikon brand cameras/accessories including lenses.
Cameras/accessories made by other manufacturers may not meet Nikon’s criteria for specifications, and incompatible cameras/accessories could damage the SB-910’s components. Nikon cannot guarantee the SB-910’s performance when used with non-Nikon products.
 Life-long learning
As part of Nikon’s “life-long learning” commitment to ongoing product support and education, continually updated information is available online at the following websites:
•For users in the United States: http://www.nikonusa.com/
•For users in Europe and Africa: http://www.europe-nikon.com/support/
•For users in Asia, Oceania and the Middle East: http://www.nikon-asia.com/
Visit these sites to keep up to date with the latest product information, tips, answers to frequently-asked questions (FAQs), and general advice on digital imaging and photography. Additional information may be available from the Nikon representative in your area. See the URL below for contact information:
http://imaging.nikon.com/
A–19
B Operation
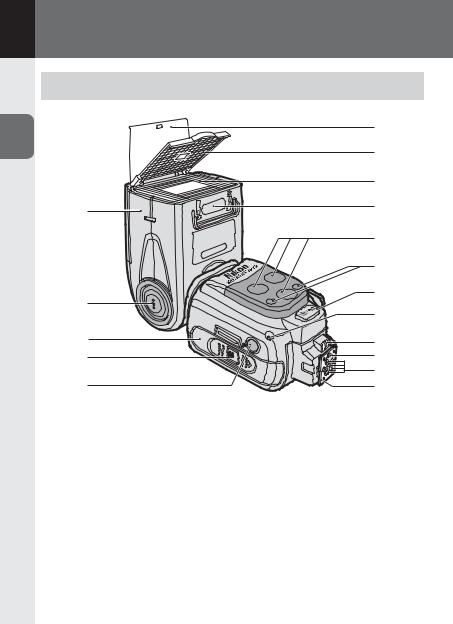
Speedlight Parts
B
2
3
4
5
1Flash head
2Flash head tilting/rotating lock release button (0B-9)
3Battery chamber cover
4Battery chamber cover lock release (0B-6)
5Light sensor window for wireless remote flash (0D-17)
6Built-in bounce card (0E-8)
7Built-in wide panel (0E-10)
8Flash panel
9Filter detector (0E-14)
|
6 |
||
|
7 |
||
|
8 |
||
|
9 |
||
|
10 |
||
|
11 |
||
|
12 |
||
|
13 |
||
|
14 |
||
|
PUSH |
15 |
|
|
16 |
||
|
17 |
10AF-assist illuminator (0E-19)
11Flash-ready indicator (in remote mode) (0D-20)
12External power source terminal (supplied with cover) (0H-11)
13Light sensor for non-TTL auto
flash (0C-5, C-8)
14External AF-assist illuminator contacts
15Locking pin
16Accessory shoe contacts
17Mounting foot
B–1
![]()
18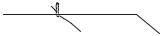
18Flash head tilting angle scale
(0E-4)
19Flash head rotating angle scale
(0E-4)
20Sync terminal cover
21Sync terminal
22LCD panel (0B-12)
23Flash-ready indicator
(0B-11, D-20)
24Mounting foot lock lever (0B-8)

Speedlight Parts
B
25[MODE] button
Selects flash mode (0B-11)
26[MENU] button
Displays custom settings (0B-13)
27Function button 1
28Function button 2
29Function button 3
•Selects item to be configured
•The assigned function or setting for each button differs according to the flash mode and settings of the SB-910. (0B-5)
30Test firing button
•Controls test firing (0E-21) and modeling illumination (0E-21)
•The button function, test firing and modeling illumination can be changed in the custom settings. (0B-17)
27
28
 29
29  30
30
31
32
33
34
31Lock release
To set wireless mode for multiple flash units, rotate the power switch/wireless mode switch for multiple flash units while holding down the lock release in the center of the switch. (0D-6, D-7)
32Power switch/wireless mode switch for multiple flash units
•Rotate to turn power on and off.
•Selects the master or remote mode in wireless multiple flashunit photography (0D-6, D-7)
33Selector dial
Rotate to change selected item. The selected item is highlighted on the LCD. (0B-12)
34[OK] button
Confirms selected setting (0B-12)
B–3

t Activating key lock
Key lock icon
Press function buttons 1 and 2, between which a lock icon is printed, simultaneously for 2 seconds. The key lock icon appears on the LCD and the dial and buttons are locked.
•The power switch/wireless mode switch for multiple flash units and the test firing button remain unlocked.
•To cancel key lock, press function buttons 1 and 2 again simultaneously for 2 seconds.
B–4
Function Buttons
The assigned function or setting for each button differs according to the flash mode and settings of the SB-910.
• The assigned function or setting for each button is indicated by an icon.
• When no function is assigned to a button, no icon appears above the button on the LCD.
|
Function button 1 |
Function button 2 |
Function button 3 |
 Functions and settings icons
Zoom head position
Flash compensation value
Flash output level in manual flash mode
Amount of underexposure due to insufficient flash output in i-TTL mode
Aperture
Flash-to-subject distance (in distance-priority manual flash mode)
Number and frequency of flash firings
Change setting items
Illumination pattern
Activate power zoom function
[With wireless multiple flash-unit photography] (0D-1)
Channels
Sound monitor
[In custom settings] (0B-13)
Go to previous page
Go to next page
Display My Menu or Full
Menu
Change My Menu items
End changing My Menu items
B–5

Basic Operations
This section covers basic procedures in i-TTL mode in combination with a CLScompatible camera.
vNotes on continuous flash photography
•To prevent the SB-910 from overheating, allow it to cool down for at least 10 minutes after 15 times of continuous firing.
•When continuous flash firing is repeated in quick succession, the internal safety function adjusts the recycling time by up to 15 seconds. If flash firing continues, the thermal cut-out indicator appears on the LCD and all operations except power ON/OFF and custom settings are suspended. (0E-23) Allow it to cool down for several minutes to disable this function.
•The conditions under which the internal safety function is activated differ depending on the temperature and the SB-910 flash output level.
•For use with High-performance Battery Pack SD-9 (optional), see “Using Highperformance Battery Pack SD-9.” (0H-11)
 STEP 1 Inserting the batteries
 Slide the battery chamber cover open while pressing the battery chamber cover lock release.
 Insert the batteries following the [+] and [−] marks.
 Close the battery chamber cover.
B–6

Basic Operations
 Compatible batteries and replacement/recharging
When replacing batteries, use four fresh AA-size batteries of the same brand. Refer to the following table to determine when to replace batteries with fresh ones or
Brechargeon. batteries according to how long the flash-ready indicator takes to come
Operation
|
Battery type |
Time the flash-ready indicator takes to |
||
|
come on |
|||
|
1.5 |
V LR6 (AA-size) alkaline battery |
20 seconds or more |
|
|
1.5 |
V FR6 (AA-size) lithium battery |
10 seconds or more |
|
|
1.2 |
V HR6 (AA-size) rechargeable Ni-MH |
10 seconds or more |
|
|
battery |
|||
•For minimum recycling time and number of flashes for each battery type, refer to “Specifications.” (0H-21)
•Alkaline battery performance may vary greatly depending on the manufacturer.
•1.5 V R6 (AA-size) carbon-zinc batteries are not recommended.
•Using an optional external power source increases the number of flashes and provides shorter recycling times. (0H-11)
v Additional precautions regarding batteries
•Read and follow battery warnings and cautions (0A-14 – A-18).
•Be sure to read and follow the warnings for the battery on the section, “Notes on Batteries” (0H-7), before using the battery.
•The recycling time can be longer when FR6 (AA-size) lithium batteries are used because they incorporate a function that suppresses the output current when heat is generated in the batteries.
B–7
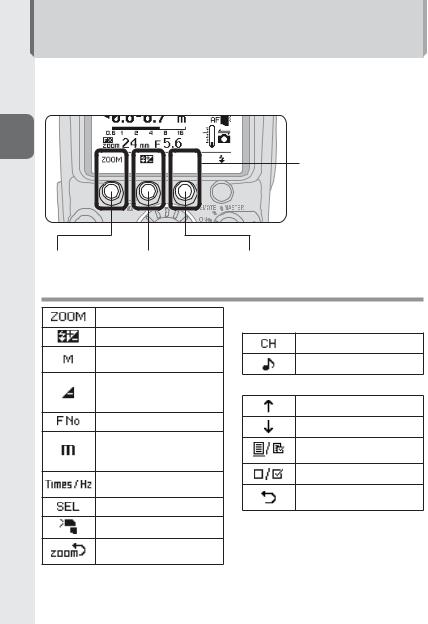
Low battery power indicator
When battery power is low, the icon shown at the left appears on the LCD and the SB-910 stops functioning. Replace or recharge batteries.
 STEP 2 Attaching the SB-910 to the camera
 Make sure the SB-910 and
the camera body are turned
off.
 Make sure the mounting
foot lock lever is on the left
(white dot).

 Slide the SB-910’s mounting
foot into the camera’s
accessory shoe.
 Turn the lock lever to “L.”


 v Lock the Speedlight in place
Turn the lock lever clockwise until it stops at the mounting foot lock index.
B–8
Basic Operations
Detaching the SB-910 from the camera
 Make sure the SB-910 and
the camera body are turned
off, turn the lock lever 90° to
the left, and then slide the
SB-910’s mounting foot from the camera’s accessory shoe.
•If the SB-910’s mounting foot cannot be removed from the camera’s accessory shoe, turn the lock lever 90° to the left again, and slide the SB-910 slowly out.
•Do not forcibly remove the SB-910.
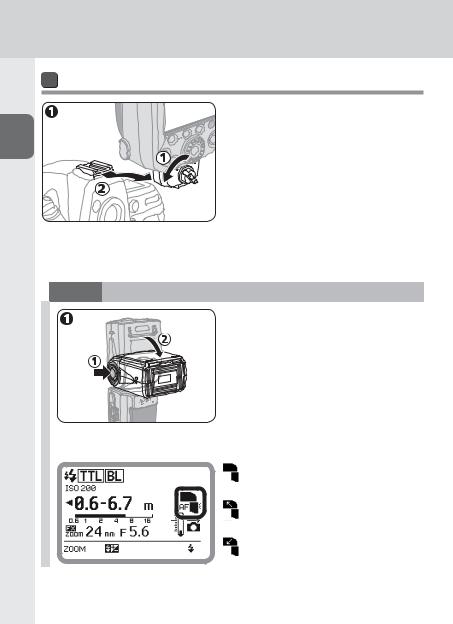
 STEP 3 Adjusting the flash head
 Adjust the flash head to
the forward-facing position
while holding down the flash
head tilting/rotating lock
release button.
• The flash head is locked when tilted 90° up or set in the forward-facing position.
LCD indicator for flash head status
Flash head is set in the forward-facing position.
Flash head is set at angle. (Flash head is tilted up or rotated to the right or left.)
Flash head is tilted down.
B–9

 STEP 4 Turning the SB-910 and camera on
 Turn the SB-910 and the
camera body on.
LCD example
•The image below is the SB-910 LCD example under the following conditions: flash mode: i-TTL mode; image area: FX format; illumination pattern: standard; ISO sensitivity: 200; zoom head position: 24 mm; aperture f-number: 5.6
•Icons on the LCD may differ depending on the SB-910 settings and the camera and lens in use.
|
SB-910 flash information |
SB-910 status icons |
|||||||||||||||||
|
Flash mode |
||||||||||||||||||
|
ISO sensitivity |
||||||||||||||||||
|
Effective flash output |
||||||||||||||||||
|
distance range |
Connected to a CLS- |
|||||||||||||||||
|
FX format |
compatible camera |
|||||||||||||||||
|
Aperture f-number |
||||||||||||||||||
|
Zoom head position |
||||||||||||||||||
|
Functions assigned for function buttons |
B–10

Basic Operations
 STEP 5 Selecting the flash mode
 Press the [MODE] button to highlight the flash mode.
 Rotate the selector dial to display
  .
.
 Press the [OK] button.
Changing the flash mode
Rotate the selector dial clockwise to display icons of available flash mode on the LCD.
•Only available flash modes are displayed on the LCD.
•The flash mode can also be selected with the [MODE] button.
Make sure that the flashready indicator on the SB-910 or in the camera’s viewfinder is on before taking a picture.
![]()
Settings and the LCD
Icons on the LCD show the status of settings. Displayed icons vary according to selected flash modes and settings.
• The basic control of SB-910 functions is as follows:
 Press a button to highlight the
selected item.
 Change the setting by rotating the selector dial.
 Press the [OK] button to confirm setting.
• Once confirmed, the highlighted item
returns to normal display.
• If the [OK] button is not pressed, the highlighted item is confirmed and returns to normal display after 8 seconds.
t Two-button reset
Press function buttons 1 and 3 (a green dot is printed by each button) simultaneously for
2 seconds to reset all settings except custom settings to default.
• When the reset completes, the LCD is highlighted and then returns to normal display.
B–12

Custom Functions and Settings
Various operations for the SB-910 can be easily set using the LCD.
•Displayed icons vary according to the combination of camera and status of the SB-910.
•Functions and settings indicated with grid boxes do not function even though
they can be configured and set.
Custom settings
 Press the [MENU] button to display the custom settings.
 Rotate the selector dial to choose an item, and then press the [OK] button.
• The highlighted item can be configured.
Item being configured
Items indicated with grid boxes can be configured but do not effect flash operation.
B–13

 Rotate the selector dial to highlight the chosen setting, and then press the [OK] button.
• Highlighted while selected
• Press the [OK] button to return display to item selection.
 Press the [MENU] button to return to normal display.
• The LCD returns to normal display.
º: Current setting
Available selection
B–14

Custom Functions and Settings
Setting My Menu
When a custom settings page is displayed, only the custom settings items that are set as My Menu are displayed on the LCD.
B• My Menu items can be changed any time.
• To display all items, select “FULL” in the My Menu setting in the custom settings.
Operation

Select “SET UP” in My Menu setting in the custom settings, and press the [OK] button.
Select custom settings item to be set as My Menu with the selector dial, and press function button 2.
•The selected item will have a ticked check box (  ).
).
•No check box appears for an item that cannot be selected.
•To untick a check box, press function button 2 again.
•To return to My Menu setting without saving, press function button 1.
 Repeat procedure
  to set all desired items, and then press the [OK] button to return to My Menu setting.
 Press the [MENU] button to close custom settings.
• The LCD returns to normal display.
B–15

t Custom settings page display function and display mode
Page display function
Custom settings pages can be changed with function buttons 1 and 2.
•The number of pages displayed varies from one to five depending on the settings.
•The position of the displayed page is indicated in the bar.
Display mode
The custom settings display mode, My Menu or Full Menu, can be changed with function button 3.
Position of displayed page within custom settings
 : Go to previous page
  : Go to next page
 : Full Menu display : My Menu display
B–16

Custom Functions and Settings
Available custom functions and settings
(Bold: default)
Non-TTL auto flash mode option (0C-5, C-8)
Auto aperture flash with monitor pre-flashes
Auto aperture flash without monitor pre-flashes
Non-TTL auto flash with monitor pre-flashes
Non-TTL auto flash without monitor pre-flashes
Master flash unit repeating flash mode (0D-10)
ON: Repeating flash mode on
OFF: Repeating flash mode off
Flash compensation step in manual flash mode (0C-17) Setting flash compensation step between M1/1 and M1/2 in manual flash mode
1/3 EV: Compensation with 1/3 EV step
1 EV: Compensation with 1 EV step
Wireless mode for multiple flash units (0D-1)
Advanced: Advanced Wireless Lighting
SU-4: SU-4 type wireless multiple flash-unit photography
Test firing button (0E-21)
FLASH: Test firing
MODELING: Modeling illumination
B–17

Test firing flash output level in i-TTL mode (0E-21)
M1/128: Approx. 1/128
M1/32: Approx. 1/32
M1/1: Full
FX/DX format selection (0A-6)
When the zoom head position is manually set, image area settings can be selected.
FX±∞DX: Automatically set according to the camera’s image area
FX: Nikon FX format (36 × 24) DX: Nikon DX format (24 × 16)
Canceling power zoom function (0E-19)
Activating or canceling power zoom function
ON: Power zoom function canceled
OFF: Power zoom function activated
AF-assist illumination/canceling flash function (0E-20) Activating or canceling AF-assist illumination and flash function
ON: Both AF-assist illumination and flash function activated
OFF: AF-assist illumination canceled, flash function activated
AF ONLY: AF-assist illumination activated, flash function canceled (only AF-assist illuminator lights up)
Standby function (0E-22)
Adjusting the time before the standby function is activated.
AUTO: Standby function activated when the camera’s exposure meter is turned off
40: 40 seconds 80: 80 seconds 160: 160 seconds 300: 300 seconds
—: Standby function canceled
B–18

Custom Functions and Settings
ISO sensitivity manual setting (0E-21)
Setting ISO sensitivity within the range of between 3 and 8000.
100: ISO 100
Flash-ready indicator in remote mode (0D-20)
Selecting which flash-ready indicator to blink/light up in remote mode to save power
REAR, FRONT: Back indicator lights up, front indicator blinks in remote mode
REAR: Only back indicator lights up
FRONT: Only front indicator blinks in remote mode
LCD panel illumination (0H-8)
Activating or canceling LCD panel illumination
ON: Activated
OFF: Canceled
LCD panel contrast (0H-8)
Contrast levels are displayed on the LCD in a nine-step graph.
5 levels in 9 steps
Measurement unit (m/ft)
m: meters ft: feet
B–19

Zoom head position manual setting with broken built-in wide panel (0E-11)
Selecting whether the zoom head position can be manually set or not when the built-in wide panel is broken.
ON: Zoom head position can be manually set
OFF: Zoom head position cannot be manually set
My Menu setting (0B-15)
Selecting custom settings display mode
FULL: All items displayed
MY MENU: Items set as My Menu displayed
SET UP: Select items to be set as My Menu
Version of firmware (0H-9)
Reset custom settings
Reset custom settings to default except measurement unit (m/ft) and My Menu settings.
YES: Reset to default
NO: Do not reset
B–20

Flash Modes
i-TTL Mode
Information obtained by monitor pre-flashes and exposure control information is integrated by the camera to automatically adjust flash output levels.
•To take pictures using the SB-910 set in i-TTL mode, see “Basic Operations” (0B-6).
•Either the i-TTL balanced fill-flash mode or the standard i-TTL mode option is available.
i-TTL balanced fill-flash
The flash output level is automatically adjusted for well-balanced exposure of the main subject and background.  appears on the LCD.
Standard i-TTL
The main subject is correctly exposed regardless of background brightness. This is useful when you want to highlight the main subject.  appears on the LCD.
t Camera’s metering mode and i-TTL mode
•When the camera’s metering mode is changed to spot metering while i-TTL balanced fill-flash is in use, the i-TTL mode automatically changes to the standard i-TTL mode.
•The i-TTL mode automatically changes to i-TTL balanced fill-flash, after changing the camera’s metering mode to matrix or center-weighted.
C–1
![]()
Setting i-TTL mode
 Press the [MODE] button.
 Rotate the selector dial to display
  or
or  .
.
 Press the [OK] button
C
Flash Modes
i-TTL mode LCD example
: Monitor pre-flashes
 : i-TTL
: Balanced fill-flash
C–2
 Loading…
 Модель: Фотовспышка Nikon Speedlight SB-910
Количество страниц: 136
Язык: русский
Формат: pdf
Размер: 3.3 Mb
Описание:
Профессиональная вспышка i-TTL совместима с зеркальными фотокамерами Nikon форматов FX и DX и включает систему креативного освещения Nikon. Быстрая, универсальная и мощная вспышка Nikon Speedlight SB-910 обеспечивает расширенные возможности фотосъемки с установленной на фотокамере или беспроводной вспышкой. Три шаблона освещения вспышкой обеспечивают полное управление зоной вспышки, при этом для диапазона объективов 17-200 мм регулировка осуществляется автоматически.
Содержание
- A. Подготовка.
- О вспышке SB-910 и данном руководстве пользователя.
- Вопросы и ответы.
- Правила безопасности.
- Перед использованием.
- B. Использование вспышки.
- Детали Speedlight.
- Кнопки функций.
- Основные функции.
- Настройки и ЖКИ.
- Собственные функции и настройки.
- C. Режимы вспышки.
- Режим i-TTL.
- Режим вспышки с автоматической диафрагмой.
- Режим автоматической вспышки без TTL.
- Режим ручной вспышки с приоритетом расстояния.
- Режим ручной вспышки.
- Режим многократной вспышки.
- D. Фотосъемка с использованием нескольких беспроводных вспышек.
- Настройка SB-910 для фотосъемки с использованием нескольких беспроводных вспышек.
- Функции SB-910 при фотосъемке с использованием нескольких беспроводных вспышек.
- Настройка ведущей вспышки.
- Настройка ведомой вспышки.
- Улучшенное беспроводное управление.
- Фотосъемка с использованием нескольких беспроводных вспышек типа SU-4.
- Ведомые вспышки.
- Проверка состояния при фотосъемке с использованием нескольких беспроводных вспышек.
- E. Функции.
- Включение шаблона освещения вспышкой.
- Функция отраженной вспышки.
- Фотосъемка с близкого расстояния.
- Фотосъемка со вспышкой и цветными фильтрами.
- Функции поддержки фотосъемки со вспышкой.
- Коррекция вспышки.
- Функция автокоррекции угла вспышки при зуммировании.
- Вспомогательная подсветка АФ.
- Настройка чувствительности ISO вручную.
- Пробное срабатывание.
- Моделирующий свет.
- Функция перехода в режим ожидания.
- Защита от перегрева.
- Функции для установки на фотокамере.
- Автоматическая высокоскоростная синхронизация FP.
- Блокировка мощности вспышки (FV-блокировка).
- Медленная синхронизация.
- Подавление эффекта «красных глаз»/подавление эффекта «красных глаз» в режиме медленной синхронизации.
- Синхронизация по задней шторке.
- F. Для использования с CLS-несовместимыми зеркальными фотокамерами.
- G. Для использования с фотокамерами COOLPIX.
- H. Советы по уходу за Speedlight и справочная информация.
- Поиск и устранение неисправностей.
- Ведущее число, диафрагма и расстояние от вспышки до объекта съемки.
- Советы по уходу за Speedlight.
- Примечания к батареям.
- Сведения о ЖКИ.
- Обновление прошивки.
- Дополнительные принадлежности.
- Технические характеристики.
- Алфавитный индекс.
Скачать: disk.yandex.ru | mega.co.nz
Раздел: Видео Аудио Фото Оборудование
Тип: Фотовспышка
Характеристики, спецификации
Краткое описание:
34;от 0,6 до 20 м;4 x AA (LR 6);510г
Вид гарантии:
гарантийный талон
Автоматическая настройка:
Да
Автоматическая фокусировка:
Да
Ведущие число (ISO100):
34
Высокоскоростная синхронизация:
Да
Диапазон срабатывания:
от 0,6 до 20 м
Беспроводной режим работы:
Да
Режим отраженной вспышки:
Да
Вертикальная регулировка:
+ 90*
Горизонтальная регулировка:
360*
Тип исп. батареи:
4 x AA (LR 6)
Подставка для беспроводного режима:
в комплекте
Батареи в комплекте:
доп.опция
Габаритные размеры (В*Ш*Г):
145*78*113 мм
Инструкция к Фотовспышке Nikon SB-910
Вспышка с автофокусировкой Speedlight
Руководство пользователя
Ru
О вспышке SB-910 и данном руководстве пользователя
Благодарим за приобретение вспышки Nikon Speedlight SB-910. Чтобы использовать
A
все возможности Speedlight , перед началом работы внимательно прочитайте
настоящее руководство пользователя. Храните данное руководство в доступном
месте для получения быстрой справки.
Поиск необходимой информации
Подготовка
i
Оглавление
(0A-11)
Поиск по ключевым словам, таким как «метод работы», «режим вспышки» или
«функция».
i
Вопросы и ответы
(0A-9)
Вы можете выполнять целевой поиск; для этого не требуется знать конкретное
название элемента или термин.
i
Алфавитный индекс
(0H-22)
Поиск при помощи алфавитного индекса.
i
Поиск и устранение неисправностей
(0H-1)
Если возникла проблема со Speedlight, здесь можно найти ее решение.
Правила безопасности
Перед началом использования Speedlight прочитайте инструкции в разделе
«Правила безопасности» (0A-14 – A-18).
A–2
Комплект поставки
A
Убедитесь, что приведенные ниже аксессуары присутствуют в комплекте SB-910.
Если какой-либо из аксессуаров отсутствует, незамедлительно сообщите об этом в
магазин, где была приобретена вспышка SB-910 или непосредственно продавцу.
❑ Подставка для Speedlight AS-21 ❑ Мягкий чехол SS-910
❑ Рассеивающий колпак Nikon SW-13H ❑ Руководство пользователя (данное
Подготовка
❑ Фильтр под лампы дневного света
руководство)
SZ-2FL
❑ Коллекция образцов снимков
❑ Фильтр под лампы накаливания SZ-2TN ❑ Гарантийный талон
Мягкий чехол SS-910
Подставка для
Speedlight AS-21
SB-910
Фильтр под лампы дневного света SZ-2FL
Фильтр под лампы накаливания SZ-2TN
Рассеивающий колпак
Nikon SW-13H
A–3
О вспышке SB-910 и данном руководстве пользователя
О вспышке SB-910
A
SB-910 – высокопроизводительная фотовспышка Speedlight, совместимая с системой
креативного освещения Nikon (CLS) с ведущим числом 34/48 (ISO 100/200, м) (при
положении зуммирующей головки 35 мм в формате Nikon FX со стандартным
шаблоном освещения вспышкой, 20 °C).
Подготовка
CLS-совместимые фотокамеры
Цифровые зеркальные фотокамеры Nikon (формата Nikon FX/DX)
(кроме серий D1, D100), F6, фотокамеры COOLPIX (P7100, P7000,
P6000)
Об этом руководстве пользователя
При составлении настоящего руководства предполагалось, что SB-910 будет
использоваться с CLS-совместимой фотокамерой, и объективом со встроенным
микропроцессором (0A-5). Чтобы использовать все возможности Speedlight , перед
началом работы внимательно прочитайте настоящее руководство пользователя.
Для использования с CLS-несовместимыми зеркальными фотокамерами см. раздел •
«Для использования с CLS-несовместимыми зеркальными фотокамерами». (0F-1)
Для использования с i-TTL- совместимыми фотокамерами COOLPIX (P5100, P5000, •
E8800, E8400) см. раздел «Для использования с фотокамерами COOLPIX». (0G-1)
Отдельная «Коллекция образцов снимков» содержит обзор возможностей •
фотосъемки со вспышкой SB-910 с примерами фотоснимков.
Описание функций и настроек фотокамеры см. в руководстве пользователя •
фотокамеры.
Обозначения, используемые в настоящем руководстве
v Описывает момент, на который следует обратить особое внимание во
избежание проблем при работе Speedlight или ошибок во время съемки.
t Содержит информацию или советы для упрощения работы со вспышкой
Speedlight.
0 Ссылка на другие страницы в данном руководстве
A–4

t Советы по идентификации объективов CPU NIKKOR со
A
встроенным микропроцессором
Объективы со встроенным микропроцессором имеют контакты микропроцессора.
Контакты микропроцессора
Вспышка SB-910 не может использоваться с •
объективами IX-Nikkor.
Подготовка
A–5

О вспышке SB-910 и данном руководстве пользователя
Терминология
A
■ Настройки по умолчанию
Настройки функций и режимов, установленные на момент приобретения
■ Система креативного освещения Nikon ( CLS)
Система освещения, обеспечивающая ряд функций при фотосъемке со вспышкой
Подготовка
с использованием усовершенствованной передачи данных между Speedlights и
фотокамерами Nikon
Шаблон освещения вспышкой ■
Контрольные типы уменьшения освещения по краям; SB-910 обеспечивает три
шаблона освещения вспышкой – стандартный, равномерный и центровзвешенный.
■ Формат FX/ формат DX
Типы области изображения цифровых зеркальных фотокамер Nikon (формат FX:
36 × 24, формат DX: 24 × 16)
Ведущее число (GN) ■
Количество света, генерируемого вспышкой; GN = расстояние от вспышки до
объекта (м) × число f диафрагмы (ISO 100)
Положение зуммирующей головки ■
Положение зуммирующей головки Speedlight; угол покрытия изменяется при
изменении положения зуммирующей головки.
■ Эффективное расстояние срабатывания вспышки
Расстояние от вспышки до объекта с правильно настроенной выходной мощностью
вспышки
■ Диапазон эффективных расстояний срабатывания вспышки
Предел эффективных расстояний для срабатывания вспышки
Коррекция вспышки ■
Намеренное изменение выходной мощности вспышки для получения необходимой
яркости объекта
A–6

Режим i-TTL ■
A
Режим вспышки, в котором Speedlight выполняет тестирующие предварительные
вспышки, во время которых фотокамера измеряет отраженный свет и управляет
выходной мощностью вспышки Speedlight
Тестирующие предварительные вспышки
Едва заметные вспышки, выполняемые перед основной вспышкой, которые
позволяют фотокамере измерить свет, отражаемый от объекта съемки
Подготовка
Сбалансированная заполняющая вспышка i-TTL
Тип режима i-TTL, в котором мощность вспышки настраивается для
сбалансированной экспозиции основного объекта и фона
Стандартный i-TTL
Тип режима i-TTL, в котором уровень выходной мощности вспышки настраивается
для получения правильной экспозиции основного объекта независимо от
яркости фона
Режим вспышки с автоматической диафрагмой ■
Режим автоматической вспышки без ТТL с приоритетом диафрагмы; Speedlight
измеряет отраженную вспышку, а также контролирует выходную мощность вспышки
в соответствии с отраженной вспышкой и информацией от объектива и фотокамеры
Режим автоматической вспышки без TTL ■
Режим автоматической вспышки без ТТL; Speedlight измеряет отраженную вспышку,
а также контролирует выходную мощность вспышки в соответствии с отраженной
вспышкой
Режим ручной вспышки с приоритетом расстояния ■
Режим ручной вспышки с приоритетом расстояния; устанавливается расстояние от
вспышки до объекта съемки, а уровень выходной мощности вспышки настраивается
в соответствии с настройками фотокамеры.
Режим ручной вспышки ■
Режим вспышки, в котором уровень выходной мощности вспышки и диафрагма
устанавливаются вручную для получения необходимой экспозиции
Режим многократной вспышки ■
Режим вспышки, в котором Speedlight срабатывает повторно при неизменяемой
экспозиции для создания разных стробоскопических эффектов
A–7

О вспышке SB-910 и данном руководстве пользователя
Шаг ■
A
Изменяемый интервал на шкале выдержки затвора или диафрагмы; при изменении
на один шаг наполовину уменьшается/увеличивается в два раза количество света,
входящего в фотокамеру
■ EV (экспозиционного числа, ЭЧ)
Каждый инкремент 1 экспозиционного числа соответствует одному шагу в
изменении экспозиции, при котором выполняется уменьшение наполовину/
Подготовка
увеличение в два раза выдержки затвора или диафрагмы
Фотосъемка с использованием нескольких беспроводных ■
вспышек
Фотосъемка со вспышкой и одновременным срабатыванием нескольких
беспроводных вспышек
Ведущая вспышка
Вспышка, управляющая ведомой вспышкой при фотосъемке с использованием
нескольких вспышек
Ведомая вспышка
Вспышка, работающая под управлением ведущей вспышки
Улучшенное беспроводное управление
Фотосъемка с использованием нескольких беспроводных вспышек и CLS;
группами, состоящими из нескольких ведомых вспышек, можно управлять с
помощью ведущей вспышки.
Фотосъемка с использованием нескольких беспроводных
вспышек типа SU-4
Фотосъемка с использованием нескольких беспроводных вспышек подходит для
съемки быстродвижущихся объектов; ведущая и ведомая вспышки срабатывают
почти одновременно, поскольку ведущая вспышка не излучает тестирующие
предварительные вспышки.
A–8
Вопросы и ответы
Доступен поиск специальных пояснений в соответствии с определенной целью.
A
Фотосъемка со вспышкой 1
(с SB-910 установленной на фотокамере)
Вопрос Ключевые слова
0
B
В каком режиме вспышки можно создавать снимки? Режимы вспышки C-1
Какой самый простой способ создания снимков? Основные функции B-6
Шаблон освещения вспышкой:
Как создавать официальные групповые снимки?
E-2
C
равномерный
Как создать портретный снимок с выделением
Шаблон освещения вспышкой:
E-2
главного объекта съемки?
центровзвешенный
Как создать снимок с мягкими тенями,
D
Функция отраженной вспышки E-4
отбрасываемыми на стену?
Как подтвердить условия освещения? Моделирующий свет E-21
Как создать более яркие (или темные) снимки
Коррекция вспышки E-17
E
объекта?
Как выполнять съемку при освещении лампами
дневного света и лампами накаливания, а также
Фильтры цветовой коррекции E-12
настроить цветовые эффекты?
F
Как создать снимок с добавлением определенного
Цветные фильтры E-12
цвета к вспышкe Speedlight?
Как использовать автофокусировку при слабом
Вспомогательная подсветка
E-19
освещении?
АФ
G
Как создать ночной снимок объекта вместе с фоном? Медленная синхронизация E-25
Как создать снимок без появления эффекта «красных
Подавление эффекта «красных
E-25
глаз»?
глаз»
H
Как снять движущийся объект с использованием
стробоскопических мультиэкспозиционных
Режим многократной вспышки C-18
эффектов?
Как использовать SB-910 с CLS-несовместимыми
CLS-несовместимая
F-1
зеркальными фотокамерами?
зеркальная фотокамера
Как использовать SB-910 с фотокамерой COOLPIX? Фотокамера COOLPIX G-1
A–9
Вопросы и ответы
Фотосъемка со вспышкой 2 (с беспроводной вспышкой SB-910)
A
Вопрос Ключевые слова
0
Как выполнить съемку с использованием нескольких
Улучшенное беспроводное
D-1
вспышек?
управление
Фотосъемка с использованием
Как выполнить съемку быстро движущихся объектов с
нескольких беспроводных
D-12
Подготовка
использованием нескольких беспроводных вспышек?
вспышек типа SU-4
Как выполнить съемку с использованием SB-910 и
фотокамерой COOLPIX, поддерживающей фотосъемку
CLS-совместимая фотокамера
G-1
с использованием нескольких беспроводных
COOLPIX
вспышек?
Настройка и использование
Вопрос Ключевые слова
0
Какой тип батарей должен использоваться в
Совместимая батарея B-7
Speedlight?
Минимальное количество
Какое время перезарядки и сколько вспышек
вспышек/время перезарядки
H-21
обеспечивает каждая установка свежих батарей?
для каждого типа батарей
Как можно изменить настройки функций? Собственные настройки B-13
Как выполнить сброс разных настроек? Двухкнопочный сброс B-12
Как заблокировать диск и кнопки Speedlight для
Блокировка кнопок B-4
избежания случайного срабатывания?
Как можно обновить прошивку Speedlight? Обновление прошивки H-9
A–10

Оглавление
Подготовка
A
A
О вспышке SB-910 и данном руководстве пользователя…………………………………….A-2
Вопросы и ответы ………………………………………………………………………………………………………………….. A-9
Правила безопасности …………………………………………………………………………………………….………..A-14
Перед использованием …………………………………………………………………………………………….……….A-19
B
Использование вспышки
B
Детали Speedlight ……………………………………………………………………………………………………………………B-1
Кнопки функций ……………………………………………………………………………………………………………………….B-5
C
Основные функции …………………………………………………………………………………………………………………B-6
Настройки и ЖКИ ………………………………………………………………………………………………………………….B-12
Собственные функции и настройки ……………………………………………………………………………B-13
D
Режимы вспышки
C
Режим i-TTL………………………………………………………………………………………………………………………………… C-1
Режим вспышки с автоматической диафрагмой …………………………………………………….. C-5
E
Режим автоматической вспышки без TTL …………………………………………………………………… C-8
Режим ручной вспышки с приоритетом расстояния …………………………………………..C-12
Режим ручной вспышки …………………………………………………………………………………………………….C-15
Режим многократной вспышки ………………………………………………………………………………………C-18
F
Фотосъемка с использованием нескольких
D
беспроводных вспышек
Настройка SB-910 для фотосъемки с использованием нескольких
G
беспроводных вспышек ………………………………………………………………………………………………….D-1
Функции SB-910 при фотосъемке с использованием нескольких
беспроводных вспышек ………………………………………………………………………………………………….D-4
H
Настройка ведущей вспышки …………………………………………………………………………………………..D-6
Настройка ведомой вспышки …………………………………………………………………………………………..D-7
Улучшенное беспроводное управление …………………………………………………………………….D-8
Фотосъемка с использованием нескольких беспроводных вспышек
типа SU-4 ……………………………………………………………………………………………………………………………..D-12
Ведомые вспышки ……………………………………………………………………………………………………………….D-17
Проверка состояния при фотосъемке с использованием нескольких
беспроводных вспышек ……………………………………………………………………………………………….D-20
A–11

Оглавление
Функции
A
E
Включение шаблона освещения вспышкой ……………………………………………………………….E-2
Функция отраженной вспышки ………………………………………………………………………………………..E—4
Фотосъемка с близкого расстояния ………………………………………………………………………………E-9
Фотосъемка со вспышкой и цветными фильтрами ……………………………………………… E-12
Функции поддержки фотосъемки со вспышкой ……………………………………………………E-17
Подготовка
Коррекция вспышки• …………………………………………………………………………………………………..E-17
Функция автокоррекции угла вспышки при зуммировании• ………………….E-18
Вспомогательная подсветка АФ• ……………………………………………………………………………E-19
Настройка чувствительности ISO вручную• ……………………………………………………..E-21
Пробное срабатывание• …………………………………………………………………………………………….E-21
Моделирующий свет• ………………………………………………………………………………………………….E-21
Функция перехода в режим ожидания• ……………………………………………………………..E-22
Защита от перегрева• ………………………………………………………………………………………………….E-23
Функции для установки на фотокамере …………………………………………………………………….E-24
Автоматическая высокоскоростная синхронизация FP• ……………………………E-24
Блокировка мощности вспышки (FV-блокировка)• ………………………………………E-25
Медленная синхронизация• …………………………………………………………………………………….E-25
Подавление эффекта «красных глаз»/подавление эффекта •
«красных глаз» в режиме медленной синхронизации …………………………. E-25
Синхронизация по задней шторке• ……………………………………………………………………..E-26
Для использования с CLS-несовместимыми
F
зеркальными фотокамерами …………………………………………………………………..F-1
Для использования с фотокамерами COOLPIX ………………… G-1
G
A–12

Советы по уходу за Speedlight и справочная
A
H
информация
Поиск и устранение неисправностей ………………………………………………………………………….H-1
Ведущее число, диафрагма и расстояние от вспышки до объекта
съемки……………………………………………………………………………………………………………………………………..H-4
B
Советы по уходу за Speedlight ………………………………………………………………………………………….H-5
Примечания к батареям ………………………………………………………………………………………………………H-7
Сведения о ЖКИ ………………………………………………………………………………………………………………………H-8
C
Обновление прошивки ……………………………………………………………………………………………………….H-9
Дополнительные принадлежности ……………………………………………………………………………. H-10
Технические характеристики ………………………………………………………………………………………… H-13
Алфавитный индекс ……………………………………………………………………………………………………………H-22
D
E
F
G
H
A–13
Правила безопасности
Перед использованием изделия внимательно прочитайте следующие сведения о мерах
A
предосторожности, чтобы обеспечить правильное и безопасное использование и избежать
повреждения изделия Nikon или травмирования вас или других людей.
Чтобы пользователи изделия могли в любой момент просмотреть данные сведения, эти
инструкции по безопасности следует хранить рядом с изделием.
В настоящем руководстве инструкции по безопасности обозначены следующими символами:
Подготовка
ПРЕДУПРЕЖДЕНИЕ
Игнорирование инструкций, обозначенных этим символом, может привести к травмам или
смерти, а также к повреждению имущества.
ПРЕДОСТЕРЕЖЕНИЕ
Игнорирование инструкций, обозначенных этим символом, может привести к повреждению
имущества.
ПРЕДУПРЕЖДЕНИЯ относительно использования вспышек Speedlight
В случае утечки корродирующих жидкостей из батарей и попадания их в глаза 1.
немедленно промойте глаза проточной водой и обратитесь к врачу. Если этого
быстро не сделать, ваши глаза могут быть серьезно повреждены.
В случае утечки корродирующих жидкостей из батарей и контакта их с кожей 2.
или одеждой немедленно смойте жидкость проточной водой. Длительный контакт
может привести к повреждению кожи.
Никогда не пытайтесь разобрать или отремонтировать вспышку 3.
самостоятельно, так как это может привести к удару электрическим током или
повреждению устройства, которое также может привести к травме.
Если вспышка упала и повредилась, не прикасайтесь к оголенным 4.
металлическим деталям. Такие детали, особенно конденсатор вспышки и связанные с
ним детали, могут обладать высоким зарядом и при прикосновении вызвать поражение
электрическим током. Отключите питание или выньте батареи, не прикасаясь к
электрическим деталям изделия, доставьте устройство в местное представительство
Nikon или в официальный сервисный центр для ремонта.
Если вспышка перегрелась, виден дым или чувствуется запах гари, немедленно 5.
прекратите работу и удалите батареи для предотвращения возгорания или
оплавления устройства. Позвольте вспышке остыть, чтобы можно было безопасно
прикоснуться к ней и вынуть батареи. Затем доставьте устройство в местное
представительство Nikon или в авторизованный сервисный центр для ремонта.
A–14

Вспышку нельзя помещать в жидкости или подвергать воздействию дождя, 6.
соленой воды или влаги, если не обеспечена надлежащая защита от жидкостей
A
и влаги. Для использования под водой требуется сертифицированный
подводный корпус. Попадание в устройство воды или влаги может привести
к возгоранию или поражению электрическим током. В таких ситуациях следует
немедленно вынуть батареи из вспышки Speedlight, после чего доставить ее в местное
представительство Nikon или в официальный сервисный центр для ремонта.
Примечание: Ремонт электронных устройств, в которые попала вода или влага,
Подготовка
зачастую экономически не оправдан.
Не используйте устройство рядом с источником горючего или взрывоопасного 7.
газа. При работе со вспышкой в зонах, в которых присутствует горючий газ, в том числе
пропан, бензин или пыль, может произойти взрыв или пожар.
Не направляйте вспышку прямо на водителя движущегося автомобиля,8. так как
это может временно ухудшить его зрение и привести к аварии.
Не направляйте вспышку прямо в глаза кого-либо, находящегося поблизости,9.
так как это может повредить сетчатку глаз. Никогда не используйте вспышку на
расстоянии менее 1 метра от младенцев.
Не используйте вспышку, если головка вспышки касается человека или 10.
предмета. Это может привести к ожогу и/или возгоранию одежды от выделяющегося
при вспышке тепла.
Храните мелкие принадлежности в местах, недоступных для детей,11. чтобы
избежать возможного проглатывания ими этих принадлежностей. Если ребенок случайно
проглотил какую-либо принадлежность, немедленно обратитесь к врачу.
Используйте только батареи, указанные в настоящем руководстве 12.
пользователя. Батареи, отличные от указанных, могут вызвать утечку корродирующих
жидкостей, взрыв или возгорание, или же могут работать ненадлежащим образом.
Не используйте батареи разных типов, марок, а также старые и новые батареи,13.
так как это может привести к утечке из батарей корродирующих жидкостей, взрыву или
возгоранию. При использовании в изделии нескольких батарей следует всегда применять
идентичные батареи, приобретенные одновременно.
Неперезаряжаемые батареи, например марганцевые, щелочные и литиевые, 14.
никогда не следует пытаться зарядить с помощью зарядного устройства, так как
это может привести к утечке корродирующих жидкостей, взрыву или возгоранию батарей.
При использовании аккумуляторных батарей стандартного размера (AA, AAA, 15.
C, D) или других типов, например никель- металлгидридных аккумуляторных
батарей, как и при их перезарядке, следует использовать только указанное
производителем батарей зарядное устройство и внимательно прочитать
инструкции. Не перезаряжайте такие батареи с нарушением полярности или до
того, как они остынут, так как это может привести к утечке корродирующих жидкостей,
взрыву или возгоранию. Те же меры предосторожности касаются использования
аккумуляторных батарей, которые могут поставляться производителем изделия.
A–15

Правила безопасности
ПРЕДОСТЕРЕЖЕНИЯ относительно использования вспышек Speedlight
A
Не прикасайтесь к вспышке мокрыми руками,1. так как это может привести к
поражению электрическим током.
Храните вспышку в недоступных для детей местах, чтобы предотвратить ее 2.
попадание в рот или касания опасных частей изделия другим способом, так как
это может привести к поражению электрическим током.
Не подвергайте устройство физическому воздействию,3. так как это может вызвать
Подготовка
его повреждение, которое может привести к взрыву или возгоранию.
Никогда не используйте для чистки изделия средства, содержащие горючие 4.
вещества: растворители, жидкости на основе бензола или пятновыводители, не
распыляйте на него средства для борьбы с насекомыми и никогда не храните
изделие в местах, содержащих химикаты типа камфары или нафталина, так
как это может повредить пластиковый корпус, привести к возгоранию или поражению
электрическим током.
Перед длительным хранением изделия удалите из него батареи5. для
предотвращения возгорания изделия или утечки корродирующих жидкостей.
ПРЕДУПРЕЖДЕНИЯ относительно использования батарей
Никогда не нагревайте батареи и не бросайте их в огонь,1. так как это может вызвать
утечку из батарей корродирующих жидкостей, выброс тепла или взрыв.
Не замыкайте батареи накоротко и не разбирайте их,2. так как это может привести к
утечке из батарей корродирующих жидкостей, выбросу тепла или взрыву.
Не используйте батареи разных типов, марок, а также старые и новые батареи,3.
так как это может привести к утечке из батарей корродирующих жидкостей, выбросу
тепла или взрыву.
Не устанавливайте батареи с нарушением полярности,4. так как это может привести
к утечке из батарей корродирующих жидкостей, выбросу тепла или взрыву. Установка
даже одной батареи с нарушением полярности может вызвать нарушение
работы вспышки.
Используйте только указанное производителем батарей зарядное устройство5.
во избежание вероятной утечки из батарей корродирующих жидкостей, выброса тепла
или взрыва.
Не переносите и не храните батареи вблизи металлических предметов, таких 6.
как бусы или заколки для волос, так как это может вызвать короткое замыкание
батарей и последующую утечку, выброс тепла или взрыв. Кроме того, особенно при
переносе большого количества батарей, располагайте их с осторожностью,
чтобы контакты одной батареи не касались контактов другой батареи с
нарушением полярности, так как их соприкасание может также вызвать короткое
замыкание батарей и последующую утечку жидкости, выброс тепла или взрыв.
A–16

В случае утечки корродирующих жидкостей из батарей и попадания их в глаза 7.
немедленно промойте глаза проточной водой и обратитесь к врачу. Если этого
A
быстро не сделать, ваши глаза могут быть серьезно повреждены.
В случае утечки корродирующих жидкостей из батарей и контакта их с кожей 8.
или одеждой немедленно смойте жидкость проточной водой. Длительный контакт
может привести к повреждению кожи.
Всегда следуйте предупреждениям и инструкциям, напечатанным на батареях,9.
во избежание действий, которые могут вызвать утечку из батарей корродирующих
Подготовка
жидкостей, выброс тепла или возгорание.
Используйте только батареи, указанные в настоящем руководстве 10.
пользователя, во избежание вероятной утечки из батарей корродирующих жидкостей,
выброса тепла или взрыва.
Никогда не вскрывайте оболочку батарей и не используйте батареи 11.
с поврежденной оболочкой, так как это может вызвать утечку из батарей
корродирующих жидкостей, выброс тепла или взрыв.
Храните батареи в местах, недоступных для детей,12. чтобы избежать возможного
проглатывания батарей. Если ребенок случайно проглотил батарею, немедленно
обратитесь к врачу.
Батареи нельзя окунать в жидкости или подвергать воздействию дождя, 13.
соленой воды или влаги, если не обеспечена надлежащая им защита от
влажной среды. Попадание в батареи воды или влаги может вызвать утечку из батарей
корродирующих жидкостей или выброс тепла.
Не используйте батареи, которые подозрительно выглядят, в том числе с 14.
изменением цвета или формы. Из таких батарей возможна утечка корродирующих
жидкостей или выброс тепла.
Прекратите зарядку аккумуляторных батарей, если вы заметили, что 15.
перезарядка не завершена за указанное время, во избежание вероятной утечки из
батарей корродирующих жидкостей или выброса тепла.
При утилизации батарей не забудьте изолировать их контакты лентой.16. В
случае короткого замыкания положительных и отрицательных контактов батарей из-за
контакта с металлическими предметами возможны возгорание, выброс тепла или взрыв.
Утилизируйте использованные батареи в соответствии с нормами местных органов
власти.
Никогда не пытайтесь перезарядить неаккумуляторные батареи в зарядном 17.
устройстве, так как это может вызвать утечку корродирующих жидкостей или выброс
тепла.
Немедленно вынимайте разряженные батареи из оборудования,18. так как из них
возможна утечка корродирующих жидкостей, выброс тепла или взрыв.
Будьте осторожны при замене батарей после длительного использования 19.
вспышки, поскольку они сильно нагреваются вследствие фотосъемки с непрерывной
вспышкой.
A–17
Правила безопасности
ПРЕДОСТЕРЕЖЕНИЕ относительно использования батарей
A
Не бросайте батареи и не подвергайте их сильному физическому воздействию, так
как это может вызвать утечку из батарей корродирующих жидкостей, выброс тепла или взрыв.
Символ раздельной утилизации, применяемой в европейских странах
Подготовка
Этот символ указывает, что данное изделие подлежит раздельной
утилизации. Следующие положения применимы только к пользователям из
стран Европы.
•
Это изделие предназначено для раздельной утилизации на
соответствующем пункте сбора. Не утилизируйте его вместе с обычным
мусором.
•
Для получения дополнительных сведений обратитесь к продавцу или
местным органам власти, заведующим утилизацией мусора.
A–18

Перед использованием
Советы по использованию Speedlight
A
Делайте пробные снимки
Перед съемкой важных событий, таких как свадьбы или выпускные вечера, сделайте
пробные снимки.
Проводите регулярное техобслуживание Speedlight Nikon
Компания Nikon рекомендует проводить техобслуживание Speedlight у авторизованного
Подготовка
дилера или в сервисном центре как минимум один раз в два года.
Используйте Speedlight с оборудованием Nikon
Производительность вспышки Nikon Speedlight SB-910 оптимизирована для
использования с фотокамерами и принадлежностями Nikon, включая объективы.
Фотокамера или принадлежности других производителей могут не соответствовать
требованиям Nikon к техническим характеристикам, а несовместимые фотокамеры
и принадлежности могут повредить детали SB-910. Nikon не может гарантировать
производительность SB-910 при использовании с продуктами сторонних производителей.
Концепция «постоянного совершенствования»
Как часть концепции «постоянного совершенствования» компании Nikon в
отношении поддержки производимой продукции и обучения, ежедневно
обновляемая информация доступна на следующих веб-сайтах:
Для пользователей в США:•
http://www.nikonusa.com/
Для пользователей в Европе и Африке: •
http://www.europe-nikon.com/support/
Для пользователей в Азии, Океании и на Ближнем Востоке: •
http://www.nikon-asia.com/
На этих сайтах можно найти последние сведения о продуктах, советы, ответы на
часто задаваемые вопросы, а также общие рекомендации по цифровой обработке
изображений и фотосъемке. Дополнительные сведения можно получить в
региональном сервисном центре компании Nikon. Для получения контактной
информации см. приведенный ниже адрес URL:
http://imaging.nikon.com/
A–19
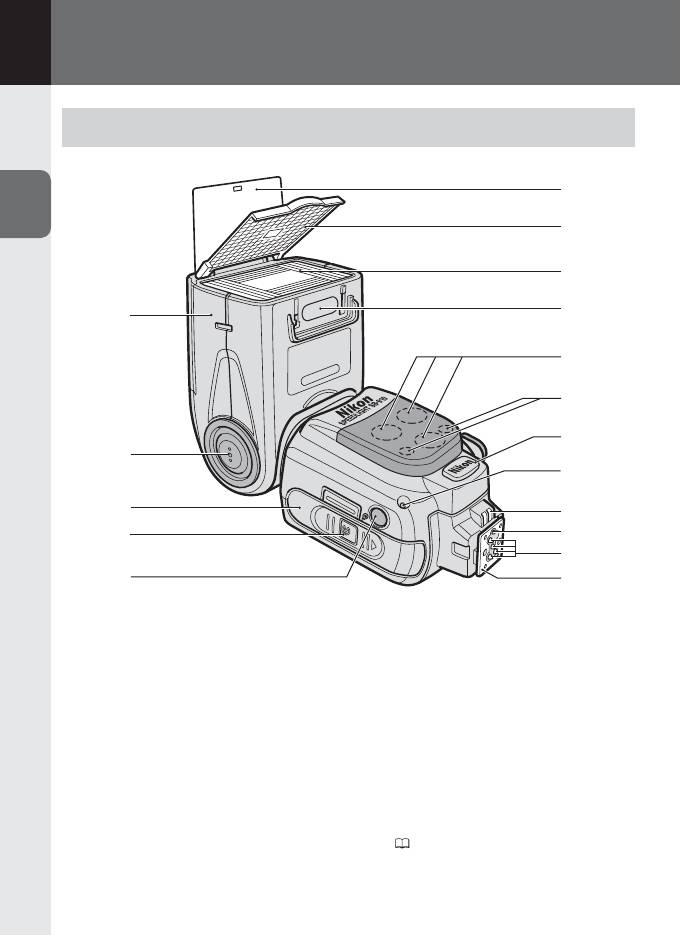
B
Использование вспышки
Детали Speedlight
6
B
7
8
9
1
10
11
12
Использование вспышки
2
13
3
14
15
4
PUSH
16
5
17
1 Головка вспышки
7 Встроенный широкоугольный
рассеиватель (0E-10)
2 Кнопка разблокировки наклона/
поворота головки вспышки (0B-9)
8 Экран вспышки
3 Крышка батарейного отсека
9 Определитель фильтра (0E-14)
4 Кнопка разблокировки крышки
10 Вспомогательная подсветка АФ
батарейного отсека (0B-6)
(0E-19)
5 Окно сенсора освещения для
11 Индикатор готовности вспышки
дистанционного управления
(в ведомом режиме) (0D-20)
вспышкой (0D-17)
12 Контакт внешнего источника
6 Встроенная отражающая карта
питания (снабжен крышкой)
(0E-8)
(
H-11)
B–1
Аннотация для Фотовспышки Nikon SB-910 в формате PDF
Топ 10 инструкций
Другие инструкции

Ru
Руководство пользователя
Вспышка с автофокусировкой Speedlight