
Бесплатная доставка
По Москве и большинству городов России
Подробнее
Бесплатное подключение
Профессионально установим технику на готовые коммуникации
Подробнее
Бесплатное хранение
До 365 дней — купите сегодня, а получите когда удобно
Подробнее
Простой возврат и обмен
Что-то не так? Обменяем товар или вернем деньги
Подробнее
|
Technical passporT |
english |
extractor hood
|
CONTENTS |
|
|
SECTION 1 |
|
|
SAFETY PRECAUTIONS …………………………………………………………………………………….. |
3 |
|
SECTION 2 |
|
|
SPECIFICATIONS…………………………………………………………………………………………………. |
4 |
|
SECTION 3 |
|
|
CONTROL……………………………………………………………………………………………………………….. |
5 |
|
SECTION 4 |
|
|
MOUNTING AND DIMENSIONS ……………………………………………………………………… |
5 |
|
SECTION 5 |
|
|
CLEANING AND MAINTENANCE ……………………………………………………………………. |
7 |
|
SECTION 6 |
|
|
TROUBLESHOOTING………………………………………………………………………………………….. |
8 |
|
SECTION 7 |
|
|
HELPFUL INFORMATION …………………………………………………………………………………. |
9 |
2
|
english |
Technical passporT |
DEAR CUSTOMER,
Thank you for purchasing our equipment! We are sure that appliances of the KUPPERSBERG brand, which are modern, functional and made of high quality materials and components, will be a reliable assistant in your kitchen.
Please read this manual carefully before starting any installation work. It will help you avoid premature failure, as well as extend the life of your appliance to the maximum possible.
Please note that the installation of this appliance must be carried out by a qualifi ed technician and in accordance with these instructions. The manufacturer is not liable for any consequences of failure to observe this condition.
 Caution!
The manufacturer reserves the right to make any changes, without prior notice, to design, outside appearance and scope of supply of appliance, which will be considered as necessary and useful according to the manufacturer’s point of view. Possible modifi cations will not affect the basic properties, including those that relate to safe operation of the appliance.
SECTION 1.
SAFETY PRECAUTIONS
1. Assembling and electrical connection of the appliance must be
extractor hood
carried out by skilled technicians of authorized service center.
2.The appliance is designed to operate on 220-240 V AC. Make sure that the technical parameters of your home power supply system correspond to the data for the power supply. If parameter values are above or below the specifi ed range, the use of the appliance is prohibited.
3.Do not connect the kitchen air cleaner to the ventilation channels that are used to remove smoke and fumes from the equipment operating on any other energy sources except electric one.
4.The appliance is to be connected only to an earthed power supply system.
5.Do not cook fl ammable foods below the kitchen air cleaner.
6.Use aluminum fi lter that comes with the appliance. The use of other materials is prohibited!
7.Do not connect the appliance
to the power supply system, until the assembly and installation of the appliance is completed.
8.Do not use the appliance without the aluminum fi lter in place.
9.Do not touch the lamps.
10.Do not remove the aluminum
filter while the appliance is in operation.
11.Do not disconnect the appliance from the power supply system directly. If necessary, turn the appliance off using the control panel and, only after that, unplug it from the power supply system.
3
|
Technical passporT |
english |
extractor hood
When switching on: fi rst connect the appliance to the power supply system, then switch it on using the control panel, but not vice versa!
12.The appliance requires regular cleaning and maintenance work.
13.When installing the appliance, observe the required distance between it and the cooking surface of your stove:
— for an electric stove: at least 65 cm — for a gas or gas-electric stove: at
least 70 cm
14.Do not allow children to play with packaging materials, it can be dangerous!
15.For best air cleaning in your kitchen, do not turn off the appliance immediately after the cooking process is completed: let the appliance run for a further 15 minutes. For this purpose you can also use the timer function (the button «Auto Switch Off Timer» on the control panel).
16.Ensure adequate ventilation in the kitchen, if a gas stove is operated simultaneously with the appliance.
17.In case of any malfunctions, contact your nearest authorized service center.
18.If the kitchen hood is supposed to operate in air discharge mode, then during installation it is important to provide a duct of the corresponding diameter.To prevent loss of performance caused by aerodynamic resistance of
the duct, the air duct must not be too long, or curved. Never restrict the duct size, or make sharp bends. In addition, it is preferable to use smooth PVC duct
(round or fl at), rather than the fl exible corrugated one because bends of a corrugated duct increase the noise level of the hood.
19. The manufacturer does not bear any responsibility for any possible damage, in case of non-compliance with above precautions.
SECTION 2.
SPECIFICATIONS
Wall hood
|
Width……………………………… |
600-900 mm |
|
Control type………………….. |
Touch |
|
Suction power………………. |
600м3 (F612-F912), |
|
………………………………………… |
850м3(F630-F930) |
|
Lamps…………………………….. |
LED 2×2 |
|
Diameter of the air |
|
|
discharge pipe ……………… |
120-150 mm |
|
Voltage…………………………… |
220-240 V / 50 Hz |
|
Modes of operation……… |
Air discharge / |
|
Recirculation |
|
|
Noise level ……………………. |
32- / 42-58 dB |
4
|
english |
Technical passporT |
SECTION 3.
CONTROL TYPE
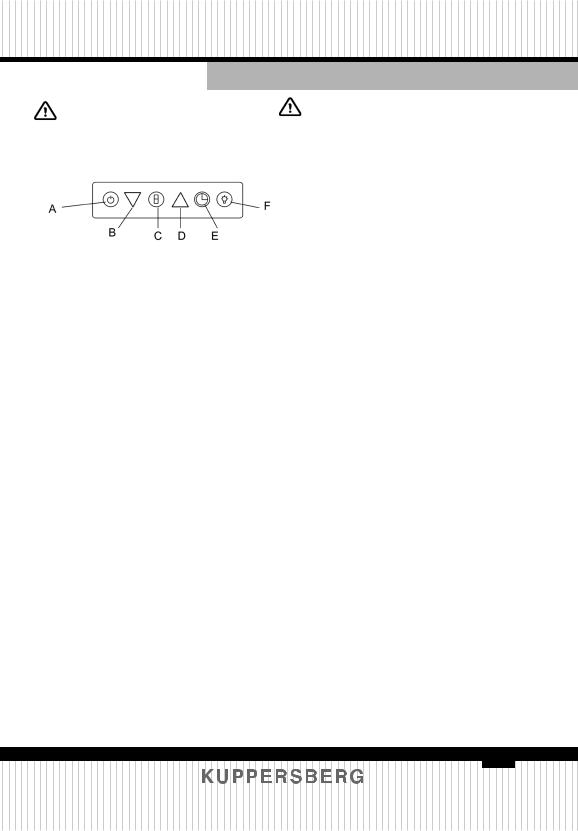
Touch control
А–On/Off switch В–Power decrease С–Display
D–Power increase
E–Auto Switch Off Timer F–Lighting
А–Hood motor On/Off
В – Motor rotation speed decrease
(suction power reducing)
С – Display shows motor rotation speed
D – Motor rotation speed increase
(suction power increasing)
E – When you press on the Timer, the motor will automatically be shut down after 15 minutes. To activate the function, press and hold the Timer for 3 seconds (rotation speed level starts to fl ash on the display).To cancel, press once on the Timer.
F–Lighting On/Off
extractor hood
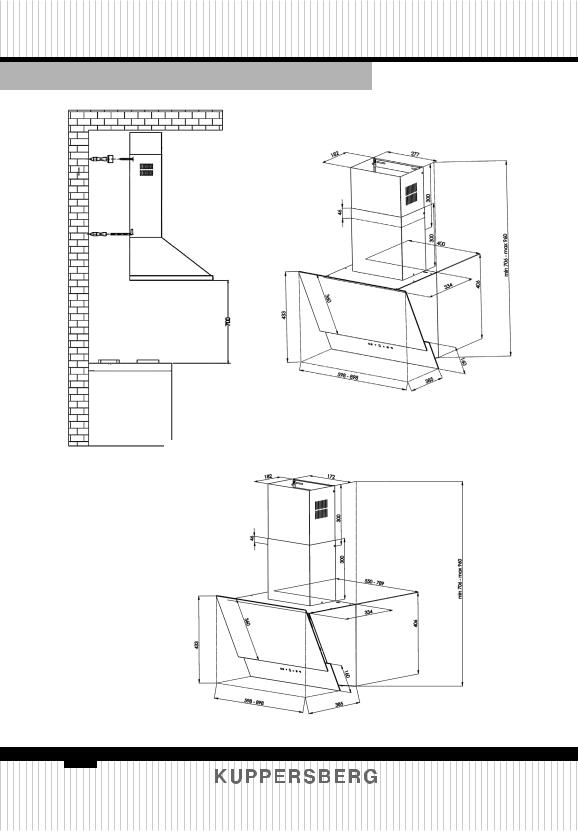
SECTION 4.
Mounting and dimensions
Please unpack and inspect the appliance! Before starting installation, make sure that the hood has no obvious transport damages. If such defects are detected, do not install or connect the appliance to the mains.
To comply with safety regulations, the distance between the cooking surface and the air cleaner should be 700 mm. For convenience of installation, each hood is provided with installation diagram. Attach the diagram to the wall, mark and drill the holes. Insert the dowels, fi x the mounting hooks. Mount the hood. Repeat the same procedure for the hood chmney.
5
|
Technical passporT |
english |
extractor hood
Step 2
Step 1
Kitchen stove
F612 / 912
F630 / 930
6
|
english |
Technical passporT |
SECTION 5.
Cleaning and maintenance
Caution! Before you start cleaning the appliance, disconnect it from the power supply.
Aluminum fi lter
Aluminum fi lter is designed to trap grease particles out of the fl ow of air running through it. For this reason, the fi lter needs regular cleaning. The cleaning interval depends on the frequency of use of the air cleaner. Generally, it is recommended to clean it once a month.
To do this, remove the fi lters, wash them in water with a neutral liquid detergent, dry them, then set them back in the air cleaner. Over time, fi lters may change color due to a regular washing. This is a natural process, which does not indicate a defect, so fi lter replacement is not required.
The aluminum fi lters can be washed in the dishwasher.
How to remove aluminum
fi lters:
1.Press on the latch of the fi lter lock.
2. Pulling down a bit, remove the
fi lter.
In order to put the fi lters in place after cleaning, follow the above instructions in reverse order.
Carbon fi lter (used in recirculated air mode)
Carbon fi lter is designed to trap odors and fumes while cooking.It is used in cases where there is no possibility to connect the air cleaner to a special
extractor hood
ventilation duct for discharging air outward. When operating the appliance with a carbon fi lter, contaminated air is sucked into the appliance and passes through a carbon fi lter, and then clean air is supplied to the kitchen.
The carbon fi lter should be replaced at regular intervals.The interval of fi lter replacement depends on the frequency of use of the air cleaner, style of cooking and frequency of the aluminum fi lter cleaning. Generally, it is recommended to replace the carbon fi lter once every
4 months.
How to remove carbon fi lter:
1.Remove aluminum fi lters.
2.Turn the carbon fi lter to the left and pull it.
3.Replace the old carbon fi lter with the new one.
4.Put the fi lter back into place.
If necessary, clean the outside of the air cleaner with a soft, damp cloth. Do not use any abrasive cleaning agents. For painted stainless steel surfaces: to avoid scratching it is recommended to wipe them with a soft, damp cloth in the painting direction. Do not remove the lamp cover during the surface cleaning process.
Caution!
Do not use the steam generators for cleaning.
Caution!
Not following the above rules for cleaning the appliance and replacing
fi lters may cause fi re.
7

|
Technical passporT |
english |
extractor hood
Replacing lamps
Before replacing lamps, disconnect the appliance from the power supply. Then, with a screwdriver, pry and remove the lamp cover, while supporting it from below. Remove the burned-out lamp and replace it with a new one. Put the lamp cover into place, press it slightly and fi x it. Caution: do not touch the halogen lamp with your fi ngers,it signifi cantly reduces its lifetime.Use a soft,dry cloth.
Caution!
If you need to transport the air cleaner,fi rst of all,disconnect it from the power supply and proceed with disassembly. It is recommended that you transport it in the original packaging. If this packaging is not available, package the appliance using materials that prevent possible damage resulting from transportation.
 SECTION 6. Troubleshooting
Very often a malfunction of the appliance occur for minor reasons. So, before you call for service center, please check whether you can troubleshoot yourself. For this purpose please check the following possible causes of malfunctions.
|
Malfunction |
Possible cause |
Troubleshooting action |
|
|
…Faulty fuse |
1. Check the fuse of the |
||
|
The appliance does not |
…Plug is not properly |
appliance |
|
|
inserted into the outlet |
2. Make sure that plug is |
||
|
operate |
|||
|
…There is no voltage in |
properly inserted into the |
||
|
the power supply system |
outlet |
||
|
Suction power is not |
…Incorrect speed |
1. Increase suction speed of |
|
|
selected |
hood |
||
|
suffi cient |
|||
|
…Filters are clogged |
2.Clean or replace fi lters |
||
|
…Faulty fuse |
1. Check the fuse of the |
||
|
appliance |
|||
|
The lamp is not |
|||
|
2. Make sure that the lamp |
|||
|
lighting |
…The lamp is burned out |
||
|
is installed correctly or |
|||
|
or incorrectly installed |
|||
|
replace it |
|||
8
 Loading…
You can only view or download manuals with
Sign Up and get 5 for free
Upload your files to the site. You get 1 for each file you add
Get 1 for every time someone downloads your manual
Buy as many as you need
Код: 116114
Извините, товара сейчас нет в наличии
Бесплатная доставка
по Красноярску
Извините, товара сейчас нет в наличии
Услуги:
Новости интернет-магазина «Лаукар»:
Дополнительная информация в категории Вытяжка:
В интернет-магазине бытовой техники «Лаукар» Вы можете скачать инструкцию к товару Вытяжка Kuppersberg F 612 W совершенно бесплатно.
Все инструкции, представленные на сайте интернет-магазина бытовой техники «Лаукар», предоставляются производителем товара.
Перед началом использования товара рекомендуем Вам ознакомиться с инструкцией по применению.
Для того чтобы скачать инструкцию, Вам необходимо нажать на ссылку «скачать инструкцию», расположенную ниже, а в случае, если ссылки нет,
Вы можете попробовать обратиться к данной странице позднее,
возможно специалисты интернет-магазина бытовой техники «Лаукар» еще не успели загрузить для скачивания инструкцию к товару:
Вытяжка Kuppersberg F 612 W.

Фирма-производитель оставляет за собой право на внесение изменений в конструкцию, дизайн и комплектацию товара: Вытяжка Kuppersberg F 612 W. Пожалуйста, сверяйте информацию о товаре с информацией на
официальном сайте компании производителя.
4
Technical passporT
english
extractor hood
When switching on: fi rst connect the
appliance to the power supply system,
then switch it on using the control
panel, but not vice versa!
12. The appliance requires regular
cleaning and maintenance work.
13. When installing the appliance,
observe the required distance between
it and the cooking surface of your stove:
— for an electric stove: at least 65 cm
— for a gas or gas-electric stove: at
least 70 cm
14. Do not allow children to play
with packaging materials, it can be
dangerous!
15. For best air cleaning in your
kitchen, do not turn off the appliance
immediately after the cooking process
is completed: let the appliance run for
a further 15 minutes. For this purpose
you can also use the timer function (the
button «Auto Switch Off Timer» on the
control panel).
16. Ensure adequate ventilation in
the kitchen, if a gas stove is operated
simultaneously with the appliance.
17. In case of any malfunctions,
contact your nearest authorized service
center.
18. If the kitchen hood is supposed
to operate in air discharge mode, then
during installation it is important to
provide a duct of the corresponding
diameter. To prevent loss of performance
caused by aerodynamic resistance of
the duct, the air duct must not be too
long, or curved. Never restrict the duct
size, or make sharp bends. In addition,
it is preferable to use smooth PVC duct
(round or fl at), rather than the fl exible
corrugated one because bends of a
corrugated duct increase the noise level
of the hood.
19. The manufacturer does not bear
any responsibility for any possible
damage, in case of non-compliance
with above precautions.
SECTION 2.
SPECIFICATIONS
Wall hood
Width ……………………………… 600-900 mm
Control type ………………….. Touch
Suction power ………………. 600м3 (F612-F912),
………………………………………… 850 м3 (F630-F930)
Lamps …………………………….. LED 2×2
Diameter of the air
discharge pipe ……………… 120-150 mm
Voltage…………………………… 220-240 V / 50 Hz
Modes of operation ……… Air discharge /
Recirculation
Noise level ……………………. 32- / 42-58 dB