
Содержание
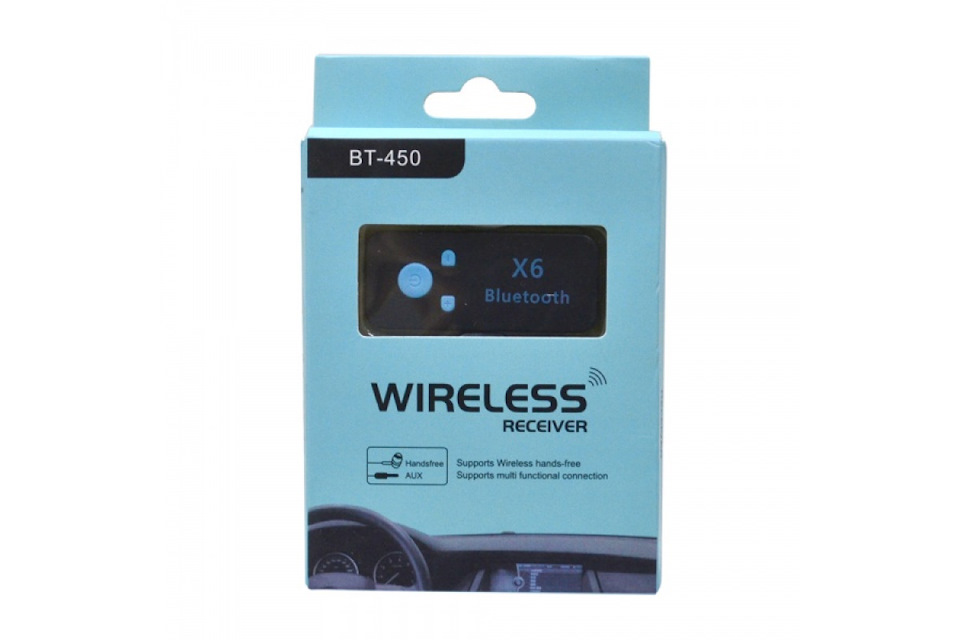
- Bluetooth приемник BT-450
- Беспроводной ресивер / трансмиттер Bluetooth 2-в-1 (HiFi Wireless Receiver and Transmitter). Инструкция на русском языке.
- Bluetooth трансмиттер для телевизора (наушников). Что это, как работает и как выбрать?
- Что такое Bluetooth трансмиттер и для чего он нужен?
- Пример использования №1
- Пример использования №2
- Как выбрать Блютуз трансмиттер?
- Выводы
- Про Bluetooth-ресиверы (Bluetooth Audio Receiver)
Bluetooth приемник BT-450


- Обзор
- Характеристики
- Отзывы 0
Компактный Bluetooth приемник Wireless Receiver BT-450 со встроенным микрофоном — неплохое универсальное решение для большинства любителей прослушивания музыки без лишних проводов. Он оснащен встроенным аккумулятором и работает в автономном режиме.
Wireless Receiver BT-450, например, можно использовать в автомобиле, где стоит магнитола без возможности соединения по Bluetooth, но есть AUX-вход. Встроенный микрофон приемника позволит также реализовать режим громкой связи.
Кроме того, к AUX-входу Bluetooth приемника можно подключить домашнюю стереосистему или обычные проводные наушники, тем самым превратив их в беспроводные.
С тыльной стороны корпуса BT-450 сделана клипса, благодаря которой его можно закрепить на одежде. На верхнем торце корпуса расположен аудио разъем 3,5мм, а на нижнем — порт Micro-USB для подзарядки аккумулятора Bluetooth приемника.
В комплект входят:
- Wireless Receiver BT-450
- переходник AUX
- кабель USB для подзарядки
Источник
Беспроводной ресивер / трансмиттер Bluetooth 2-в-1 (HiFi Wireless Receiver and Transmitter). Инструкция на русском языке.
HiFi Wireless Receiver and Transmitter
Беспроводной ресивер и трансмиттер Bluetooth HiFi 2-в-1
Руководство пользователя (инструкция)
на русском языке
1. Информация о продукте
Данное устройство представляет собой ресивер и трансмиттер Bluetooth, выполненные в одном корпусе, которые позволяют свободно отправлять и получать аудиоданные. При помощи данного продукта, Вы можете передавать музыку с Вашего телефона на колонки без использования проводов. Вы можете использовать телевизор, CD – плеер, MP3 или любое другое оборудование, отправляющее аудиоданные через Bluetooth.
Это устройство поддерживает технологию “low latency”, то есть, имеет низкую задержку, что позволяет использовать его для компьютерных игр, телевидения, просмотра кино или ведения аудиотрансляции в режиме реального времени.
Это устройство оснащено встроенной в корпус аккумуляторной батареей и является, пожалуй, лучшим решением для беспроводного соединения колонок или наушников с мобильными телефонами или плеерами.
2. Основные характеристики
Поддерживаемые протоколы: A2DP, AVRCP
Дальность Bluetooth: до 10 метров
Встроенная аккумуляторная батарея: 600 мАч
Время работы: до 8 часов
Время зарядки: около 2 часов
Входное напряжения для зарядки: 5 Вольт постоянного тока
Разъёмы вход / выход: Jack 3.5 мм, стерео
Совместимость: со всеми телефонами и планшетами на Android / iOS, а также со всеми Bluetooth аудиоустройствами.
3. Комплект поставки
Ресивер / трансмиттер – 1шт
Инструкция – 1 шт
Зарядный кабель – 1шт
Аудиокабель с двумя разъёмами Jack 3.5 мм – 1шт
Аудиокабель 2xRCA — Jack 3.5 мм – 1шт
4. Описание продукта
5. Светодиоды
Синий светодиод Bluetooth часто мигает
Светодиоды не горят
При зарядке красный светодиод ярко горит, по окончании зарядки гаснет
Режим ресивера (приёмника)
Горит лампа «receive»
Низкий заряд батареи
Красный индикатор «receive» иногда мигает
Синий индикатор «Bluetooth» часто мигает
Синий индикатор Bluetooth редко мигает
Режим трансмиттера (передатчика)
Горит красная лампа «transmit»
Низкий заряд батареи
Красный индикатор «transmit» иногда мигает
Поиск устройства Bluetooth
Синий светодиод «Bluetooth» часто мигает
Синий индикатор Bluetooth редко мигает
6. Режим зарядки
Данный продукт оснащён встроенной аккумуляторной батареей. Рекомендуется полностью её зарядить перед первым использованием.
A. Установите кабель зарядки в порт устройства, а другой конец кабеля присоедините к USB.
B. Заряжайте примерно 2 часа
C. Когда устройство заряжается, светодиод горит красным. По окончании зарядки светодиод погаснет.
D. Вы можете пользоваться устройством во время зарядки.
E. Если индикатор статуса «receive» или «transmit» начал иногда мигать, это означает, что устройство почти разряжено.
7. Управление устройством
Включение. Зажмите кнопку, пока синий светодиод не начнет мигать.
Выключение. Зажмите и не отпускайте кнопку, пока не погаснет индикатор.
Функция автоматического отключения. После 10 минут простоя устройство автоматически войдёт в режим энергосбережения и отключит светодиод.
7.1. Режим ресивера (приёмника)
Используется для всех аудиоустройств с динамиком.
A. Включите устройство. Синий индикатор Bluetooth начнет часто мигать.
B. Присоедините разъём Jack 3.5 мм к разъёму «receive» устройства, а другой конец кабеля присоедините к колонкам.
C. После установки соединения с телефоном, статус индикатора Bluetooth изменится и начнёт изредка мигать.
7.2. Режим трансмиттера (передатчика)
В этом режиме Вы подключаете Bluetooth – гарнитуру к устройству, и можете наслаждаться музыкой без проводов.
Последовательность соединения:
A. Включите устройство, синий индикатор Bluetooth замигает.
B. Установите кабель Jack 3.5 мм в разъём «transmit». При этом индикатор «transmit» загорится. Другой конец кабеля установите в передающее устройство – MP3 плеер, телефон, планшет, ПК, аудиовыход телевизора (например, это может быть разъём для наушников) и т.д.
C. Нажмите и отпустите (не зажимая) кнопку на устройстве. Синий светодиод Bluetooth начнёт интенсивно мигать и искать доступное Bluetooth устройство для подключения. Держите коммутируемые устройства не дальше 10 метров друг от друга, чтобы они могли установить соединение. Примечание от Интернет-магазина «Азиада» https://aziada.ru — для того, чтобы узнать, как подключить Ваши наушники, обратитесь к инструкции к наушникам.
D. После успешного соединения, светодиод Bluetooth перестанет часто мигать и будет периодически загораться, показывая, что соединение установлено. Если подключилась не та гарнитура, которую Вы хотели, Вы можете выбрать следующее Bluetooth устройство нажатием на кнопку.
8. Советы
8.1. Различные устройства Bluetooth (такие, как наушники) имеют различные протоколы и программы, поэтому время поиска и время, необходимое для установки соединения, может быть разным у разных гарнитур.
8.2. Если долгое время установить соединение не получается, выключите устройства, повторно включите их и попробуйте снова.
8.3. Данный прибор имеет функцию переключения Bluetooth – устройств. Она используется в том случае, если рядом находятся несколько гарнитур, и беспроводной ресивер / трансмиттер подключился не к тому устройству, к которому Вы хотели его подключить. Просто нажмите и отпустите кнопку (не зажимая), и устройство присоединится к следующей доступной гарнитуре.
9. Возможные проблемы и методы их решения
Если Вы столкнулись с проблемами, попробуйте следующие методы. Если же Вы не смогли решить возникшие трудности используя нижеприведенные инструкции, обратитесь к дистрибьютору. Не разбирайте и не ремонтируйте устройство самостоятельно.
Что делать, если Bluetooth устройство не работает как нужно?
A. Проверьте, включен ли адаптер.
B. Подключите зарядное устройство, чтобы убедиться, что батарея не полностью разряжена.
C. Выключите и снова включите адаптер.
D. Сначала воспроизведите музыку на том устройстве, к которому трансмиттер подключился автоматически. Отключите устройства, которыми вы не пользуетесь, и попробуйте подключить нужное Вам устройство еще раз.
E. Согласно светодиодному индикатору, режим работы по умолчанию – это ресивер. Если одновременно в оба разъёма устройства подключены кабели, режим работы по-прежнему остаётся «receive».
F. Убедитесь, что правильно выбран режим работы. Удостоверьтесь, что кабель с разъёмом Jack 3.5 мм установлен в правильный разъём. Удостоверьтесь, что горит правильный индикатор.
G. Если не получается подключить Bluetooth – устройство, например, наушники, попробуйте разместить коммутируемые продукты ближе друг к другу. Или нажмите кнопку и попробуйте снова.
Источник
Bluetooth трансмиттер для телевизора (наушников). Что это, как работает и как выбрать?
Статья, в которой я показывал как подключить Bluetooth наушники к телевизору собрала очень много просмотров и комментариев. И главная проблема, с которой сталкиваются люди – в телевизоре нет Bluetooth, или он есть, но телевизор не дает подключить наушники. Даже если в телевизоре есть Bluetooth модуль, он очень часто предназначен для подключения только каких-то определенных устройств, или фирменных аксессуаров. И подключить наушники к такому телевизору никак не удается. Он их либо просто не видит, либо возникает какая-то ошибка в процессе подключения.
Использовать проводные наушники с телевизором очень неудобно. Да и к тому же, все чаще производители телевизоров отказываются от обычного выхода 3.5 mm Jack. Почему они убирают этот выход и ограничивают работу встроенного Bluetooth модуля – мне не понятно. Но судя по комментариям к другим статьям по этой теме, народ активно использует (или хочет использовать) наушники при просмотре телевизора. Это понятно, ведь подключив наушники, можно смотреть телевизор, или играть на приставке не мешая другим. Но вот производители телевизоров делают все, чтобы процесс подключения беспроводных наушников к телевизору сделать максимально. И невозможным без дополнительных устройств.
В этой статье речь пойдет об Bluetooth трансмиттерах – устройствах, которые могут получать звук с телевизора через тот же 3.5 mm Jack, RCA (тюльпан), или оптический аудиовыход и передавать его по Bluetooth на любые наушники, колонку, акустическую систему, саундбар, домашний кинотеатр и т. д.
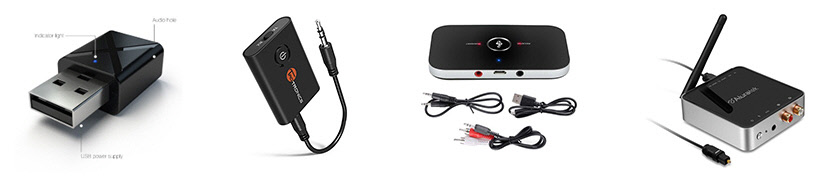
Чтобы не писать статью об устройствах, которые я сам ни разу не видел и не настраивал, я заказал на Алиэкспресс два Bluetooth трансмиттера. Один дешевый, за $2.84 (VIKEFON) и еще один намного дороже и функциональнее, за $25.29 (CSR8675 APTX HD) .

Оба трансмиттера я подробнее покажу в этой статье и расскажу о них. Я уже все подключил, настроил, протестировал. Все работает, но есть много нюансов. О настройке Bluetooth трансмиттера на телевизоре и подключении к нему Bluetooth наушников я расскажу в отдельной статье. Еще хочу заметить, что этих устройств есть просто огромное количество не только в китайских интернета-магазинах, но и наших. Все они очень разные и сильно отличаются своим функционалом и соответственно ценой. Есть даже фирменные устройства от популярных производителей, которые стоят каких-то нереальных денег. Разумеется, что протестировать все трансмиттеры, которые есть на рынке – это нереально. Но на примере этих двух устройств, о которых я расскажу в этой статье, вы сможете понять, что это за устройства, как они работают, и какие функции могут выполнять. А так же мы выясним, чем отличается дешевый Bluetooth трансмиттер от дорого и как выбирать такие устройства среди огромного их количества на рынке.
Что такое Bluetooth трансмиттер и для чего он нужен?
Как правило это компактные устройства, в которых встроенный Bluetooth модуль и разные ауди входы/выходы для подключения к разным источникам звука (телевизоры, компьютеры, телефоны) или к устройствам, которые предназначены для вывода звука (колонки, акустические системы, музыкальные центры, магнитолы и т. д.) . Все эти устройства отличаются не только техническими характеристиками, но и внешним видом. Вот некоторые из них:
Основные отличия между разными моделями Bluetooth трансмиттеров:
- Поддержка разных интерфейсов подключения. Например, есть трансмиттеры, которые подключаются только через обычный 3.5 mm Jack. А есть модели, в которых кроме 3.5 mm разъема есть еще и RCA (тюльпан) и оптический аудиовход/выход.
- Наличием, или отсутствие встроенного аккумулятора.
- Версиями Bluetooth.
- Возможностью подключения нескольких Bluetooth наушников или колонок.
- Качеством Bluetooth модуля, наличием разных интерфейсов управления, качеством сборки, кабелей и т. д.
Если я правильно понял (возможно ошибаюсь, так как проверить все устройства нереально) , то все представленные на рынке Bluetooth трансмиттеры могут работать в режиме приема и передачи (2 в 1) . Так как даже мой самый дешевый адаптер может как принимать звук по Bluetooth и передавать его на ту же акустическую систему, так и передавать звук по Bluetooth (с телевизора, ПК) на наушники, или другое устройство. Обычно эти режимы называются TX Mode и RX Mode.
- TX – режим передатчика. Когда Блютуз трансмиттер принимает звук от того же телевизора через определенный интерфейс (кабель) и передает его на наушники через Bluetooth. Эти устройства чаще всего используются именно в этом режиме работы.
- RX – режим приемника. Когда к трансмиттеру мы по кабелю подключаем обычные колонки, музыкальный центр, автомагнитолу (через AUX) , или другое устройство для вывода звука. Затем с телефона, планшета, ноутбука или другого устройства подключаемся к трансмиттеру по Bluetooth и транслируем музыку. Получается, чтобы мы добавили поддержку Bluetooth для обычных колонок.
На картинке ниже показана работа двух режимов:

Даже мой самый дешевый трансмиттер без проблем (почти без проблем :)) работает в двух режимах. На примем и передачу звука по Bluetooth. Только вот способ переключения между режимами на разных трансмиттерах сильно отличается.

Если на дорогом есть отдельный переключатель TX/RX, то на дешевом вообще нет кнопок. А смена режима происходит подключением, отключением и повторным подключением устройства к источнику питания. В режиме приемника индикатор мигает синим, а в режиме передатчика — красным. Без инструкции (которой, кстати, не было в комплекте) догадаться нереально. Хорошо хоть в описании товара на Али об этом написано.
Пример использования №1
В этом примере показана работа в режиме передатчика (TX). Телевизор без Bluetooth (или Bluetooth есть, но наушники не подключаются) , а нам необходимо подключить беспроводные наушники. Мы соединяем трансмиттер с телевизором с помощью аудио кабеля. Если в телевизоре есть 3.5 mm выход на наушники – используем его. В моем, например, 3.5 mm разъема нет. Поэтому, я подключаю через оптический аудиовыход. Можно так же использовать RAC (тюльпан) . Даже в старых телевизорах он есть. Очень важно учесть это при выборе данного устройства. Так же к трансмиттеру нужно подключить питание. Я подключаю его в USB-порт на телевизоре. Если USB нет, можно использовать любой адаптер, которым заряжаем телефон.

После включения питания трансмиттера, нужно подключить к нему Bluetooth наушники. Обычно, достаточно перевести наушники в режим подключения. Способ подключения может немного отлиться, в зависимости от вашего трансмиттера и наушников. После подключения звук идет на наушники. К модели подороже можно подключить сразу две пары наушников. В случае соединения с телевизором через оптический аудиовыход, звук так же одновременно воспроизводится из динамиков телевизора. Но его можно просто отключить, или скрутить на телевизоре. Тогда звук будет воспроизводиться только через наушники. Есть небольшая задержка между звуком из динамиков телевизора и на наушниках через трансмиттер.
Пример использования №2
В этом примере показана работа в режиме приемника (RX). Есть обычная акустическая система без Bluetooth. Но мы хотим транслировать на нее музыку с телефона или планшета. Или даже с ноутбука или ПК, но у нас нет возможности (или желания) соединить колонки с компьютером по кабелю. Берем Bluetooth трансмиттер и подключаем его к колонкам. Тут точно так же можно использовать как 3.5 mm Jack, так и RAC, или оптический аудио кабель. В зависимости от того, какие разъемы для подключения есть на вашем трансмиттере и колонках. Так же нужно подключить питание к трансмиттеру. Питание можно взять с USB-порта любого устройства, или через адаптер.

Переключаем трансмиттер в режим приемника (RX) . В этом режиме он доступен для обнаружения на всех устройствах (телефоны, ноутбуки) . Включаем Bluetooth, например, на телефоне, и подключаемся к трансмиттеру (в инструкцию должно быть написано его имя) . Телефон, или другое устройство определяет его как наушники и выводит звук. А трансмиттер в свою очередь передает звук на колонки по кабелю.
Как выбрать Блютуз трансмиттер?
В первую очередь вы должны понимать, зачем он вам нужен и как вы его будете использовать. Например, если вы выбираете Bluetooth трансмиттер для телевизора (чтобы подключать наушники) , то нужно выяснить, какие варианты подключения возможны конкретно на вашем телевизоре. Это главное.
На что обратить внимание при выборе:
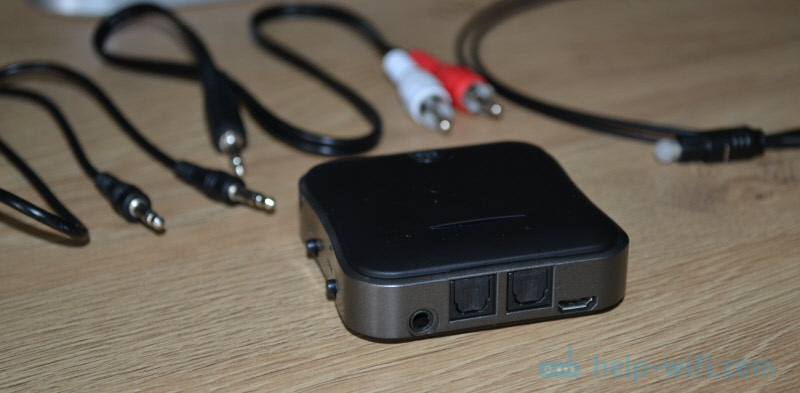
- На интерфейсы подключения. В большинстве случаев достаточно трансмиттера с возможностью подключения через обычный 3.5 mm Jack или RCA (тюльпан) . Там просто кабеля разные. И при заказе обычно есть возможность выбрать определенный кабель, или заказать оба кабеля. Более дорогие модели оснащены еще и оптическим аудиовходом/выходом. И если в вашем телевизоре есть оптический аудиовыход (Digital Audio Out) , то я бы советовал покупать модель с поддержкой этого интерфейса. Вот для примера дешевая модель с поддержкой только 3.5 mm Jack и RCA (RCA кабеля в комплекте не было, но его можно было выбрать при заказе) :
 А в дорогой модели есть еще поддержка оптического аудио кабеля. Ну и соответственно все кабеля в комплекте.
  На самом трансмиттере есть оптический вход и выход: SPDIF IN TX и SPDIF OUT RX. А на корпусе есть переключатель SPDIF/AUX. Который нужно ставить в определенный режим, в зависимости от того, какой кабель вы используете для подключения к источнику вывода звука, или к устройству, на который будет выводиться звук.
  Если взять устройство с тремя кабелями (Оптический + RCA + 3.5 мм) , то вы точно сможете подобрать нужный интерфейс для подключения к вашему телевизору, или другому устройству.
 - Не покупайте самые дешевые устройства. Я лично в этом убедился. Мой трансмиттер (который дешевый, за 3 доллара) , ужасно выводит звук на наушники. Слышен шум и треск во время воспроизведения. Пробовал менять адаптер питание – не помогло. В то время как в обратную сторону, с телефона на колонки он звук выводит без помех. Наушники проверены на разных устройствах, проблема не в них. Возможно, мне просто брак попался. Так же в дешевых моделях может быть сильная задержка в трансляции звука (из-за дешевого Bluetooth модуля) . И звук будет сильно отставать от изображения на телевизоре. От стоимости данных устройств сильно зависит качество звука и качество самого устройства в целом.
- Если вам нужно подключать к телевизору через трансмиттер более одной пары наушников одновременно, то обязательно выясните перед покупкой, дает ли такую возможность выбранная вами модель. В моем случае к простому и дешевому трансмиттеру можно подключить только одни наушники. К дорогой модели – две пары наушников одновременно. Я проверял, это работает. Одновременно подключал наушники и колонку. Но процесс подключения очень сложный. Особенно когда инструкция на английском и лень ее переводить.
- Что касается версии Bluetooth, то берите устройства с самой новой версией. У меня оба с Bluetooth 5.0. На наушниках, если не ошибаюсь, Bluetooth 4.1. Все работает. Они совместимы между собой.
- Есть Bluetooth трансмиттеры с NFC. У меня такого нет, проверить не могу. Но по идеи, поддержка NFC нужна для более простого подключения наушников, колонок, телефонов и других устройств, на которых, разумеется, тоже есть поддержка NFC. Так как процесс подключения именно наушников и подобных устройств к трансмиттеру – это еще то занятие, то наличие NFC отличное решение.
- Видел трансмиттеры с внешними антеннами. В их характеристиках заявлено, что радиус действия в помещении увеличивается примерно до 30 метров. В обычных радиус действия метров 10. Не приходилось работать с такими моделями, но если у вас большой дом или квартира, или какие-то особые задачи, то такой вариант может вам подойти. В обычном случае не вижу смысла переплачивать.
- Встроенный аккумулятор. Честно говоря, не совсем понимаю зачем он нужен. Для моего трансмиттера производитель завяливает работу от аккумулятора на протяжении 24 часов. Но зачем? Наверное проще подключить питание, чем думать о зарядке еще одного устройства. Хотя, возможно в некоторых ситуациях возможность автономной работы может пригодится.


Внимательно изучайте технические характеристики. Там всегда указано, что поставляется в комплекте с устройством, какие кабеля, какие есть варианты подключения, сколько устройств можно подключать по Bluetooth одновременно и т. д. Читайте отзывы.
Выводы
Интересные и полезные устройства. Можно придумать много вариантов их применения. Но основной – подключение беспроводных наушников к телевизору. Тем более, что даже в новых моделях телевизоров, которые конечно же оборудованы Bluetooth, производители почему-то ограничивают подключение наушников.
Все подключается и работает даже в случае с трансмиттером за 3 доллара. Но я бы не советовал покупать такие устройства. Все из-за очень плохого качества и большой вероятности получить устройство с браком. К тому же, процесс подключения таких устройств не самый простой и понятный. На более дорогих устройствах все реализовано немного проще. Есть кнопки и переключатели. Еще бы инструкцию на русском/украинском языке, так вообще было бы отлично.
Покупая Bluetooth трансмиттер будьте готовы к тому, что придется потратить немного времени на то, чтобы разобраться, как все подключить и настроить. Читайте инструкцию на сайте интернет-магазина. С помощью телефона (камерой в Google Переводчик) можно перевести инструкцию, которая идет в комплекте (если она есть) . В случае с подключением к телевизору возможны некоторые неудобные моменты с переключением звука с динамиков телевизора на наушники и в обратном порядке. Многое зависит от способа подключения трансмиттера к телевизору и от самого телевизора.
Источник
Про Bluetooth-ресиверы (Bluetooth Audio Receiver)
В связи с новомодной тенденцией отсутствия 3,5 мм разъема для прямого подключения наушников к устройствам, хочу вам рассказать про устройства, которые вам помогут — Bluetooth-ресиверы.
Что это такое? Это небольшое устройство, которое способно превратить ваши любимые наушники в беспроводную гарнитуру. Оно имеет на борту разъем для наушников, батарею и Bluetooth-мудуль, который позволяет подключаться к передающим устройствам – смартфонам, планшетам, компьютерам и т.д.
Для подключения наушников к своим устройствам я использую ресиверы от Xiaomi и Ugreen.
Краткие их характеристики:
- Название модели
В начале мной было приобретен ресивер от компании Xiaomi. Устройство хорошее. Качественно (мой экземпляр) сделан. Поставляется в простенькой белой корочке в лучших традициях одной фруктовой компании. Официально устройство за пределы Китая не поставляется и из-за этого документация и прошивка устройства только китайская. Китайская документация, как и любая другая, не нужна девайсу. Все управление сосредоточено в одной кнопке и светодиоде.
Нажатие на 3 секунды включает устройство. В наушниках китайская барышня что-то мило «мяукает» и загорается синий светодиод. Если ресивер обнаруживает спаренное устройство, то тут же к нему подключается. В этом случае диод с длительным циклом мигает синим. Если нужно спарить устройства, то нужно длительное нажатие на кнопку. Длиннее 5 секунд. Светодиод начинает попеременно мигать синим и красным. После этого устройство становится «видимым» в поиске. Если вдруг, то пин-код прошит стандартный — 0000 (четыре нуля). Кратковременное нажатие на кнопку отвечает за стартпаузу воспроизведения музыки или за поднятьположить трубку в зависимости от контекста.
По качеству звучания ресивер оставляет желать лучшего, но если слушать подкасты, аудиокниги и электронную музыку, то устройства хватает. Мощность звука средняя. При использовании внутриканальных наушников звука на три четверти достаточно. Накладные наушники или наушники вкладыши из-за большей прозрачности к окружающим звукам мало подходят под ресивер от Xiaomi. Я использую в комплекте с наушниками Sennheiser CX180. Полноразмерные Sony MDR-XB950 раскачать малыш не смог.
Заявленные 4 часа с одной зарядки аккумулятор держал легко, но после года ежедневного использования стал деградировать. Теперь держит чуть больше 2 часов при зарядке примерно 2 часа. И именно из-за этого я решил поэкспериментировать с другим устройством. Далее о нем.
Новый ресивер, после начала деградации аккумулятора предыдущего от Xiaomi, я выбирал довольно долго и в результате решил попробовать Ugreen. Меня подкупило наличие продвинутого протокола APT-X. Вроде бы с ним должно очень резко улучшиться качество звучания и узким местом станет качество самих подключенных наушников.
После нескольких месяцев использования какого-то дополнительного качества не обнаружил! Прискорбно. Хотя пробовал подключать разные наушники, субъективной разницы нет. Но в подключенных Bluetooth устройствах теперь можно полюбоваться на строку Ugreen-40854E (aptX). Реально что изменилось это время работы устройства. Если ресивер Xiaomi, при использовании в течение дня, разряжался до прихода домой примерно в 18-00, то Ugreen хватает до прихода домой. Это плюс.
Этот плюс получился за счет более емкой батареи.
Ссылки на реальные лоты на Али, которые я покупал:
Источник
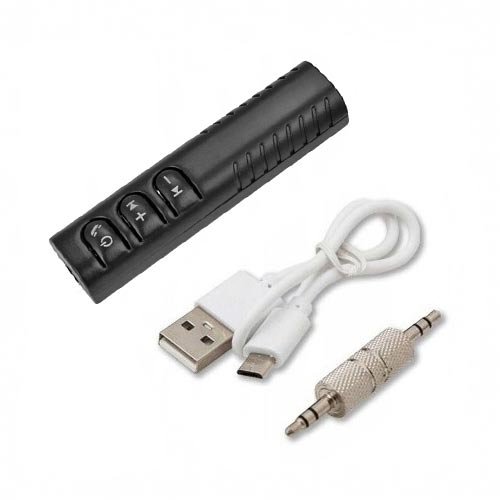
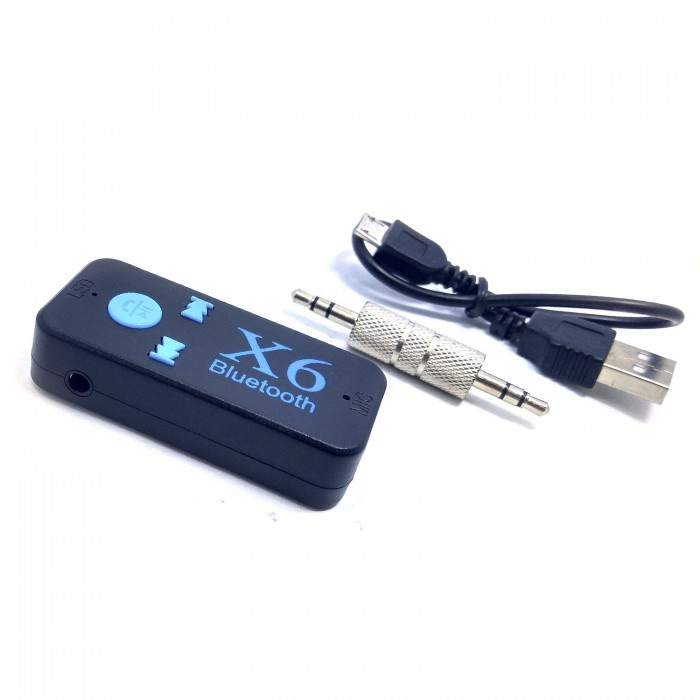
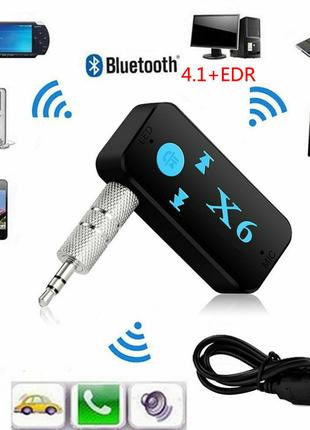
Всем привет !
Недавно делал обзор на BOROFONE DE35 за — 12 $ — обзор автомобильного FM модулятора, трансмиттера, QC3.0, Bluetooth V5.0  но там нету AUX!
Тут прикупил такой адаптер — BT-450 X6 — за 5$
За свою цену он не плох но есть косяки по сборки в первую очередь это аккумулятор он там никакой плюс не изолирован, лучше его сразу заменить!
Адаптер BT-450 X6 Bluetooth AUX предназначен для соединения вашего телефона или любого другого устройства, проигрывающего музыку, по Bluetooth через AUX-вход с автомагнитолой. Высокое качество воспроизведения. Прибор нужен тем автомобилистам, у которых в машине стоит магнитола без возможности соединения по Bluetooth, но есть AUX-вход. Благодаря встроенному микрофону, изделие можно использовать как громкую связь в автомобиле.
Чтобы прибор привести в действие необходимо:
Вставить устройство в AUX-вход.
Подключить провод Micro USB к источнику питания 5 В.
Нажать и удерживать кнопку на корпусе устройства в течении 4-6 секунд, пока не станет мигать синий светодиод.
Включить Bluetooth в настройках телефона.
Соединиться с найденным адаптером (Х6).
Переключить магнитолу в режим AUX и запустить аудиофайл на телефоне или вставить карту памяти, с записанной на ней музыкой.
BT-X6 — можно использовать с домашними стереосистемами, динамиками, наушниками и т. д.
Характеристики:
Напряжение питания — 5 В.
Ток потребления — 0,4 А.
Bluetooth v4.1 + EDR.
Частота — 2,4 ГГц
Дальность передачи до 10 м.
Поддержка A2DR стерео.
Поддержка воспроизведения музыки с MicroSD карт памяти.
Встроенный микрофон.
Встроенный аккумулятор.
Двусторонний металлический коннектор 3,5 мм, мини джек.
Провод USB — Micro USB.
Диапазон рабочих температур от -10 С° до 60 С°.
Габариты — 53 х 24 х 13 мм. • Вес — 13,0 г.
Все подробности дальше в моем обзоре!
P.S. — кто не подписался на мой канал подписывайтесь! — Telegram
YouTube Компьютерная технология
Группа на фейсе — Computer Technology/
Цена вопроса: 5 $
Пробег: 99 950 км
-
Page 1: BT 450
B T V er ve 450 U ser Guide[…]
-
Page 2: BT 450
• Ultra slim handset. • Answering machine with up to 15 minutes digital r ecording time and helpful voice prompts. • 200 Name and number phonebook to store all your contact numbers for easy dialling. • Stor e a directory entr y then copy it – or the entir e phonebook – to another B T V erve 450 handset. • Send and receive text message[…]
-
Page 3: BT 450
Section This U ser Guide provides you with all the inf ormation you need to get the most from your phone. Bef ore you mak e your first call you will need to set up your phone. F ollow the simple instructions in ‘Getting Started’, on the next few pages. Need help? If yo u have any p robl ems sett ing up or u sin g your B T V erve 450 p lease ca […]
-
Page 4: BT 450
4 If you experience any problems, please call the Helpline on 0800 218 2182* or email bt.helpdesk@vtecheurope.com In this guide Getting star ted Location . . . . . . . . . . . . . . . . . . . . . . . . . . . . . 7 Setting up . . . . . . . . . . . . . . . . . . . . . . . . . . . . 7 Setting up for multiple packs . . . . . . . . . . . . 9 Set date an[…]
-
Page 5: BT 450
Sounds Handset ringer . . . . . . . . . . . . . . . . . . . . . . . . 31 Handset beeps . . . . . . . . . . . . . . . . . . . . . . . . 31 Settings Display contrast / Handset name . . . . . . . . . 33 Auto answer . . . . . . . . . . . . . . . . . . . . . . . . . . 33 H a n d s e tr e s e t…………………….3 4 R i n g e r…………………[…]
-
Page 6: BT 450
T o enable / disable remote access . . . . . . . . . 52 If you for get to switch on your answering machine . . . . . . . . . . . . . . . . . . . . 53 Operating your answering machine remotely . . . . . . . . . . . . . . . . . . . . . 53 T ex t messaging Subscribe to the text messaging service . . . . 55 Cost of the fixed line ser vice . . . . . . .[…]
-
Page 7: BT 450
Location Place your BT V er ve 450 within 2 metres of the mains power socket and telephone so cket so that the cables will r each. Make sur e it is at leas t 1 metre away fr om other electrical appliances to avoid interference. Y our BT V er ve 450 works by sending radio signals between the handset and base. The strength of the signal depends on wh[…]
-
Page 8: BT 450
Battery low warning If the icon flashes in the handset display you will need to rechar ge the handset before you can use it a gain. Y ou also hear a low battery warning beep once every 60 seconds. During charging, the icon will scroll in the display . Battery per formance In ideal conditions, a fully charged battery should give up to 10 hours talk […]
-
Page 9: BT 450
Setting up for multiple packs If you have purchased a B T V er ve 450 multiple pack, you will need to prepar e any additional handsets and chargers for use. For each additional handset and char ger: 1. Insert the cable thr ough the chan nel at the rea r of the cha rge r and inse r t the plug int o the power sock et. Plug the o ther end into t he ma[…]
-
Page 10: BT 450
Date and time Providing you have subscribed to your network’ s Caller Display ser vice, the date and time is set automatically f or all handsets when you receive your first call. The date and time is recor ded with each answering machine message you receive. If you do not have a Caller Display service you can set the date and time manually . Any […]
-
Page 11: BT 450
11 If you experience any problems, please call the Helpline on 0800 218 2182* or email bt.helpdesk@vtecheurope.com Getting to know your phone BT Press to open the B T Ser vices menu, page 44. (UP) Redial In standby , press to open and scroll through the R edial lis t, page 19. In talk mode, press to adjust volume. In menu mode, press to scroll up t[…]
-
Page 12: BT 450
12 If you experience any problems, please call the Helpline on 0800 218 2182* or email bt.helpdesk@vtecheurope.com Handset display Getting to know your phone Display icons Shows handset battery s tatus. Scrolls when the handset is char ging. Empty when filled in black. On – displayed in standby mode to indicate handset is in range of the base. Fl[…]
-
Page 13: BT 450
Base Getting to know your phone Off hook light Flashes when the handset is taking or making a call. Power light On: power on. Find Press to ring all r egistered handsets, helpful for finding a missing handset, page 22. Also used during the registration pr ocess, page 63. On/Off Switch answering machine on or off . I SKIP Press once to repeat th[…]
-
Page 14: BT 450
Navigating the menus Y our BT V er ve 450 has an easy to use menu system. Each menu has a list of options, which you can see on the menu map on the following page. When the handset is switched on and in standby: 1. Press Menu to open the main menu. 2. Then use or buttons t o scroll thr ough the available options. 3. Press the OK option button to se[…]
-
Page 15: BT 450
Menu map 15 Getting to know your phone If you experience any problems, please call the Helpline on 0800 218 2182* or email bt.helpdesk@vtecheurope.com T ext W rite new text Inbox Outbox T emplate T ext settings Answer machine Play messages Delete msg Answer on/off Outgoing msg Ans. settings Sound Ringer T ones Settings H/set settings Base settings […]
-
Page 16: BT 450
U sing the phone 16 When you make a call, the light on the base flashes. Call timer Y our handset will automatically tim e the duration of all external calls. The handset display shows the call duration both during and f or a few seconds after your call. Out of range warning When the handset goes out of range of the base, the flashes. If you are on[…]
-
Page 17: BT 450
Receive a call When you receive a call, the phone rings. The display shows the caller’ s number if available or the caller’ s name if it matches an entry in the phonebook. If you do not have a Caller Display service, the screen shows External call . 1. Press . Call W aiting Providing you have subscribed to your network’ s Call W aiting servic[…]
-
Page 18: BT 450
During a handsfree call, press or to change the volume. Earpiece / handsfree volume During a call you can adjust the volume of the earpiece or loudspeaker . There are 5 levels. 1. Press or to increase or decr ease the volume. Secrecy (Mut e) During a call, you can talk to someone nearby without your caller hearing. 1. Press . The display shows Mute[…]
-
Page 19: BT 450
2. Press to end the call. Answer a call handsfree When the phone rings: 1. Press . The call is tr ansferred to the handset loudspeak er . Switch t o hands free during a call 1. During a call: press to put the call on the loudspeak er . T o switch handsfree off and return the call to the earpiece, press again. R edial Up to the last 15 telephone num[…]
-
Page 20: BT 450
Press Clear to delete any unwant ed digits and then enter new ones using the keypad. If the directory is full, the display shows Memory full and the number will not be saved. Y ou will need to delete a number in the directory first, see page 26. Redial a number fr om the redial list 1. Press , the last number you called is displayed. 2. Press or to[…]
-
Page 21: BT 450
4. Press Yes to confirm or No to cancel. 5. Press Back to ret urn to the previous menu level. Delete all redial numbers 1. Press . The last number dialled is displayed. 2. Press Option and scroll to Delete all and press OK . 3. Press Yes to confirm or No to cancel. 4. Press to exit and return to standby . Keypad lock Y ou can lock the keypad so tha[…]
-
Page 22: BT 450
Paging calls cannot be answer ed by a handset. Find handset (Paging) Y ou can ring a handset to help locate it. 1. Press on the base. All handsets register ed to the base will ring for up to 30 seconds. 2. Press on the base again to stop the ringing or press a button on any handset. Message & Call inbo x Y our BT V er ve 450 has an inbox which […]
-
Page 23: BT 450
Direct or y Y ou can store up to 200 names and numbers in the direct or y . Names can be up to 15 char acters long and numbers up to 24 digits. Stor e a name and number 1. From standby , press . The dir ector y menu is displayed. 2. When storing the firs t entry: New entry is highlighted. Press OK . When storing fur ther entries: The direct or y li[…]
-
Page 24: BT 450
T o search alphabetically Press the relevant k eypad button, e.g. for the entries beginning with T pr ess once then scroll or through the entries. Call groups Y our options ar e: General F amily Business Friends Utilities VIP Others No Group View an entry 1. Press . The first entr y is displayed. 2. Scroll or to the entry you want. 3. Press Option […]
-
Page 25: BT 450
Edit a name and number 1. Press . 2. Scroll or to the entry you want. 3. Press Option and scroll to Edit entry and press OK . 4. Use the keypad t o enter a new name. 5. Scroll to Number to enter a new number . 6. Scroll to Group to select a differ ent group. 7. Press OK to save or Back to ret urn to the previous menu level. Copy an entry 1. Press .[…]
-
Page 26: BT 450
Y ou can copy the entir e director y to another handset registered t o the base. If the directory becomes full during copying the display shows Memory full . If copying is not successful the display shows Dir. copy failed . If you copy an entry that already exists in the receiving handset it will creat e a duplicate entry . Copy all entries 1. Pres[…]
-
Page 27: BT 450
Delete entire directory 1. Press . 2. Press Option and scroll or to Delete all and press OK . 3. Press Yes to confirm or No to cancel. 4. Press Back to ret urn to the previous menu level. Edit call group name 1. Press . 2. Press Option and scroll or to Edit call grp and press OK . 3. Scroll or to the call group you want. 4. Press Option . Display h[…]
-
Page 28: BT 450
Change call group ringtone 1. Press . 2. Press Option and scroll or to Edit call grp and press OK . 3. Scroll or to the call group you want. 4. Press Option . Scroll to Ringtone . Press OK . 5. Press or to choose the ringtone. A sample of each one is played. Press OK to save. 6. Press Back to ret urn to the previous menu level. Speed dial Y ou can […]
-
Page 29: BT 450
4. If a name and number is already allocated to the Speed dial you have chosen they will be displayed. T o re-use this Speed dial see, “T o edit a Speed dial”. 5. If the Speed dial is empty No number is displayed and then all the Directory entries. Scroll or to the entr y you want to copy and press OK to save. 6. Press Back to ret urn to the pr[…]
-
Page 30: BT 450
T o edit a Speed dial 1. Press . 2. Press Option and scroll or to Speed dial and press OK . 3. Scroll or to the Speed dial you want to edit and press OK . 4. The name and number is displayed, press Option and Edit is displayed. 5. Press OK to confirm, and then scroll or to the entry you want and press OK to save. 6. This new name and number will re[…]
-
Page 31: BT 450
Sounds 31 Handset ringer 1. Press Menu , scroll to Sound and press OK . 2. Ringer is highlighted. Press OK . 3. The current External melody is highlighted. Press or to select the ringtone you want f or ex ternal calls. 4. Scroll to the Internal melody . Press or to select the ringtone you want f or internal calls. 5. Scroll to Ring volume . Press o[…]
-
Page 32: BT 450
5. Scroll to Battery low . Press or to select On or Off . 6. Scroll to Out of range . Press or to select On or Off . 7. Press OK to confirm. 8. Press Back to ret urn to the previous menu level. 32 Sounds If you experience any problems, please call the Helpline on 0800 218 2182* or email bt.helpdesk@vtecheurope.com[…]
-
Page 33: BT 450
Settings 33 Handset settings Display contr as t / Handset name 1. Press Menu , scroll to Settings and press OK . 2. H/set settings is highlighted. Press OK . 3. Scroll to Display and press OK . 4. Press or to select the contrast setting. 5. Scroll to Name . Press Clear to delete the curr ent name. Enter a new name. 6. Press OK to save. 7. Press Bac[…]
-
Page 34: BT 450
Handset reset 1. Press Menu , scroll to Settings and press OK . 2. H/set settings is highlighted. Press OK . 3. Scroll to Handset reset and press OK . 4. Press Yes to confirm or No to cancel. Base settings Ringer 1. Press Menu , scroll to Settings and press OK . 2. Scroll to Base settings . Press OK . 3. Ringer is highlighted. Press OK . 4. The Rin[…]
-
Page 35: BT 450
Handset priority 1. Press Menu , scroll to Settings and press OK . 2. Scroll to Base settings . Press OK . 3. Scroll to H/set priority . Press OK . 4. All handsets is highlighted. Press OK for all handsets to ring together . Or Scroll to Select handset . Press OK then press or to select the handset you want to ring first. Press OK . Th e ring d ela[…]
-
Page 36: BT 450
PBX/switchboard access code 1. Press Menu , scroll to Settings and press OK . 2. Scroll to Base settings . Press OK . 3. Scroll to PBX access . Press OK . 4. Enter the code you want, then press OK . 5. Press Back to ret urn to the previous menu level. S ys tem PIN 1. Press Menu , scroll to Settings and press OK . 2. Scroll to Base settings . Press […]
-
Page 37: BT 450
S ys tem reset This resets your B T V er ve 450 to its original settings. 1. Press Menu , scroll to Settings and press OK . 2. Scroll to Base settings . Press OK . 3. Scroll to System reset . Press OK . 4. Enter the system PIN (original setting = 0000) and press OK . 5. Press Yes to confirm or No to cancel. 6. If you select Yes the handset returns […]
-
Page 38: BT 450
Date/Time/Alarm Set date and time Providing you have subscribed to your network’ s Caller Display service, the date and time is set automatically when you receive your first call. 1. Press Menu , scroll to Settings and press OK . 2. Scroll to Date/Time/Alarm . Press OK . 3. Date/Time is highlighted. Press OK . 4. Pr es s or t o sel ec t th e Ti m[…]
-
Page 39: BT 450
Set alarm call 1. Press Menu , scroll to Settings and press OK . 2. Scroll to Date/Time/Alarm . Press OK . 3. Scroll to Alarm . Press OK . 4. Enter the alarm time, using the 24 hour format, e.g. 0730 f or 7.30am. 5. Scroll to Alarm on/off . Pr ess or to select Daily , Once or Off . 6. Scroll to Ringtone and press or to select the ringtone you want […]
-
Page 40: BT 450
40 If you experience any problems, please call the Helpline on 0800 218 2182* or email bt.helpdesk@vtecheurope.com Calls lists Caller Display If you have subscribed to a Caller Display Service, you will be able to see your caller’ s number on your handset display (provided it is not withheld) prior to answering the call. If your caller’ s name […]
-
Page 41: BT 450
41 If you experience any problems, please call the Helpline on 0800 218 2182* or email bt.helpdesk@vtecheurope.com When a Calls list is open, press to scroll from the newest call to the oldest, or press to scroll fr om the oldest call to the newest. 5. Press or to display details about the next call. 6. Press Back to ret urn to the previous menu le[…]
-
Page 42: BT 450
42 If you experience any problems, please call the Helpline on 0800 218 2182* or email bt.helpdesk@vtecheurope.com 4. Enter the name. 5. Scroll to Number and edit the number if requir ed. 6. Scroll to Select group and press or to set the call group you want. 7. Press OK to save. 8. Press Back to ret urn to the previous menu level. Calls list settin[…]
-
Page 43: BT 450
Delete an entry 1. Press . 2. Press or to scroll thr ough the lis t to the entry you want. 3. Press Option . Scroll to Delete and press OK . Display shows Deleted . 4. Press Back to ret urn to the previous menu level. Delete entire Calls list 1. Press . 2. Press Option . Scroll to Delete all and press OK . 3. Press Yes to confirm or No to cancel. 4[…]
-
Page 44: BT 450
44 If you experience any problems, please call the Helpline on 0800 218 2182* or email bt.helpdesk@vtecheurope.com B T Network Ser vices By selecting the BT Services menu you can access a range of useful pre-stor ed numbers and fur ther BT Calling Featur es. Pre-stor ed BT Services number s: BT 118500 (Directory Enquiries) 1. Press . 2. Dir enquiri[…]
-
Page 45: BT 450
45 If you experience any problems, please call the Helpline on 0800 218 2182* or email bt.helpdesk@vtecheurope.com Call W aiting lets you know if another person is trying to contact you while you are on a call. If a second caller rings you will hear a beep in the handset. Providing you have also subscribed to Caller Display , the screen will show t[…]
-
Page 46: BT 450
46 If you experience any problems, please call the Helpline on 0800 218 2182* or email bt.helpdesk@vtecheurope.com Answering machine Y our BT V er ve 450 can digitally record up to 15 minut es of messages or up to 59 messages. Each incoming message can last up to a maximum of 1 minute. Y ou can operate your answering machine fr om: • the handset.[…]
-
Page 47: BT 450
47 If you experience any problems, please call the Helpline on 0800 218 2182* or email bt.helpdesk@vtecheurope.com Answer and Record The pre-set Answer and Re cord outgoing message, that allows your caller to leave a message, is “Hello, your call cannot be taken at the moment, so please leave your message after the tone”. Y our Answer and R eco[…]
-
Page 48: BT 450
48 If you experience any problems, please call the Helpline on 0800 218 2182* or email bt.helpdesk@vtecheurope.com 4. Scroll to Ans & Rec or Answer only and press OK . 5. Y our message is then played back. If you want to delete it, press Delete during playback. Or press OK to save. Answer settings 1. Press Menu . Scroll to Answer machine . Pres[…]
-
Page 49: BT 450
Call screening When the answering machine is on and takes a call, you can listen to the caller leaving a message. Y ou can then identify the caller and decide whether to tak e the call in person. The call can be heard thr ough the base speaker , or the handset as follows: 1. When your BT V erve 450 rings, wait for the answering machine to take the […]
-
Page 50: BT 450
50 If you experience any problems, please call the Helpline on 0800 218 2182* or email bt.helpdesk@vtecheurope.com Message playback 1. Press Menu . Scroll to Answer machine . Press OK . 2. Play messages is highlighted. Press OK . 3. The handset displays the number or name of the caller if available, and the date and time it was received. During pla[…]
-
Page 51: BT 450
Memory full If the caller’ s s till talking when the memory becomes full the caller hears “Thank you for calling” and the machine will hang up. Y ou must delete messages bef ore your machine will be able to recor d new ones. T o delete old (played) messages, see page 50 or opposite for instructions. Answering machine messages that are not del[…]
-
Page 52: BT 450
52 If you experience any problems, please call the Helpline on 0800 218 2182* or email bt.helpdesk@vtecheurope.com to play the next message. to pause and resume playback. to stop playback. ad jus t the s pea ke r vol um e + or – d uri ng pl ay ba ck. At the end of playback pr ess and follow the voice prompt to pr ess again to delete all old messa[…]
-
Page 53: BT 450
If you for get to switch on your answering machine 1. Call your number from another phone and let it ring. After 20 rings the machine will switch on and answer your call. 2. Enter your remote access PIN. Play back your messages as shown below in ‘Operating your answering machine r emotely’. If you do not choose to switch your answering machine […]
-
Page 54: BT 450
54 If you experience any problems, please call the Helpline on 0800 218 2182* or email bt.helpdesk@vtecheurope.com Delete current message Skip forward to next message Set answer mode – this lets you select the outgoing message to Answer & Recor d or Answer Only Play outgoing message Set answering machine to On or Off Ends outgoing message rec[…]
-
Page 55: BT 450
T ex t messaging 55 W elcome to the BT text messaging service on your BT V erve 450. Y our BT V er ve 450 can send and receive text messages from participating mobile networks and compatible landline telephones in the UK. The fixed line text service is provided under BT’ s terms and conditions for teleph one ser vice. These can be found by visiti[…]
-
Page 56: BT 450
If the text is not sent, the display shows Message failed . It is stored in the Outbox. Writing tips Use the k eypad to enter letters and numbers, eg to write today (2day): Press four times to enter 2. Press once to enter d. Press once to enter a. Press three times to enter y . Press to enter a space and use and/or for other char acters. P r es s C[…]
-
Page 57: BT 450
T emplates There are five pr e-set templates Please call I’ll be there at Thank you I’ll call you Happy Birthday! Receiving a call while writing a text If you are writing a text and you receive a call the text will be lost. Do you have two text phone bases connected to the same phone line? If you have two text phone base stations plugged […]
-
Page 58: BT 450
4. The message is displayed. Press Option to Send , Store , add a Template , Delete or Delete all . 5. Press to cancel at any stage and return to standby . R eceiving messages When you receive a new text message, the icon is displayed along with New text msg and the base text indicator flashes. Un r ead m es sa ge s ar e m ark e d N e w . R ea d me[…]
-
Page 59: BT 450
Forward Press OK . Add more text if requir ed. Press Option to Send . Call number Press OK . The caller’ s number is displayed. Edit the number if r equired. Press to dial. Store number Press OK . Enter the name. Scroll to Number and edit number if requir ed. Scroll to Group and press or to select the Group . Press OK to save. Delete Press OK . T[…]
-
Page 60: BT 450
Ser vice Centre numbers T o send a nd rec eiv e tex t mes sag es yo u nee d the tel ephone num ber of you r Netwo rk’ s t ext Ce ntr e. If yo u acc ide nta lly dele te the O utgoi ng or I nco ming Servic e Centr e numb ers yo u will ne ed to r e-ent er them i n orde r for yo ur text Se r vice t o work. Y ou can enter up to 4 Service Centre number[…]
-
Page 61: BT 450
Select Send Ser vice Centre Only service centres that have numbers stored will be displayed as Send Centres. 1. Press Menu , Text and press OK . 2. Scroll or to Text settings and press OK . 3. Scroll to Send Service and press OK . 4. Pr es s o r to s el ec t the S e r v i c e C e n tr e an d pr es s O K . 5. Press Back to ret urn to the previous me[…]
-
Page 62: BT 450
Switch new message alert on or off 1. Press Menu , Text is highlighted. Press OK . 2. Scroll or to Text settings and press OK . 3. Scroll to New text alert and press OK . 4. Press or to select On or Off and press OK . 5. Press Back to ret urn to the previous menu level. 62 T ext messaging If you experience any problems, please call the Helpline on […]
-
Page 63: BT 450
63 If you experience any problems, please call the Helpline on 0800 218 2182* or email bt.helpdesk@vtecheurope.com U sing additional handsets Y ou can use up to five BT V er ve 450 additional handsets with your BT V er ve 450 base to extend your phone system without needing to install extension sockets f or each new phone. Y our BT V er ve 450 hand[…]
-
Page 64: BT 450
64 If you experience any problems, please call the Helpline on 0800 218 2182* or email bt.helpdesk@vtecheurope.com At the base: 1. Press and hold . The handset is automatically assigned the next available handset number . Select base 1. Press Menu , scroll to Settings and press OK . 2. H/set settings is highlighted. Press OK . 3. Scroll to Select b[…]
-
Page 65: BT 450
6. Display shows De-registered! 7. Press Back to ret urn to the previous menu level. Internal calls Call another handset If you have more than one handset r egis tered t o the base, you can make internal c alls between two handsets. 1. Press Int and if you have one other handset it will ring. If you have extra handsets, press or to select the h[…]
-
Page 66: BT 450
66 If you experience any problems, please call the Helpline on 0800 218 2182* or email bt.helpdesk@vtecheurope.com 3-W ay confer ence call Y ou can hold a 3-way conference call between 2 int ernal callers and 1 external caller 1. During your call, press Int . Y our external caller is put on hold. 2. If you have one other handset it will ring. If yo[…]
-
Page 67: BT 450
67 If you experience any problems, please call the Helpline on 0800 218 2182* or email bt.helpdesk@vtecheurope.com Help Phone does not work • Have you installed the batteries corr ectly? See page 8. • Check that the mai ns power is correctly connected. No dial tone • Is the t elephone cord of the base plugged into the phone socket? • Check […]
-
Page 68: BT 450
68 If you experience any problems, please call the Helpline on 0800 218 2182* or email bt.helpdesk@vtecheurope.com No display • The batt eries may be flat, dead or incorrectly inser ted. • R echarge or replace the batteries icon flashes • Is the handset r egistered correctly to the base, see page 63. • Check that the mains po wer is correct[…]
-
Page 69: BT 450
Cannot access your messages from another phone • Have you changed the r emote access security PIN code? See page 52. Always keep a note of the ne w PIN code in a safe place. • Has R emote access been disabled? T o enable Remote access, see page 52. No Caller Display number/name displa yed • Have you subscribed t o a Caller Display ser vice fr[…]
-
Page 70: BT 450
70 If you experience any problems, please call the Helpline on 0800 218 2182* or email bt.helpdesk@vtecheurope.com Buzzing noise on my phone or on other electrical equipment nearby • Sometimes your B T V erve 450 can inter fer e with other electrical equipment if it is placed too close. It is recommended that you place your B T V er ve 450 at lea[…]
-
Page 71: BT 450
Cannot receive text • Y ou will not be able to receive text messages until you have first sent a message. The first message sent registers you with the text service. • Mor e than one text messaging product is plugged into the line. Remove other pr oducts. • Check service centre number is corr ect. • Ensur e you have subscribed to a Caller D[…]
-
Page 72: BT 450
72 If you experience any problems, please call the Helpline on 0800 218 2182* or email bt.helpdesk@vtecheurope.com General sales enquiries • B T Residential lines – call 150. B T Business lines – call 152. • F or non BT line customers, call 0800 800 150 (residential) or 0800 800 152 (business). • Additional handsets ar e available from th[…]
-
Page 73: BT 450
If you are sending a message from a fix ed line phone to another fixed line phone For ces a message you send to be delivered as a voice text even though the recipient may have a text enabled phone and usually r eceives written text. This command is inserted at the s tart of the message and applies only to that message, e.g. ‘Hello I will be home […]
-
Page 74: BT 450
74 If you experience any problems, please call the Helpline on 0800 218 2182* or email bt.helpdesk@vtecheurope.com Gener al inf ormation IMPORT ANT This equipment is not designed for making emer gency telephone call when the power fails. Alternative arrangements should be made f or access to emergency services. This product is intended f or connect[…]
-
Page 75: BT 450
75 If you experience any problems, please call the Helpline on 0800 218 2182* or email bt.helpdesk@vtecheurope.com • It is recommended that you place your product at least one metre away from such appliances to minimise any risk of interference. • Never dispose of batteries in a fire. Ther e is a serious risk of explosion and/or the release of […]
-
Page 76: BT 450
76 If you experience any problems, please call the Helpline on 0800 218 2182* or email bt.helpdesk@vtecheurope.com Guarant ee Y our BT V erve 450 is guaranteed for a period of 12 months from the date of pur chase. Subject to the terms listed below , the guarantee will provide f or the repair of , or at BT’ s or its agent’ s discretion, the opti[…]
-
Page 77: BT 450
T echnical inf ormation How many telephones can I have? All items of telephone equipment have a Ringer Equivalence Number (REN), which is used to calculate the number of items which may be connected to any one telephone line. Y our BT V erve 450 has a REN of 1. A total REN of 4 is allowed. If the total REN of 4 is exceeded, the telephones may not r[…]
-
Page 78: BT 450
[…]
-
Page 79: BT 450
[…]
-
Page 80: BT 450
Offices worldwide The services described in this publication are subject to availability and may be modified from time to time. Services and equipment are provided subject to British T elecommunications plc’s respective standard conditions of contract. Nothing in this publication f orms any part of any contract. © British T elecommunications p[…]
Bt 450 wireless receiver – это устройство, которое позволяет подключить беспроводные наушники или колонки к компьютеру или другому устройству с помощью Bluetooth соединения. Это удобное решение для тех, кто хочет наслаждаться музыкой или просматривать видео без проводов.
Для подключения Bt 450 wireless receiver необходимо выполнить несколько простых шагов. Во-первых, убедитесь, что ваше устройство имеет встроенный Bluetooth или поддерживает внешние Bluetooth-адаптеры. Если устройство не имеет Bluetooth, вы можете купить внешний адаптер и подключить его к USB-порту.
Важно помнить, что для успешного подключения устройств, они должны находиться в пределах действия Bluetooth сигнала. Обычно это расстояние не превышает 10 метров.
Когда Bluetooth-адаптер готов к работе, включите Bt 450 wireless receiver и дождитесь, пока он войдет в режим поиска устройств. В это время также активируйте Bluetooth на вашем устройстве, чтобы оно могло быть обнаружено.
Когда устройства установили связь, вы сможете наслаждаться качественным звуком без проводов. Bt 450 wireless receiver позволяет передавать звук в стерео-формате, обеспечивая высокое качество звучания ваших любимых композиций или фильмов.
Как подключить Bt 450 wireless receiver
Для подключения Bt 450 wireless receiver к вашему устройству следуйте указанным ниже инструкциям:
- Убедитесь, что ваше устройство (например, компьютер или телевизор) поддерживает функцию беспроводной передачи по Bluetooth.
- Найдите кнопку включения на Bt 450 wireless receiver и удерживайте ее нажатой, пока индикатор не начнет мигать. Это означает, что устройство перешло в режим “готовности к подключению”.
- На своем устройстве перейдите в раздел настроек Bluetooth.
- Активируйте Bluetooth на вашем устройстве (если он еще не был включен).
- В списке доступных устройств выберите Bt 450 wireless receiver.
- Подтвердите соединение с Bt 450 wireless receiver на вашем устройстве.
- После успешного подключения, индикатор на Bt 450 wireless receiver должен перестать мигать и загореться постоянным светом.
- Теперь ваше устройство готово к использованию Bt 450 wireless receiver. Вы можете наслаждаться беспроводным аудио-потоком с вашего устройства на подключенные наушники или акустическую систему.
Идеальное решение для беспроводного подключения
Bt 450 wireless receiver имеет множество преимуществ, которые делают его идеальным решением для беспроводного подключения. Во-первых, он оснащен последней версией Bluetooth, что обеспечивает стабильное и качественное подключение. Во-вторых, он имеет компактный и элегантный дизайн, который позволяет установить его в любом месте без привлечения лишнего внимания.
- Простота установки и использования
- Отличное качество звука
Bt 450 wireless receiver прост в установке и использовании. Для его работы достаточно подключить его к аудиовыходу компьютера или телевизора, и он автоматически установит соединение с беспроводными наушниками или колонками. Также он поддерживает автоматическое подключение, что позволяет сэкономить время при повторном использовании.
Благодаря использованию передовых технологий, Bt 450 wireless receiver обеспечивает отличное качество звука. Он поддерживает высокое разрешение аудиофайлов и обеспечивает бесперебойное воспроизведение музыки или звука из видео.
В заключение, Bt 450 wireless receiver – это идеальное решение для всех, кто ищет простой и удобный способ подключения беспроводных наушников или колонок к компьютеру или телевизору. Он обладает преимуществами простоты установки и использования, а также обеспечивает отличное качество звука.
Найти подходящий источник питания
Перед началом подключения убедитесь, что у вас есть подходящий источник питания. Обычно Bt 450 Wireless Receiver может работать от различных источников питания, таких как:
- Сетевой адаптер (приобретается отдельно)
- USB-порт компьютера или ноутбука
- Порт HDMI (если доступен на вашем устройстве)
- Порт USB телевизора или монитора (если доступен)
- Встроенный аккумулятор
Выбор источника питания зависит от ваших потребностей и доступности нужных портов на устройстве. Если вы планируете использовать Bt 450 Wireless Receiver с телевизором или монитором, проверьте наличие портов HDMI или USB.
Если вы используете компьютер или ноутбук, вам понадобится USB-порт для подключения ресивера. Если у вас нет свободного USB-порта, вы можете воспользоваться сетевым адаптером, чтобы подключить ресивер к розетке.
Если устройство оснащено встроенным аккумулятором, убедитесь, что он полностью заряжен перед использованием. Это гарантирует, что Bt 450 Wireless Receiver будет работать без проблем.
После выбора подходящего источника питания вам потребуется кабель или адаптер, чтобы подключить ресивер. Убедитесь, что у вас есть правильный кабель с нужными разъемами или адаптер, совместимый с выбранным источником питания.
Провести настройку
После подключения Bt 450 wireless receiver к компьютеру или другому устройству с помощью USB-порта, необходимо выполнить настройку, чтобы он корректно работал.
Вот, что нужно сделать для проведения настройки:
- Убедитесь, что на вашем устройстве установлены все необходимые драйверы для работы с Bt 450 wireless receiver. Если драйверы не установлены, загрузите их с официального сайта производителя.
- Вставьте батарейку в Bt 450 wireless receiver, чтобы он получил питание. Обычно батарейку можно вставить с помощью открывающейся крышки на задней или нижней стороне устройства.
- Включите Bt 450 wireless receiver, нажав на соответствующую кнопку или переключатель питания.
- Подождите несколько секунд, чтобы устройство завершило процесс запуска.
- При необходимости включите режим сопряжения Bt 450 wireless receiver с вашим устройством. Для этого обычно нужно нажать и держать кнопку сопряжения на устройстве, пока оно не начнет мигать или показывать соответствующий индикатор.
- На вашем устройстве найдите раздел “Bluetooth” в настройках и активируйте его.
- Запустите поиск Bluetooth-устройств на вашем устройстве и дождитесь, пока Bt 450 wireless receiver будет найден и отображен в списке найденных устройств.
- Выделите Bt 450 wireless receiver в списке и нажмите кнопку “Подключить”.
- Дождитесь завершения процесса подключения. Когда подключение будет установлено, на вашем устройстве появится соответствующее уведомление или индикатор.
После проведения всех этих шагов Bt 450 wireless receiver будет готов к использованию. Теперь вы можете наслаждаться беспроводной связью с подключенными устройствами.
Подключение к компьютеру
Для подключения BT 450 wireless receiver к компьютеру вам потребуется следовать нескольким простым шагам:
- Убедитесь, что ваш компьютер имеет Bluetooth-функцию. Если нет, вам может потребоваться приобрести внешний Bluetooth-адаптер, который подходит для вашей операционной системы.
- Включите BT 450 wireless receiver и убедитесь, что он находится в режиме поиска устройств. Обычно это делается путем удержания кнопки питания на приемнике в течение нескольких секунд.
- На компьютере откройте раздел управления Bluetooth-устройствами. Местоположение этого раздела может отличаться в зависимости от операционной системы, но обычно его можно найти в настройках.
- В разделе управления Bluetooth-устройствами выберите опцию “Добавить новое устройство” или “Сопряжение нового устройства”.
- Когда ваш компьютер найдет BT 450 wireless receiver, он будет отображаться в списке доступных устройств Bluetooth.
- Выберите BT 450 wireless receiver из списка и нажмите “Подключить” или аналогичную кнопку на вашем компьютере.
- Если требуется пароль для подключения, введите его и следуйте инструкциям на экране.
- После успешного подключения вы увидите подтверждение на вашем компьютере и BT 450 wireless receiver будет готов к использованию.
Теперь, когда BT 450 wireless receiver успешно подключен к вашему компьютеру, вы можете начать использовать его для подключения беспроводных устройств, таких как наушники или клавиатура. Просто следуйте инструкциям, предоставленным производителем устройства, чтобы установить соединение и наслаждаться беспроводной связью.
Подключение к мобильному устройству
Если вы хотите подключить Bt 450 wireless receiver к мобильному устройству, вам понадобятся следующие шаги:
1. Убедитесь, что ваше мобильное устройство поддерживает Bluetooth. Обычно это можно проверить в настройках устройства или посмотрев спецификации производителя.
2. Включите Bluetooth на вашем мобильном устройстве. Обычно это делается через настройки или путем щелчка на значке Bluetooth в верхней панели управления.
3. Включите Bt 450 wireless receiver, нажав и удерживая кнопку питания на устройстве. Убедитесь, что индикатор питания загорелся.
4. На мобильном устройстве найдите список доступных устройств Bluetooth. В разных устройствах он может называться по-разному, но обычно это делается через настройки Bluetooth или путем щелчка на значке Bluetooth.
5. В списке устройств найдите Bt 450 wireless receiver. Обычно он будет называться похожим образом, но может отличаться в зависимости от модели и производителя.
6. Нажмите на имя Bt 450 wireless receiver в списке устройств, чтобы установить соединение. В некоторых случаях вам может потребоваться ввести пароль или подтвердить соединение.
7. После установления соединения ваше мобильное устройство будет подключено к Bt 450 wireless receiver. Теперь вы можете использовать его для передачи звука.
Обратите внимание, что процесс подключения может отличаться в зависимости от модели вашего мобильного устройства и Bt 450 wireless receiver. Если у вас возникли сложности, рекомендуется обратиться к инструкции по использованию или свяжитесь с производителем для получения дополнительной помощи.
Установка драйверов и программного обеспечения
После подключения Bt 450 wireless receiver к компьютеру необходимо установить соответствующие драйверы и программное обеспечение, чтобы устройство работало корректно. В этом разделе мы расскажем о том, как выполнить данную процедуру.
Перед установкой драйверов и программного обеспечения рекомендуется проверить наличие интернет-соединения и убедиться, что компьютер обновлен до последней версии операционной системы. Это позволит избежать возможных проблем и обеспечить наилучшую совместимость.
Шаг 1: Поиск драйверов
Первым шагом необходимо найти и загрузить драйверы для Bt 450 wireless receiver. На официальном сайте производителя обычно предоставляются актуальные версии драйверов для различных операционных систем. Используйте поисковую систему или перейдите на сайт производителя и введите модель устройства для поиска нужных драйверов.
Шаг 2: Загрузка и установка драйверов
После того, как вы нашли необходимые драйверы, загрузите их на компьютер. Обычно драйверы предоставляются в виде исполняемых файлов или архивов. Если драйверы представлены в виде архива, распакуйте его с помощью архиватора, например, WinRAR или 7-Zip.
После распаковки запустите установочный файл драйвера и следуйте инструкциям мастера установки. В процессе установки могут быть запрошены административные права, разрешите доступ, если это требуется.
Шаг 3: Установка программного обеспечения
Помимо драйверов, для Bt 450 wireless receiver может потребоваться установка дополнительного программного обеспечения. Обычно на официальном сайте производителя также доступны необходимые программы или инструменты для настройки и использования устройства. Перейдите на сайт производителя, найдите раздел с поддержкой или загрузками и загрузите все необходимое ПО.
Запустите установочный файл скачанного программного обеспечения и следуйте инструкциям мастера установки. Убедитесь, что у вас есть все необходимые права доступа для успешной установки.
После завершения установки драйверов и программного обеспечения перезагрузите компьютер, чтобы изменения вступили в силу. После перезагрузки устройство Bt 450 wireless receiver будет готово к использованию.
Подключение к выходу аудио или видео
Для подключения BT 450 wireless receiver к выходу аудио или видео устройства необходимо выполнить следующие шаги:
- Найдите выходной порт аудио или видео на вашем источнике сигнала. Обычно это 3,5 мм гнездо для аудио или HDMI-порт для видео.
- Подключите соответствующий кабель к выходному порту вашего устройства и другой конец к соответствующему входу BT 450 wireless receiver.
- Включите BT 450 wireless receiver и устройство, с которым вы хотите его соединить.
- Подождите, пока BT 450 wireless receiver выполнит процесс сопряжения и установит соединение с основным устройством.
- Убедитесь, что звук или видео передается на подключенное устройство. Если необходимо, настройте параметры звука или видео на источнике сигнала.
Теперь вы можете наслаждаться беспроводной передачей аудио или видео с вашего источника на BT 450 wireless receiver. Это особенно удобно, если вы хотите использовать наушники или акустическую систему без проводов.
Тестирование
После подключения BT 450 Wireless Receiver к устройству, необходимо приступить к тестированию функциональности и качества работы.
Перед началом тестирования убедитесь, что оба устройства находятся в зоне покрытия друг друга и между ними отсутствуют препятствия, которые могут ослабить сигнал.
Тестирование на подключение:
- Включите BT 450 Wireless Receiver и устройство, с которым вы планируете его подключить.
- Откройте на устройстве настройки Bluetooth и включите его.
- В списке доступных устройств найдите BT 450 Wireless Receiver и выберите его.
- Дождитесь успешного подключения и проверьте, что устройство отображается в списке уже подключенных устройств.
Тестирование на передачу данных:
- Запустите любое приложение или программу, которая использует Bluetooth для передачи данных.
- Проверьте возможность передачи данных между устройством и BT 450 Wireless Receiver.
- Убедитесь, что передача данных происходит без задержек и сбоев.
Тестирование на качество звука:
- Подключите BT 450 Wireless Receiver к аудиоустройству или наушникам.
- Включите любимую музыку или видео и оцените качество звука при использовании BT 450 Wireless Receiver.
- Проверьте отсутствие шумов, искажений или прерывания звука в процессе воспроизведения.
Тестирование на дальность действия:
- Убедитесь, что устройства находятся на максимально возможном расстоянии друг от друга.
- Проверьте стабильность сигнала и качество приема звука или передачи данных на максимальном расстоянии.
В случае обнаружения неполадок или неудовлетворительной работы устройства свяжитесь с технической поддержкой производителя для получения дальнейшей помощи.
Вопрос-ответ:
Как подключить Bt 450 wireless receiver?
Для подключения Bt 450 wireless receiver необходимо выполнить следующие шаги: 1. Вставьте приемник в свободный порт USB вашего устройства. 2. Дождитесь, пока операционная система автоматически распознает и установит драйверы для приемника. 3. После установки драйверов можно приступить к использованию приемника. Просто перейдите в настройки вашего устройства и выберите его в качестве входного устройства.
Можно ли использовать Bt 450 wireless receiver с разными устройствами?
Да, Bt 450 wireless receiver может быть использован с разными устройствами, которые имеют USB-порт и поддерживают передачу данных по Bluetooth. Вы можете подключить его к компьютеру, ноутбуку, планшету или даже смартфону, чтобы получить беспроводную связь.
Как проверить, что Bt 450 wireless receiver правильно подключен?
Чтобы проверить, что Bt 450 wireless receiver правильно подключен, выполните следующие действия: 1. Убедитесь, что приемник вставлен в USB-порт вашего устройства. 2. Откройте настройки вашего устройства и найдите раздел “Bluetooth”. 3. Если Bt 450 wireless receiver правильно подключен, вы увидите его в списке доступных Bluetooth-устройств. Если приемник не отображается, попробуйте перезапустить устройство или проверьте его совместимость с вашей операционной системой.
Какие устройства могут использовать Bt 450 wireless receiver?
Bt 450 wireless receiver может быть использован различными устройствами, например: компьютерами, ноутбуками, планшетами, смартфонами и другими устройствами, которые поддерживают беспроводную передачу данных по Bluetooth. Однако перед использованием рекомендуется проверить совместимость вашего устройства с Bt 450 wireless receiver и операционной системой, которую вы используете.
Какие функции предоставляет Bt 450 wireless receiver?
Bt 450 wireless receiver предоставляет функции беспроводной передачи данных по Bluetooth. С помощью приемника вы можете подключить беспроводную клавиатуру, мышь, наушники или другие устройства к вашему компьютеру или другому совместимому устройству. Благодаря Bt 450 wireless receiver вы сможете наслаждаться свободой движения и удобством беспроводной связи без необходимости использования проводов.
Какой дальностью действия обладает Bt 450 wireless receiver?
Bt 450 wireless receiver имеет дальность действия до 10 метров. Это означает, что вы можете использовать его на расстоянии до 10 метров от устройства, к которому он подключен. Это очень удобно, так как вы можете управлять устройством, не находясь рядом с ним. Например, вы можете подключить Bt 450 wireless receiver к своему компьютеру и управлять медиа-проигрывателем, находясь на другом конце комнаты. Однако помните, что преграды, такие как стены или мебель, могут снизить дальность действия устройства.
-
BT 450 — page 1
B T V er ve 450 U ser Guide …
-
BT 450 — page 2
• Ultra slim handset. • Answering machine with up to 15 minutes digital r ecording time and helpful voice prompts. • 200 Name and number phonebook to store all your contact numbers for easy dialling. • Stor e a directory entr y then copy it – or the entir e phonebook – to another B T V erve 450 handset. • Send and receive text message …
-
BT 450 — page 3
Section This U ser Guide provides you with all the inf ormation you need to get the most from your phone. Bef ore you mak e your first call you will need to set up your phone. F ollow the simple instructions in ‘Getting Started’, on the next few pages. Need help? If yo u have any p robl ems sett ing up or u sin g your B T V erve 450 p lease ca …
-
BT 450 — page 4
4 If you experience any problems, please call the Helpline on 0800 218 2182* or email bt.helpdesk@vtecheurope.com In this guide Getting star ted Location . . . . . . . . . . . . . . . . . . . . . . . . . . . . . 7 Setting up . . . . . . . . . . . . . . . . . . . . . . . . . . . . 7 Setting up for multiple packs . . . . . . . . . . . . 9 Set date an …
-
BT 450 — page 5
Sounds Handset ringer . . . . . . . . . . . . . . . . . . . . . . . . 31 Handset beeps . . . . . . . . . . . . . . . . . . . . . . . . 31 Settings Display contrast / Handset name . . . . . . . . . 33 Auto answer . . . . . . . . . . . . . . . . . . . . . . . . . . 33 H a n d s e tr e s e t…………………….3 4 R i n g e r………………… …
-
BT 450 — page 6
T o enable / disable remote access . . . . . . . . . 52 If you for get to switch on your answering machine . . . . . . . . . . . . . . . . . . . . 53 Operating your answering machine remotely . . . . . . . . . . . . . . . . . . . . . 53 T ex t messaging Subscribe to the text messaging service . . . . 55 Cost of the fixed line ser vice . . . . . . . …
-
BT 450 — page 7
Location Place your BT V er ve 450 within 2 metres of the mains power socket and telephone so cket so that the cables will r each. Make sur e it is at leas t 1 metre away fr om other electrical appliances to avoid interference. Y our BT V er ve 450 works by sending radio signals between the handset and base. The strength of the signal depends on wh …
-
BT 450 — page 8
Battery low warning If the icon flashes in the handset display you will need to rechar ge the handset before you can use it a gain. Y ou also hear a low battery warning beep once every 60 seconds. During charging, the icon will scroll in the display . Battery per formance In ideal conditions, a fully charged battery should give up to 10 hours talk …
-
BT 450 — page 9
Setting up for multiple packs If you have purchased a B T V er ve 450 multiple pack, you will need to prepar e any additional handsets and chargers for use. For each additional handset and char ger: 1. Insert the cable thr ough the chan nel at the rea r of the cha rge r and inse r t the plug int o the power sock et. Plug the o ther end into t he ma …
-
BT 450 — page 10
Date and time Providing you have subscribed to your network’ s Caller Display ser vice, the date and time is set automatically f or all handsets when you receive your first call. The date and time is recor ded with each answering machine message you receive. If you do not have a Caller Display service you can set the date and time manually . Any …
-
BT 450 — page 11
11 If you experience any problems, please call the Helpline on 0800 218 2182* or email bt.helpdesk@vtecheurope.com Getting to know your phone BT Press to open the B T Ser vices menu, page 44. (UP) Redial In standby , press to open and scroll through the R edial lis t, page 19. In talk mode, press to adjust volume. In menu mode, press to scroll up t …
-
BT 450 — page 12
12 If you experience any problems, please call the Helpline on 0800 218 2182* or email bt.helpdesk@vtecheurope.com Handset display Getting to know your phone Display icons Shows handset battery s tatus. Scrolls when the handset is char ging. Empty when filled in black. On – displayed in standby mode to indicate handset is in range of the base. Fl …
-
BT 450 — page 13
Base Getting to know your phone Off hook light Flashes when the handset is taking or making a call. Power light On: power on. Find Press to ring all r egistered handsets, helpful for finding a missing handset, page 22. Also used during the registration pr ocess, page 63. On/Off Switch answering machine on or off . I SKIP Press once to repeat th …
-
BT 450 — page 14
Navigating the menus Y our BT V er ve 450 has an easy to use menu system. Each menu has a list of options, which you can see on the menu map on the following page. When the handset is switched on and in standby: 1. Press Menu to open the main menu. 2. Then use or buttons t o scroll thr ough the available options. 3. Press the OK option button to se …
-
BT 450 — page 15
Menu map 15 Getting to know your phone If you experience any problems, please call the Helpline on 0800 218 2182* or email bt.helpdesk@vtecheurope.com T ext W rite new text Inbox Outbox T emplate T ext settings Answer machine Play messages Delete msg Answer on/off Outgoing msg Ans. settings Sound Ringer T ones Settings H/set settings Base settings …
-
BT 450 — page 16
U sing the phone 16 When you make a call, the light on the base flashes. Call timer Y our handset will automatically tim e the duration of all external calls. The handset display shows the call duration both during and f or a few seconds after your call. Out of range warning When the handset goes out of range of the base, the flashes. If you are on …
-
BT 450 — page 17
Receive a call When you receive a call, the phone rings. The display shows the caller’ s number if available or the caller’ s name if it matches an entry in the phonebook. If you do not have a Caller Display service, the screen shows External call . 1. Press . Call W aiting Providing you have subscribed to your network’ s Call W aiting servic …
-
BT 450 — page 18
During a handsfree call, press or to change the volume. Earpiece / handsfree volume During a call you can adjust the volume of the earpiece or loudspeaker . There are 5 levels. 1. Press or to increase or decr ease the volume. Secrecy (Mut e) During a call, you can talk to someone nearby without your caller hearing. 1. Press . The display shows Mute …
-
BT 450 — page 19
2. Press to end the call. Answer a call handsfree When the phone rings: 1. Press . The call is tr ansferred to the handset loudspeak er . Switch t o hands free during a call 1. During a call: press to put the call on the loudspeak er . T o switch handsfree off and return the call to the earpiece, press again. R edial Up to the last 15 telephone num …
-
BT 450 — page 20
Press Clear to delete any unwant ed digits and then enter new ones using the keypad. If the directory is full, the display shows Memory full and the number will not be saved. Y ou will need to delete a number in the directory first, see page 26. Redial a number fr om the redial list 1. Press , the last number you called is displayed. 2. Press or to …
-
BT 450 — page 21
4. Press Yes to confirm or No to cancel. 5. Press Back to ret urn to the previous menu level. Delete all redial numbers 1. Press . The last number dialled is displayed. 2. Press Option and scroll to Delete all and press OK . 3. Press Yes to confirm or No to cancel. 4. Press to exit and return to standby . Keypad lock Y ou can lock the keypad so tha …
-
BT 450 — page 22
Paging calls cannot be answer ed by a handset. Find handset (Paging) Y ou can ring a handset to help locate it. 1. Press on the base. All handsets register ed to the base will ring for up to 30 seconds. 2. Press on the base again to stop the ringing or press a button on any handset. Message & Call inbo x Y our BT V er ve 450 has an inbox which …
-
BT 450 — page 23
Direct or y Y ou can store up to 200 names and numbers in the direct or y . Names can be up to 15 char acters long and numbers up to 24 digits. Stor e a name and number 1. From standby , press . The dir ector y menu is displayed. 2. When storing the firs t entry: New entry is highlighted. Press OK . When storing fur ther entries: The direct or y li …
-
BT 450 — page 24
T o search alphabetically Press the relevant k eypad button, e.g. for the entries beginning with T pr ess once then scroll or through the entries. Call groups Y our options ar e: General F amily Business Friends Utilities VIP Others No Group View an entry 1. Press . The first entr y is displayed. 2. Scroll or to the entry you want. 3. Press Option …
-
BT 450 — page 25
Edit a name and number 1. Press . 2. Scroll or to the entry you want. 3. Press Option and scroll to Edit entry and press OK . 4. Use the keypad t o enter a new name. 5. Scroll to Number to enter a new number . 6. Scroll to Group to select a differ ent group. 7. Press OK to save or Back to ret urn to the previous menu level. Copy an entry 1. Press . …
-
BT 450 — page 26
Y ou can copy the entir e director y to another handset registered t o the base. If the directory becomes full during copying the display shows Memory full . If copying is not successful the display shows Dir. copy failed . If you copy an entry that already exists in the receiving handset it will creat e a duplicate entry . Copy all entries 1. Pres …
-
BT 450 — page 27
Delete entire directory 1. Press . 2. Press Option and scroll or to Delete all and press OK . 3. Press Yes to confirm or No to cancel. 4. Press Back to ret urn to the previous menu level. Edit call group name 1. Press . 2. Press Option and scroll or to Edit call grp and press OK . 3. Scroll or to the call group you want. 4. Press Option . Display h …
-
BT 450 — page 28
Change call group ringtone 1. Press . 2. Press Option and scroll or to Edit call grp and press OK . 3. Scroll or to the call group you want. 4. Press Option . Scroll to Ringtone . Press OK . 5. Press or to choose the ringtone. A sample of each one is played. Press OK to save. 6. Press Back to ret urn to the previous menu level. Speed dial Y ou can …
-
BT 450 — page 29
4. If a name and number is already allocated to the Speed dial you have chosen they will be displayed. T o re-use this Speed dial see, “T o edit a Speed dial”. 5. If the Speed dial is empty No number is displayed and then all the Directory entries. Scroll or to the entr y you want to copy and press OK to save. 6. Press Back to ret urn to the pr …
-
BT 450 — page 30
T o edit a Speed dial 1. Press . 2. Press Option and scroll or to Speed dial and press OK . 3. Scroll or to the Speed dial you want to edit and press OK . 4. The name and number is displayed, press Option and Edit is displayed. 5. Press OK to confirm, and then scroll or to the entry you want and press OK to save. 6. This new name and number will re …
-
BT 450 — page 31
Sounds 31 Handset ringer 1. Press Menu , scroll to Sound and press OK . 2. Ringer is highlighted. Press OK . 3. The current External melody is highlighted. Press or to select the ringtone you want f or ex ternal calls. 4. Scroll to the Internal melody . Press or to select the ringtone you want f or internal calls. 5. Scroll to Ring volume . Press o …
-
BT 450 — page 32
5. Scroll to Battery low . Press or to select On or Off . 6. Scroll to Out of range . Press or to select On or Off . 7. Press OK to confirm. 8. Press Back to ret urn to the previous menu level. 32 Sounds If you experience any problems, please call the Helpline on 0800 218 2182* or email bt.helpdesk@vtecheurope.com …
-
BT 450 — page 33
Settings 33 Handset settings Display contr as t / Handset name 1. Press Menu , scroll to Settings and press OK . 2. H/set settings is highlighted. Press OK . 3. Scroll to Display and press OK . 4. Press or to select the contrast setting. 5. Scroll to Name . Press Clear to delete the curr ent name. Enter a new name. 6. Press OK to save. 7. Press Bac …
-
BT 450 — page 34
Handset reset 1. Press Menu , scroll to Settings and press OK . 2. H/set settings is highlighted. Press OK . 3. Scroll to Handset reset and press OK . 4. Press Yes to confirm or No to cancel. Base settings Ringer 1. Press Menu , scroll to Settings and press OK . 2. Scroll to Base settings . Press OK . 3. Ringer is highlighted. Press OK . 4. The Rin …
-
BT 450 — page 35
Handset priority 1. Press Menu , scroll to Settings and press OK . 2. Scroll to Base settings . Press OK . 3. Scroll to H/set priority . Press OK . 4. All handsets is highlighted. Press OK for all handsets to ring together . Or Scroll to Select handset . Press OK then press or to select the handset you want to ring first. Press OK . Th e ring d ela …
-
BT 450 — page 36
PBX/switchboard access code 1. Press Menu , scroll to Settings and press OK . 2. Scroll to Base settings . Press OK . 3. Scroll to PBX access . Press OK . 4. Enter the code you want, then press OK . 5. Press Back to ret urn to the previous menu level. S ys tem PIN 1. Press Menu , scroll to Settings and press OK . 2. Scroll to Base settings . Press …
-
BT 450 — page 37
S ys tem reset This resets your B T V er ve 450 to its original settings. 1. Press Menu , scroll to Settings and press OK . 2. Scroll to Base settings . Press OK . 3. Scroll to System reset . Press OK . 4. Enter the system PIN (original setting = 0000) and press OK . 5. Press Yes to confirm or No to cancel. 6. If you select Yes the handset returns …
-
BT 450 — page 38
Date/Time/Alarm Set date and time Providing you have subscribed to your network’ s Caller Display service, the date and time is set automatically when you receive your first call. 1. Press Menu , scroll to Settings and press OK . 2. Scroll to Date/Time/Alarm . Press OK . 3. Date/Time is highlighted. Press OK . 4. Pr es s or t o sel ec t th e Ti m …
-
BT 450 — page 39
Set alarm call 1. Press Menu , scroll to Settings and press OK . 2. Scroll to Date/Time/Alarm . Press OK . 3. Scroll to Alarm . Press OK . 4. Enter the alarm time, using the 24 hour format, e.g. 0730 f or 7.30am. 5. Scroll to Alarm on/off . Pr ess or to select Daily , Once or Off . 6. Scroll to Ringtone and press or to select the ringtone you want …
-
BT 450 — page 40
40 If you experience any problems, please call the Helpline on 0800 218 2182* or email bt.helpdesk@vtecheurope.com Calls lists Caller Display If you have subscribed to a Caller Display Service, you will be able to see your caller’ s number on your handset display (provided it is not withheld) prior to answering the call. If your caller’ s name …
-
BT 450 — page 41
41 If you experience any problems, please call the Helpline on 0800 218 2182* or email bt.helpdesk@vtecheurope.com When a Calls list is open, press to scroll from the newest call to the oldest, or press to scroll fr om the oldest call to the newest. 5. Press or to display details about the next call. 6. Press Back to ret urn to the previous menu le …
-
BT 450 — page 42
42 If you experience any problems, please call the Helpline on 0800 218 2182* or email bt.helpdesk@vtecheurope.com 4. Enter the name. 5. Scroll to Number and edit the number if requir ed. 6. Scroll to Select group and press or to set the call group you want. 7. Press OK to save. 8. Press Back to ret urn to the previous menu level. Calls list settin …
-
BT 450 — page 43
Delete an entry 1. Press . 2. Press or to scroll thr ough the lis t to the entry you want. 3. Press Option . Scroll to Delete and press OK . Display shows Deleted . 4. Press Back to ret urn to the previous menu level. Delete entire Calls list 1. Press . 2. Press Option . Scroll to Delete all and press OK . 3. Press Yes to confirm or No to cancel. 4 …
-
BT 450 — page 44
44 If you experience any problems, please call the Helpline on 0800 218 2182* or email bt.helpdesk@vtecheurope.com B T Network Ser vices By selecting the BT Services menu you can access a range of useful pre-stor ed numbers and fur ther BT Calling Featur es. Pre-stor ed BT Services number s: BT 118500 (Directory Enquiries) 1. Press . 2. Dir enquiri …
-
BT 450 — page 45
45 If you experience any problems, please call the Helpline on 0800 218 2182* or email bt.helpdesk@vtecheurope.com Call W aiting lets you know if another person is trying to contact you while you are on a call. If a second caller rings you will hear a beep in the handset. Providing you have also subscribed to Caller Display , the screen will show t …
-
BT 450 — page 46
46 If you experience any problems, please call the Helpline on 0800 218 2182* or email bt.helpdesk@vtecheurope.com Answering machine Y our BT V er ve 450 can digitally record up to 15 minut es of messages or up to 59 messages. Each incoming message can last up to a maximum of 1 minute. Y ou can operate your answering machine fr om: • the handset. …
-
BT 450 — page 47
47 If you experience any problems, please call the Helpline on 0800 218 2182* or email bt.helpdesk@vtecheurope.com Answer and Record The pre-set Answer and Re cord outgoing message, that allows your caller to leave a message, is “Hello, your call cannot be taken at the moment, so please leave your message after the tone”. Y our Answer and R eco …
-
BT 450 — page 48
48 If you experience any problems, please call the Helpline on 0800 218 2182* or email bt.helpdesk@vtecheurope.com 4. Scroll to Ans & Rec or Answer only and press OK . 5. Y our message is then played back. If you want to delete it, press Delete during playback. Or press OK to save. Answer settings 1. Press Menu . Scroll to Answer machine . Pres …
-
BT 450 — page 49
Call screening When the answering machine is on and takes a call, you can listen to the caller leaving a message. Y ou can then identify the caller and decide whether to tak e the call in person. The call can be heard thr ough the base speaker , or the handset as follows: 1. When your BT V erve 450 rings, wait for the answering machine to take the …
-
BT 450 — page 50
50 If you experience any problems, please call the Helpline on 0800 218 2182* or email bt.helpdesk@vtecheurope.com Message playback 1. Press Menu . Scroll to Answer machine . Press OK . 2. Play messages is highlighted. Press OK . 3. The handset displays the number or name of the caller if available, and the date and time it was received. During pla …
-
BT 450 — page 51
Memory full If the caller’ s s till talking when the memory becomes full the caller hears “Thank you for calling” and the machine will hang up. Y ou must delete messages bef ore your machine will be able to recor d new ones. T o delete old (played) messages, see page 50 or opposite for instructions. Answering machine messages that are not del …
-
BT 450 — page 52
52 If you experience any problems, please call the Helpline on 0800 218 2182* or email bt.helpdesk@vtecheurope.com to play the next message. to pause and resume playback. to stop playback. ad jus t the s pea ke r vol um e + or – d uri ng pl ay ba ck. At the end of playback pr ess and follow the voice prompt to pr ess again to delete all old messa …
-
BT 450 — page 53
If you for get to switch on your answering machine 1. Call your number from another phone and let it ring. After 20 rings the machine will switch on and answer your call. 2. Enter your remote access PIN. Play back your messages as shown below in ‘Operating your answering machine r emotely’. If you do not choose to switch your answering machine …
-
BT 450 — page 54
54 If you experience any problems, please call the Helpline on 0800 218 2182* or email bt.helpdesk@vtecheurope.com Delete current message Skip forward to next message Set answer mode – this lets you select the outgoing message to Answer & Recor d or Answer Only Play outgoing message Set answering machine to On or Off Ends outgoing message rec …
-
BT 450 — page 55
T ex t messaging 55 W elcome to the BT text messaging service on your BT V erve 450. Y our BT V er ve 450 can send and receive text messages from participating mobile networks and compatible landline telephones in the UK. The fixed line text service is provided under BT’ s terms and conditions for teleph one ser vice. These can be found by visiti …
-
BT 450 — page 56
If the text is not sent, the display shows Message failed . It is stored in the Outbox. Writing tips Use the k eypad to enter letters and numbers, eg to write today (2day): Press four times to enter 2. Press once to enter d. Press once to enter a. Press three times to enter y . Press to enter a space and use and/or for other char acters. P r es s C …
-
BT 450 — page 57
T emplates There are five pr e-set templates Please call I’ll be there at Thank you I’ll call you Happy Birthday! Receiving a call while writing a text If you are writing a text and you receive a call the text will be lost. Do you have two text phone bases connected to the same phone line? If you have two text phone base stations plugged …
-
BT 450 — page 58
4. The message is displayed. Press Option to Send , Store , add a Template , Delete or Delete all . 5. Press to cancel at any stage and return to standby . R eceiving messages When you receive a new text message, the icon is displayed along with New text msg and the base text indicator flashes. Un r ead m es sa ge s ar e m ark e d N e w . R ea d me …
-
BT 450 — page 59
Forward Press OK . Add more text if requir ed. Press Option to Send . Call number Press OK . The caller’ s number is displayed. Edit the number if r equired. Press to dial. Store number Press OK . Enter the name. Scroll to Number and edit number if requir ed. Scroll to Group and press or to select the Group . Press OK to save. Delete Press OK . T …
-
BT 450 — page 60
Ser vice Centre numbers T o send a nd rec eiv e tex t mes sag es yo u nee d the tel ephone num ber of you r Netwo rk’ s t ext Ce ntr e. If yo u acc ide nta lly dele te the O utgoi ng or I nco ming Servic e Centr e numb ers yo u will ne ed to r e-ent er them i n orde r for yo ur text Se r vice t o work. Y ou can enter up to 4 Service Centre number …
-
BT 450 — page 61
Select Send Ser vice Centre Only service centres that have numbers stored will be displayed as Send Centres. 1. Press Menu , Text and press OK . 2. Scroll or to Text settings and press OK . 3. Scroll to Send Service and press OK . 4. Pr es s o r to s el ec t the S e r v i c e C e n tr e an d pr es s O K . 5. Press Back to ret urn to the previous me …
-
BT 450 — page 62
Switch new message alert on or off 1. Press Menu , Text is highlighted. Press OK . 2. Scroll or to Text settings and press OK . 3. Scroll to New text alert and press OK . 4. Press or to select On or Off and press OK . 5. Press Back to ret urn to the previous menu level. 62 T ext messaging If you experience any problems, please call the Helpline on …
-
BT 450 — page 63
63 If you experience any problems, please call the Helpline on 0800 218 2182* or email bt.helpdesk@vtecheurope.com U sing additional handsets Y ou can use up to five BT V er ve 450 additional handsets with your BT V er ve 450 base to extend your phone system without needing to install extension sockets f or each new phone. Y our BT V er ve 450 hand …
-
BT 450 — page 64
64 If you experience any problems, please call the Helpline on 0800 218 2182* or email bt.helpdesk@vtecheurope.com At the base: 1. Press and hold . The handset is automatically assigned the next available handset number . Select base 1. Press Menu , scroll to Settings and press OK . 2. H/set settings is highlighted. Press OK . 3. Scroll to Select b …
-
BT 450 — page 65
6. Display shows De-registered! 7. Press Back to ret urn to the previous menu level. Internal calls Call another handset If you have more than one handset r egis tered t o the base, you can make internal c alls between two handsets. 1. Press Int and if you have one other handset it will ring. If you have extra handsets, press or to select the h …
-
BT 450 — page 66
66 If you experience any problems, please call the Helpline on 0800 218 2182* or email bt.helpdesk@vtecheurope.com 3-W ay confer ence call Y ou can hold a 3-way conference call between 2 int ernal callers and 1 external caller 1. During your call, press Int . Y our external caller is put on hold. 2. If you have one other handset it will ring. If yo …
-
BT 450 — page 67
67 If you experience any problems, please call the Helpline on 0800 218 2182* or email bt.helpdesk@vtecheurope.com Help Phone does not work • Have you installed the batteries corr ectly? See page 8. • Check that the mai ns power is correctly connected. No dial tone • Is the t elephone cord of the base plugged into the phone socket? • Check …
-
BT 450 — page 68
68 If you experience any problems, please call the Helpline on 0800 218 2182* or email bt.helpdesk@vtecheurope.com No display • The batt eries may be flat, dead or incorrectly inser ted. • R echarge or replace the batteries icon flashes • Is the handset r egistered correctly to the base, see page 63. • Check that the mains po wer is correct …
-
BT 450 — page 69
Cannot access your messages from another phone • Have you changed the r emote access security PIN code? See page 52. Always keep a note of the ne w PIN code in a safe place. • Has R emote access been disabled? T o enable Remote access, see page 52. No Caller Display number/name displa yed • Have you subscribed t o a Caller Display ser vice fr …
-
BT 450 — page 70
70 If you experience any problems, please call the Helpline on 0800 218 2182* or email bt.helpdesk@vtecheurope.com Buzzing noise on my phone or on other electrical equipment nearby • Sometimes your B T V erve 450 can inter fer e with other electrical equipment if it is placed too close. It is recommended that you place your B T V er ve 450 at lea …
-
BT 450 — page 71
Cannot receive text • Y ou will not be able to receive text messages until you have first sent a message. The first message sent registers you with the text service. • Mor e than one text messaging product is plugged into the line. Remove other pr oducts. • Check service centre number is corr ect. • Ensur e you have subscribed to a Caller D …
-
BT 450 — page 72
72 If you experience any problems, please call the Helpline on 0800 218 2182* or email bt.helpdesk@vtecheurope.com General sales enquiries • B T Residential lines – call 150. B T Business lines – call 152. • F or non BT line customers, call 0800 800 150 (residential) or 0800 800 152 (business). • Additional handsets ar e available from th …
-
BT 450 — page 73
If you are sending a message from a fix ed line phone to another fixed line phone For ces a message you send to be delivered as a voice text even though the recipient may have a text enabled phone and usually r eceives written text. This command is inserted at the s tart of the message and applies only to that message, e.g. ‘Hello I will be home …
-
BT 450 — page 74
74 If you experience any problems, please call the Helpline on 0800 218 2182* or email bt.helpdesk@vtecheurope.com Gener al inf ormation IMPORT ANT This equipment is not designed for making emer gency telephone call when the power fails. Alternative arrangements should be made f or access to emergency services. This product is intended f or connect …
-
BT 450 — page 75
75 If you experience any problems, please call the Helpline on 0800 218 2182* or email bt.helpdesk@vtecheurope.com • It is recommended that you place your product at least one metre away from such appliances to minimise any risk of interference. • Never dispose of batteries in a fire. Ther e is a serious risk of explosion and/or the release of …
-
BT 450 — page 76
76 If you experience any problems, please call the Helpline on 0800 218 2182* or email bt.helpdesk@vtecheurope.com Guarant ee Y our BT V erve 450 is guaranteed for a period of 12 months from the date of pur chase. Subject to the terms listed below , the guarantee will provide f or the repair of , or at BT’ s or its agent’ s discretion, the opti …
-
BT 450 — page 77
T echnical inf ormation How many telephones can I have? All items of telephone equipment have a Ringer Equivalence Number (REN), which is used to calculate the number of items which may be connected to any one telephone line. Y our BT V erve 450 has a REN of 1. A total REN of 4 is allowed. If the total REN of 4 is exceeded, the telephones may not r …
-
BT 450 — page 78
…
-
BT 450 — page 79
…
-
BT 450 — page 80
Offices worldwide The services described in this publication are subject to availability and may be modified from time to time. Services and equipment are provided subject to British T elecommunications plc’s respective standard conditions of contract. Nothing in this publication f orms any part of any contract. © British T elecommunications p …