
Hobbywing 10BL60 / 10BL120 Sensored — Brushless Speed Controller Manual

Introduction
Congratulations and thanks for purchasing the QUICRUN series electronic speed controller (ESC).
The power system for RC model can be very dangerous, so please read this manual carefully. Since we have no control over the installation, application, use or maintenance of this product, in no case shall we be liable for any damages, losses or costs.
Features

- High performance but low price, users can own this reliable race-ready ESC at an affordable cost.
- Compact size, suitable for various car chassis.
- Auto identification system can recognize sensored / sensorless brushless motors automatically.
- Core competition program for excellent control feel & multiple programmable items.
- 8 steps of timing adjustment greatly increase the output power of the motor, and unlock its maximum potential.
- Proportional brake with 4 steps of Maximum Brake Force adjustment, 8 steps of Drag Brake Force adjustment and 4 steps of Initial Brake Force adjustment.
- 9 steps of acceleration (punch) adjustment, from «soft» to «very aggressive» to fit for different kinds of cars, tires and tracks.
- Multiple protections: Low voltage cut-off protection for Lipo or NiMH battery / Over-heat protection / Throttle signal loss protection / Motor Lock-up protection.
- One-button (the «SET» button on the ESC) to set the ESC, and easy to reset all parameters to the factory default settings.
- Compatible with the optional device — the portable Digital LED Program Card, especially convenient for outdoor use.
Begin to Use a New Brushless ESC
Connections

Sensored motor wiring
When using sensored brushless motor, please connect the «SENSOR» port of the ESC and the the «SENSOR» ATTENTION port of the motor with a sensor wire. For sensored brushless motor, the #A, #B, #C wires of the ESC MUST be connected with the motor wire #A, #B, #C respectively. Do not change the wires sequence optionally! (#A is Blue, #B is Yellow, #C is Orange.)
Sensorless motor wiring
When using sensorless brushless motor, the #A, #B, #C wires of the ESC can be connected with the motor wires freely (without any order). If the motor runs in the opposite direction, please swap any two wire connections. Please disconnect the battery from the ESC after running the car!
Specifications
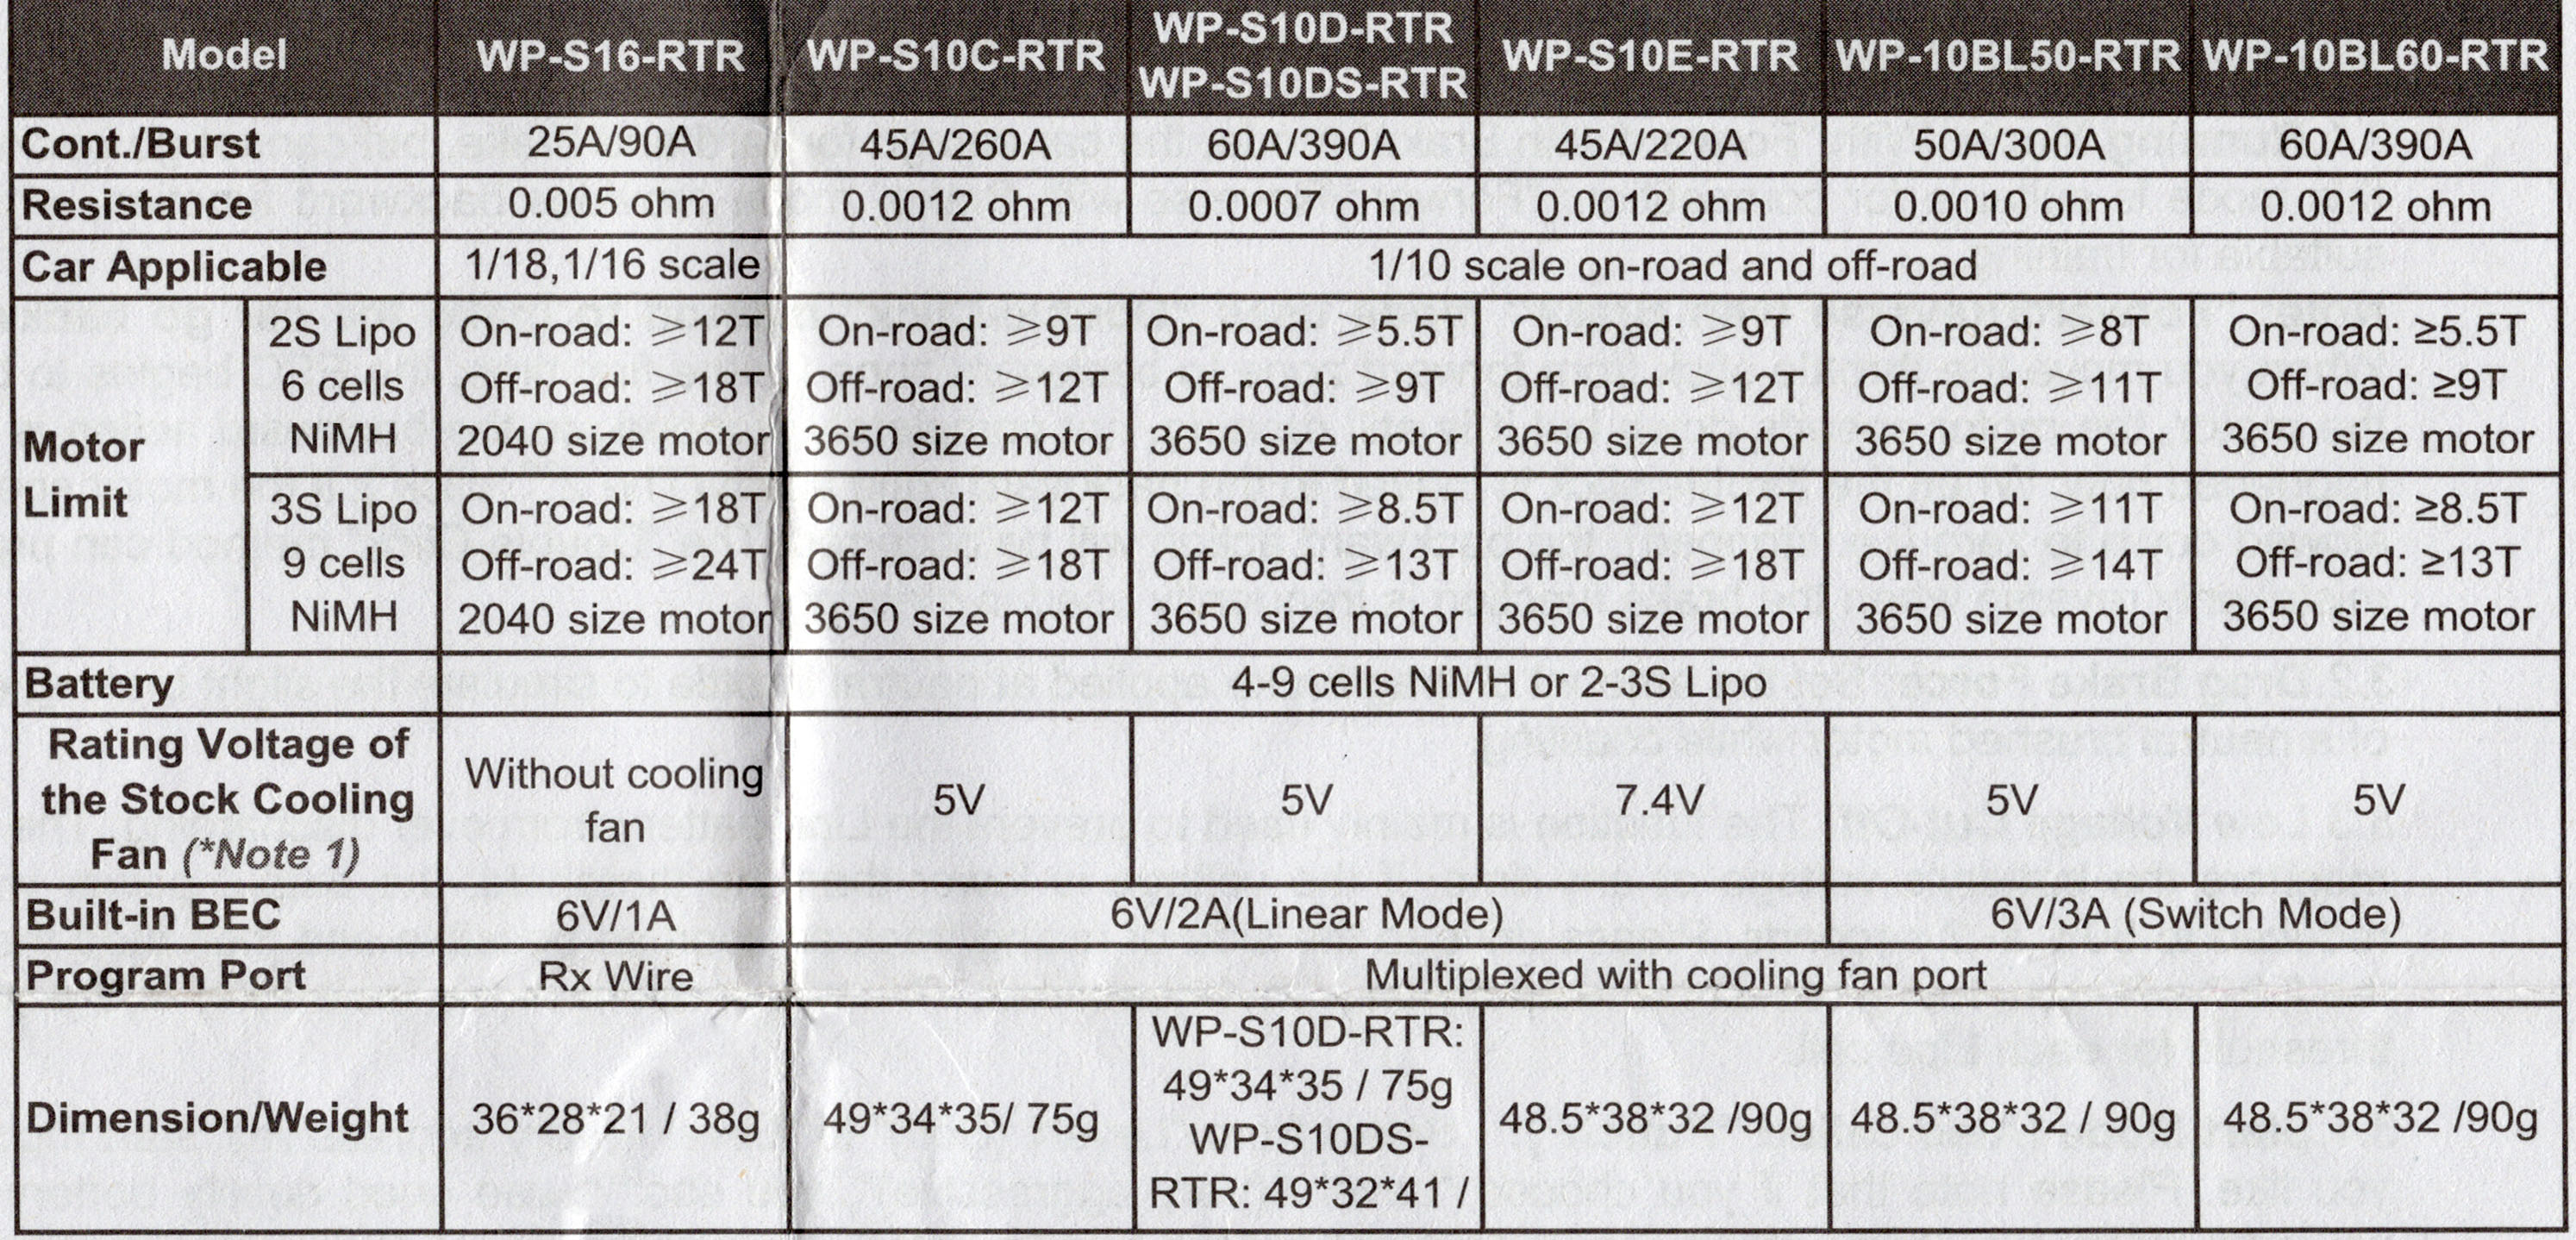
| Model | QUICRUN 10BL60 SENSORED | QUICRUN 10BL120 SENSORED | |
| Cont. / Peak Current | 60A / 380A | 120A / 760A | |
| Motor Type Supported | Sensored / Sensorless Brushless Motor | Sensored / Sensorless Brushless Motor | |
| Car Applicable | 1/10th Touring Car/Buggy/F1/Drift Car & 1/12th On-road | 1/10th Touring Car/Buggy/F1/Drift Car, and etc. | |
| Motor Limit (Note) | 4-6 cells NiMH / 2S LiPo | ≥8.5T (1/10 On-road), ≥13.5T (1/10 Off-road) | ≥3.5T (1/10 On-road), ≥4.5T (1/10 Off-road) |
| 8-9 cells NiMH / 3S LiPo | ≥13.5T (1/10 On-road), ≥17.5T (1/10 Off-road) | ≥8.5T (1/10 On-road), ≥10.5T (1/10 Off-road) | |
| Battery | 4-9 cells NiMH, 2-3S LiPo | 4-9 cells NiMH, 2-3S LiPo | |
| BEC Output | 6V@2A, Linear Mode | 6V@3A,Linear Mode | |
| Cooling Fan | 6V (The cooling fan gets its power supply from the built-in BEC) | Powered by the battery | |
| Dimensions / Weight | 33 x 28 x 31.5mm (w/ Fan) / 59g (w/ Wires, w/o Fan) | 43 x 36 x 33mm (w/ Fan) / 105g (w/ Wires & Fan) |
Note: «T» indicates the limit value of motor turns when the ESC timing is set to 0 degree. The larger the timing, the more turns the motor needs. Please pay close attention to temperatures of the motor and the ESC to avoid any damage to these two equipments.
Set the Throttle Range
In order to make sure the ESC fits the throttle range of your transmitter, you must calibrate it when begin to use a new ESC, or a used transmitter if some of its settings have been changed, like the Throttle Trim, D/R, EPA or other parameters. Otherwise, the ESC cannot work properly. Besides, we strongly recommend users to enable the «failsafe» function of the transmitter, set the «F/S» of the throttle channel to the Shutdown mode or set the protection value to the neutral position, so the car can be stopped if the receiver fails to get the radio signals from the transmitter. Please calibrate the throttle range according to the following steps.
Hold down the SET button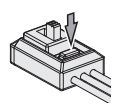
Turn on the switch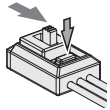

- Turn on the transmitter, and set parameters (of the throttle channel) like «D/R, «EPA», «ATL» to 100% (if there is no LCD display on the transmitter, please adjust the corresponding knob to its limit). Set the throttle trim to 0 (if there is no display, then adjust the knob to the neutral position). For FUTABA TM and similar transmitters, set the throttle direction to «REV», while the throttle direction of others to «NOR». Please disable the built-in ABS brake function in your transmitter.
- Hold the SET button while sliding the switch to the ON position, and then release the «SET» button the moment when the Red LED starts to blink. (If you don’t release the SET button in 3 seconds, the ESC will enter the program mode, in such a case, please switch off the ESC and re-calibrate the throttle range again from Step 1.)
Move the throttle stick to the neutral position and press the SET button.
Move the throttle stick to the end position of forward and press the SET button.
Move the throttle stick to the end position of backward and press the SET button.
Set the 3 points according to pictures
- The neutral point.
- The end point of the forward direction.
- The end point of the backward/brake direction.
When the process of calibration is finished, the motor can be started after 3 seconds.
Check the LED Status in Normal Running
- When the throttle stick is in the neutral range, neither the Red LED nor the Green LED lights up.
- When the car moves forward, the Red LED solidly lights; the Green LED also lights up when the throttle stick is at the top position (100% throttle).
- When the car brakes, the Red LED solidly lights; the Green LED also lights up when the throttle stick is at the end position and the maximum brake force is set to 100%.
- When the car reverses, the Red LED solidly lights; the Green LED also lights up when the throttle stick is at the end position and the maximum reverse force is set to 100%.
Set the ESC by the SET button

ATTENTION
- In the ESC setting process, the motor will emit «Beep» tone at the same time when the LED is flashing.
- If the «N» is bigger than the number «5», we use a long time flash and long «Beep—» tone to represent «5», so it is easy to identify the items with the big serial number.
For example, if the LED flashes as the following:
«A long time flash + 1 short time flash» (Motor sounds «B—B») = the No. 6 item,
«A long time flash + 2 short time flash» (Motor sounds «B—BB») = the No. 7 item,
«A long time flash + 3 short time flash» (Motor sounds «B—BBB») = the No. 8 item, and so on.
Set the ESC by Program Card
The Program Card is optional equipment which needs to be purchased separately. It has 3 digital LEDs to display the programmable items’ number and the options’ number. It is portable and very easy to use. (For detailed information, please refer to the user manual of the program card).
Reset All Items to Default Values
At any time when the throttle is located at neutral position (except in the throttle calibration or parameters program process), press and hold the «SET» key for over 3 seconds, the red LED and green LED will blink simultaneously, which means each programmable item has be reset to its default value. It needs to be restarted to complete the whole process.
Programmable Items
- Running Mode: With «Forward with Brake» mode, the car can go forward and brake, but cannot go backward, this mode is suitable for competition; «Forward / Reverse with Brake» mode has reverse running function, which is suitable for daily training.
Note: «Forward/Reverse with Brake» mode uses «Double-click» method to make the car go backward. When you move the throttle stick from forward zone to backward zone for the first time (The 1st «click»), the ESC begins to brake the motor, the motor slows down but it is still running, not completely stopped, so the backward action is NOT happened immediately. When the throttle stick is moved to the backward zone again (The 2nd «click»), if the motor speed is slowed down to zero (i.e. stopped), the backward action will happen. The «Double-Click» method can prevent mistakenly reversing action when the brake function is frequently used in steering. By the way, in the process of braking or reversing, if the throttle stick is moved to forward zone, the motor will run forward at once. «Forward/Reverse» mode uses «single-click» method to make the car reverse. When moving the throttle stick from neutral zone to backward zone, the vehicle reverses immediately, so this mode is usually used by rock crawler. - Drag Brake Force: Set the amount of drag brake applied at neutral throttle to simulate the slight braking effect of a brushed motor while coasting.
- Low Voltage Cut-Off: The function mainly prevents the Lipo battery from over discharging. The ESC detects the battery voltage at any time, if the voltage is lower than the threshold for 2 seconds, the output power will be reduced 70%, after 10 seconds the output power will be completely shut off and the red LED flashes in such a way: «☆-, ☆-, ☆-«. Please stop your car at the track side as soon as possible to avoid obstructing other racing cars.
Note: For NiMH battery, if the voltage of the whole NiMH battery pack is higher than 9.0V, it will be considered as a 3 cells Lipo battery pack; If it is lower than 9.0V, it will be considered as a 2 cells Lipo battery pack. For example, if a NiMH battery pack is 8.0V, and the threshold is set to 2.6V/Cell, so it will be considered as a 2 cells Lipo battery pack, and the low-voltage cut-off threshold for this NiMH battery pack is 2.6×2=5.2V. - Start Mode (Also called «Punch» or «Acceleration»): Level 1 has very soft start acceleration, while level 9 has very quick start acceleration. From Level 1 to Level 9, the start force is increasing. If you choose «Level 7» to «Level 9», you should use good quality battery with powerful discharge ability, otherwise you cannot get the burst start effect as you want. If the motor cannot run smoothly (the motor is cogging), sometimes it is caused by the weak discharge ability, please use a better battery or increase the gear ratio.
- Maximum Brake Force: The ESC provides proportional brake function. The brake force is related to the position of the throttle stick. Maximum brake force refers to the force when the throttle stick is located at the end point of the backward zone. A very large brake force can shorten the brake time, but it may damage the gears.
- Maximum Reverse Force: Sets how much power will be applied in the reverse direction.
- Initial Brake Force: It is also called «minimum brake force», which refers to the force when the throttle stick is located at the initial position of the backward zone. The default value is equal to the drag brake force, so the brake action can be very smoothly.
- Throttle Neutral Range: This setting adjusts the width of the neutral range.
- Timing: This function can be used to fine-tune the output power of the motor, the bigger the timing, the faster the motor runs or the larger output power of the motor. As the Boost Timing technology has been introduced into this ESC, so under the sensored mode, adjust the ESC timing can greatly increase the motor speed. Therefore, please remember to enlarge the gear ratio of the chassis and carefully check temperatures of the motor and the ESC after increasing the timing.
Parameter List of QuicRun-10BL60SD
(Italics in the form below indicate factory defaults)
| Basic Items | Option 1 | Option 2 | Option 3 | Option 4 | Option 5 | Option 6 | Option 7 | Option 8 | Option 9 |
| 1.Running Mode *Note | Fwd/Br | Fwd/Rev/Br | Fwd/Rev | ||||||
| 2.Drag Brake Force | 0% | 5% | 10% | 20% | 40% | 60% | 80% | 100% | |
|
Disable | 2.6V/Cell | 2.8V/Cell | 3.0V/Cell | 3.2V/Cell | 3.4V/Cell | |||
|
Level 1 | Level 2 | Level 3 | Level 4 | Level 5 | Level 6 | Level 7 | Level 8 | Level 9 |
| Advanced Items | |||||||||
|
25% | 50% | 75% | 100% | |||||
|
25% | 50% | 75% | 100% | |||||
|
Equals Drag Brake Force |
0% | 20% | 40% | |||||
|
6% (Narrow) | 9% (Normal) 12%(Wide) | |||||||
|
0.00 deg | 3.75 deg | 7.50 deg | 11.25 deg | 15.00 deg | 18.75 deg | 22.50 deg | 26.25 deg |
Note: Fwd= Forward, Rev=Reverse, Brk=Brake
Recommended Power System
| Motor | KV | Gear Ratio (1/10 on-road) | Gear Ratio (1/10 off-road) | Main Application |
| QUICRUN 3650SD 6.5T G2 | 5750 | 6.4 — 8.4 | 9.0 — 11.0 | 1/10th buggy racing |
| QUICRUN 3650SD 8.5T G2 | 4560 | 5.0 — 6.0 | 7.0 — 8.5 | 1/10th buggy racing, drift car |
| QUICRUN 3650SD 10.5T G2 | 3600 | 5.0 — 6.5 | 6.5 — 8.0 | 1/10th drift car/ Stock racing |
| QUICRUN 3650SD 13.5T G2 | 2850 | 4.0 — 5.5 | 6.5 — 7.5 | 1/10th Stock racing |
| QUICRUN 3650SD 17.5T G2 | 2170 | 3.5 — 5.5 | 5.5 — 7.0 | 1/10th Stock racing |
| QUICRUN 3650SD 21.5T G2 | 1800 | 3.0 — 5.5 | 4.0 — 6.0 | 1/10th Stock racing, F1, rock crawler |
| QUICRUN 3650SD 25.5T G2 | 1520 | — | — | 1/10th Stock racing, rock crawler |
ATTENTION
The reference gear ratios in the above form are based on the 1/10 RC cars with 2S Lipo and 0 timing ESC. If the ESC timing is increased, then the gear ratio needs to be increased accordingly. Besides, please pay attention to the temperature of the ESC and the motor to avoid any damage to the equipments.
Trouble Shooting
| Trouble(s) | Possible Causes | Solution(s) |
| Turn on the switch, no LED lights up, and neither the motor nor fan works. | No battery voltage is input to the ESC. The switch of the ESC is damaged | Check the connections between the battery and the ESC, re-solder the connectors if needed. Change the switch. |
| After power on, motor doesn’t work but emits «beep-beep-, beep-beep-» alert tone. (there’s 1-second pause between 2 «beep-beep-«). | The voltage of the battery pack is not in the normal range, it’s too high or too low. | Check the voltage of the battery pack. |
| After power on, the Red LED turns solid red but the motor doesn’t work. | The throttle signal wire is oppositely inserted or into the incorrect channel. | Plug the signal wire (Rx lead) correctly into the throttle channel (usually Channel #2) of the receiver. |
| The car runs backwards when accelerating forward on radio. | The wire connections between the ESC and the motor need to be changed. The ESC is not suitable for the chassis. | Swap any two wire connections between the ESC and the motor. (Note: This method is ONLY available for SENSORLESS motor ) Please don’t use the ESC for this special chassis. |
| The car suddenly slows down, then stops about 10 seconds later. | Low voltage cutoff protection (Red LED blinks) Thermal protection (Green LED blinks) |
Check the battery voltage. If still has some capacity, lower the cut-off threshold voltage; if not, replace a new battery. Wait several minutes to cool the ESC. Increase the gear ratio or the T number (Turns) of the motor. |
| The motor stuttering under heavy acceleration. |
Low battery discharge rate. The motor RPM is too high (i.e. the motor runs too fast), and the gear ratio is too small. The «Punch» setting is too high. |
Use a battery pack with better discharge ability. Use a low-speed motor, or increase the gear ratio. Set the acceleration (punch) to the softer mode. |
| The car slows down and then stopped. The Red and Green LEDs blink rapidly and synchronously when throttle stick in neutral. | ESC detects abnormal signals from the sensor port of the motor and the ESC changes to sensorless driving mode automatically. | Check the sensor wire connection.
The Hall sensors in the motor are damaged, please change the motor. |
| The motor stutters and can’t start up. | The connections between the motor and ESC are not A-A, B-B and C-C; The ESC is damaged | Check wiring & connections. Contact the distributor for sales-after service. |

Documents / Resources
Download manual
Here you can download full pdf version of manual, it may contain additional safety instructions, warranty information, FCC rules, etc.
Download Hobbywing 10BL60 / 10BL120 Sensored — Brushless Speed Controller Manual

Form 1: Parameter List of QuicRun-WP16BL30 and QuicRun-WP10BL60: (Italics in the form below indicate factory defaults) Form 2: Parameter List of QuicRun-WP-8BL150 (Italics in the form below indicate factory defaults)
Option 1
1.Running Mode
2.Drag Brake Force
3. Low Voltage Cutoff
4. Start Mode (Punch)
5. Max. Brake Force
6. Max. Reverse Force
7. Initial Brake Force
8. Throttle Range
9. Timing
Option 2 Option 3 Option 4 Option 5 Option 6 Option 7 Option 8 Option 9
Fwd/Br
0%
5% 10% 20% 40% 60%
Disable
2.6V/Cell 2.8V/Cell 3.0V/Cell 3.2V/Cell 3.4V/Cell
80% 100%
Fwd/Rev/Br Fwd/Rev
Level 5 Level 6 Level 7 Level 8 Level 9Level 4Level 3Level 2
Level 1
25%
50% 75% 100% Disable
25%
drag brake
force
drag brake
force
50% 75% 100%
0% 20% 40%
6%
(Narrow)
9%
(Normal)
9%
(Normal)
12%(Wide)
0.00 deg 3.75 deg 7.50 deg 11.25 deg 15.00 deg 18.75 deg 22.50 deg 26.25 deg
Enable
Disable
CCW
CW
Note 2
Auto-
identification
2S LiPo 3S LiPo 4S LiPo 5S LiPo 6S LiPo
Programmable Items
Note 1
Option 1
1.Running Mode
2.Drag Brake Force
3. Low Voltage Cutoff
4. Start Mode (Punch)
5. Max. Brake Force
6. Max. Reverse Force
7. Initial Brake Force
8. Throttle Range
9. Timing
Option 2 Option 3 Option 4 Option 5 Option 6 Option 7 Option 8 Option 9
Fwd/Br
0%
5% 10% 20% 40% 60%
Disable
2.6V/Cell 2.8V/Cell 3.0V/Cell 3.2V/Cell 3.4V/Cell
80% 100%
Fwd/Rev/Br Fwd/Rev
Level 5 Level 6 Level 7 Level 8 Level 9Level 4Level 3Level 2
Level 1
25%
50% 75% 100% Disable
25%
50% 75% 100%
0% 20% 40%
6%
(Narrow)
12%(Wide)
0.00 deg 3.75 deg 7.50 deg 11.25 deg 15.00 deg 18.75 deg 22.50 deg 26.25 deg
10. Overheat
Protection
11. Motor Rotation
12.Cell Count
Programmable Items
Note 1
Note 1: Fwd=Forward, Rev=Reverse, Brk=Brake
Note 2: When set to the “Auto-identification” mode, the battery pack can only be identified as 2S, 4S and 6S Lipo. Because the
normal voltage of each LiPo cell varies from 2.6V to 4.2V, it’s not easy to correctly calculate the cell count of a discharged LiPo
battery pack. Therefore, we strongly suggest you set the “LiPo Cells” manually.
In order to make sure the ESC fits the throttle range of your transmitter, you must calibrate it when begin to use a new ESC, or a used transmitter if some of its settings have been changed,
like the Throttle Trim, D/R, EPA or other parameters. Otherwise, the ESC cannot work properly. Besides, we strongly recommend users to enable the “failsafe” function of the transmitter, set
the “F/S” of the throttle channel to the Shutdown mode or set the protection value to the neutral position, so the car can be stopped if the receiver fails to get the radio signals from the
transmitter. Please calibrate the throttle range according to the following steps.Model QuicRun-WP-16BL30 QuicRun-WP-10BL60Continuous Current /Peak Current / ResistanceMotor Type SupportedCar Applicable30A/180A/0.002Ω
Sensorless Brushless Motor (compatible with sensored motor but not in sensored operating mode)
1:18 & 1:16 On-road / Off-road / Buggy / Monster 1:10 On-road / Off-road / Buggy / Monster
60A/360A/0.001Ω6V/3A (Switch Mode)Motor LimitBattery 4-9 Cells NiMH, 2-3S Lipo 4-9 Cells NiMH, 2-3S LipoQuicRun-WP-8BL1501:8 Buggy / Monster150A/950A/0.00035Ω6V/3A (Switch Mode)9-18 Cells NiMH, 3-6S LipoBEC OutputDimensions / WeightExternal Program PortWorking voltage of Fan36x28x16mm / 38gNot AvailableNo cooling fan48.5x38x32mm / 90gAvailableFrom BEC(6V)59.5x48x42mm / 178gAvailableFrom BEC(6V)6V/1A (Linear Mode)For 2S Lipo or 6 cells NiMH:1. On-road: 2435-size or smaller motor with the KV<80002. Off-road / Buggy / Monster: 2435-size or smaller motor with the KV<5000For 3S Lipo or 9 cells NiMH:1. On-road: 2435-size or smaller motor with the KV<55002. Off-road / Buggy / Monster: 2435-size or smaller motor with the KV<3500.For 2S Lipo or 6 cells NiMH:1. On-road: 3656-size or smaller motor with the KV<60002. Off-road / Buggy / Monster: 3656-size or smaller motor with the KV<4000For 3S Lipo or 9 cells NiMH:1. On-road: 3656-size or smaller motor with the KV<40002. Off-road / Buggy / Monster: 3656-size or smaller motor with the KV<3000.For 4S Lipo or 12 cells NiMH:4274-size or smaller motor with the KV<3000For 6S Lipo or 18 cells NiMH:4274-size or smaller motor with the KV<2400
• Water-proof and dust-proof for all-weather races;
(Note: please uninstall the cooling fan before using this ESC in water; Clean and dry it soon after the
use for avoiding the connectors get rusty.)
• External programming port, easy to connect to the Program Card when setting the ESC;
• Proportional brake with 4 steps of maximum brake force adjustment and 8 steps of drag brake force adjustment;
• 9 steps of acceleration(punch) adjustment from “soft” to “Very aggressive” to fit for different kinds
of models, tires and tracks;
• Multiple protections: Low voltage cut-off protection / Over-heat protection / Throttle signal loss
protection / Motor lock-up protection;
• One-button(the “SET” button on the ESC) to set the ESC, and easy to reset all parameters to the
factory default settings;
• Compatible with the optional device-the portable Digital LED Program Card, especially convenient
for outdoor use.
01
Features
02
Begin to Use a New Brushless ESC
03
Program the ESC
Connections
Specifications
IMPORTANT
CAUTIONS
ATTENTION
Congratulations and thanks for purchasing HOBBYWING electronic speed controller (ESC). The brushless power system for RC model can be very powerful and dangerous, so please read this manual carefully. Since we have no control over the installation, application, use or maintenance of this product, in no case shall we be liable for any damages, losses or costs. Besides, we have the rights to change the design, appearance, functions and operational requirements without any notifications.
ATTENTION
1
Program the ESC with the SET Button
1
Set the ESC by the Program Card
2
Set up Throttle Range
2
• In the programming process, the motor will emit “Beep” tone while the LED is
flashing.
• If the “N” is bigger than the number “5”, we use a long time flash and long
“Beep—” tone to represent “5”, so it is easy to identify the items of the big number.For example, if the LED flashes as the following:“A long time flash + 1 short time flash” (Motor sounds “B—B”) = the No. 6 item“A long time flash + 2 short time flash” (Motor sounds “B—BB”) = the No. 7 item“A long time flash + 3 short time flash” (Motor sounds “B—BBB”) = the No. 8 item, and so on.The Program Card is optional equipment which needs to be purchased separately. It has 3 digital LEDs to display the programmable items’ number and the options’ number. (Please refer to the user manual of the program card for detail info)
ATTENTION
The QuicRun-WP10BL60 and QuicRun-WP8BL150 can only be connected to the program card via the external programming port.
ATTENTION
a) When the throttle stick is in the neutral range, neither the Red LED nor the Green LED lights up;
b) When the car moves forward, the Red LED solidly lights; the Green LED also lights up when the throttle stick is at the top position (100% throttle);
c) When the car brakes, the Red LED solidly lights; the Green LED also lights up when the throttle stick is at the bottom position and the maximum brake force is set to 100%;
d) When the car reverses, the Red LED solidly lights; the Green LED also lights up when the throttle stick is at the bottom position and the maximum reverse force is set to 100%.
Check the LED Status in Normal Running
3
Explanation for the Beep Sound
In normal case, when the ESC is switched on, the motor will emit several “Beep” tones to express the cell count of the battery pack. For example, “Beep-Beep-” means 2S LiPo,
“Beep-Beep-Beep-” means 3S LiPo, “Beep-Beep-Beep- Beep-” means 4S LiPo.
EXPLANATION
06
Trouble Shooting
Trouble(s) Solution(s)Possible Causes
No battery voltage is input to the ESC. The switch of the ESC is damagedThe voltage of the battery pack is not in the normal range, it’s too high or too low. The throttle signal wire is oppositely inserted or into the incorrect channel. The wire connections between the ESC and the motor need to be changed.Low voltage cutoff protection (Red LED blinks) Overheat protection (Green LED blinks)The throttle neutral point drifts to the brake area. The connections between motor and ESC are not reliable. The ESC is damaged.Check the connections between the battery and the ESC, re-solder the connectors if needed. Change the switch.Check the voltage of the battery pack.
Plug the signal wire (Rx lead) correctly into the throttle channel (usually Channel #2) of the receiver.
Swap any two wire connections between the ESC and the motor. Check the battery voltage. If still has some capacity, lower the cut-off threshold voltage; if not, replace a new battery.
Wait several minutes to cool the ESC. Increase the gear ratio or the T number (Turns) of the motor.
Calibrate the throttle neutral point again to ensure that no LED lights when the throttle stick is at the neutral position. Check all the solder joints and ensure they are well soldered. Check connectors.Contact the distributor for after-sales service. After power on, motor doesn’t work but emits “beep-beep-, beep-beep-”alert tone. (there’s 1 second pause between 2 “beep-beep-”).After power on, the Red LED turns solid red but the motor doesn’t work.
Turn on the switch, no LED lights up, and neither the motor nor fan works.
The car runs backwards when accelerating forward on radio.The motor stutters, and cannot start up.The vehicle can go forward but cannot reverse.The car suddenly slows down, then stops about 15 seconds later.Enter the 2
nd
item»Drag Brake Force»Hold the SET keySwitch on the ESCRed LED flashes Green LED flashesonce Green LED flashestwiceGreen LED flashes3 times Green LED flashesN times ReleaseSET kyeReleaseSET kyePressSET kyePressSET kyePressSET kyePressSET kyeReleaseSET kyeReleaseSET kyeRed LED flashes once, choose «0%» Red LED flashes twice, choose «5%»Red LED flashes 3 times, choose «10%» Red LED flashes 4 times, choose «20%» Red LED flashes 5 times, choose «40%»Red LED flashes 6 times, choose «60%» Red LED flashes 7 times, choose «80%»Red LED flashes 8 times, choose «100%» Red LED flashes once, choose «None»Red LED flashes twice, choose «2.6V»Red LED flashes 3 times, choose «2.8V»Red LED flashes 4 times, choose «3.0V»Red LED flashes 5 times, choose «3.2V»Red LED flashes 6 times, choose «3.4V»Red LED flashes once to choose Red LED flashes twice to choose Red LED flashes 3 times to choose «Forward with brake»»Forward / Reverse with brake»»Forward / Reverse»Enter the 3
rd
item»Low Voltage Cut-Off»Enter the N
th
itemEnter the 1
st
item»Running Mode»Turn off the ESCTurn on the transmitterHold SET key for 3 secondsHold SET key for 3 secondsHold SET key for 3 secondsHold SET key for 3 seconds……The following steps are just like the above setps……Finish programming, switch off the ESC, and then switch it on
05
Programmable Items
1. Running Mode: With “Forward with Brake” mode, the car can go forward and brake, but cannot go backward, this mode is suitable for competition; “Forward / Reverse with Brake” mode provides backward function, which is suitable for daily training.
Note: “Forward/Reverse with Brake” mode uses “Double-click” method to make the car go backward. When you move the throttle stick from forward zone to backward zone for the first time (The 1st “click”), the ESC begins to brake the motor,
the motor speeds down but it is still running, not completely stopped, so the backward action is NOT happened immediately. When the throttle stick is moved to the backward zone again (The 2nd “click”), if the motor speed is slowed down to
zero, then the backward action will happen. The “Double-Click” method can prevent mistakenly reversing action when the brake function is frequently used in steering. By the way, in the process of braking or reversing, if the throttle stick is
moved to forward zone, the motor will run forward at once. “Forward/Reverse” mode uses “single-click” method to make the car reverse. When moving the throttle stick from neutral zone to backward zone, the vehicle reverses immediately,
so this mode is usually used in rock crawling.
2. Drag Brake Force: Set the amount of drag brake applied at neutral throttle to simulate the slight braking effect of a neutral brushed motor while coasting.
3. Low Voltage Cut-Off: The function mainly prevents the Lipo battery from over discharging. The ESC detects the battery voltage at any time, if the voltage is lower than the threshold for 2 seconds, the output power will be reduced 70%,
after 15 seconds the output power will be completely shut off and the red LED flashes in such a way: “☆-, ☆-, ☆-”. Please stop your car at the track side as soon as possible to avoid obstructing other racing cars.
Note: For NiMH battery, if the voltage of the whole NiMH battery pack is higher than 9.0V, it will be considered as a 3 cells Lipo battery pack; If it is lower than 9.0V, it will be considered as a 2 cells Lipo battery pack. For example, if a NiMH battery
pack is 8.0V, and the threshold is set to 2.6V/Cell, so it will be considered as a 2 cells Lipo battery pack, and the low-voltage cut-off threshold for this NiMH battery pack is 2.6×2=5.2V.
4. Start Mode (Also called “Punch” or “Acceleration”): Level 1 has very soft start acceleration, while level 9 has very quick start acceleration. From Level 1 to Level 9, the start force is increasing. If you choose “Level 7” to “Level 9”, you should use good
quality battery with powerful discharge ability, otherwise you cannot get the burst start effect as you want. If the motor cannot run smoothly (the motor is cogging), sometimes it is caused by the weak discharge ability, please use a better
battery or increase the gear ratio.
5. Maximum Brake Force: The ESC provides proportional brake function. The brake force is related to the position of the throttle stick. Maximum brake force refers to the force when the throttle stick is located at the top point of the backward
zone. A very large brake force can shorten the brake time, but it may damage the gears.6. Maximum Reverse Force: Sets how much power will be applied in the reverse direction.
7. Initial Brake Force: It is also called “minimum brake force”, which refers to the force when the throttle stick is located at the initial position of the backward zone. The default value is equal to the drag brake force, so the brake action can be very smoothly.
8. Throttle Neutral Range: This setting adjusts the width of the neutral range.
9. Timing: This function can be used to fine-tune the output power of the motor, the bigger the timing, the faster the motor runs or the larger output power of the motor. As the Boost Timing technology has been introduced into this ESC, so
under the sensored mode, adjust the ESC timing can greatly increase the motor RPM. Therefore, please remember to enlarge the gear ratio of the chassis and carefully check temperatures of the motor and the ESC after increasing the timing.
10. Over-Heat Protection: If this function is activated, the output power will be cut off when the temperature is higher than the factory-preset value for 5 seconds. When the protection happens, the Green LED will flash in such a way “☆-, ☆-, ☆-” .
11. Motor Rotation: Face to the motor shaft (that means the endbell of the motor is far from your face), and move the throttle stick to forward zone. If this programmable item is set to “CCW”, the shaft runs counter-clockwise; if it is set to “CW”, the
shaft runs clockwise.
12. Cell Count: We strongly suggest you set the “Cell Count” manually instead of using the “Auto-identification” mode.
04
Reset All Items to Default Values
At any time when the throttle is located in neutral zone (except in the throttle calibration or parameters program process), press and hold the “SET” key for over 3 seconds, the red LED and green LED will flash
simultaneously , which means each programmable item has be reset to its default value. The ESC needs to be restarted to complete the reset process.
Click the SET button to choose the option, the times the red LED blinks indicates the option number you are going to select. After entering the corresponding item, the red LED starts to blink, the times it blinks represents the current option number.Press SET key to choose the value, the flash times of the RED LED means the option number.(Once means the 1st option, twice means the 2nd option, etc.)
USER MANUAL
16BL30 • 10BL60 • 8BL150Brushless Electronic Speed ControllerThis brushless system is powerful and dangerous, for the safety of your own and those people around you, please turn on the ESC while keeping all the wheels in the air.
1. Turn on the transmitter, and set parameters (of the throttle channel) like “D/R, “EPA”, “ATL” to 100% (if there is no LCD display
on the transmitter, please adjust the corresponding knob to its limit). Set the throttle trim to 0 (if there is no display, then adjust the
knob to the neutral position). For FUTABA
TM
and similar transmitters, set the throttle direction to “REV”, while the throttle direction
of others to “NOR”. Please disable the built-in ABS brake function in your transmitter.
2. Hold the SET button while sliding the switch to the ON position, and then release the “SET” button the moment when the Red
LED starts to blink. (If you don’t release the SET button in 3 seconds, the ESC will enter the program mode, in such a case, please
switch off the ESC and re-calibrate the throttle range again from Step 1.)
Hold down the set button.
Move the throttle stick to the neutral position and press
the set button.
Turn on the switchRelease the set button once the LED flashes.
Set the 3 points according to pictures
• The neutral point. • The end point of the forward direction. • The end point of the backward/brake direction.
When the process of calibration is finished, the motor can be started after 3 seconds.
The Green LED
flashes once and
motor emits
“Beep” tone.
Move the throttle stick to the end position of forward
and press the set button.
The Green LED flashes
twice and motor emits
“Beep-Beep”
tone.
Move the throttle stick to the end position of forward
and press the setup button.
The Green LED flashes
twice and motor emits
“Beep-Beep-
Beep” tone.
BatteryMotor
Blue
YellowOrangeReceiverSwitchElectronic Speed Controller
External Programming
Port for Connecting
Program Card.
| Параметры | Регуляторы скорости бесколлекторные |
Бесколлекторный регулятор скорости с вентилятором охлаждения WP-10BL60 на 60А и влагозащитой для автомоделей 10 масштаба.
Поддерживает 2-х и 3-х баночные Li-Po аккумуляторы на 7.4-11.1V
ВЕС: 6/2А
Таблица настройки регулятора HSP Racing:

Turn on the switch
- Turn on the transmitter, and set parameters (of the throttle channel) like «D/R, «EPA», «ATL» to 100% (if there is no LCD display on the transmitter, please adjust the corresponding knob to its limit). Set the throttle trim to 0 (if there is no display, then adjust the knob to the neutral position). For FUTABA TM and similar transmitters, set the throttle direction to «REV», while the throttle direction of others to «NOR». Please disable the built-in ABS brake function in your transmitter.
- Hold the SET button while sliding the switch to the ON position, and then release the «SET» button the moment when the Red LED starts to blink. (If you don’t release the SET button in 3 seconds, the ESC will enter the program mode, in such a case, please switch off the ESC and re-calibrate the throttle range again from Step 1.)
Move the throttle stick to the neutral position and press the SET button.
Move the throttle stick to the end position of forward and press the SET button.
Move the throttle stick to the end position of backward and press the SET button.
Set the 3 points according to pictures
- The neutral point.
- The end point of the forward direction.
- The end point of the backward/brake direction.
When the process of calibration is finished, the motor can be started after 3 seconds.
Check the LED Status in Normal Running
- When the throttle stick is in the neutral range, neither the Red LED nor the Green LED lights up.
- When the car moves forward, the Red LED solidly lights; the Green LED also lights up when the throttle stick is at the top position (100% throttle).
- When the car brakes, the Red LED solidly lights; the Green LED also lights up when the throttle stick is at the end position and the maximum brake force is set to 100%.
- When the car reverses, the Red LED solidly lights; the Green LED also lights up when the throttle stick is at the end position and the maximum reverse force is set to 100%.
Set the ESC by the SET button
ATTENTION
- In the ESC setting process, the motor will emit «Beep» tone at the same time when the LED is flashing.
- If the «N» is bigger than the number «5», we use a long time flash and long «Beep—» tone to represent «5», so it is easy to identify the items with the big serial number.
For example, if the LED flashes as the following:
«A long time flash + 1 short time flash» (Motor sounds «B—B») = the No. 6 item,
«A long time flash + 2 short time flash» (Motor sounds «B—BB») = the No. 7 item,
«A long time flash + 3 short time flash» (Motor sounds «B—BBB») = the No. 8 item, and so on.
Set the ESC by Program Card
The Program Card is optional equipment which needs to be purchased separately. It has 3 digital LEDs to display the programmable items’ number and the options’ number. It is portable and very easy to use. (For detailed information, please refer to the user manual of the program card).
Reset All Items to Default Values
At any time when the throttle is located at neutral position (except in the throttle calibration or parameters program process), press and hold the «SET» key for over 3 seconds, the red LED and green LED will blink simultaneously, which means each programmable item has be reset to its default value. It needs to be restarted to complete the whole process.
Programmable Items
- Running Mode: With «Forward with Brake» mode, the car can go forward and brake, but cannot go backward, this mode is suitable for competition; «Forward / Reverse with Brake» mode has reverse running function, which is suitable for daily training.
Note: «Forward/Reverse with Brake» mode uses «Double-click» method to make the car go backward. When you move the throttle stick from forward zone to backward zone for the first time (The 1st «click»), the ESC begins to brake the motor, the motor slows down but it is still running, not completely stopped, so the backward action is NOT happened immediately. When the throttle stick is moved to the backward zone again (The 2nd «click»), if the motor speed is slowed down to zero (i.e. stopped), the backward action will happen. The «Double-Click» method can prevent mistakenly reversing action when the brake function is frequently used in steering. By the way, in the process of braking or reversing, if the throttle stick is moved to forward zone, the motor will run forward at once. «Forward/Reverse» mode uses «single-click» method to make the car reverse. When moving the throttle stick from neutral zone to backward zone, the vehicle reverses immediately, so this mode is usually used by rock crawler. - Drag Brake Force: Set the amount of drag brake applied at neutral throttle to simulate the slight braking effect of a brushed motor while coasting.
- Low Voltage Cut-Off: The function mainly prevents the Lipo battery from over discharging. The ESC detects the battery voltage at any time, if the voltage is lower than the threshold for 2 seconds, the output power will be reduced 70%, after 10 seconds the output power will be completely shut off and the red LED flashes in such a way: «☆-, ☆-, ☆-«. Please stop your car at the track side as soon as possible to avoid obstructing other racing cars.
Note: For NiMH battery, if the voltage of the whole NiMH battery pack is higher than 9.0V, it will be considered as a 3 cells Lipo battery pack; If it is lower than 9.0V, it will be considered as a 2 cells Lipo battery pack. For example, if a NiMH battery pack is 8.0V, and the threshold is set to 2.6V/Cell, so it will be considered as a 2 cells Lipo battery pack, and the low-voltage cut-off threshold for this NiMH battery pack is 2.6×2=5.2V. - Start Mode (Also called «Punch» or «Acceleration»): Level 1 has very soft start acceleration, while level 9 has very quick start acceleration. From Level 1 to Level 9, the start force is increasing. If you choose «Level 7» to «Level 9», you should use good quality battery with powerful discharge ability, otherwise you cannot get the burst start effect as you want. If the motor cannot run smoothly (the motor is cogging), sometimes it is caused by the weak discharge ability, please use a better battery or increase the gear ratio.
- Maximum Brake Force: The ESC provides proportional brake function. The brake force is related to the position of the throttle stick. Maximum brake force refers to the force when the throttle stick is located at the end point of the backward zone. A very large brake force can shorten the brake time, but it may damage the gears.
- Maximum Reverse Force: Sets how much power will be applied in the reverse direction.
- Initial Brake Force: It is also called «minimum brake force», which refers to the force when the throttle stick is located at the initial position of the backward zone. The default value is equal to the drag brake force, so the brake action can be very smoothly.
- Throttle Neutral Range: This setting adjusts the width of the neutral range.
- Timing: This function can be used to fine-tune the output power of the motor, the bigger the timing, the faster the motor runs or the larger output power of the motor. As the Boost Timing technology has been introduced into this ESC, so under the sensored mode, adjust the ESC timing can greatly increase the motor speed. Therefore, please remember to enlarge the gear ratio of the chassis and carefully check temperatures of the motor and the ESC after increasing the timing.
Parameter List of QuicRun-10BL60SD
(Italics in the form below indicate factory defaults)
| Basic Items | Option 1 | Option 2 | Option 3 | Option 4 | Option 5 | Option 6 | Option 7 | Option 8 | Option 9 |
| 1.Running Mode *Note | Fwd/Br | Fwd/Rev/Br | Fwd/Rev | ||||||
| 2.Drag Brake Force | 0% | 5% | 10% | 20% | 40% | 60% | 80% | 100% | |
|
Disable | 2.6V/Cell | 2.8V/Cell | 3.0V/Cell | 3.2V/Cell | 3.4V/Cell | |||
|
Level 1 | Level 2 | Level 3 | Level 4 | Level 5 | Level 6 | Level 7 | Level 8 | Level 9 |
| Advanced Items | |||||||||
|
25% | 50% | 75% | 100% | |||||
|
25% | 50% | 75% | 100% | |||||
|
Equals Drag Brake Force |
0% | 20% | 40% | |||||
|
6% (Narrow) | 9% (Normal) 12%(Wide) | |||||||
|
0.00 deg | 3.75 deg | 7.50 deg | 11.25 deg | 15.00 deg | 18.75 deg | 22.50 deg | 26.25 deg |
Note: Fwd= Forward, Rev=Reverse, Brk=Brake
Recommended Power System
| Motor | KV | Gear Ratio (1/10 on-road) | Gear Ratio (1/10 off-road) | Main Application |
| QUICRUN 3650SD 6.5T G2 | 5750 | 6.4 — 8.4 | 9.0 — 11.0 | 1/10th buggy racing |
| QUICRUN 3650SD 8.5T G2 | 4560 | 5.0 — 6.0 | 7.0 — 8.5 | 1/10th buggy racing, drift car |
| QUICRUN 3650SD 10.5T G2 | 3600 | 5.0 — 6.5 | 6.5 — 8.0 | 1/10th drift car/ Stock racing |
| QUICRUN 3650SD 13.5T G2 | 2850 | 4.0 — 5.5 | 6.5 — 7.5 | 1/10th Stock racing |
| QUICRUN 3650SD 17.5T G2 | 2170 | 3.5 — 5.5 | 5.5 — 7.0 | 1/10th Stock racing |
| QUICRUN 3650SD 21.5T G2 | 1800 | 3.0 — 5.5 | 4.0 — 6.0 | 1/10th Stock racing, F1, rock crawler |
| QUICRUN 3650SD 25.5T G2 | 1520 | — | — | 1/10th Stock racing, rock crawler |
ATTENTION
The reference gear ratios in the above form are based on the 1/10 RC cars with 2S Lipo and 0 timing ESC. If the ESC timing is increased, then the gear ratio needs to be increased accordingly. Besides, please pay attention to the temperature of the ESC and the motor to avoid any damage to the equipments.
Trouble Shooting
| Trouble(s) | Possible Causes | Solution(s) |
| Turn on the switch, no LED lights up, and neither the motor nor fan works. | No battery voltage is input to the ESC. The switch of the ESC is damaged | Check the connections between the battery and the ESC, re-solder the connectors if needed. Change the switch. |
| After power on, motor doesn’t work but emits «beep-beep-, beep-beep-» alert tone. (there’s 1-second pause between 2 «beep-beep-«). | The voltage of the battery pack is not in the normal range, it’s too high or too low. | Check the voltage of the battery pack. |
| After power on, the Red LED turns solid red but the motor doesn’t work. | The throttle signal wire is oppositely inserted or into the incorrect channel. | Plug the signal wire (Rx lead) correctly into the throttle channel (usually Channel #2) of the receiver. |
| The car runs backwards when accelerating forward on radio. | The wire connections between the ESC and the motor need to be changed. The ESC is not suitable for the chassis. | Swap any two wire connections between the ESC and the motor. (Note: This method is ONLY available for SENSORLESS motor ) Please don’t use the ESC for this special chassis. |
| The car suddenly slows down, then stops about 10 seconds later. | Low voltage cutoff protection (Red LED blinks) Thermal protection (Green LED blinks) |
Check the battery voltage. If still has some capacity, lower the cut-off threshold voltage; if not, replace a new battery. Wait several minutes to cool the ESC. Increase the gear ratio or the T number (Turns) of the motor. |
| The motor stuttering under heavy acceleration. |
Low battery discharge rate. The motor RPM is too high (i.e. the motor runs too fast), and the gear ratio is too small. The «Punch» setting is too high. |
Use a battery pack with better discharge ability. Use a low-speed motor, or increase the gear ratio. Set the acceleration (punch) to the softer mode. |
| The car slows down and then stopped. The Red and Green LEDs blink rapidly and synchronously when throttle stick in neutral. | ESC detects abnormal signals from the sensor port of the motor and the ESC changes to sensorless driving mode automatically. | Check the sensor wire connection.
The Hall sensors in the motor are damaged, please change the motor. |
| The motor stutters and can’t start up. | The connections between the motor and ESC are not A-A, B-B and C-C; The ESC is damaged | Check wiring & connections. Contact the distributor for sales-after service. |
Documents / Resources
Download manual
Here you can download full pdf version of manual, it may contain additional safety instructions, warranty information, FCC rules, etc.
Download Hobbywing 10BL60 / 10BL120 Sensored — Brushless Speed Controller Manual
Form 1: Parameter List of QuicRun-WP16BL30 and QuicRun-WP10BL60: (Italics in the form below indicate factory defaults) Form 2: Parameter List of QuicRun-WP-8BL150 (Italics in the form below indicate factory defaults)
Option 1
1.Running Mode
2.Drag Brake Force
3. Low Voltage Cutoff
4. Start Mode (Punch)
5. Max. Brake Force
6. Max. Reverse Force
7. Initial Brake Force
8. Throttle Range
9. Timing
Option 2 Option 3 Option 4 Option 5 Option 6 Option 7 Option 8 Option 9
Fwd/Br
0%
5% 10% 20% 40% 60%
Disable
2.6V/Cell 2.8V/Cell 3.0V/Cell 3.2V/Cell 3.4V/Cell
80% 100%
Fwd/Rev/Br Fwd/Rev
Level 5 Level 6 Level 7 Level 8 Level 9Level 4Level 3Level 2
Level 1
25%
50% 75% 100% Disable
25%
drag brake
force
drag brake
force
50% 75% 100%
0% 20% 40%
6%
(Narrow)
9%
(Normal)
9%
(Normal)
12%(Wide)
0.00 deg 3.75 deg 7.50 deg 11.25 deg 15.00 deg 18.75 deg 22.50 deg 26.25 deg
Enable
Disable
CCW
CW
Note 2
Auto-
identification
2S LiPo 3S LiPo 4S LiPo 5S LiPo 6S LiPo
Programmable Items
Note 1
Option 1
1.Running Mode
2.Drag Brake Force
3. Low Voltage Cutoff
4. Start Mode (Punch)
5. Max. Brake Force
6. Max. Reverse Force
7. Initial Brake Force
8. Throttle Range
9. Timing
Option 2 Option 3 Option 4 Option 5 Option 6 Option 7 Option 8 Option 9
Fwd/Br
0%
5% 10% 20% 40% 60%
Disable
2.6V/Cell 2.8V/Cell 3.0V/Cell 3.2V/Cell 3.4V/Cell
80% 100%
Fwd/Rev/Br Fwd/Rev
Level 5 Level 6 Level 7 Level 8 Level 9Level 4Level 3Level 2
Level 1
25%
50% 75% 100% Disable
25%
50% 75% 100%
0% 20% 40%
6%
(Narrow)
12%(Wide)
0.00 deg 3.75 deg 7.50 deg 11.25 deg 15.00 deg 18.75 deg 22.50 deg 26.25 deg
10. Overheat
Protection
11. Motor Rotation
12.Cell Count
Programmable Items
Note 1
Note 1: Fwd=Forward, Rev=Reverse, Brk=Brake
Note 2: When set to the “Auto-identification” mode, the battery pack can only be identified as 2S, 4S and 6S Lipo. Because the
normal voltage of each LiPo cell varies from 2.6V to 4.2V, it’s not easy to correctly calculate the cell count of a discharged LiPo
battery pack. Therefore, we strongly suggest you set the “LiPo Cells” manually.
In order to make sure the ESC fits the throttle range of your transmitter, you must calibrate it when begin to use a new ESC, or a used transmitter if some of its settings have been changed,
like the Throttle Trim, D/R, EPA or other parameters. Otherwise, the ESC cannot work properly. Besides, we strongly recommend users to enable the “failsafe” function of the transmitter, set
the “F/S” of the throttle channel to the Shutdown mode or set the protection value to the neutral position, so the car can be stopped if the receiver fails to get the radio signals from the
transmitter. Please calibrate the throttle range according to the following steps.Model QuicRun-WP-16BL30 QuicRun-WP-10BL60Continuous Current /Peak Current / ResistanceMotor Type SupportedCar Applicable30A/180A/0.002Ω
Sensorless Brushless Motor (compatible with sensored motor but not in sensored operating mode)
1:18 & 1:16 On-road / Off-road / Buggy / Monster 1:10 On-road / Off-road / Buggy / Monster
60A/360A/0.001Ω6V/3A (Switch Mode)Motor LimitBattery 4-9 Cells NiMH, 2-3S Lipo 4-9 Cells NiMH, 2-3S LipoQuicRun-WP-8BL1501:8 Buggy / Monster150A/950A/0.00035Ω6V/3A (Switch Mode)9-18 Cells NiMH, 3-6S LipoBEC OutputDimensions / WeightExternal Program PortWorking voltage of Fan36x28x16mm / 38gNot AvailableNo cooling fan48.5x38x32mm / 90gAvailableFrom BEC(6V)59.5x48x42mm / 178gAvailableFrom BEC(6V)6V/1A (Linear Mode)For 2S Lipo or 6 cells NiMH:1. On-road: 2435-size or smaller motor with the KV<80002. Off-road / Buggy / Monster: 2435-size or smaller motor with the KV<5000For 3S Lipo or 9 cells NiMH:1. On-road: 2435-size or smaller motor with the KV<55002. Off-road / Buggy / Monster: 2435-size or smaller motor with the KV<3500.For 2S Lipo or 6 cells NiMH:1. On-road: 3656-size or smaller motor with the KV<60002. Off-road / Buggy / Monster: 3656-size or smaller motor with the KV<4000For 3S Lipo or 9 cells NiMH:1. On-road: 3656-size or smaller motor with the KV<40002. Off-road / Buggy / Monster: 3656-size or smaller motor with the KV<3000.For 4S Lipo or 12 cells NiMH:4274-size or smaller motor with the KV<3000For 6S Lipo or 18 cells NiMH:4274-size or smaller motor with the KV<2400
• Water-proof and dust-proof for all-weather races;
(Note: please uninstall the cooling fan before using this ESC in water; Clean and dry it soon after the
use for avoiding the connectors get rusty.)
• External programming port, easy to connect to the Program Card when setting the ESC;
• Proportional brake with 4 steps of maximum brake force adjustment and 8 steps of drag brake force adjustment;
• 9 steps of acceleration(punch) adjustment from “soft” to “Very aggressive” to fit for different kinds
of models, tires and tracks;
• Multiple protections: Low voltage cut-off protection / Over-heat protection / Throttle signal loss
protection / Motor lock-up protection;
• One-button(the “SET” button on the ESC) to set the ESC, and easy to reset all parameters to the
factory default settings;
• Compatible with the optional device-the portable Digital LED Program Card, especially convenient
for outdoor use.
01
Features
02
Begin to Use a New Brushless ESC
03
Program the ESC
Connections
Specifications
IMPORTANT
CAUTIONS
ATTENTION
Congratulations and thanks for purchasing HOBBYWING electronic speed controller (ESC). The brushless power system for RC model can be very powerful and dangerous, so please read this manual carefully. Since we have no control over the installation, application, use or maintenance of this product, in no case shall we be liable for any damages, losses or costs. Besides, we have the rights to change the design, appearance, functions and operational requirements without any notifications.
ATTENTION
1
Program the ESC with the SET Button
1
Set the ESC by the Program Card
2
Set up Throttle Range
2
• In the programming process, the motor will emit “Beep” tone while the LED is
flashing.
• If the “N” is bigger than the number “5”, we use a long time flash and long
“Beep—” tone to represent “5”, so it is easy to identify the items of the big number.For example, if the LED flashes as the following:“A long time flash + 1 short time flash” (Motor sounds “B—B”) = the No. 6 item“A long time flash + 2 short time flash” (Motor sounds “B—BB”) = the No. 7 item“A long time flash + 3 short time flash” (Motor sounds “B—BBB”) = the No. 8 item, and so on.The Program Card is optional equipment which needs to be purchased separately. It has 3 digital LEDs to display the programmable items’ number and the options’ number. (Please refer to the user manual of the program card for detail info)
ATTENTION
The QuicRun-WP10BL60 and QuicRun-WP8BL150 can only be connected to the program card via the external programming port.
ATTENTION
a) When the throttle stick is in the neutral range, neither the Red LED nor the Green LED lights up;
b) When the car moves forward, the Red LED solidly lights; the Green LED also lights up when the throttle stick is at the top position (100% throttle);
c) When the car brakes, the Red LED solidly lights; the Green LED also lights up when the throttle stick is at the bottom position and the maximum brake force is set to 100%;
d) When the car reverses, the Red LED solidly lights; the Green LED also lights up when the throttle stick is at the bottom position and the maximum reverse force is set to 100%.
Check the LED Status in Normal Running
3
Explanation for the Beep Sound
In normal case, when the ESC is switched on, the motor will emit several “Beep” tones to express the cell count of the battery pack. For example, “Beep-Beep-” means 2S LiPo,
“Beep-Beep-Beep-” means 3S LiPo, “Beep-Beep-Beep- Beep-” means 4S LiPo.
EXPLANATION
06
Trouble Shooting
Trouble(s) Solution(s)Possible Causes
No battery voltage is input to the ESC. The switch of the ESC is damagedThe voltage of the battery pack is not in the normal range, it’s too high or too low. The throttle signal wire is oppositely inserted or into the incorrect channel. The wire connections between the ESC and the motor need to be changed.Low voltage cutoff protection (Red LED blinks) Overheat protection (Green LED blinks)The throttle neutral point drifts to the brake area. The connections between motor and ESC are not reliable. The ESC is damaged.Check the connections between the battery and the ESC, re-solder the connectors if needed. Change the switch.Check the voltage of the battery pack.
Plug the signal wire (Rx lead) correctly into the throttle channel (usually Channel #2) of the receiver.
Swap any two wire connections between the ESC and the motor. Check the battery voltage. If still has some capacity, lower the cut-off threshold voltage; if not, replace a new battery.
Wait several minutes to cool the ESC. Increase the gear ratio or the T number (Turns) of the motor.
Calibrate the throttle neutral point again to ensure that no LED lights when the throttle stick is at the neutral position. Check all the solder joints and ensure they are well soldered. Check connectors.Contact the distributor for after-sales service. After power on, motor doesn’t work but emits “beep-beep-, beep-beep-”alert tone. (there’s 1 second pause between 2 “beep-beep-”).After power on, the Red LED turns solid red but the motor doesn’t work.
Turn on the switch, no LED lights up, and neither the motor nor fan works.
The car runs backwards when accelerating forward on radio.The motor stutters, and cannot start up.The vehicle can go forward but cannot reverse.The car suddenly slows down, then stops about 15 seconds later.Enter the 2
nd
item»Drag Brake Force»Hold the SET keySwitch on the ESCRed LED flashes Green LED flashesonce Green LED flashestwiceGreen LED flashes3 times Green LED flashesN times ReleaseSET kyeReleaseSET kyePressSET kyePressSET kyePressSET kyePressSET kyeReleaseSET kyeReleaseSET kyeRed LED flashes once, choose «0%» Red LED flashes twice, choose «5%»Red LED flashes 3 times, choose «10%» Red LED flashes 4 times, choose «20%» Red LED flashes 5 times, choose «40%»Red LED flashes 6 times, choose «60%» Red LED flashes 7 times, choose «80%»Red LED flashes 8 times, choose «100%» Red LED flashes once, choose «None»Red LED flashes twice, choose «2.6V»Red LED flashes 3 times, choose «2.8V»Red LED flashes 4 times, choose «3.0V»Red LED flashes 5 times, choose «3.2V»Red LED flashes 6 times, choose «3.4V»Red LED flashes once to choose Red LED flashes twice to choose Red LED flashes 3 times to choose «Forward with brake»»Forward / Reverse with brake»»Forward / Reverse»Enter the 3
rd
item»Low Voltage Cut-Off»Enter the N
th
itemEnter the 1
st
item»Running Mode»Turn off the ESCTurn on the transmitterHold SET key for 3 secondsHold SET key for 3 secondsHold SET key for 3 secondsHold SET key for 3 seconds……The following steps are just like the above setps……Finish programming, switch off the ESC, and then switch it on
05
Programmable Items
1. Running Mode: With “Forward with Brake” mode, the car can go forward and brake, but cannot go backward, this mode is suitable for competition; “Forward / Reverse with Brake” mode provides backward function, which is suitable for daily training.
Note: “Forward/Reverse with Brake” mode uses “Double-click” method to make the car go backward. When you move the throttle stick from forward zone to backward zone for the first time (The 1st “click”), the ESC begins to brake the motor,
the motor speeds down but it is still running, not completely stopped, so the backward action is NOT happened immediately. When the throttle stick is moved to the backward zone again (The 2nd “click”), if the motor speed is slowed down to
zero, then the backward action will happen. The “Double-Click” method can prevent mistakenly reversing action when the brake function is frequently used in steering. By the way, in the process of braking or reversing, if the throttle stick is
moved to forward zone, the motor will run forward at once. “Forward/Reverse” mode uses “single-click” method to make the car reverse. When moving the throttle stick from neutral zone to backward zone, the vehicle reverses immediately,
so this mode is usually used in rock crawling.
2. Drag Brake Force: Set the amount of drag brake applied at neutral throttle to simulate the slight braking effect of a neutral brushed motor while coasting.
3. Low Voltage Cut-Off: The function mainly prevents the Lipo battery from over discharging. The ESC detects the battery voltage at any time, if the voltage is lower than the threshold for 2 seconds, the output power will be reduced 70%,
after 15 seconds the output power will be completely shut off and the red LED flashes in such a way: “☆-, ☆-, ☆-”. Please stop your car at the track side as soon as possible to avoid obstructing other racing cars.
Note: For NiMH battery, if the voltage of the whole NiMH battery pack is higher than 9.0V, it will be considered as a 3 cells Lipo battery pack; If it is lower than 9.0V, it will be considered as a 2 cells Lipo battery pack. For example, if a NiMH battery
pack is 8.0V, and the threshold is set to 2.6V/Cell, so it will be considered as a 2 cells Lipo battery pack, and the low-voltage cut-off threshold for this NiMH battery pack is 2.6×2=5.2V.
4. Start Mode (Also called “Punch” or “Acceleration”): Level 1 has very soft start acceleration, while level 9 has very quick start acceleration. From Level 1 to Level 9, the start force is increasing. If you choose “Level 7” to “Level 9”, you should use good
quality battery with powerful discharge ability, otherwise you cannot get the burst start effect as you want. If the motor cannot run smoothly (the motor is cogging), sometimes it is caused by the weak discharge ability, please use a better
battery or increase the gear ratio.
5. Maximum Brake Force: The ESC provides proportional brake function. The brake force is related to the position of the throttle stick. Maximum brake force refers to the force when the throttle stick is located at the top point of the backward
zone. A very large brake force can shorten the brake time, but it may damage the gears.6. Maximum Reverse Force: Sets how much power will be applied in the reverse direction.
7. Initial Brake Force: It is also called “minimum brake force”, which refers to the force when the throttle stick is located at the initial position of the backward zone. The default value is equal to the drag brake force, so the brake action can be very smoothly.
8. Throttle Neutral Range: This setting adjusts the width of the neutral range.
9. Timing: This function can be used to fine-tune the output power of the motor, the bigger the timing, the faster the motor runs or the larger output power of the motor. As the Boost Timing technology has been introduced into this ESC, so
under the sensored mode, adjust the ESC timing can greatly increase the motor RPM. Therefore, please remember to enlarge the gear ratio of the chassis and carefully check temperatures of the motor and the ESC after increasing the timing.
10. Over-Heat Protection: If this function is activated, the output power will be cut off when the temperature is higher than the factory-preset value for 5 seconds. When the protection happens, the Green LED will flash in such a way “☆-, ☆-, ☆-” .
11. Motor Rotation: Face to the motor shaft (that means the endbell of the motor is far from your face), and move the throttle stick to forward zone. If this programmable item is set to “CCW”, the shaft runs counter-clockwise; if it is set to “CW”, the
shaft runs clockwise.
12. Cell Count: We strongly suggest you set the “Cell Count” manually instead of using the “Auto-identification” mode.
04
Reset All Items to Default Values
At any time when the throttle is located in neutral zone (except in the throttle calibration or parameters program process), press and hold the “SET” key for over 3 seconds, the red LED and green LED will flash
simultaneously , which means each programmable item has be reset to its default value. The ESC needs to be restarted to complete the reset process.
Click the SET button to choose the option, the times the red LED blinks indicates the option number you are going to select. After entering the corresponding item, the red LED starts to blink, the times it blinks represents the current option number.Press SET key to choose the value, the flash times of the RED LED means the option number.(Once means the 1st option, twice means the 2nd option, etc.)
USER MANUAL
16BL30 • 10BL60 • 8BL150Brushless Electronic Speed ControllerThis brushless system is powerful and dangerous, for the safety of your own and those people around you, please turn on the ESC while keeping all the wheels in the air.
1. Turn on the transmitter, and set parameters (of the throttle channel) like “D/R, “EPA”, “ATL” to 100% (if there is no LCD display
on the transmitter, please adjust the corresponding knob to its limit). Set the throttle trim to 0 (if there is no display, then adjust the
knob to the neutral position). For FUTABA
TM
and similar transmitters, set the throttle direction to “REV”, while the throttle direction
of others to “NOR”. Please disable the built-in ABS brake function in your transmitter.
2. Hold the SET button while sliding the switch to the ON position, and then release the “SET” button the moment when the Red
LED starts to blink. (If you don’t release the SET button in 3 seconds, the ESC will enter the program mode, in such a case, please
switch off the ESC and re-calibrate the throttle range again from Step 1.)
Hold down the set button.
Move the throttle stick to the neutral position and press
the set button.
Turn on the switchRelease the set button once the LED flashes.
Set the 3 points according to pictures
• The neutral point. • The end point of the forward direction. • The end point of the backward/brake direction.
When the process of calibration is finished, the motor can be started after 3 seconds.
The Green LED
flashes once and
motor emits
“Beep” tone.
Move the throttle stick to the end position of forward
and press the set button.
The Green LED flashes
twice and motor emits
“Beep-Beep”
tone.
Move the throttle stick to the end position of forward
and press the setup button.
The Green LED flashes
twice and motor emits
“Beep-Beep-
Beep” tone.
BatteryMotor
Blue
YellowOrangeReceiverSwitchElectronic Speed Controller
External Programming
Port for Connecting
Program Card.
| Параметры | Регуляторы скорости бесколлекторные |
Бесколлекторный регулятор скорости с вентилятором охлаждения WP-10BL60 на 60А и влагозащитой для автомоделей 10 масштаба.
Поддерживает 2-х и 3-х баночные Li-Po аккумуляторы на 7.4-11.1V
ВЕС: 6/2А
Таблица настройки регулятора HSP Racing:
Таблица настройки регулятора BSD Racing:
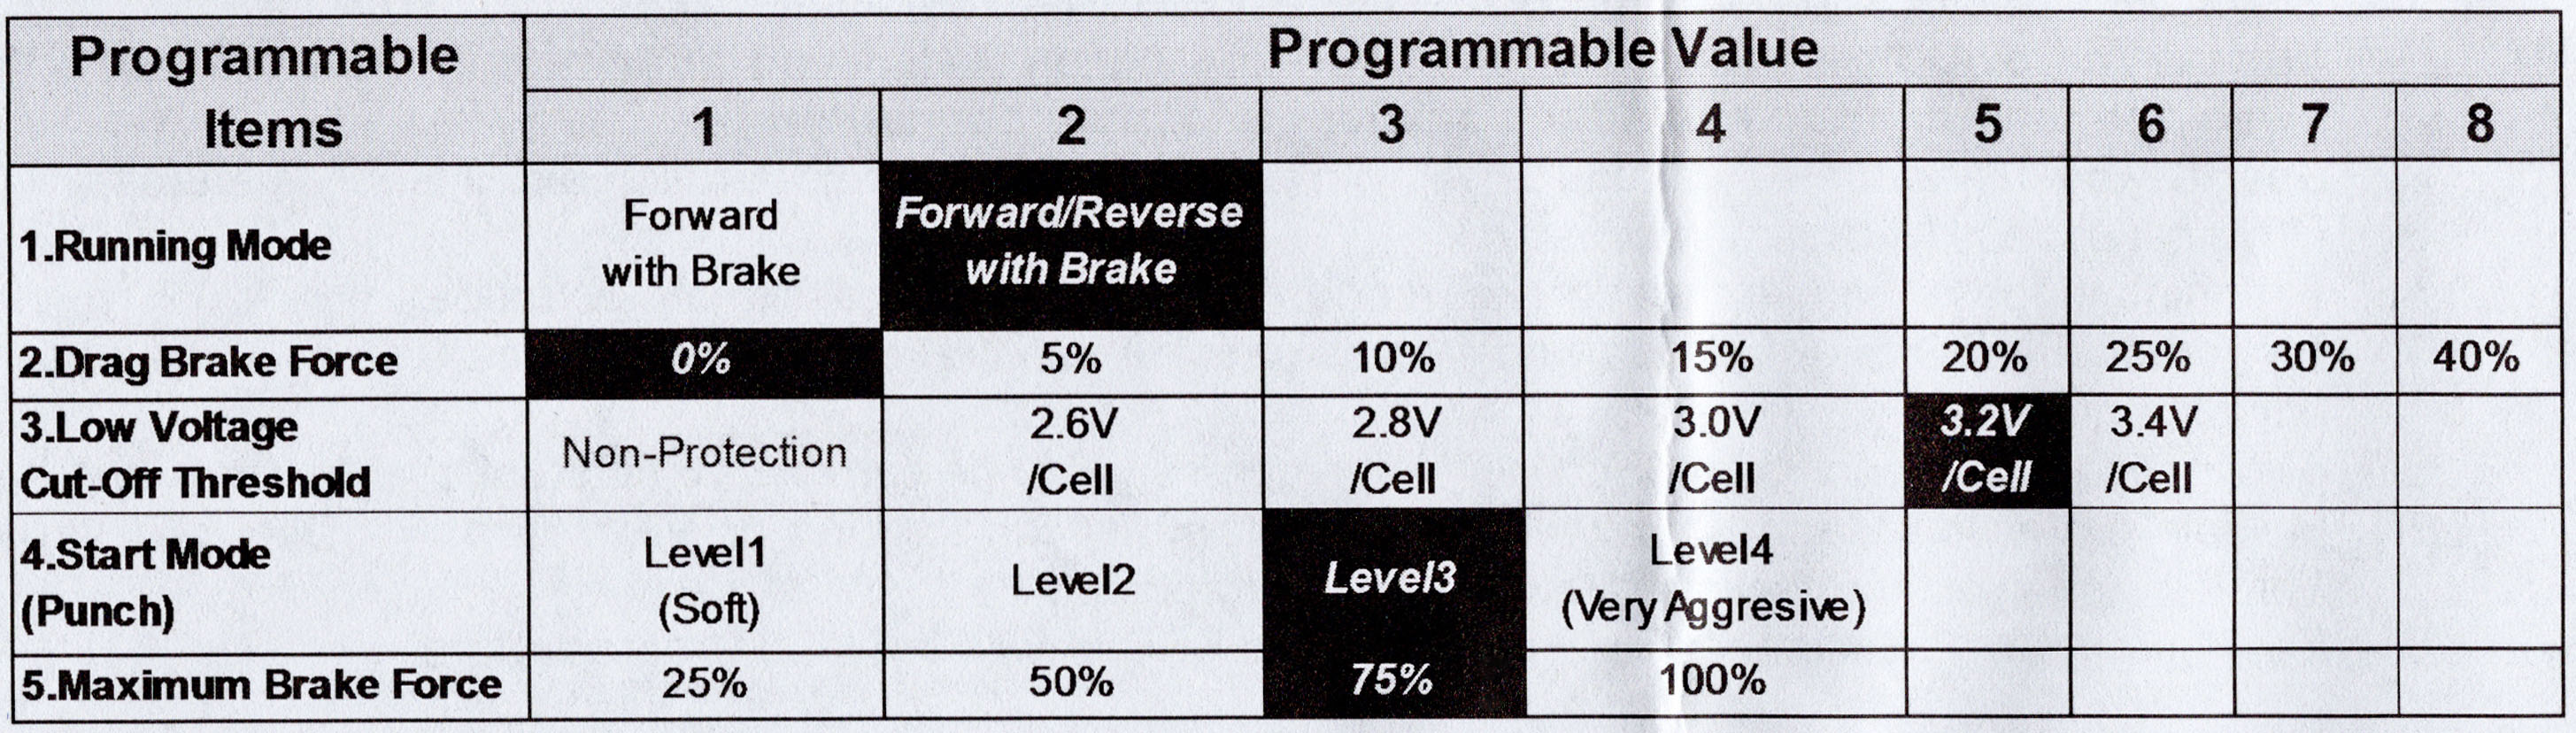
Таблица настройки регулятора Remo Hobby:

Таблица подбора моторов и аккумуляторов:
User Manual of Water-Proof Brushless Speed Controller (RTR Version)
the opposite direction, please swap any two wire connections.
Note: You can use the transmitter to set the throttle channel to the»Reverse» direction, and then the motor
will run oppositely. Please calibrate the throttle range again after changing the direction of throttle
channel.
2. Throttle Range Setting (Throttle Range Calibration)
In order to make the ESC match the throttle range, you must calibrate it when you begin to use a new ESC, or a
new transmitter, or after changing the settings of the neutral position of throttle channel, ATV or EPA parameters,
otherwise the ESC cannot work properly.
There are 3 points need to be set, they are the top point of «forward»,» backward» and the neutral point.
The following pictures show how to set the throttle range with a Futaba
A) Switch off the ESC, turn on the
transmitter, set the direction of throttle
channel to «REV», set the «EPA/ATV»
value of throttle channel to «100%», and
disable the «ABS» brake function of
your transmitter.
(*Note2)
B) Hold the «SET» key and then switch on
the ESC, when the red LED begins to
flash, release the key immediately.
(Please check the picture on the right side)
C) Set the THREE points according to the
steps shown in the picture on the right
side.
1) Neutral point
2) End point of forward direction
3) End point of backward direction
D) When the process of calibration is
finished, the motor can be started after
3 seconds.
Note2: If you don’t release the «SET» key after the
red LED begins to flash, the ESC will enter the
program mode, in such a case, please switch off
the ESC and re-calibrate the throttle range again
from step A to step D.
3. The LED Status in Normal Running
a)
When the throttle stick is in the neutral range, neither the Red LED nor the Green LED lights up.
b)
When the car moves forward, the Red LED solidly lights; the Green LED also lights up when the throttle stick is
at the top position (100% throttle).
c)
When the car brakes, the Red LED solidly lights; the Green LED also lights up when the throttle stick is at the
bottom position and the maximum brake force is set to 100%.
d)
When the car reverses, the Red LED solidly lights.
【ALERT TONES】
1.
Input voltage abnormal alert tone: The ESC begins to check the input voltage when power on, if it is out of the
normal range, such an alert tone will be emitted: «beep-beep-, beep-beep-, beep-beep-» (There is 1 second
time interval between every «beep-beep-» tone).
2.
Throttle signal abnormal alert tone: When the ESC can’t detect the normal throttle signal, such an alert tone
will be emitted: «beep-, beep-, beep-» (There is 2 seconds time interval between every «beep-» tone).
【PROTECTION FUNCTION】
1.
Low voltage cut-off protection: If the voltage of a Lipo battery pack is lower than the threshold for 2 seconds,
the ESC will cut off the output power. Please note that the ESC cannot be restarted if the voltage of each Lipo
cell is lower than 3.5V.
For NiMH battery packs, if the voltage of the whole NiMH battery pack is higher than 9.0V but lower than 12V,
it will be considered as a 3S Lipo; If it is lower than 9.0V, it will be considered as a 2S Lipo. For example, if the
NiMH battery pack is 8.0V, and the threshold is set to 2.6V/Cell, it is considered as a 2S Lipo, and the
low-voltage cut-off threshold for this NiMH battery pack is 2.6*2=5.2V.
TM
transmitter.
2.
Over-heat protection: When the temperature of the ESC is over a factory preset threshold for 5 seconds, the
ESC will cut off the output power. You can disable the over-heat protection function for competition race.
3.
Throttle signal loss protection: The ESC will cut off the output power if the throttle signal is lost for 0.2 second.
【PROGRAM THE ESC】
1. Program Method
Note:
In the program process, the motor will emit «Beep» tone when the LED is flashing.
th
programmable item is represented by 5 short Beeps (that is, «BBBBB»).
The 5
For the options of each programmable item, we use a long time flash and long «Beep—» tone to represent
number «5», so it is easy to identify the options with big numbers.
For example, if the LED flashes as the following:
«A long time flash» (Motor sounds «B—«) = The option 5
«A long time flash + a short time flash» (Motor sounds «B—B») = The option 6
«A long time flash + 2 short times flash» (Motor sounds «B—BB») = The option 7
«A long time flash + 3 short times flash» (Motor sounds «B—BBB») = The option 8
HW-SM601ENG-20140903 Page — 2 —

Самовывоз —  руб
руб
Другими способами — руб
Для резервирования товара оформите заказ на сайте или позвоните по телефону 8 (495) 662-97-94
- ОПИСАНИЕ
- ОТЗЫВЫ
QuicRun-WP-10BL60
Бесколлекторный влагозащищенный регулятор Hobbywing Quicrun WP-10BL60 для масштаба 1:10, 1:12.
Максимальный постоянный ток регулятора — 60А
Максимальный кратковременный ток регулятора (в рывке) — 380А
Питание: 4-9 банок NiMh, 2-3 банки LiPo
BEC: Линейный 6v / 2A
Внутреннее сопротивление регулятора: 0.001 Ом.
Тип моторов — бессенсорные бесколлекторные моторы
Поддерживаемые моторы:
— With 4-6 cells NiMH/NiCd or 2 cells Lipo с мотором 3556 или меньше >= 6000Kv
— With 6-9 cells NiMH/NiCd or 3 cells Lipo с мотором 3656 или меньше >= 4000Kv
Подходит для моделей: авто 1/10
Вентилятор питается напрямую от батареи в обход BEC. Поддерживаются 2S и 3S LiPo
Размеры: 48.5x38x32мм
Вес: 90 грамм
Особенности:
Регулятор защищен от влаги и пыли и подходит для использования на трассах с водой и грязью
Подходит для любых бессенсорных бесколлекторных моторов
Используются высококачественные компоненты для повышения токотдачи и долговечности регулятора
Внешний порт для программирования регулятора
3 режима работы: Гоночный (только вперед), Вперед/назад и режим offroad.
4 шага регулировки мощности заднего хода.
Пропорциональная система торможения с 4 шагами регулировки максимального тормозного усилия, 8 шагов регулировки усилия в нейтрали и 4 шага начального тормозного усилия
9 режимов старта от «Soft» до «Very aggressive» для настройки под разные покрытия и трассы.
Несколько типов защиты: Отсечка для LiPo / Защита от перегрева / Failsafe по газу / Защита при блокировке мотора.
Легко программируется с помощью карточки программирования.
В комплекте:
Регулятор Quicrun WP-10BL60
Инструкция на русском языке
Внимание! Внешний вид товара, комплектация и характеристики могут изменяться производителем без предварительных уведомлений. Данный интернет-сайт носит исключительно информационный характер и ни при каких условиях не является публичной офертой, определяемой положениями Статьи 437 (2) Гражданского кодекса Российской Федерации.
Заявка успешно отправлена.
Наш менеджер скоро свяжется с Вами.
| Параметры | Регуляторы скорости бесколлекторные |
Бесколлекторный регулятор скорости с вентилятором охлаждения WP-10BL60 на 60А и влагозащитой для автомоделей 10 масштаба.
Поддерживает 2-х и 3-х баночные Li-Po аккумуляторы на 7.4-11.1V
ВЕС: 6/2А
Таблица настройки регулятора HSP Racing:
Таблица настройки регулятора BSD Racing:
Таблица настройки регулятора Remo Hobby:
Таблица подбора моторов и аккумуляторов:
Описание товара:
Описание:
• Бесколлекторный регулятор Quicrun WP-10BL60 для масштаба 1:10, 1:12
Характеристики:
• Максимальный постоянный ток регулятора — 60А
• Максимальный кратковременный ток регулятора (в рывке) — 380А
• Питание: 4-9 банок NiMh, 2-3 банки LiPo
• BEC: 6v / 2A Линейный
Артикул
HW-QuicRun-WP-10BL60
Артикул производителя
30105060004
Максимальный постоянный ток регулятора (A)
60
Описание товара
Описание:
Влагозащищенный RC регулятор применяется для моделей, выполненных в размере один к десяти или один к двенадцати. Вы можете использовать его на любых трассах, даже если на них имеется влага, пыль или грязь.
Quicrun WP 10BL60 совместим со всеми видами моторов без сенсора и без коллектора. Список поддерживаемых моторов ищите в характеристиках. Приспособление изготовлено известным производителем из высококачественных элементов.
Для программирования с помощью соответствующей карточки имеется внешний порт. HobbyWing Quicrun поставляется в комплекте с инструкцией на русском языке.
Характеристики:
• Максимальный постоянный ток регулятора — 60А
• Максимальный кратковременный ток регулятора (в рывке) — 380А
• Питание: 4-9 банок NiMh, 2-3 банки LiPo
• BEC: Линейный 6v / 2A
• Внутреннее сопротивление регулятора: 0.001 Ом.
• Тип моторов — бессенсорные бесколлекторные моторы
• Поддерживаемые моторы:
With 4-6 cells NiMH/NiCd or 2 cells Lipo с мотором 3556 или меньше ≤ 6000Kv
With 6-9 cells NiMH/NiCd or 3 cells Lipo с мотором 3656 или меньше ≤ 4000Kv
• Подходит для моделей: авто 1/10
• Вентилятор питается напрямую от батареи в обход BEC. Поддерживаются 2S и 3S LiPo
• Размеры: 48.5мм * 38мм * 32мм
• Вес: 90г
Особенности:
• Регулятор защищен от влаги и пыли и подходит для использования на трассах с водой и грязью
• Подходит для любых бессенсорных бесколлекторных моторов
• Используются высококачественные компоненты для повышения токотдачи и долговечности регулятора
• Внешний порт для программирования регулятора
• 3 режима работы: Гоночный (только вперед), Вперед/назад и режим offroad.
• 4 шага регулировки мощности заднего хода.
• Пропорциональная система торможения с 4 шагами регулировки максимального тормозного усилия, 8 шагов регулировки усилия в нейтрали и 4 шага начального тормозного усилия
• 9 режимов старта от «Soft» до «Very aggressive» для настройки под разные покрытия и трассы.
• Несколько типов защиты: Отсечка для LiPo / Защита от перегрева / Failsafe по газу / Защита при блокировке мотора.
• Легко программируется с помощью карточки программирования.
В комплект входит:
• Регулятор Quicrun WP-10BL60
• Инструкция на русском языке
Бесколлекторный влагозащищенный регулятор Quicrun WP-10BL60 для моделей масштаба 1:10 — HW-QuicRun-WP-10BL60ID: 125160
ID: 125160Артикул: HW-QuicRun-WP-10BL60
Старая цена: 4990 руб.
Артикул: HW-QuicRun-WP-10BL60
Курьерская доставка:
Загружаю…
Бесколлекторный влагозащищенный регулятор Hobbywing Quicrun WP-10BL60 для масштаба 1:10, 1:12
Характеристики:
- Максимальный постоянный ток регулятора — 60А
- Максимальный кратковременный ток регулятора (в рывке) — 380А
- Питание: 4-9 банок NiMh, 2-3 банки LiPo
- BEC: Линейный 6v / 2A
- Внутреннее сопротивление регулятора: 0.001 Ом.
- Тип моторов — бессенсорные бесколлекторные моторы
- Поддерживаемые моторы:
- With 4-6 cells NiMH/NiCd or 2 cells Lipo с мотором 3556 или меньше ? 6000Kv
- With 6-9 cells NiMH/NiCd or 3 cells Lipo с мотором 3656 или меньше
- Подходит для моделей: авто 1/10
- Вентилятор питается напрямую от батареи в обход BEC. Поддерживаются 2S и 3S LiPo
- Размеры: 48.5мм * 38мм * 32мм
- Вес: 90г
Особенности:
- Регулятор защищен от влаги и пыли и подходит для использования на трассах с водой и грязью
- Подходит для любых бессенсорных бесколлекторных моторов
- Используются высококачественные компоненты для повышения токотдачи и долговечности регулятора
- Внешний порт для программирования регулятора
- 3 режима работы: Гоночный (только вперед), Вперед/назад и режим offroad.
- 4 шага регулировки мощности заднего хода.
- Пропорциональная система торможения с 4 шагами регулировки максимального тормозного усилия, 8 шагов регулировки усилия в нейтрали и 4 шага начального тормозного усилия
- 9 режимов старта от «Soft» до «Very aggressive» для настройки под разные покрытия и трассы.
- Несколько типов защиты: Отсечка для LiPo / Защита от перегрева / Failsafe по газу / Защита при блокировке мотора.
- Легко программируется с помощью карточки программирования.
Комплектация:
- Регулятор Quicrun WP-10BL60
- ХарактеристикиХар-ки
- Доставка
- Оплата
- Отзывы (1)
- Вопросы (0)
Магазин RC-TODAY.RU осуществляет доставку заказов как собственной курьерской службой, так и различными транспортными компаниями.
Доставка по Москве
Самовывоз из магазина RC-TODAY.RU —БЕСПЛАТНО
Мы находимся:г. Москва, 6-й монетчиковский пер., д. 8с1 (3 минуты пешком от метро Павелецкая)
Время работы: Ежедневно с 09:00 до 21:00
Сделайте заказ любым удобным для Вас способом, наш менеджер свяжется с Вами для согласования даты и времени Вашего приезда.
Как только заказ будет скомплектован, мы Вам позвоним и отправим смс-уведомление.
Цена доставки зависит от адреса и рассчитывается самостоятельно в корзине или по телефону с менеджером.
Срок доставки — 1-2 дня. В рабочие дни минимальный интервал доставки — 3 часа, в выходные и праздничные дни — 8 часов.
Если Вы находитесь за МКАД, то срок доставки — 1-2 дня, а минимальный интервал доставки — 8 часов.
Просим учесть, что крупногабаритные товары мы доставляем только до подъезда. Подъём до квартиры осуществляется за отдельную плату.
Доставка по России
СДЭК
cdek.ru
Оплата заказа возможна наложенным платежом. Срок доставки 2-14 рабочих дней, в зависимости от удалённости города.
Почта России
pochta.ru
Отправка заказа только по полной предоплате. Срок доставки 1-10 рабочих дней, в зависимости от удалённости города.
Деловые линии, Байкал сервис, ПЭК и любые другие ТК
Если Вы знаете транспортную компанию в своём городе, которая устраивает Вас больше, чем предложенные нами, просто сообщите нам об этом, и мы отправим Ваш заказ через неё. Если указанная Вами транспортная компания не предоставляет возможности оплаты заказа при получении, необходимо сделать предоплату за заказ в полном объёме. Доставка, как правило, оплачивается при получении заказа. Сроки доставки зависят от ТК и удалённости региона. При этом забор транспортной компанией с нашего склада оплачивается клиентом вне зависимости от стоимости заказа.
Стоимость доставки зависит от веса и цены товара и рассчитывается оператором при подтверждении заказа.
Самовывоз из пунктов выдачи
Практически в каждом городе у нас есть пункт выдачи заказов от наших партнёров. Уточнить адреса и контакты пункта выдачи Вы можете любым удобным для Вас способом: по телефону, в онлайн чате, а также при оформлении заказа в корзине.
Оплата наличными
Оплата производится наличными средствами курьеру при получении заказа. Если для Вас это самый удобный вариант оплаты, просто выберите «Оплата при доставке» при оформлении заказа или, если Вы оформляете заказ по телефону, сообщите об этом менеджеру. Эта опция доступна не только для жителей Москвы и Санкт-Петербурга, но и для жителей остальных регионов России. Оплачивайте свои заказы по факту получения. Ваш комфорт – наш приоритет.
Оплата через сайт
Вы можете оплатить свой заказ непосредственно при оформлении заказа. Для этого нужно выбрать способ оплаты «Картами Visa, MasterСard, МИР». После этого Вы автоматически перейдете на сайт платежной системы и сможете произвести оплату любым удобным для Вас способом. Если вы оформляете заказ по телефону, попросите менеджера отправить Вам ссылку на оплату заказа онлайн на Вашу электронную почту. Перейдя по этой ссылке, Вы попадете на сайт платежной системы, где сможете оплатить заказ.
Оплата банковским переводом
При оформлении заказа выбираете тип оплаты «Банковский перевод». В форме заказа необходимо заполнить электронную почту – на нее мы отправим Вам ссылку на счет с нашими реквизитами. Если вы оформляете заказ по телефону, попросите менеджера прислать Вам счет на оплату. Оплатить счет Вы можете в любом банке. Пожалуйста, указывайте в комментарии к платежу номер Вашего заказа!
Описание:
Влагозащищенный RC регулятор применяется для моделей, выполненных в размере один к десяти или один к двенадцати. Вы можете использовать его на любых трассах, даже если на них имеется влага, пыль или грязь.
Quicrun WP 10BL60 совместим со всеми видами моторов без сенсора и без коллектора. Список поддерживаемых моторов ищите в характеристиках. Приспособление изготовлено известным производителем из высококачественных элементов.
Для программирования с помощью соответствующей карточки имеется внешний порт. HobbyWing Quicrun поставляется в комплекте с инструкцией на русском языке.
Характеристики:
• Максимальный постоянный ток регулятора — 60А
• Максимальный кратковременный ток регулятора (в рывке) — 380А
• Питание: 4-9 банок NiMh, 2-3 банки LiPo
• BEC: Линейный 6v / 2A
• Внутреннее сопротивление регулятора: 0.001 Ом.
• Тип моторов — бессенсорные бесколлекторные моторы
• Поддерживаемые моторы:
With 4-6 cells NiMH/NiCd or 2 cells Lipo с мотором 3556 или меньше ≤ 6000Kv
With 6-9 cells NiMH/NiCd or 3 cells Lipo с мотором 3656 или меньше ≤ 4000Kv
• Подходит для моделей: авто 1/10
• Вентилятор питается напрямую от батареи в обход BEC. Поддерживаются 2S и 3S LiPo
• Размеры: 48.5мм * 38мм * 32мм
• Вес: 90г
Особенности:
• Регулятор защищен от влаги и пыли и подходит для использования на трассах с водой и грязью
• Подходит для любых бессенсорных бесколлекторных моторов
• Используются высококачественные компоненты для повышения токотдачи и долговечности регулятора
• Внешний порт для программирования регулятора
• 3 режима работы: Гоночный (только вперед), Вперед/назад и режим offroad.
• 4 шага регулировки мощности заднего хода.
• Пропорциональная система торможения с 4 шагами регулировки максимального тормозного усилия, 8 шагов регулировки усилия в нейтрали и 4 шага начального тормозного усилия
• 9 режимов старта от «Soft» до «Very aggressive» для настройки под разные покрытия и трассы.
• Несколько типов защиты: Отсечка для LiPo / Защита от перегрева / Failsafe по газу / Защита при блокировке мотора.
• Легко программируется с помощью карточки программирования.
В комплект входит:
• Регулятор Quicrun WP-10BL60
• Инструкция на русском языке
Влагозащищённый бессенсорный регулятор оборотов Hobbywing QuicRun WP-10BL60 (QuicRun-WP-10BL60) 60А с вентилятором системы охлаждения для бесколлекторных моторов на шоссейных автомоделях и багги масштаба 1/10-1/12.
Регулятор защищен от влаги и пыли и подходит для использования на трассах с водой и грязью.
Подходит для любых бессенсорных бесколлекторных моторов.
Используются высококачественные компоненты для повышения токотдачи и долговечности регулятора.
Внешний порт для программирования регулятора.
3 режима работы: Гоночный (только вперед), Вперед/назад и режим off-road.
4 шага регулировки мощности заднего хода.
Пропорциональная система торможения с 4 шагами регулировки максимального тормозного усилия, 8 шагов регулировки усилия в нейтрали и 4 шага начального тормозного усилия.
9 режимов старта от «Soft» до «Very aggressive» для настройки под разные покрытия и трассы.
Несколько типов защиты: Отсечка для LiPo / Защита от перегрева / Failsafe по газу / Защита при блокировке мотора.
Легко программируется с помощью карточки программирования (покупается отдельно).
Спецификация регулятора Hobbywing QuicRun WP-10BL60:
входное напряжение: LiPo 2-3S и NiMH 4-9 cells
максимальный рабочий ток: 60А
максимальный кратковременный ток: 380А
параметры BEC: 6V, 2A (линейное)
размеры: 48.5 x 38 x 32 мм
вес: 90 г
ограничение по моторам:
2S LiPo: ≤6000KV (3650 класс)
3S LiPo: ≤4000KV (3650 класс)
В комплекте:
регулятор оборотов Hobbywing QuicRun WP-10BL60 с вентилятором системы охлаждения
Авторизуйтесь, чтобы оставлять отзывы