
Руководство пользователя
AV-Ресивер
СОДЕРЖАНИЕ
ПЕРЕД ИСПОЛЬЗОВАНИЕМ ДАННОГО АППАРАТА
ФУНКЦИИ
НАЗВАНИЯ КОМПОНЕНТОВ И ИХ ФУНКЦИИ
ПОДГОТОВКА
ИСПОЛЬЗОВАНИЕ ЗВУКОВОГО ПОЛЯ
ВОСПРОИЗВЕДЕНИЕ
ПОЛЕЗНЫЕ ФУНКЦИИ
ПРОСЛУШИВАНИЕ В НЕСКОЛЬКИХ КОМНАТАХ (ЗОНАХ)
КОНФИГУРАЦИИ
ОБНОВЛЕНИЕ
УСТРАНЕНИЕ НЕИСПРАВНОСТЕЙ
ПРИЛОЖЕНИЕ
![]()
Руководство пользователя
AV-Ресивер
RU

СОДЕРЖАНИЕ |
|
|
СОДЕРЖАНИЕ |
|
|
ПЕРЕД ИСПОЛЬЗОВАНИЕМ ДАННОГО АППАРАТА |
8 |
|
Для ознакомления в первую очередь ……………………………………………… |
8 |
|
Как пользоваться данным руководством …………………………………………………………………………………………………………. |
8 |
|
Глоссарий ………………………………………………………………………………………………………………………………………………………… |
9 |
|
Проверка принадлежностей ……………………………………………………….. |
10 |
|
Проверка принадлежностей ……………………………………………………………………………………………………………………………. |
10 |
|
Использование пульта ДУ …………………………………………………………… |
11 |
|
Вставьте батарейки в пульт ДУ ………………………………………………………………………………………………………………………… |
11 |
|
Диапазон работы пульта ДУ …………………………………………………………………………………………………………………………….. |
12 |
|
ФУНКЦИИ |
13 |
|
Возможности аппарата ………………………………………………………………. |
13 |
|
Полезные приложения ………………………………………………………………. |
20 |
|
AV SETUP GUIDE ………………………………………………………………………………………………………………………………………………… |
20 |
|
MusicCast CONTROLLER …………………………………………………………………………………………………………………………………….. |
21 |
|
НАЗВАНИЯ КОМПОНЕНТОВ И ИХ ФУНКЦИИ |
22 |
|
Корпус аппарата ………………………………………………………………………. |
22 |
|
Названия и функции компонентов передней панели ………………………………………………………………………………………. |
22 |
|
Дисплей передней панели ……………………………………………………………………………………………………………………………….. |
24 |
|
Названия и функции компонентов задней панели ………………………………………………………………………………………….. |
29 |
|
Пульт ДУ ………………………………………………………………………………… |
31 |
|
Названия и функции компонентов пульта ДУ ………………………………………………………………………………………………….. |
31 |
|
ПОДГОТОВКА |
34 |
|
Перед началом …………………………………………………………………………. |
34 |
|
Названия и функции компонентов колонок …………………………………………………………………………………………………….. |
34 |
|
Процесс подготовки ………………………………………………………………………………………………………………………………………… |
35 |
|
Размещение колонок (систем колонок) …………………………………………. |
37 |
|
Акустические системы, рекомендуемые для аппарата (основная настройка) …………………………………………………. |
37 |
|
Другие акустические системы (основная настройка) ………………………………………………………………………………………. |
39 |
|
Подключение зонных колонок (расширенная настройка) ……………………………………………………………………………….. |
45 |
|
Подключение фронтальных колонок, поддерживающих соединение с двухканальным усилением |
|
|
(расширенная настройка) ………………………………………………………………………………………………………………………………… |
47 |
2

|
СОДЕРЖАНИЕ |
|
|
Подключение колонок ………………………………………………………………. |
48 |
|
Требования к колонкам …………………………………………………………………………………………………………………………………… |
48 |
|
Требования к кабелю ………………………………………………………………………………………………………………………………………. |
49 |
|
Подключение колонок …………………………………………………………………………………………………………………………………….. |
50 |
|
Подключение телевизора …………………………………………………………… |
53 |
|
HDMI-соединение с телевизором …………………………………………………………………………………………………………………….. |
53 |
|
Подключение воспроизводящих устройств ……………………………………. |
55 |
|
HDMI-соединение с видеоустройством, например, BD/DVD-проигрывателем ………………………………………………….. |
55 |
|
Соединение с воспроизводящим устройством, отличное от HDMI …………………………………………………………………… |
56 |
|
Подключение радиоантенн ………………………………………………………… |
57 |
|
Подключение FM-антенны ……………………………………………………………………………………………………………………………….. |
57 |
|
Подключение AM-антенны ……………………………………………………………………………………………………………………………….. |
58 |
|
Подключение DAB/FM-антенны ……………………………………………………………………………………………………………………….. |
60 |
|
Подготовка к сетевому подключению …………………………………………… |
61 |
|
Сетевое подключение аппарата ………………………………………………………………………………………………………………………. |
61 |
|
Подключение сетевого кабеля (проводное соединение) …………………………………………………………………………………. |
62 |
|
Подготовка беспроводных антенн (беспроводное соединение) ……………………………………………………………………… |
63 |
|
Включение питания аппарата ……………………………………………………… |
64 |
|
Подключение силового кабеля ………………………………………………………………………………………………………………………… |
64 |
|
Установка питания в положение включения/режима ожидания (Зона A) ………………………………………………………… |
65 |
|
Выбор языка меню ……………………………………………………………………. |
66 |
|
Выбор языка меню …………………………………………………………………………………………………………………………………………… |
66 |
|
Настройка MusicCast …………………………………………………………………. |
67 |
|
Что такое MusicCast ………………………………………………………………………………………………………………………………………….. |
67 |
|
Использование MusicCast CONTROLLER ……………………………………………………………………………………………………………. |
68 |
|
Добавление аппарата к сети MusicCast ……………………………………………………………………………………………………………. |
69 |
|
Использование функции MusicCast Surround ………………………………….. |
70 |
|
Конфигурирование беспроводных колонок ……………………………………………………………………………………………………. |
70 |
|
Настройка параметров колонок …………………………………………………… |
72 |
|
Процесс конфигурации колонок ……………………………………………………………………………………………………………………… |
72 |
|
Назначение конфигурации колонок ………………………………………………………………………………………………………………… |
75 |
|
Сообщения об ошибках от YPAO ………………………………………………………………………………………………………………………. |
76 |
|
Предупреждения от YPAO ………………………………………………………………………………………………………………………………… |
77 |
|
ИСПОЛЬЗОВАНИЕ ЗВУКОВОГО ПОЛЯ |
78 |
|
Использование эффектов звукового поля ……………………………………… |
78 |
|
Выбор предпочтительного режима звука ………………………………………………………………………………………………………… |
78 |
|
Наслаждение 3-мерными звуковыми полями …………………………………………………………………………………………………… |
79 |
|
Использование эффектов звукового поля,оптимизированных для определенного типа контента ………………… |
80 |
|
Использование эффектов звукового поля без колонок окружающего звучания (Virtual CINEMA DSP) …………….. |
82 |
|
Воспроизведение с эффектом окружающего звука с помощью 5 фронтальных колонок (Virtual CINEMA |
|
|
FRONT) ……………………………………………………………………………………………………………………………………………………………… |
83 |
|
Окружающее звучание и наушники (SILENT CINEMA) ……………………………………………………………………………………….. |
84 |
3

|
СОДЕРЖАНИЕ |
|
|
Использование необработанного воспроизведения …………………………. |
85 |
|
Наслаждение оригинальным звуком (прямое декодирование) ……………………………………………………………………….. |
85 |
|
Наслаждение многоканальным воспроизведением без эффектов звукового поля (декодер окружающего |
|
|
звучания) …………………………………………………………………………………………………………………………………………………………. |
86 |
|
Наслаждение воспроизведением с высоким качеством (Pure Direct) ……………………………………………………………….. |
87 |
|
Наслаждайтесь излюбленным звуком …………………………………………… |
88 |
|
Наслаждение более мощным звуком источника аудиосигнала (компрессионный музыкальный усилитель) ….. |
88 |
|
Расширение низкочастотного диапазона из сабвуфера …………………………………………………………………………………. |
89 |
|
Повышение четкости звуков диалогов …………………………………………………………………………………………………………….. |
90 |
|
Наслаждение басовым звуком с помощью небольших колонок (Extra Bass) …………………………………………………….. |
91 |
|
Наслаждение более качественным звуком ………………………………………………………………………………………………………. |
92 |
|
ВОСПРОИЗВЕДЕНИЕ |
93 |
|
Основная процедура воспроизведения ………………………………………….. |
93 |
|
Основная процедура для воспроизведения видео и музыки …………………………………………………………………………… |
93 |
|
Названия элементов и функции компонентов экрана воспроизведения ………………………………………………………… |
94 |
|
Названия элементов и функции компонентов экрана просмотра …………………………………………………………………… |
95 |
|
Воспроизведение аудиосигнала телевизора …………………………………… |
97 |
|
Воспроизведение аудиосигнала телевизора с помощью eARC/ARC …………………………………………………………………. |
97 |
|
Воспроизведение аудиосигнала телевизора с помощью цифрового оптического кабеля ……………………………… |
98 |
|
Прослушивание радио ………………………………………………………………. |
99 |
|
Подготовка к прослушиванию радио ………………………………………………………………………………………………………………. |
99 |
|
Прослушивание радио …………………………………………………………………………………………………………………………………… |
102 |
|
Отображение информации Radio Data System ……………………………………………………………………………………………….. |
103 |
|
Отображение данных DAB ……………………………………………………………………………………………………………………………… |
104 |
|
Сохранение радиостанции вручную ………………………………………………………………………………………………………………. |
105 |
|
Автоматическое сохранение FM-радиостанций (Auto Preset) …………………………………………………………………………. |
106 |
|
Удаление предустановленных станций ………………………………………………………………………………………………………….. |
107 |
|
Воспроизведение музыки с помощью соединения по Bluetooth® ………… |
108 |
|
Воспроизведение на аппарате музыки с устройства Bluetooth® …………………………………………………………………….. |
108 |
|
Воспроизведение музыки с помощью колонок/наушников Bluetooth® ………………………………………………………….. |
110 |
|
Воспроизведение музыки с помощью AirPlay ………………………………… |
112 |
|
Воспроизведение музыки с помощью AirPlay …………………………………………………………………………………………………. |
112 |
|
Воспроизведение музыки, сохраненной на флэш-накопителе USB …….. |
113 |
|
Воспроизведение контента флэш-накопителя USB ……………………………………………………………………………………….. |
113 |
|
Воспроизведение музыки, хранящейся на медиа-серверах (ПК/NAS) ….. 115 |
|
|
Воспроизведение с музыкальных медиасерверов (ПК/NAS) …………………………………………………………………………… |
115 |
|
Прослушивание интернет-радио ………………………………………………… |
116 |
|
Выбор интернет-радиостанции ……………………………………………………………………………………………………………………… |
116 |
|
Прослушивание услуг потоковой передачи музыки ………………………… |
117 |
|
Прослушивание музыкального потокового сервиса ……………………………………………………………………………………… |
117 |
4

|
СОДЕРЖАНИЕ |
|
|
ПОЛЕЗНЫЕ ФУНКЦИИ |
118 |
|
Функция таймера сна ………………………………………………………………. |
118 |
|
Установка времени таймера сна …………………………………………………………………………………………………………………….. |
118 |
|
Функция SCENE ………………………………………………………………………. |
119 |
|
Выбор источника входного сигнала и избранных настроек одним нажатием (SCENE) ………………………………….. |
119 |
|
Выбор сохраненной сцены …………………………………………………………………………………………………………………………….. |
120 |
|
Сохранение сцены ………………………………………………………………………………………………………………………………………….. |
121 |
|
Функция ярлыка …………………………………………………………………….. |
122 |
|
Сохранение избранного контента в качестве ярлыка ……………………………………………………………………………………. |
122 |
|
Вызов сохраненного контента в качестве ярлыка …………………………………………………………………………………………. |
123 |
|
ПРОСЛУШИВАНИЕ В НЕСКОЛЬКИХ КОМНАТАХ |
|
|
(ЗОНАХ) |
124 |
|
Подготовка зон ………………………………………………………………………. |
124 |
|
Воспроизведение в нескольких комнатах (функция зоны) …………………………………………………………………………….. |
124 |
|
Подключение колонок зоны …………………………………………………………………………………………………………………………… |
125 |
|
Управление зонами …………………………………………………………………. |
126 |
|
Включение/выключение питания зон ……………………………………………………………………………………………………………. |
126 |
|
Основная процедура в зоне …………………………………………………………………………………………………………………………… |
127 |
|
Корректировка разницы в громкости между зонами …………………………………………………………………………………….. |
128 |
|
Раздельная регулировка уровня громкости для зоны ……………………………………………………………………………………. |
129 |
|
КОНФИГУРАЦИИ |
130 |
|
Настройка аппарата ………………………………………………………………… |
130 |
|
Использование меню ……………………………………………………………………………………………………………………………………… |
130 |
|
Настройка параметров воспроизведения для различных источников |
|
|
воспроизведения (меню Опция) …………………………………………………. |
131 |
|
Основные операции меню Опция …………………………………………………………………………………………………………………… |
131 |
|
Элементы меню Опция …………………………………………………………………………………………………………………………………… |
133 |
|
Настройка DSP/окружающего звучания ………………………………………………………………………………………………………… |
134 |
|
Корректировка разницы в громкости во время воспроизведения ………………………………………………………………… |
139 |
|
Включение настройки Lipsync ……………………………………………………………………………………………………………………….. |
142 |
|
Проверка информации об аудиосигнале ……………………………………………………………………………………………………….. |
143 |
|
Проверка информации о видеосигнале …………………………………………………………………………………………………………. |
144 |
|
Объединение гнезда аудиовхода с входным гнездом HDMI ……………………………………………………………………………. |
145 |
|
Выбор источника видеосигнала, который будет отображаться с выбранным источником аудиосигнала …….. |
146 |
|
Настройка параметров воспроизведения в случайном порядке ……………………………………………………………………. |
147 |
|
Настройка параметров повторного воспроизведения ………………………………………………………………………………….. |
148 |
|
Настройка использования управления громкостью через AirPlay/Bluetooth …………………………………………………. |
149 |
|
Добавление радиостанции “NET RADIO” в папку “Favorites” ………………………………………………………………………….. |
150 |
|
Удаление радиостанции из папки “Favorites” ………………………………………………………………………………………………… |
151 |
5

|
СОДЕРЖАНИЕ |
|
|
Настройка различных функций (меню Настройка) …………………………. |
152 |
|
Основные операции меню Настройка ……………………………………………………………………………………………………………. |
152 |
|
Элементы меню Настройка ……………………………………………………………………………………………………………………………. |
154 |
|
Настройка параметров колонок …………………………………………………………………………………………………………………….. |
162 |
|
Конфигурация настроек HDMI ……………………………………………………………………………………………………………………….. |
174 |
|
Настройка параметров звука …………………………………………………………………………………………………………………………. |
182 |
|
Настройка параметров сцены ………………………………………………………………………………………………………………………… |
195 |
|
Конфигурация настроек функции ………………………………………………………………………………………………………………….. |
197 |
|
Конфигурация сетевых настроек …………………………………………………………………………………………………………………… |
214 |
|
Конфигурация настроек Bluetooth® ……………………………………………………………………………………………………………….. |
222 |
|
Конфигурация настроек языка ………………………………………………………………………………………………………………………. |
227 |
|
Выполнение настроек аппарата с помощью операций на передней панели |
|
|
на корпусе аппарата (Меню дисплея передней панели) ……………………. |
228 |
|
Основные операции меню дисплея передней панели ……………………………………………………………………………………. |
228 |
|
Пункты меню дисплея передней панели ………………………………………………………………………………………………………… |
229 |
|
Регулировка яркости дисплея передней панели ……………………………………………………………………………………………. |
230 |
|
Установка питания каждой зоны в положение включения/режим ожидания ………………………………………………… |
231 |
|
Настройка использования громкости на передней панели …………………………………………………………………………… |
232 |
|
Настройка использования селектора входного сигнала на передней панели ……………………………………………….. |
233 |
|
Настройка использования кнопки сцены на передней панели ……………………………………………………………………… |
234 |
|
Настройка использования звука работы ……………………………………………………………………………………………………….. |
235 |
|
Установка использования пульта ДУ ……………………………………………………………………………………………………………… |
236 |
|
Выбор идентификационного кода пульта ДУ …………………………………………………………………………………………………. |
237 |
|
Установка пунктов информации, которые будут пропущены при использовании SELECT/ENTER …………………. |
238 |
|
Восстановление настроек по умолчанию ………………………………………………………………………………………………………. |
239 |
|
Резервное копирование и восстановление всех настроек …………………………………………………………………………….. |
240 |
|
Обновление встроенного программного обеспечения ………………………………………………………………………………….. |
241 |
|
Настройка использования магазинного демо-режима ………………………………………………………………………………….. |
242 |
|
ОБНОВЛЕНИЕ |
243 |
|
Обновление встроенного программного обеспечения аппарата ………… |
243 |
|
Обновления встроенного программного обеспечения ………………………………………………………………………………….. |
243 |
|
Обновление встроенного программного обеспечения аппарата через сеть …………………………………………………. |
244 |
|
Обновление встроенного программного обеспечения аппарата с использованием флэш-накопителя USB … 246 |
6

|
СОДЕРЖАНИЕ |
|
|
УСТРАНЕНИЕ НЕИСПРАВНОСТЕЙ |
247 |
|
При возникновении каких-либо проблем ……………………………………… |
247 |
|
При возникновении проблемы сначала проверьте следующее: …………………………………………………………………….. |
247 |
|
Питание, система или пульт ДУ ……………………………………………………………………………………………………………………… |
248 |
|
Проблемы с аудиосигналом …………………………………………………………………………………………………………………………… |
258 |
|
Проблемы с видеосигналом …………………………………………………………………………………………………………………………… |
269 |
|
Проблемы с FM/AM-радио ………………………………………………………………………………………………………………………………. |
273 |
|
Проблемы с DAB-радио …………………………………………………………………………………………………………………………………… |
278 |
|
Проблемы с USB ……………………………………………………………………………………………………………………………………………… |
283 |
|
Проблемы с сетью ………………………………………………………………………………………………………………………………………….. |
287 |
|
Проблемы с Bluetooth® …………………………………………………………………………………………………………………………………… |
298 |
|
Сообщения об ошибках на дисплее передней панели ……………………… |
300 |
|
Сообщения об ошибках на дисплее передней панели ……………………………………………………………………………………. |
300 |
|
ПРИЛОЖЕНИЕ |
302 |
|
Уход и очистка ……………………………………………………………………….. |
302 |
|
Уход за передней панелью ……………………………………………………………………………………………………………………………… |
302 |
|
Беспроводное подключение к сети ……………………………………………… |
303 |
|
Выбор способа беспроводного сетевого подключения …………………………………………………………………………………. |
303 |
|
Настройка беспроводного соединения с помощью кнопки WPS ……………………………………………………………………. |
304 |
|
Настройка беспроводного подключения с использованием iPhone ………………………………………………………………. |
305 |
|
Настройка беспроводного соединения путем выбора из списка доступных точек доступа …………………………… |
306 |
|
Настройка беспроводного подключения вручную ………………………………………………………………………………………… |
307 |
|
Настройка беспроводного подключения с помощью PIN-кода WPS ………………………………………………………………. |
308 |
|
Поддерживаемые устройства и форматы файлов …………………………… |
309 |
|
Поддерживаемые устройства Bluetooth® ……………………………………………………………………………………………………….. |
309 |
|
Поддерживаемые устройства USB …………………………………………………………………………………………………………………. |
310 |
|
Поддерживаемые форматы файлов ………………………………………………………………………………………………………………. |
311 |
|
Товарные знаки ……………………………………………………………………… |
312 |
|
Товарные знаки ……………………………………………………………………………………………………………………………………………… |
312 |
|
Технические характеристики …………………………………………………….. |
314 |
|
Технические характеристики …………………………………………………………………………………………………………………………. |
314 |
|
Настройки по умолчанию ………………………………………………………….. |
320 |
|
Настройки по умолчанию меню Опция ………………………………………………………………………………………………………….. |
320 |
|
Настройки по умолчанию меню Настройка ……………………………………………………………………………………………………. |
321 |
|
Настройки по умолчанию меню дисплея передней панели …………………………………………………………………………… |
325 |
7

ПЕРЕД ИСПОЛЬЗОВАНИЕМ ДАННОГО АППАРАТА > Для ознакомления в первую очередь
ПЕРЕД ИСПОЛЬЗОВАНИЕМ ДАННОГО АППАРАТА
Для ознакомления в первую очередь
Как пользоваться данным руководством
Благодарим вас за покупку изделия Yamaha.
Этот аппарат представляет собой изделие для просмотра видео и прослушивания музыки дома.
В данном руководстве приведено описание подготовки и эксплуатации для повседневного использования аппарата.
Для безопасного и правильного использования аппарата обязательно прочтите данное руководство перед его использованием.
Во время чтения данного руководства имейте в виду следующее.
На иллюстрациях основного устройства в данном руководстве изображена модель для США, если не указано иное.
Вданном руководстве в основном приведено описание операций с помощью меню, отображаемого на экране телевизора.
Вданном руководстве приведено описание операций с использованием прилагаемого пульта ДУ.
Вданном руководстве все модели “iPod touch”, “iPhone” и “iPad” описаны как “iPhone”. “iPhone”
означает “iPod touch”, “iPhone” так и “iPad”, если не указано иное.
Символы и сигнальные слова в данном руководстве
 ВНИМАНИЕ:
Указывает на меры предосторожности для предотвращения незначительной травмы или травмы средней тяжести.
УВЕДОМЛЕНИЕ:
Указывает на меры предосторожности во время эксплуатации во избежание возможной неисправности/повреждения аппарата и потери данных аппарата.
ПРИМЕЧАНИЕ:
Указывает на инструкции и дополнительные пояснения по оптимальному использованию. [Поиск тега]:
Указывает на ключевое слово, используемое для поиска. Оно служит в качестве ссылки из “Краткое руководство по началу работы” в “Руководство пользователя”.
ПРИМЕЧАНИЕ
Сначала прочтите “Брошюра по безопасности” и “Краткое руководство по началу работы”.
8

ПЕРЕД ИСПОЛЬЗОВАНИЕМ ДАННОГО АППАРАТА > Для ознакомления в первую очередь
Глоссарий
Словарь терминов, используемых в данном руководстве, приведен на сайте ниже. Это пояснения терминов и технологий для данного изделия, а также для AV-изделий Yamaha в целом.
https://manual.yamaha.com/av/cm/glossary/
9

ПЕРЕД ИСПОЛЬЗОВАНИЕМ ДАННОГО АППАРАТА > Проверка принадлежностей
Проверка принадлежностей
Проверка принадлежностей
Убедитесь, что в комплект поставки изделия входят следующие принадлежности.
£ AM-антенна (кроме моделей для Великобритании, Европы, России и Австралии)
£ FM-антенна (кроме моделей для Великобритании, Европы, России и Австралии)
*В зависимости от региона покупки поставляется одна из указанных выше антенн.
£DAB/FM-антенна (модели для Великобритании, Европы, России и Австралии)
£ Микрофон YPAO
£Пульт ДУ
£Батарейки (AAA, R03, UM-4) (x2)
£Краткое руководство по началу работы
£Брошюра по безопасности
ПРИМЕЧАНИЕ
Для загрузки последней версии Краткое руководство по началу работы перейдите на веб-сайт Yamaha Downloads. http://download.yamaha.com/
10
![]()
ПЕРЕД ИСПОЛЬЗОВАНИЕМ ДАННОГО АППАРАТА > Использование пульта ДУ
Использование пульта ДУ
Вставьте батарейки в пульт ДУ
Вставьте батарейки надлежащим образом.
11
ПЕРЕД ИСПОЛЬЗОВАНИЕМ ДАННОГО АППАРАТА > Использование пульта ДУ
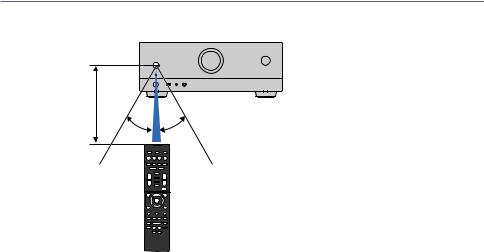
Диапазон работы пульта ДУ
Диапазон работы пульта ДУ показан на следующем рисунке. Направьте пульт ДУ на сенсор ДУ на аппарате.
В пределах 6 м
12

ФУНКЦИИ > Возможности аппарата
ФУНКЦИИ
Возможности аппарата
Поддержка различных акустических систем
Вы можете наслаждаться своими любимыми акустическими пространствами в различных стилях в соответствии с числом используемых колонок.
5.1-канальная система
3.1-канальная система
2.1-канальная система
Virtual CINEMA FRONT
Соединения зоны Соединения двухканального усиления
Ссылки по теме
( “Акустические системы, рекомендуемые для аппарата (основная настройка)” (c. 37) ( “Другие акустические системы (основная настройка)” (c. 39)
( “Подключение зонных колонок (расширенная настройка)” (c. 45)
( “Подключение фронтальных колонок, поддерживающих соединение с двухканальным усилением (расширенная настройка)” (c. 47)
13

ФУНКЦИИ > Возможности аппарата
Автоматическая оптимизация настроек колонок
Функция YPAO определяет подключения колонок и измеряет расстояния между ними и положениями прослушивания (положениями измерения), используя измерение с помощью микрофона YPAO, а затем автоматически оптимизирует настройки колонок, такие как баланс громкости и акустические параметры, в соответствии с характеристиками вашего помещения (YPAO: Yamaha Parametric room Acoustic Optimizer).
( “Процесс конфигурации колонок” (c. 72)
14

ФУНКЦИИ > Возможности аппарата
Использование эффектов звукового поля с большим эффектом присутствия
Аппарат оснащен различными звуковыми программами и декодерами окружающего звука, позволяющими прослушивать звук с воспроизводящих устройств в режиме предпочтительного звука (например, эффект звукового поля или стереовоспроизведение).
“Наслаждение 3-мерными звуковыми полями” (c. 79)
“Использование эффектов звукового поля,оптимизированных для определенного типа контента” (c. 80)
“Использование эффектов звукового поля без колонок окружающего звучания (Virtual CINEMA DSP)” (c. 82)
“Окружающее звучание и наушники (SILENT CINEMA)” (c. 84) “Наслаждение оригинальным звуком (прямое декодирование)” (c. 85)
“Наслаждение многоканальным воспроизведением без эффектов звукового поля (декодер окружающего звучания)” (c. 86)
“Наслаждение воспроизведением с высоким качеством (Pure Direct)” (c. 87) “Наслаждение басовым звуком с помощью небольших колонок (Extra Bass)” (c. 91)
“Наслаждение более мощным звуком источника аудиосигнала (компрессионный музыкальный усилитель)” (c. 88)
15

ФУНКЦИИ > Возможности аппарата
Широкий диапазон поддерживаемого контента по сети
При подключении данного аппарата к сети вы можете прослушивать на аппарате различный контент по сети.
( “Воспроизведение музыки с помощью AirPlay” (c. 112)
( “Воспроизведение с музыкальных медиасерверов (ПК/NAS)” (c. 115) ( “Выбор интернет-радиостанции” (c. 116)
( “Прослушивание музыкального потокового сервиса” (c. 117)
16

ФУНКЦИИ > Возможности аппарата
Воспроизведение контента на различных устройствах
Несколько гнезд HDMI и различные входные/выходные гнезда на аппарате позволяют подключать к нему видеоустройства (такие как BD/DVD-проигрыватели), аудиоустройства (такие как CDпроигрыватели), устройства Bluetooth (такие как смартфоны), игровые консоли, флэш-накопители USB и другие устройства. Вы можете воспроизводить их контент или настраиваться на радиостанцию.
“Прослушивание радио” (c. 102)
“Воспроизведение на аппарате музыки с устройства Bluetooth®” (c. 108) “Воспроизведение контента флэш-накопителя USB” (c. 113)
17

ФУНКЦИИ > Возможности аппарата
Полезные функции
Данный аппарат оснащен различными полезными функциями. Функция СЦЕНА позволяет одним нажатием выбрать источник входного сигнала и настройки, сохраненные для соответствующей сцены, например, звуковую программу и включение/выключение Compressed Music Enhancer. Вы можете вызвать сохраненный контент (например, музыку, хранящуюся на медиасерверах, и интернет-радиостанции), выбрав номер ярлыка. При подключении данного аппарата к телевизору, совместимому с функцией управления по HDMI, с помощью кабеля HDMI, можно осуществлять управление аппаратом (например, питанием и громкостью) с помощью операций с пультом ДУ телевизора.
“Выбор источника входного сигнала и избранных настроек одним нажатием (SCENE)” (c. 119) “Сохранение избранного контента в качестве ярлыка” (c. 122)
“Воспроизведение аудиосигнала телевизора с помощью eARC/ARC” (c. 97)
18

ФУНКЦИИ > Возможности аппарата
Поддержка беспроводных колонок
Аппарат оснащен функцией беспроводного подключения колонок. Вы можете наслаждаться аудиосигналом, воспроизводимым на аппарате с помощью колонок/наушников Bluetooth. Также, при использовании устройств с поддержкой функции MusicCast Surround, колонки окружающего звука и сабвуфер могут быть беспроводными.
“Воспроизведение музыки с помощью колонок/наушников Bluetooth®” (c. 110) “Конфигурирование беспроводных колонок” (c. 70)
19

ФУНКЦИИ > Полезные приложения
Полезные приложения
AV SETUP GUIDE
AV SETUP GUIDE представляет собой приложение, упрощающее подключение кабелей между AV-Ресивер и воспроизводящими устройствами, а также настройку AV-Ресивер. Данное приложение помогает выполнять различные настройки, например, подключение колонок, телевизора и воспроизводящих устройств, а также выбирать систему колонок.
Более подробную информацию можно найти по запросу “AV SETUP GUIDE” в App Store или Google Play.
20
![]()
ФУНКЦИИ > Полезные приложения
MusicCast CONTROLLER
MusicCast CONTROLLER представляет собой приложение, которое позволяет связывать MusicCast-совместимое устройство с другими MusicCast-совместимыми устройствами в других комнатах и одновременно выполнять на них воспроизведение. Данное приложение позволяет вам использовать смартфон или другое мобильное устройство вместо пульта дистанционного управления для простого выбора воспроизводимой музыки, а также настройки аппарата и MusicCast-совместимых устройств.
Более подробную информацию можно найти по запросу “MusicCast CONTROLLER” в App Store или
Google Play.
21
НАЗВАНИЯ КОМПОНЕНТОВ И ИХ ФУНКЦИИ > Корпус аппарата
НАЗВАНИЯ КОМПОНЕНТОВ И ИХ ФУНКЦИИ
Корпус аппарата
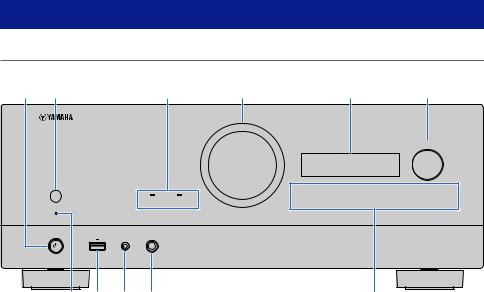
Названия и функции компонентов передней панели
Далее приведены названия и функции компонентов передней панели.
|
A |
B |
C |
D |
E |
F |
||||||
|
SELECT/ENTER |
|||||||||||
|
SCENE |
|||||||||||
|
ZONE |
PURE DIRECT |
1 |
2 |
3 |
4 |
RETURN |
MENU (CONNECT) |
||||
|
USB |
YPAO |
PHONES |
|||||||||
|
5V 1A |
G H I J K
az(питание)
Включение/выключение (режим ожидания) аппарата (c. 65).
bСенсор дистанционного управления
Принимает сигналы (инфракрасные) пульта ДУ (c. 12).
cИндикатор
Загорается при следующем условии.
ZONE
Загорается при включении зоны (c. 126).
PURE DIRECT
Загорается во время работы PURE DIRECT (c. 87).
dVOLUME
Регулировка громкости.
eДисплей передней панели
Отображение информации и меню (c. 24).
ПРИМЕЧАНИЕ
При низкой или высокой температуре иногда ухудшается видимость символов вследствие характеристик ЖКдисплея. Это не свидетельствует о неполадке.
fSELECT/ENTER
Выбор источника входного сигнала и управление дисплеем передней панели.
22
НАЗВАНИЯ КОМПОНЕНТОВ И ИХ ФУНКЦИИ > Корпус аппарата
g Индикатор режима ожидания
Загорается, когда аппарат находится в режиме ожидания, в любом из следующих случаев:
|
( |
HDMI Контроль включен (c. 174) |
|
( |
Режим В режим ожидания включен (c. 176) |
|
( |
Режим Сеть режим ожидания включен (c. 219) |
|
( |
Режим ожидания Bluetooth включен (c. 224) |
hГнездо USB
Для подключения флэш-устройства USB (c. 113).
iГнездо YPAO
Для подключения прилагаемого микрофона YPAO (c. 72).
jГнездо PHONES
Для подключения наушников.
kСенсорная панель
Для управления касанием. Прозвучит звук работы.
SCENE
Переключение одним касанием между несколькими настройками, установленными с использованием функции СЦЕНА. А также включение аппарата, когда он находится в режиме ожидания (c. 119).
RETURN
Управление меню “Дисплей передней панели”.
MENU (CONNECT)
Управление меню “Дисплей передней панели”.
Вход в сетевое приложение MusicCast и настройку беспроводной локальной сети при нажатии и удерживании в течение 5 секунд.
Ссылки по теме
“Уход за передней панелью” (c. 302)
23
НАЗВАНИЯ КОМПОНЕНТОВ И ИХ ФУНКЦИИ > Корпус аппарата
Дисплей передней панели
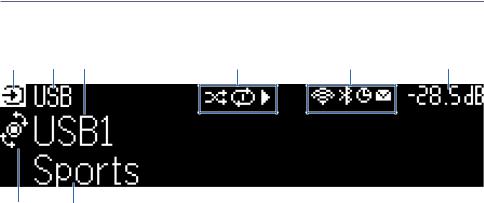
Названия и функции компонентов дисплея передней панели
Далее приведены названия и функции компонентов дисплея передней панели.
A B C D E F
G H
aЗначок режима работы
Указывает текущий режим дисплея передней панели (режим выбора входа или режим выбора информации).
bНазвание входа по умолчанию
Отображает название по умолчанию при переименовании названия источника входного сигнала.
cОсновная информация
Отображает такую информацию, как название текущего входа, пункт информации входа в соответствии с режимом дисплея передней панели.
dЗначок состояния воспроизведения Случайный порядок
Загорается при включении установки случайного порядка (c. 147).
Повтор
Загорается при включении установки повтора (c. 148).
Воспроизведение/пауза/остановка
Загорается во время воспроизведения аппаратом песни, паузы или остановки.
eЗначок состояния Беспроводная локальная сеть
Загорается во время подключения аппарата к беспроводной сети (c. 303).
Bluetooth
Загорается во время подключения аппарата к устройству Bluetooth (c. 108).
Таймер сна
Загорается при включенном таймере сна (c. 118).
Обновление встроенного программного обеспечения
Загорается, если в сети доступно обновление встроенного программного обеспечения (c. 243).
fГромкость
Используется для отображения текущей громкости.
24
НАЗВАНИЯ КОМПОНЕНТОВ И ИХ ФУНКЦИИ > Корпус аппарата
gИндикатор SELECT/ENTER
Указывает доступное состояние SELECT/ENTER (нажатие или поворот) для правой области дисплея.
hДополнительная информация
Отображает дополнительную информацию о текущем входе, такую как Прием, Программа DSP.
ПРИМЕЧАНИЕ
( В зависимости от воспроизводимого контента аппарат может не установить должным образом свое состояние воспроизведения. Подробнее о состоянии воспроизведения см. в приложении MusicCast CONTROLLER или в программном обеспечении для воспроизведения.
( Если аппарат представляет собой подчиненное устройство сети MusicCast, состояние воспроизведения отображается следующим образом в зависимости от главного устройства.
( Значок воспроизведения высвечивается на дисплее передней панели аппарата в случае выбора контента воспроизводимого аудиосигнала в качестве источника входного сигнала главного устройства и паузы главного устройства.
( Значок воспроизведения всегда высвечивается на дисплее передней панели аппарата в случае выбора “HDMI”, “AUDIO”, “TV” или “TUNER” в качестве источника входного сигнала главного устройства.
25
НАЗВАНИЯ КОМПОНЕНТОВ И ИХ ФУНКЦИИ > Корпус аппарата
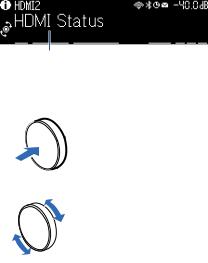
Выбор информации о входе, отображаемой на дисплее передней панели
На дисплее передней панели в режиме выбора информации отображается дополнительная информация, относящаяся к источнику входного сигнала на дисплее передней панели.
Элемент
На передней панели нажмите SELECT/ENTER для переключения дисплея передней панели в режим выбора информации. И поворачивайте SELECT/ENTER для выбора между различными элементами. Под элементом отображается дополнительная информация.
A
B
Отображаемые элементы меняются в зависимости от источника входного сигнала.
|
Текущий источник входного |
Отображаемый элемент |
|
сигнала |
HDMI
|
AUDIO |
Программа DSP, Аудиодекодер, Выходной канал, Состояние HDMI, Состояние зоны, |
|
|
Состояние системы |
||
|
TV |
||
|
Прием, Программа DSP, Аудиодекодер, Выходной канал, Состояние HDMI, |
||
|
Состояние зоны, Состояние системы |
||
|
TUNER (FM/AM) |
(Только модели для Великобритании, Европы и России) |
|
|
Данные Radio Data System также доступны, когда аппарат настроен на |
||
|
радиовещательную станцию Radio Data System. Подробнее об этом см. далее: |
||
|
( “Отображение информации Radio Data System” (c. 103) |
||
|
(Только модели для Великобритании, Европы, России и Австралии) |
||
|
TUNER (DAB) |
Для получения подробной информации см. следующее: |
|
|
( “Отображение данных DAB” (c. 104) |
||
|
SERVER |
Песня, Исполнитель, Альбом, IP-адрес, MAC-адрес Ethernet, MAC-адрес Wi-Fi, |
|
|
Программа DSP, Аудиодекодер, Выходной канал, Состояние HDMI, Состояние зоны, |
||
|
Состояние системы |
||
|
NET RADIO |
Станция, IP-адрес, MAC-адрес Ethernet, MAC-адрес Wi-Fi, Программа DSP, |
|
|
Аудиодекодер, Выходной канал, Состояние HDMI, Состояние зоны, Состояние |
||
|
системы, Песня, Альбом |
||
|
Deezer |
Дорожка, Исполнитель, Альбом, IP-адрес, MAC-адрес Ethernet, MAC-адрес Wi-Fi, |
|
|
Программа DSP, Аудиодекодер, Выходной канал, Состояние HDMI, Состояние зоны, |
||
|
Состояние системы |
26
НАЗВАНИЯ КОМПОНЕНТОВ И ИХ ФУНКЦИИ > Корпус аппарата
|
Текущий источник входного |
Отображаемый элемент |
|
сигнала |
музыкальные потоковые
|
сервисы (с информацией |
Песня, Исполнитель, Альбом, IP-адрес, MAC-адрес Ethernet, MAC-адрес Wi-Fi, |
|
|
о воспроизведении) |
Программа DSP, Аудиодекодер, Выходной канал, Состояние HDMI, Состояние зоны, |
|
|
AirPlay |
Состояние системы |
|
|
музыкальные потоковые |
||
|
сервисы (без |
||
|
информации о |
Программа DSP, Аудиодекодер, Выходной канал, Состояние HDMI, Состояние зоны, |
|
|
воспроизведении) |
||
|
Состояние системы, IP-адрес, MAC-адрес Ethernet, MAC-адрес Wi-Fi |
||
|
Alexa |
||
|
MusicCast Link |
||
|
Bluetooth |
Песня, Исполнитель, Альбом, Программа DSP, Аудиодекодер, Выходной канал, |
|
|
USB |
Состояние HDMI, Состояние зоны, Состояние системы |
|
|
ПРИМЕЧАНИЕ |
Вы можете установить “Пропуск информации” в меню “Дисплей передней панели” для пропуска пунктов информации на дисплее передней панели.
Если не использовать SELECT/ENTER в течение нескольких секунд, дисплей передней панели автоматически переключится в режим выбора входа.
Ссылки по теме
“Установка пунктов информации, которые будут пропущены при использовании SELECT/ENTER” (c. 238)
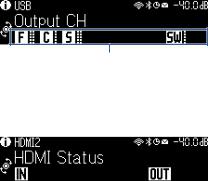
n Выходной канал
Отображается информация о разъемах колонок, которые в данный момент выводят звук. Отсутствие выводимого звука обозначается в виде подчеркивания.
Индикаторы
n Состояние HDMI
Отображается информация о входных гнездах HDMI (подключение) и выходном гнезде HDMI (подключение). Отсутствие подключения обозначается в виде подчеркивания.
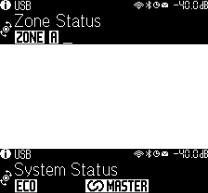
n Состояние зоны
Отображается информация о номере или букве зоны, которая включена в данный момент. Отключенная зона обозначается в виде подчеркивания.
27
НАЗВАНИЯ КОМПОНЕНТОВ И ИХ ФУНКЦИИ > Корпус аппарата
n Состояние системы
Отображается следующая информация о системе. Если она отключена, это обозначается в виде подчеркивания.
ECO: включен эко-режим.
MASTER: аппарат является главным устройством сети MusicCast.
28

|
НАЗВАНИЯ КОМПОНЕНТОВ И ИХ ФУНКЦИИ > Корпус аппарата |
||||||||||
Названия и функции компонентов задней панели |
||||||||||
|
Далее приведены названия и функции компонентов задней панели. |
||||||||||
|
A |
B |
C |
D |
E |
A |
F |
||||
|
HDMI OUT |
HDMI |
NETWORK |
||||||||
|
1 |
2 |
3 |
4 |
(4 NET RADIO) |
||||||
|
EARC/ARC |
(1 MOVIE) |
|||||||||
|
AUDIO 1 |
AUDIO 2 |
AUDIO 3 |
AUDIO 4 AUDIO 5 |
PRE OUT |
ANTENNA |
|||||
|
SUBWOOFER |
||||||||||
|
(3 MUSIC) |
1 |
AM |
( 2 RADIO ) |
FM |
||||||
|
OPTICAL |
COAXIAL |
75 |
||||||||
|
2 |
||||||||||
|
SPEAKERS |
||||||||||
|
C |
FR |
FL |
SR |
SL |
||||||
|
CENTER |
FRONT |
SURROUND |
||||||||
|
/ZONE B/BI-AMP |
||||||||||
|
G |
H |
I |
(Модель для США)
( Область вокруг выходных видео-/аудиогнезд обозначена белым цветом непосредственно на устройстве, чтобы избежать ошибок при подключении.
aБеспроводные антенны
Для беспроводного подключения (Wi-Fi) к сети (c. 61) и подключения Bluetooth (c. 108).
bГнездо HDMI OUT
Для подключения к HDMI-совместимому телевизору и вывода видео/аудиосигналов (c. 53). При использовании eARC/ARC также подаются аудиосигналы телевизора.
cГнезда HDMI 1-4
Для подключения к воспроизводящим устройствам, совместимым со стандартом HDMI, и для подачи видео-/ аудиосигналов (c. 55).
dГнездо NETWORK
Для проводного подключения к сети (c. 62).
eГнезда ANTENNA
Для подключения к радиоантеннам (c. 57).
fСиловой кабель
Для подключения к настенной розетке переменного тока (c. 64).
gГнезда AUDIO 1–5
Для подключения к воспроизводящим аудиоустройствам и ввода аудиосигналов (c. 56).
hРазъемы SPEAKERS
Для подключения к колонкам (c. 34).
29
НАЗВАНИЯ КОМПОНЕНТОВ И ИХ ФУНКЦИИ > Корпус аппарата
iГнезда PRE OUT
Для подключения к сабвуферу со встроенным усилителем (c. 52).
30
![]()
НАЗВАНИЯ КОМПОНЕНТОВ И ИХ ФУНКЦИИ > Пульт ДУ
Пульт ДУ
Названия и функции компонентов пульта ДУ
Далее приведены названия и функции компонентов прилагаемого пульта ДУ.
|
A |
|||||
|
B |
|||||
|
C |
|||||
|
D |
ZONEA |
ZONE B |
|||
|
SLEEP |
|||||
|
SCENE |
|||||
|
E |
1 |
2 |
3 |
4 |
|
|
STRAIGHT PURE DIRECT ENHANCER SUR.DECODE |
|||||
|
F |
PROGRAM |
||||
|
TUNER |
|||||
|
G |
USB |
||||
|
INPUT |
VOLUME |
||||
|
NET |
|||||
|
BLUETOOTH |
|||||
|
MUTE |
|||||
|
H |
SETUP |
OPTION |
|||
|
ENTER |
|||||
|
I |
|||||
|
RETURN |
DISPLAY |
||||
|
TOP MENU |
HOME |
POP-UP/MENU |
|||
|
J |
|||||
|
RED |
GREEN |
YELLOW |
BLUE |
MEMORY
K
TUNING MODE BAND TUNING
PRESET
L
31
НАЗВАНИЯ КОМПОНЕНТОВ И ИХ ФУНКЦИИ > Пульт ДУ
aПередатчик сигнала ДУ
Передает сигналы (инфракрасные) пульта ДУ.
bКнопка z(питание)
Включает/выключает зону, выбранную переключателем зоны (c. 126).
cКнопка SLEEP
Устанавливает время таймера сна (c. 118).
dПереключатель зоны
Изменение зоны с помощью пульта ДУ (c. 127).
eКнопки SCENE
Переключение одним касанием между несколькими настройками, установленными с использованием функции СЦЕНА. А также включение аппарата, когда он находится в режиме ожидания (c. 119).
fКнопки выбора режима звука
Выбор звуковой программы или декодера окружающего звука (c. 78).
gКнопки выбора входа
Выбор источника входного сигнала для воспроизведения.
ПРИМЕЧАНИЕ
Нажимайте NET до тех пор, пока не будет выбран нужный сетевой источник.
hКнопка SETUP
Отображает меню настроек, используемое на телевизоре (c. 152).
iКлавиши ENTER/курсора, RETURN
Управление меню на телевизоре.
ijklmnКнопки управления внешним устройством
Управление воспроизведением устройства, совместимого с функцией управления по HDMI.
ПРИМЕЧАНИЕ
Воспроизводящие устройства должны поддерживать функцию управления по HDMI. Использование некоторых устройств, совместимых с функцией управления по HDMI, невозможно.
kКнопки управления воспроизведением
Управление воспроизведением с флэш-накопителя USB, музыкального медиасервера (ПК/NAS) или радио.
lКнопки PRESET
Выбор предустановленной радиостанции (c. 102).
Вызов контента Bluetooth, USB или сетевого контента, который зарегистрирован с помощью ярлыка (c. 123).
mКнопки VOLUME
Регулировка громкости.
nКнопка MUTE
Приглушение выводимого звука.
oКнопка OPTION
Отображает меню опций, используемое на телевизоре (c. 131).
32
НАЗВАНИЯ КОМПОНЕНТОВ И ИХ ФУНКЦИИ > Пульт ДУ
pКнопка DISPLAY
Включение/выключение экрана просмотра, экрана воспроизведения и т.п. на телевизоре.
33
ПОДГОТОВКА > Перед началом
ПОДГОТОВКА
Перед началом
Названия и функции компонентов колонок
Далее приведены названия и функции компонентов колонок, подключенных к аппарату.
|
1 |
2 |
|
3 |
|
|
9 |
9 |
|
4 |
5 |
|
10–30° |
10–30° |
|
Тип колонок |
Сокр. |
Функция |
|
Фронтальный |
1/2 |
Воспроизведение звуков фронтальных каналов (стереозвуки). |
|
Центральный |
3 |
Воспроизведение звуков центрального канала (например, диалоги и |
|
вокал). |
||
|
Окружающий |
4/5 |
Воспроизведение звуков каналов окружающего звука. |
|
Сабвуфер |
9 |
Воспроизведение звуков канала LFE (low-frequency effect) и |
|
усиления басовой составляющей других каналов. |
ПРИМЕЧАНИЕ
Используйте данную схему в качестве справки по идеальному расположению колонок для аппарата. Однако ваша схема расположения колонок не обязательно должна точно соответствовать данному рисунку. Автоматическая настройка колонок (YPAO) может использоваться для автоматической оптимизации настроек колонок (например, расстояния) в соответствии с действительным расположением колонок.
Ссылки по теме
( “Процесс подготовки (с подключением колонок окружающего звука с помощью акустических кабелей)” (c. 35) ( “Процесс подготовки (при беспроводном подключении колонок окружающего звука)” (c. 36)
34

ПОДГОТОВКА > Перед началом
Процесс подготовки
Процесс подготовки (с подключением колонок окружающего звука с помощью акустических кабелей)
Основной процесс подготовки к использованию аппарата выглядит следующим образом.
1 Разместите колонки.
2 Подключите колонки.
3 Подключите телевизор.
4 Подключите воспроизводящие устройства.
5 Подключите радиоантенны.
6 Выполните подготовку к сетевому подключению.
7 Создайте сеть MusicCast.
8 Назначьте конфигурацию колонок.
9 Настройте параметры колонок.
Ссылки по теме
“Размещение колонок (систем колонок)” (c. 37)
35
ПОДГОТОВКА > Перед началом
Процесс подготовки (при беспроводном подключении колонок окружающего звука)
Основной процесс подготовки к использованию аппарата при беспроводном подключении колонок окружающего звука выглядит следующим образом.
1 Разместите колонки.
2 Подключите колонки.
3 Подключите телевизор.
4 Подключите воспроизводящие устройства.
5 Подключите радиоантенны.
6 Выполните подготовку к сетевому подключению.
7 Создайте сеть MusicCast.
8 Подключите беспроводные колонки.
9 Назначьте конфигурацию колонок.
10 Настройте параметры колонок.
Ссылки по теме
“Размещение колонок (систем колонок)” (c. 37)
36
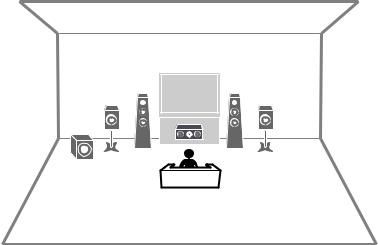
ПОДГОТОВКА > Размещение колонок (систем колонок)
Размещение колонок (систем колонок)
Акустические системы, рекомендуемые для аппарата (основная настройка)
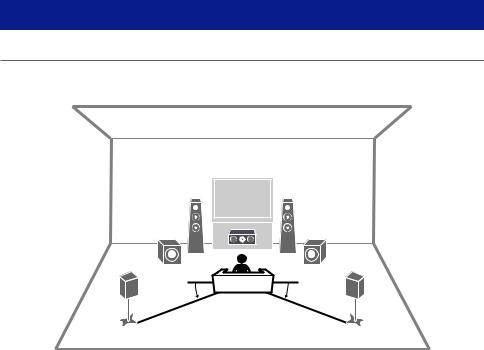
Данная акустическая система обеспечивает полное использование возможностей аппарата. Вы можете наслаждаться 5.1-канальным окружающим звуком.
[Поиск тега]#Q01 Акустические системы
n 5.1-канальная система
|
1 |
2 |
|
3 |
|
|
9 |
9 |
|
4 |
5 |
|
10–30° |
10–30° |
37
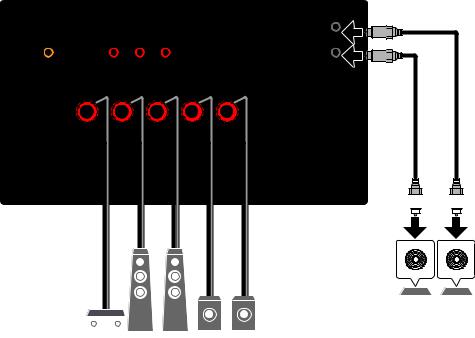
ПОДГОТОВКА > Размещение колонок (систем колонок)
PRE OUT
|
AUDIO 1 |
AUDIO 2 |
AUDIO 3 |
AUDIO 4 AUDIO 5 |
SUBW |
|
(3 MUSIC) |
1 |
|||
|
OPTICAL |
COAXIAL |
|||
|
2 |
SPEAKERS
|
C |
FR |
FL |
SR |
SL |
|
CENTER |
FRONT |
SURROUND |
||
|
/ZONE B/BI-AMP |
|
32154 |
9 9 |
ПРИМЕЧАНИЕ
Ваша схема расположения колонок не обязательно должна точно соответствовать данному рисунку. Автоматическое измерение (YPAO) может использоваться для автоматической оптимизации настроек колонок (например, расстояния) в соответствии с действительным расположением колонок.
К аппарату также можно подключить до 2 сабвуферов (со встроенным усилителем). Два сабвуфера, подключенные к данному аппарату, выводят одинаковый звук.
При использовании только одного сабвуфера его можно разместить с левой или правой стороны.
Ссылки по теме
“Требования к колонкам” (c. 48)
38

ПОДГОТОВКА > Размещение колонок (систем колонок)
Другие акустические системы (основная настройка)
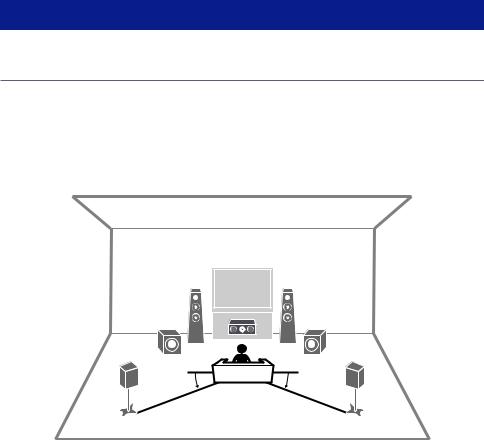
3.1-канальная система
Эта схема расположения колонок для наслаждения звуком с центральной колонкой. Она позволяет четко воспроизводить звук центрального канала, например, диалоги и вокал.
[Поиск тега]#Q01 Акустические системы
1 2
3
9
39

ПОДГОТОВКА > Размещение колонок (систем колонок)
|
AUDIO 1 |
AUDIO 2 |
AUDIO 3 |
AUDIO 4 AUDIO 5 |
PRE OUT |
|
SUBWOOFER |
||||
|
(3 MUSIC) |
1 |
|||
|
OPTICAL |
COAXIAL |
|||
|
2 |
SPEAKERS
|
C |
FR |
FL |
SR |
SL |
|
CENTER |
FRONT |
SURROUND |
||
|
/ZONE B/BI-AMP |
|
321 |
9 |
ПРИМЕЧАНИЕ
К аппарату также можно подключить до 2 сабвуферов (со встроенным усилителем). Два сабвуфера, подключенные к данному аппарату, выводят одинаковый звук.
При использовании только одного сабвуфера его можно разместить с левой или правой стороны.
Ссылки по теме
“Требования к колонкам” (c. 48)
40
![]()
ПОДГОТОВКА > Размещение колонок (систем колонок)
2.1-канальная система
Это схема расположения колонок, рекомендованная для наслаждения стереозвуком. [Поиск тега]#Q01 Акустические системы
1 2
9
41

ПОДГОТОВКА > Размещение колонок (систем колонок)
|
AUDIO 1 |
AUDIO 2 |
AUDIO 3 |
AUDIO 4 AUDIO 5 |
PRE OUT |
|
SUBWOOFER |
||||
|
(3 MUSIC) |
1 |
|||
|
OPTICAL |
COAXIAL |
|||
|
2 |
SPEAKERS
|
C |
FR |
FL |
SR |
SL |
|
CENTER |
FRONT |
SURROUND |
||
|
/ZONE B/BI-AMP |
|
21 |
9 |
ПРИМЕЧАНИЕ
К аппарату также можно подключить до 2 сабвуферов (со встроенным усилителем). Два сабвуфера, подключенные к данному аппарату, выводят одинаковый звук.
При использовании только одного сабвуфера его можно разместить с левой или правой стороны.
Ссылки по теме
“Требования к колонкам” (c. 48)
42
ПОДГОТОВКА > Размещение колонок (систем колонок)
Virtual CINEMA FRONT
Если расположение колонок с задней стороны комнаты невозможно, рекомендуется данное расположение колонок.
[Поиск тега]#Q01 Акустические системы
1 2
3
9
43

ПОДГОТОВКА > Размещение колонок (систем колонок)
|
AUDIO 1 |
AUDIO 2 |
AUDIO 3 |
AUDIO 4 AUDIO 5 |
PRE OUT |
|
SUBWOOFER |
||||
|
(3 MUSIC) |
1 |
|||
|
OPTICAL |
COAXIAL |
|||
|
2 |
SPEAKERS
|
C |
FR |
FL |
SR |
SL |
|
CENTER |
FRONT |
SURROUND |
||
|
/ZONE B/BI-AMP |
32154 9
ПРИМЕЧАНИЕ
Для использования Virtual CINEMA FRONT необходимо изменить настройки конфигурации колонок.
К аппарату также можно подключить до 2 сабвуферов (со встроенным усилителем). Два сабвуфера, подключенные к данному аппарату, выводят одинаковый звук.
При использовании только одного сабвуфера его можно разместить с левой или правой стороны.
Ссылки по теме
( “Настройка системы колонок” (c. 162)
( “Настройка использования Virtual CINEMA FRONT” (c. 168)
( “Требования к колонкам” (c. 48)
44

ПОДГОТОВКА > Размещение колонок (систем колонок)
Подключение зонных колонок (расширенная настройка)
Функция зоны позволяет воспроизводить источники входного сигнала в комнате, где установлен аппарат, и в другой комнате.
[Поиск тега]#Q01 Акустические системы
1 2
9
ZoneB
ZoneA
45

ПОДГОТОВКА > Размещение колонок (систем колонок)
|
AUDIO 1 |
AUDIO 2 |
AUDIO 3 |
AUDIO 4 AUDIO 5 |
PRE OUT |
|
SUBWOOFER |
||||
|
(3 MUSIC) |
1 |
|||
|
OPTICAL |
COAXIAL |
|||
|
2 |
SPEAKERS
|
C |
FR |
FL |
SR |
SL |
|
CENTER |
FRONT |
SURROUND |
||
|
/ZONE B/BI-AMP |
||||
32121 9
Zone B
ПРИМЕЧАНИЕ
Для использования зонной акустической системы необходимо изменить настройки конфигурации колонок.
К аппарату также можно подключить до 2 сабвуферов (со встроенным усилителем). Два сабвуфера, подключенные к данному аппарату, выводят одинаковый звук.
При использовании только одного сабвуфера его можно разместить с левой или правой стороны.
Ссылки по теме
( “Требования к колонкам” (c. 48)
( “Настройка системы колонок” (c. 162)
( “Воспроизведение в нескольких комнатах (функция зоны)” (c. 124)
46

ПОДГОТОВКА > Размещение колонок (систем колонок)
Подключение фронтальных колонок, поддерживающих соединение с двухканальным усилением (расширенная настройка)
Вы можете подключить фронтальные колонки, поддерживающие соединение с двухканальным усилением.
Для включения функции двухканального усиления выполните необходимые настройки колонки. [Поиск тега]#Q01 Акустические системы
Аппарат (вид сзади)
SPEAKERS
|
C |
FR |
FL |
SR |
SL |
|
CENTER |
FRONT |
SURROUND |
||
|
/ZONE B/BI-AMP |
УВЕДОМЛЕНИЕ
( Перед выполнением соединений двухканального усиления извлеките кронштейны или кабели, соединяющие низкоастотный и высокочастотный динамики. Если не используются соединения с двухканальным усилением, перед подключением акустических кабелей убедитесь, что перемычки или кабели подключены. Подробнее смотрите инструкцию по эксплуатации колонок.
ПРИМЕЧАНИЕ
Следующие колонки невозможно подключить одновременно.
Колонки окружающего звука Колонки Zone B
Колонки двухканального усиления
Ссылки по теме
( “Настройка системы колонок” (c. 162) ( “Требования к колонкам” (c. 48)
47

ПОДГОТОВКА > Подключение колонок
Подключение колонок
Требования к колонкам
Колонки и сабвуферы, подключаемые к аппарату, должны соответствовать следующим требованиям:
(Только модели для США и Канады)
Используйте колонки с импедансом 8 Ом. При использовании колонок на 6 Ом переключите настройку импеданса колонок аппарата позже в конфигурациях колонок.
(Кроме моделей для США и Канады)
Используйте колонки с импедансом не менее 6 Ом. Используйте сабвуфер со встроенным усилителем.
[Поиск тега]#Q01 Акустические системы
ПРИМЕЧАНИЕ
Подготовьте необходимое число колонок в соответствии с вашей системой колонок. Не забудьте подключить левую и правую фронтальные колонки.
Ссылки по теме
( “Настройка импеданса колонок” (c. 172) ( “Требования к кабелю” (c. 49)
48

ПОДГОТОВКА > Подключение колонок
Требования к кабелю
Используйте следующие типы продающихся отдельно кабелей для подключения колонок к аппарату: ( Акустические кабели (для подключения колонок)
( Штекерный аудиокабель (для подключения сабвуфера)
Ссылки по теме
“Подключение колонки” (c. 50)
49

ПОДГОТОВКА > Подключение колонок
Подключение колонок
Подключение колонки
Подключите акустический кабель между отрицательным (–) разъемом аппарата и отрицательным (–) разъемом колонки, а также между положительным (+) разъемом аппарата и положительным (+) разъемом колонки.
Перед подключением колонки отключите от настенной розетки переменного тока силовой кабель аппарата.
C 
RONT

 D A
D A
— (черный)
УВЕДОМЛЕНИЕ
( Подготовьте акустические кабели на удалении от аппарата, чтобы избежать короткого замыкания или повреждения аппарата в результате случайного попадания оголенных концов кабелей внутрь аппарата.
( Неправильное подключение акустических кабелей может привести к короткому замыканию, а также повреждению аппарата или колонок.
( Не допускайте, чтобы оголенные провода акустического кабеля соприкасались между собой.
( Не допускайте, чтобы оголенные провода акустического кабеля соприкасались с металлическими деталями аппарата (задней панелью и винтами).
1 Снимите приблизительно 10 мм изоляции на концах акустического кабеля и надежно скрутите оголенные части проводов.
Открутите разъем на колонке.
Вставьте оголенные провода кабеля в щель на боковой стороне разъема.
50
 Loading…
-
Page 1
User Guide AV Receiver… -
Page 2: Table Of Contents
CONTENTS CONTENTS BEFORE USING THE UNIT 9 Read me first……………….. 9 How to use this guide………………………….. 9 Glossary……………………………… 10 Checking the accessories……………. 11 Checking the accessories…………………………… 11 Using the remote control……………. 12 Insert the batteries in the remote control…………………….. 12 Operating range of the remote control……………………… 13 FEATURES 14 What you can do with the unit………….. 14…
-
Page 3
CONTENTS Connecting speakers……………. 48 Speaker requirements………………………….. 48 Cable requirements……………………………. 49 How to connect speakers………………………….. 50 Connecting a TV……………… 53 HDMI connection with a TV………………………… 53 Connecting playback devices………….. 55 HDMI connection with a video device such as a BD/DVD player……………….. 55 Connection other than HDMI with a playback device.. -
Page 4
CONTENTS ENJOYING SOUND 78 Enjoying sound field effects………….. 78 Selecting your favorite sound mode………………………. 78 Enjoying 3-dimentional sound fields………………………. 79 Enjoying sound field effects optimized for the type of content………………… 80 Enjoying sound field effects without surround speakers (Virtual CINEMA DSP)………….. 82 Enjoying surround sound with 5 speakers placed in front (Virtual CINEMA FRONT)………… 83 Enjoying surround sound with headphones (SILENT CINEMA).. -
Page 5
CONTENTS Playing back music with AirPlay………….. 110 Playback of music with AirPlay………………………… 110 Playing back music stored on a USB flash drive………. 111 Playback of USB flash drive content……………………….. 111 Playing back music stored on media servers (PCs/NAS)……. 113 Playback of music media servers (PCs/NAS).. -
Page 6
CONTENTS Configuring playback settings for different playback sources (Option menu).. 129 Basic operation of the Option menu……………………….. 129 Option menu items………………………….. 131 Configuring DSP/Surround………………………… 132 Correcting volume differences during playback…………………… 137 Enabling Lipsync adjustment………………………… 140 Checking the audio signal information…………………….. 141 Checking the video signal information.. -
Page 7
CONTENTS Configuring the unit’s settings by operation of the body front panel (Front Display menu)……………… 226 Basic operation of the Front Display menu…………………….. 226 Front Display menu items………………………… 227 Adjusting the brightness of the front display…………………… 228 Setting the power of each zone to on/standby.. -
Page 8
CONTENTS APPENDIX 299 Care and cleaning……………… 299 Care for the front panel………………………….. 299 Connecting to a network wirelessly………… 300 Selecting a wireless network connection method………………….. 300 Setting up a wireless connection using the WPS button………………… 301 Setting up a wireless connection using an iPhone………………….. 302 Setting up a wireless connection by selecting from the list of available access points.. -
Page 9: Before Using The Unit
Read me first How to use this guide Thank you very much for purchasing a Yamaha product. This unit is a product for enjoying video and music at home. This guide explains preparations and operations for everyday users of the unit.
-
Page 10: Glossary
BEFORE USING THE UNIT > Read me first Glossary For a glossary of terms used in this guide, refer to the site below. There are explanations of terms and technologies for this product and also for Yamaha AV products in general. https://manual.yamaha.com/av/cm/glossary/…
-
Page 11: Checking The Accessories
£ DAB/FM antenna (U.K., Europe, Russia and Australia models) £ YPAO microphone £ Remote control £ Batteries (AAA, R03, UM-4) (x2) £ Quick Start Guide £ Safety Brochure NOTE Access the Yamaha Downloads site to download the latest Quick Start Guide. http://download.yamaha.com/…
-
Page 12: Using The Remote Control
BEFORE USING THE UNIT > Using the remote control Using the remote control Insert the batteries in the remote control Insert the batteries the right way round.
-
Page 13: Operating Range Of The Remote Control
BEFORE USING THE UNIT > Using the remote control Operating range of the remote control The operating range of the remote control is shown in the following figure. Point the remote control at the remote control sensor on the unit. Within 6 m (20 ft) 30°…
-
Page 14: Features
FEATURES > What you can do with the unit FEATURES What you can do with the unit Supporting various speaker system According to the number of speakers that you are using, you can enjoy your favorite acoustic spaces in various styles. 5.1-channel system 3.1-channel system 2.1-channel system…
-
Page 15
YPAO function detects speaker connections, measures the distances from them to your listening positions (measuring positions) by using YPAO microphone measurement, and then automatically optimizes the speaker settings, such as volume balance and acoustic parameters, to suit your room (YPAO: Yamaha Parametric room Acoustic Optimizer). -
Page 16
FEATURES > What you can do with the unit Enjoying sound field effects with much presence The unit is equipped with a variety of sound programs and surround decoders that allow you to enjoy playback sources with your favorite sound mode (such as sound field effect or stereo playback). “Enjoying 3-dimentional sound fields” (p.79) “Enjoying sound field effects optimized for the type of content” (p.80) “Enjoying sound field effects without surround speakers (Virtual CINEMA DSP)” (p.82) -
Page 17
FEATURES > What you can do with the unit Wide variety of supported content via network When the unit is connected to a network, you can enjoy the various kinds of content via network on the unit. “Playback of music with AirPlay” (p.110) “Playback of music media servers (PCs/NAS)” (p.113) “Selecting an Internet radio station” (p.114) “Listening to a music streaming service” (p.115) -
Page 18
FEATURES > What you can do with the unit Playing back content of various devices A number of HDMI jacks and various input/output jacks on the unit allow you to connect video devices (such as BD/DVD players), audio devices (such as CD players), Bluetooth devices (such as smartphones), game consoles, USB flash drives, and other devices. -
Page 19
FEATURES > What you can do with the unit Useful functions The unit is equipped with the various useful functions. The SCENE function allows you to select the input source and settings registered to the corresponding scene, such as sound program and Compressed Music Enhancer on/off, with just one touch. -
Page 20
FEATURES > What you can do with the unit Supporting wireless speakers The unit is equipped with the function connected with speakers wirelessly. You can enjoy audio played back on the unit using Bluetooth speakers/headphones. Also, using devices that support the MusicCast Surround function, the surround speakers and subwoofer can be wireless. -
Page 21: Useful Applications
FEATURES > Useful applications Useful applications AV SETUP GUIDE AV SETUP GUIDE is an application that assists you with cable connections between AV Receiver and playback devices as well as AV Receiver setup. This app guides you through the various settings such as speaker connections, TV and playback device connections and selecting the speaker system.
-
Page 22: Musiccast Controller
FEATURES > Useful applications MusicCast CONTROLLER MusicCast CONTROLLER is an application that allows you to link a MusicCast compatible device to other MusicCast compatible devices in other rooms and play them back simultaneously. This app lets you use your smartphone or other mobile device instead of the remote control to easily select music to play back as well as configure the unit and MusicCast compatible devices.
-
Page 23: Part Names And Functions Unit Body
PART NAMES AND FUNCTIONS > Unit body PART NAMES AND FUNCTIONS Unit body Part names and functions of the front panel The part names and functions of the front panel are as follows. SELECT/ENTER SCENE ZONE PURE DIRECT RETURN MENU (CONNECT) YPAO PHONES…
-
Page 24
PART NAMES AND FUNCTIONS > Unit body SELECT/ENTER Selects the input source and operates the front display. Standby indicator Lights up when the unit is in standby mode under any of the following conditions. HDMI Control is enabled (p.172) Standby Through is enabled (p.174) Network Standby is enabled (p.217) Bluetooth Standby is enabled (p.222) USB jack… -
Page 25: Front Display
PART NAMES AND FUNCTIONS > Unit body Front display Part names and functions of the front display The part names and functions of the front display are as follows. Operation mode icon Indicates the current mode of the front display (the input select mode or the info select mode). Input default name Displays the default name when you have renamed the input source name.
-
Page 26
PART NAMES AND FUNCTIONS > Unit body Volume Indicates the current volume. SELECT/ENTER indicator Indicates the available SELECT/ENTER status (push or rotate) for the right display area. Additional information Displays the additional information of the current input such as Reception, DSP Program. -
Page 27
PART NAMES AND FUNCTIONS > Unit body Selecting the input information displayed on the front display The front display in the info select mode displays additional information related to the input source on the front display. Item Push SELECT/ENTER on the front panel to switch the front display to the info select mode. And rotate SELECT/ENTER to select between the various items. -
Page 28
PART NAMES AND FUNCTIONS > Unit body Currently input source Displayed item music streaming services (without playback DSP Program, Audio Decoder, Output Channel, HDMI Status, System Status, IP Address, information) Ethernet MAC Address, Wi-Fi MAC Address Alexa MusicCast Link Bluetooth Song, Artist, Album, DSP Program, Audio Decoder, Output Channel, HDMI Status, System Status NOTE… -
Page 29: Part Names And Functions Of The Rear Panel
PART NAMES AND FUNCTIONS > Unit body Part names and functions of the rear panel The part names and functions of the rear panel are as follows. HDMI NETWORK HDMI OUT (4 NET RADIO) (1 MOVIE) eARC/ARC PRE OUT AUDIO 1 AUDIO 2 AUDIO 3 AUDIO 4…
-
Page 30
PART NAMES AND FUNCTIONS > Unit body SPEAKERS terminals For connecting to speakers (p.34). PRE OUT jacks For connecting to a subwoofer with built-in amplifier (p.52). -
Page 31: Remote Control
PART NAMES AND FUNCTIONS > Remote control Remote control Part names and functions of the remote control The part names and functions of the supplied remote control are as follows. ZONE A ZONE A ZONE A ZONE B ZONE B ZONE B SLEEP SLEEP…
-
Page 32
PART NAMES AND FUNCTIONS > Remote control Remote control signal transmitter Transmits remote control signals (infrared). z (power) key Turns on/off the zone selected by zone switch (p.124). SLEEP key Sets the time of the sleep timer (p.116). Zone switch Changes the zone that is controlled by the remote control (p.125). -
Page 33
PART NAMES AND FUNCTIONS > Remote control OPTION key Displays the Option menu operated on the TV (p.129). DISPLAY key Turns on/off the browse screen, playback screen, etc. on the TV. -
Page 34: Preparations Before Starting
PREPARATIONS > Before starting PREPARATIONS Before starting Names and functions of speakers The names and functions of speakers connected to the unit are as follows. 10° to 30° 10° to 30° Speaker type Abbr. Function Front Produces front channel sounds (stereo sounds). Center Produces center channel sounds (such as movie dialogue and vocals).
-
Page 35: Flow Of Preparations
PREPARATIONS > Before starting Flow of preparations Flow of preparations (with surround speakers connected by speaker cables) Basic flow of preparations for using the unit is as follows. Place speakers. Connect speakers. Connect a TV. Connect playback devices. Connect the radio antennas. Prepare for connecting to a network.
-
Page 36
PREPARATIONS > Before starting Flow of preparations (with surround speakers wirelessly connected) Basic flow of preparations for using the unit with surround speakers wirelessly connected is as follows. Place speakers. Connect speakers. Connect a TV. Connect playback devices. Connect the radio antennas. Prepare for connecting to a network. -
Page 37: How To Place Speakers (Speaker Systems)
PREPARATIONS > How to place speakers (speaker systems) How to place speakers (speaker systems) Speaker systems recommended to the unit (basic setup) This speaker system brings out the full performance of the unit. You can enjoy 5.1-channel surround sound. [Search tag]#Q01 Speaker systems 5.1-channel system 10°…
-
Page 38
PREPARATIONS > How to place speakers (speaker systems) PRE OUT AUDIO 1 AUDIO 2 AUDIO 3 AUDIO 4 AUDIO 5 SUBWOOFER (3 MUSIC) OPTICAL COAXIAL SPEAKERS SURROUND CENTER FRONT /ZONE B/BI-AMP NOTE Your speaker layout does not need to match the diagram exactly. The automatic measurement (YPAO) can be used to automatically optimize the speaker settings (such as distances) to suit the actual speaker layout. -
Page 39: Other Speaker Systems (Basic Setup)
PREPARATIONS > How to place speakers (speaker systems) Other speaker systems (basic setup) 3.1-channel system This is a speaker layout recommended for enjoying stereo sound with a center speaker. Center channel sound such as movie dialogue and vocals can be clearly obtained. [Search tag]#Q01 Speaker systems…
-
Page 40
PREPARATIONS > How to place speakers (speaker systems) PRE OUT AUDIO 1 AUDIO 2 AUDIO 3 AUDIO 4 AUDIO 5 SUBWOOFER (3 MUSIC) OPTICAL COAXIAL SPEAKERS SURROUND CENTER FRONT /ZONE B/BI-AMP NOTE You can also connect up to 2 subwoofers (with built-in amplifier) to the unit. Two subwoofers connected to the unit output the same sounds. -
Page 41
PREPARATIONS > How to place speakers (speaker systems) 2.1-channel system This is a speaker layout recommended for enjoying stereo sound. [Search tag]#Q01 Speaker systems… -
Page 42
PREPARATIONS > How to place speakers (speaker systems) PRE OUT AUDIO 1 AUDIO 2 AUDIO 3 AUDIO 4 AUDIO 5 SUBWOOFER (3 MUSIC) OPTICAL COAXIAL SPEAKERS SURROUND CENTER FRONT /ZONE B/BI-AMP NOTE You can also connect up to 2 subwoofers (with built-in amplifier) to the unit. Two subwoofers connected to the unit output the same sounds. -
Page 43
PREPARATIONS > How to place speakers (speaker systems) Virtual CINEMA FRONT This speaker layout is recommended if you cannot place speakers in the back of the room. [Search tag]#Q01 Speaker systems… -
Page 44
PREPARATIONS > How to place speakers (speaker systems) PRE OUT AUDIO 1 AUDIO 2 AUDIO 3 AUDIO 4 AUDIO 5 SUBWOOFER (3 MUSIC) OPTICAL COAXIAL SPEAKERS SURROUND CENTER FRONT /ZONE B/BI-AMP NOTE To use Virtual CINEMA FRONT, the speaker configuration settings must be changed. You can also connect up to 2 subwoofers (with built-in amplifier) to the unit. -
Page 45: Connecting Zone Speakers (Advanced Setup)
PREPARATIONS > How to place speakers (speaker systems) Connecting zone speakers (advanced setup) The Zone function allows you to play back an input source in the room where the unit is installed and in another room. [Search tag]#Q01 Speaker systems Zone B Zone A…
-
Page 46
PREPARATIONS > How to place speakers (speaker systems) PRE OUT AUDIO 1 AUDIO 2 AUDIO 3 AUDIO 4 AUDIO 5 SUBWOOFER (3 MUSIC) OPTICAL COAXIAL SPEAKERS SURROUND CENTER FRONT /ZONE B/BI-AMP Zone B NOTE To use the Zone speaker system, the speaker configuration settings must be changed. You can also connect up to 2 subwoofers (with built-in amplifier) to the unit. -
Page 47: Connecting Front Speakers That Support Bi-Amp Connections (Advanced Setup)
PREPARATIONS > How to place speakers (speaker systems) Connecting front speakers that support bi-amp connections (advanced setup) You can connect the front speakers that support bi-amp connections. To enable the bi-amp function, configure the necessary speaker settings. [Search tag]#Q01 Speaker systems The unit (rear) SPEAKERS SURROUND…
-
Page 48: Connecting Speakers
PREPARATIONS > Connecting speakers Connecting speakers Speaker requirements Speakers and subwoofers to be connected to the unit must meet the following requirements: (U.S.A. and Canada models only) Use speakers with an impedance of 8-ohm. If you use 6-ohm speakers, switch the unit’s speaker impedance setting later in the speaker configurations.
-
Page 49: Cable Requirements
PREPARATIONS > Connecting speakers Cable requirements Use the following types of commercially-available cables to connect speakers to the unit: Speaker cables (for connecting the speakers) – – Audio pin cable (for connecting a subwoofer) Related links “Connecting the speaker” (p.50)
-
Page 50: How To Connect Speakers
PREPARATIONS > Connecting speakers How to connect speakers Connecting the speaker Connect a speaker cable between the negative (–) terminal of the unit and the negative (–) terminal of the speaker, and between the positive (+) terminal of the unit and the positive (+) unit of the speaker. Remove the unit’s power cable from an AC wall outlet before connecting the speaker.
-
Page 51
PREPARATIONS > Connecting speakers NOTE If “Check SP Wires” appears on the front display when the unit is turned on, turn off the unit, and then confirm that the speaker cables are not short circuited. (U.S.A., Canada, China, Taiwan, Brazil, Central and South America and General models only) When using a banana plug, tighten the speaker terminal and insert a banana plug into the end of the terminal. -
Page 52
PREPARATIONS > Connecting speakers Connecting the subwoofer Use an audio pin cable to connect the subwoofer. Unplug the power cables of the unit and subwoofer from the AC wall outlets before connecting the subwoofer. Audio pin cable Related links “HDMI connection with a TV” (p.53) -
Page 53: Connecting A Tv
PREPARATIONS > Connecting a TV Connecting a TV HDMI connection with a TV Connect a TV to the unit with an HDMI cable. When the TV audio is played back on the unit, use eARC/ARC function or use a digital optical cable to input TV audio to the unit. [Search tag]#Q02 Connect TV NOTE Use a 19-pin HDMI cable with the HDMI logo.
-
Page 54
PREPARATIONS > Connecting a TV The unit (rear) HDMI OUT jack HDMI input HDMI OUT HDMI (1 MOVIE) eARC/ARC HDMI AUDIO 1 AUDIO 2 AUDIO 3 AUDIO 4 AUDIO 5 (3 MUSIC) HDMI HDMI HDMI HDMI OPTICAL COAXIAL SPEAKERS CENTER FRONT AUDIO 1 OPTICAL… -
Page 55: Connecting Playback Devices
PREPARATIONS > Connecting playback devices Connecting playback devices HDMI connection with a video device such as a BD/DVD player Connect a video device to the unit with an HDMI cable. HDMI 1–4 jacks The unit (rear) (1 MOVIE) HDMI HDMI OUT (1 MOVIE) eARC/ARC HDMI OUT jack…
-
Page 56: Connection Other Than Hdmi With A Playback Device
PREPARATIONS > Connecting playback devices Connection other than HDMI with a playback device AUDIO connection with an audio device such as a CD player Connect audio devices such as CD players to the unit. Depending on the audio output jacks available on your audio device, choose one of the following connections.
-
Page 57: Connecting The Radio Antennas
PREPARATIONS > Connecting the radio antennas Connecting the radio antennas Connecting the FM antenna Model For U.S.A., Canada, Asia, Korea, China, Taiwan, Brazil, General, and Central and South America Connect the supplied FM antenna to the unit. Fix the end of the FM antenna to a wall. FM antenna The unit (rear) HDMI…
-
Page 58: Connecting The Am Antenna
PREPARATIONS > Connecting the radio antennas Connecting the AM antenna Model For U.S.A., Canada, Asia, Korea, China, Taiwan, Brazil, General, and Central and South America Connect the supplied AM antenna to the unit. Place the AM antenna on a flat surface. AM antenna HDMI NETWORK…
-
Page 59
PREPARATIONS > Connecting the radio antennas Related links “Network connection of the unit” (p.61) -
Page 60: Connecting The Dab/Fm Antenna
PREPARATIONS > Connecting the radio antennas Connecting the DAB/FM antenna Model For U.K., Europe, Russia and Australia Connect the supplied DAB/FM antenna to the unit. Fix the antenna ends to a wall. DAB/FM antenna The unit (rear) HDMI NETWORK (4 NET RADIO) PRE OUT ANTENNA SUBWOOFER…
-
Page 61: Preparing For Connecting To A Network
PREPARATIONS > Preparing for connecting to a network Preparing for connecting to a network Network connection of the unit The unit supports wired and wireless connections. Select a connection method according to your network environment. You can enjoy Internet radio or music files stored on media servers, such as PCs and Network Attached Storage (NAS), on the unit.
-
Page 62: Connecting A Network Cable (Wired Connection)
PREPARATIONS > Preparing for connecting to a network Connecting a network cable (wired connection) Connect the unit to your router with a commercially-available STP network cable (CAT-5 or higher straight cable). When using a router that supports DHCP, you do not need to configure any network settings for the unit. Network Attached Storage (NAS) Internet…
-
Page 63: Preparing Wireless Antennas (Wireless Connection)
PREPARATIONS > Preparing for connecting to a network Preparing wireless antennas (wireless connection) Stand the wireless antennas upright for connecting to the wireless network or a Bluetooth device wirelessly. NOTICE Do not apply excessive force on the wireless antenna. Doing so may damage the antenna. Related links “Adding the unit to the MusicCast network” (p.69) “Selecting a wireless network connection method” (p.300)
-
Page 64: Turning On The Power Of The Unit
PREPARATIONS > Turning on the power of the unit Turning on the power of the unit Plugging in the power cable After all the connections are complete, plug in the power cable. The unit (rear) NETWORK (4 NET RADIO) To an AC wall outlet PRE OUT ANTENNA SUBWOOFER…
-
Page 65: Setting The Power To On/Standby (Zone A)
PREPARATIONS > Turning on the power of the unit Setting the power to on/standby (Zone A) Switch the power of Zone A between on and standby. NOTE Zone A is the room where the unit is installed. Set the zone switch to “ZONE A”. Press z.
-
Page 66: Selecting The Menu Language
PREPARATIONS > Selecting the menu language Selecting the menu language Selecting the menu language To set the desired menu language, switch the input of the TV to display video from the unit and press SETUP. And then, select “Language” in the “SETUP” menu. Related links “Setting the menu language” (p.225) “Basic operation of the Setup menu” (p.150)
-
Page 67: Setting Musiccast
Setting MusicCast What is MusicCast MusicCast is a wireless musical solution from Yamaha, allowing you to share music among all of your rooms with a variety of devices. You can enjoy music from your smartphone, PC, NAS drive, Internet radio station and music streaming service anywhere in your house with one easy-to-use dedicated application “MusicCast…
-
Page 68: Using Musiccast Controller
PREPARATIONS > Setting MusicCast Using MusicCast CONTROLLER To use the network features on the MusicCast compatible device, you need the dedicated application “MusicCast CONTROLLER” for the operation. Search for the free application “MusicCast CONTROLLER” on the App Store or Google Play and install it to your device. Related links “Adding the unit to the MusicCast network” (p.69)
-
Page 69: Adding The Unit To The Musiccast Network
PREPARATIONS > Setting MusicCast Adding the unit to the MusicCast network Perform the following procedure to add the unit to the MusicCast network. You can also configure the unit’s wireless network settings at once. Launch the “MusicCast CONTROLLER” application on your mobile device and tap “Setup”.
-
Page 70: Using The Musiccast Surround Function
PREPARATIONS > Using the MusicCast Surround function Using the MusicCast Surround function Configuring wireless speakers Using devices that support the MusicCast Surround function, you can enjoy a 5.1-channel system with wireless surround speakers and subwoofer. NOTE Refer to the instruction manual of the devices that support the MusicCast Surround function for details on settings and operations. Devices supporting MusicCast Surround As of April 1, 2020 Wireless Streaming Speaker…
-
Page 71
The unit and the devices supporting MusicCast Surround must be registered with the same location on the MusicCast CONTROLLER app. Follow the app’s on-screen instructions to complete setup of the MusicCast Surround function. For detailed setup instructions, refer to the following. https://download.yamaha.com/files/tcm:39-1212383 Related links “Flow of the speaker configurations” (p.72) -
Page 72: Configuring The Speaker Settings
YPAO microphone, the unit detects speaker connections and measures the distances from them to your listening position(s) that is measuring position(s). And then, the unit automatically optimizes the speaker settings such as volume balance and acoustic parameters. (YPAO: Yamaha Parametric room Acoustic Optimizer) NOTE During the measuring process, test tones are output at high volume.
-
Page 73
PREPARATIONS > Configuring the speaker settings Connect the YPAO microphone to the YPAO jack. The unit (front) Ear height The following screen appears on the TV. Setting of “Power Amp Assign” in the “Setup” menu (U.S.A. and Canada models only) Setting of “Speaker Impedance” in the “Setup” menu… -
Page 74
PREPARATIONS > Configuring the speaker settings According to the guidance displayed on the screen, start the measurement. The following screen appears on the TV when the measurement finishes. After confirming the measurement results, press ENTER. The number of speakers (front side/rear side/subwoofer) Speaker distance (nearest/farthest) Adjustment range of speaker output level Warning message (if available) -
Page 75: Assigning Speaker Configuration
PREPARATIONS > Configuring the speaker settings Assigning speaker configuration If you use any of the following speaker configurations, configure the corresponding speaker settings manually. When using bi-amp connections or zone connections When using the surround speakers placed in front (Virtual CINEMA FRONT) Related links “Setting your speaker system” (p.160) “Setting the use of Virtual CINEMA FRONT” (p.166)
-
Page 76: Error Messages From Ypao
Connect the YPAO microphone to the YPAO jack firmly and retry YPAO. Connect the YPAO microphone to the YPAO jack firmly and retry YPAO. If this error E-8:No Signal occurs repeatedly, contact the nearest authorized Yamaha dealer or service center. E-9:User Cancel Retry or exit YPAO as necessary.
-
Page 77: Warning Messages From Ypao
PREPARATIONS > Configuring the speaker settings Warning messages from YPAO If a warning message is displayed, resolve the problem by following table and perform YPAO again. You can still apply the measurement results, however, we recommend you resolve the problem and perform YPAO again in order to use the unit with the optimal speaker settings.
-
Page 78: Enjoying Sound
ENJOYING SOUND > Enjoying sound field effects ENJOYING SOUND Enjoying sound field effects Selecting your favorite sound mode The unit is equipped with a variety of sound programs and surround decoders. You can enjoy playback sources with your favorite sound mode such as sound field effect or stereo playback. ZONE A ZONE A ZONE A…
-
Page 79: Enjoying 3-Dimentional Sound Fields
Enjoying 3-dimentional sound fields The unit is equipped with a variety of sound programs that utilize Yamaha’s original DSP technology (CINEMA DSP 3D). It allows you to easily create sound fields like actual movie theaters or concert halls in your room and enjoy natural 3-dimensional sound fields.
-
Page 80: Enjoying Sound Field Effects Optimized For The Type Of Content
ENJOYING SOUND > Enjoying sound field effects Enjoying sound field effects optimized for the type of content The unit is equipped with a variety of sound programs. You can enjoy playback sources with your favorite sound mode. You can select a sound program by pressing PROGRAM. We recommend a sound program in the “MOVIE”…
-
Page 81
ENJOYING SOUND > Enjoying sound field effects This program creates a sound field that emphasizes the surround feeling without disturbing the original acoustic positioning of multichannel audio. Its design is based on the concept of Standard the ideal movie theater, in which the audience is surrounded by beautiful reverberations from the left, right, and rear. -
Page 82: Enjoying Sound Field Effects Without Surround Speakers (Virtual Cinema Dsp)
ENJOYING SOUND > Enjoying sound field effects Enjoying sound field effects without surround speakers (Virtual CINEMA DSP) If you select one of the sound programs when no surround speakers are connected, the unit automatically creates the surround sound field using the front speakers. You can enjoy sound field effects without surround speakers.
-
Page 83: Enjoying Surround Sound With 5 Speakers Placed In Front (Virtual Cinema Front)
ENJOYING SOUND > Enjoying sound field effects Enjoying surround sound with 5 speakers placed in front (Virtual CINEMA FRONT) When the surround speakers are placed in front and “Virtual CINEMA FRONT” in the “Setup” menu is set to “On”, the unit creates the virtual surround speakers in the rear side. You can enjoy multichannel surround sound only with speakers placed in the front.
-
Page 84: Enjoying Surround Sound With Headphones (Silent Cinema)
ENJOYING SOUND > Enjoying sound field effects Enjoying surround sound with headphones (SILENT CINEMA) You can enjoy surround or sound field effects, like a multichannel speaker system, with stereo headphones by connecting the headphones to the PHONES jack and selecting a sound program or a surround decoder. Related links “Enjoying sound field effects optimized for the type of content” (p.80) “Enjoying multichannel playback without sound field effects (surround decoder)” (p.86)
-
Page 85: Enjoying Unprocessed Playback
ENJOYING SOUND > Enjoying unprocessed playback Enjoying unprocessed playback Enjoying original sound (straight decode) You can play back input sources without any sound field effects. The unit produces stereo sound from the front speakers for 2-channel sources such as CDs, and produces unprocessed multichannel sounds for multichannel sources.
-
Page 86: Enjoying Multichannel Playback Without Sound Field Effects (Surround Decoder)
ENJOYING SOUND > Enjoying unprocessed playback Enjoying multichannel playback without sound field effects (surround decoder) The unit enables multichannel playback from 2-channel/multichannel sources without sound field effects. Press SUR. DECODE to select a surround decoder. Each time you press SUR. DECODE, the surround decoder changes. NOTE You can also change the surround decoder in “Sur.Decode”…
-
Page 87: Enjoying Pure High Fidelity Sound (Pure Direct)
ENJOYING SOUND > Enjoying unprocessed playback Enjoying pure high fidelity sound (Pure Direct) The unit plays back the selected source with the least circuitry and no sound field effects. It allows you to enjoy Hi-Fi sound quality. Each time you press PURE DIRECT, the direct playback mode is enabled or disabled. When the Pure Direct is enabled, “PURE DIRECT”…
-
Page 88: Enjoying Favorite Sound
ENJOYING SOUND > Enjoying favorite sound Enjoying favorite sound Enjoying more powerful sound to the audio source (Compressed Music Enhancer) You can enjoy a dynamic sound by adding depth and breadth to the sound. This function can be used along with any other sound modes.
-
Page 89: Enhancing The Low-Frequency Range From The Subwoofer
ENJOYING SOUND > Enjoying favorite sound Enhancing the low-frequency range from the subwoofer You can enhance the low-frequency range from the subwoofer while avoiding interference with the front speakers in middle- and low-frequency range. Set “Subwoofer Trim” in the “Option” menu. Related links “Adjusting the subwoofer volume” (p.138)
-
Page 90: Making Easy To Hear The Dialogue Sounds
ENJOYING SOUND > Enjoying favorite sound Making easy to hear the dialogue sounds You can adjust the volume of dialogue sounds to become easy to hear. Set “Dialogue Level” in the “Setup” menu. Related links “Adjusting the volume of dialogue sound” (p.188)
-
Page 91: Enjoying Bass Sound With Small Speakers (Extra Bass)
ENJOYING SOUND > Enjoying favorite sound Enjoying bass sound with small speakers (Extra Bass) You can enjoy sufficient bass sound, regardless of the size of the front speakers and the presence or absence of a subwoofer. Set “Extra Bass” in the “Setup” menu. Related links “Setting the use of Extra Bass” (p.165)
-
Page 92: Enjoying Sound Better
ENJOYING SOUND > Enjoying favorite sound Enjoying sound better Enjoying music streaming services You can listen to better sound in music streaming services. Set Compressed Music Enhancer to “On”. For details, see the following: “Enjoying more powerful sound to the audio source (Compressed Music Enhancer)” (p.88) Enjoying sound at a low volume at night Sound at a low volume is hard to listen to.
-
Page 93: Playback
PLAYBACK > Basic playback procedure PLAYBACK Basic playback procedure Basic procedure for playing back video and music Basic procedure for playing back video and music is as follows. Turn on the external devices. Use the input selection keys to select an input source. ZONE A ZONE A ZONE A…
-
Page 94: Item Names And Functions Of The Playback Screen
PLAYBACK > Basic playback procedure Item names and functions of the playback screen When playback starts, the playback screen appears on the TV. Status indicators Display the current shuffle/repeat settings and playback status (such as play/pause). Playback information Displays the artist name, album name, song title, track number, station name, and elapsed time. NOTE Displayed items vary depending on the content of playback.
-
Page 95: Item Names And Functions Of The Browse Screen
PLAYBACK > Basic playback procedure Item names and functions of the browse screen When the following input source is selected, the browse screen appears on the TV. SERVER NET RADIO List name Contents list Displays the list of contents. Select an item and press ENTER to confirm the selection. Item number/total Status indicators Display the current shuffle/repeat settings and playback status (such as play/pause).
-
Page 96
PLAYBACK > Basic playback procedure NOTE Displayed items vary depending on the input source. The music content delivered from streaming services can be operated by using MusicCast CONTROLLER on your mobile device. -
Page 97: Playing Back Tv Audio
PLAYBACK > Playing back TV audio Playing back TV audio Playback of TV audio with eARC/ARC Connect your TV that supports eARC/ARC to the unit with an HDMI cable to play back the TV audio on the unit. When you select a TV program with the TV remote control, the input source of the unit will be automatically switched to “TV”…
-
Page 98: Playback Of Tv Audio With A Digital Optical Cable
PLAYBACK > Playing back TV audio Playback of TV audio with a digital optical cable In the following case, use a digital optical cable to input TV audio to the unit. Your TV does not support eARC/ARC. You do not want to use eARC/ARC. Set “ARC”…
-
Page 99: Listening To The Radio
PLAYBACK > Listening to the radio Listening to the radio Preparing to listen to the radio Setting the frequency steps Model For Asia, Taiwan, Brazil, General, and Central and South America Set the radio tuning frequency steps of the unit depending on your country or region. At the factory, the frequency step setting is set to 50 kHz for FM and 9 kHz for AM.
-
Page 100
PLAYBACK > Listening to the radio Preparing the DAB tuning Model For U.K., Europe, Russia and Australia Before listening to DAB (Digital Audio Broadcasting) radio, perform an initial scan to register the DAB radio stations automatically. Select “TUNER” as the input source. Press BAND to select the DAB band. -
Page 101
PLAYBACK > Listening to the radio Frequency Channel label 190.640 MHz 192.352 MHz 194.064 MHz 195.936 MHz 197.648 MHz 199.360 MHz 201.072 MHz 202.928 MHz 204.640 MHz 206.352 MHz 208.064 MHz 209.936 MHz 211.648 MHz 213.360 MHz 215.072 MHz 216.928 MHz 218.640 MHz 220.352 MHz 222.064 MHz… -
Page 102: Listening To The Radio
PLAYBACK > Listening to the radio Listening to the radio You can tune in to a radio station by using the unit’s built-in tuner. Select “TUNER” as the input source. “TUNER” is selected as the input source and the frequency currently selected is displayed on the front display.
-
Page 103: Displaying The Radio Data System Information
PLAYBACK > Listening to the radio Displaying the Radio Data System information Model For U.K., Europe and Russia Radio Data System is a data transmission system used by FM stations. The unit can receive various types of data, such as “Program Service”, “Program Type”, “Radio Text” and “Clock Time”, when it is tuned in to a Radio Data System broadcasting station.
-
Page 104: Displaying The Dab Information
PLAYBACK > Listening to the radio Displaying the DAB information Model For U.K., Europe, Russia and Australia The unit can receive various types of DAB information when it is tuned into a DAB radio station. Tune in to the desired DAB radio station. Push and rotate SELECT/ENTER on the front panel to select between the various display items.
-
Page 105: Registering A Radio Station Manually
PLAYBACK > Listening to the radio Registering a radio station manually Tune in to a radio station and register it to a preset number. Tune in to the desired radio station. Hold down MEMORY for 3 seconds. Press PRESET to select the preset number. Press MEMORY.
-
Page 106: Registering Fm Radio Stations Automatically (Auto Preset)
PLAYBACK > Listening to the radio Registering FM radio stations automatically (Auto Preset) You can register FM radio stations automatically. FM radio stations with strong signals are automatically registered to the preset numbers. Select the FM band. Hold down MEMORY for 3 seconds. Press PRESET to select the preset number from which to start the registration.
-
Page 107: Clearing Preset Stations
PLAYBACK > Listening to the radio Clearing preset stations Clears radio stations registered to the preset numbers. Select “TUNER” as the input source. Hold down MEMORY for 3 seconds. Press PRESET to select a preset station to be cleared. Press MODE. The preset station is cleared.
-
Page 108: Playing Back Music With The Bluetooth® Connection
PLAYBACK > Playing back music with the Bluetooth® connection Playing back music with the Bluetooth® connection Playback of Bluetooth® device music on the unit You can play back music files stored on a Bluetooth device (such as smartphones) on the unit. CAUTION When you use Bluetooth device controls to adjust volume, the volume may be unexpectedly loud, and it could result in difficulty in hearing or damage to devices.
-
Page 109: Playback Of Music Using Bluetooth® Speakers/Headphones
PLAYBACK > Playing back music with the Bluetooth® connection Playback of music using Bluetooth® speakers/headphones You can enjoy audio played back on the unit using Bluetooth speakers/headphones. Be sure to connect the Bluetooth speakers/headphones whose volume is adjustable. You cannot adjust the volume of the Bluetooth speakers/headphones from the unit.
-
Page 110: Playing Back Music With Airplay
PLAYBACK > Playing back music with AirPlay Playing back music with AirPlay Playback of music with AirPlay The AirPlay allows you to play back music on the unit. Click (Tap) the AirPlay icon on your iPhone or iTunes/ music and select the unit as the audio output device. CAUTION When you use AirPlay device controls to adjust volume, the volume may be unexpectedly loud, and it could result in difficulty in hearing or damage to devices.
-
Page 111: Playing Back Music Stored On A Usb Flash Drive
PLAYBACK > Playing back music stored on a USB flash drive Playing back music stored on a USB flash drive Playback of USB flash drive content You can play back music files stored on a USB flash drive on the unit. Connect the USB flash drive to the USB jack.
-
Page 112
PLAYBACK > Playing back music stored on a USB flash drive Related links “Item names and functions of the browse screen” (p.95) “Item names and functions of the playback screen” (p.94) “Configuring the shuffle setting” (p.145) “Configuring the repeat setting” (p.146) “Registering a favorite content as shortcut” (p.120) -
Page 113: Playing Back Music Stored On Media Servers (Pcs/Nas)
PLAYBACK > Playing back music stored on media servers (PCs/NAS) Playing back music stored on media servers (PCs/NAS) Playback of music media servers (PCs/NAS) You can play back music files stored on your media server on the unit. NOTE You need to configure the media sharing setting on each device or media server software in advance. For details, refer to the instruction manual for the device or software.
-
Page 114: Listening To Internet Radio
You may not be able to receive some Internet radio stations. The unit uses the airable.Radio service. airable is a service of airable GmbH. Service may change or be discontinued without notice. We ask for your understanding in advance that Yamaha Corporation would not bear any liability for it.
-
Page 115: Listening To Music Streaming Services
You need a pay application in some streaming services. For details, refer to the service provider’s website. Service may change or be discontinued without notice. We ask for your understanding in advance that Yamaha Corporation would not bear any liability for it.
-
Page 116: Useful Functions
USEFUL FUNCTIONS > Sleep timer function USEFUL FUNCTIONS Sleep timer function Setting the time of the sleep timer The unit switches to the standby mode after set time passes. Press SLEEP repeatedly to set the time of the sleep timer (120 min, 90 min, 60 min, 30 min, off). When the sleep timer is on, the sleep timer indicator lights up on the front display.
-
Page 117: Scene Function
USEFUL FUNCTIONS > SCENE function SCENE function Selecting the input source and favorite settings with one touch (SCENE) The SCENE function allows you to select the input source and settings registered to the corresponding scene with just one touch. The settings which can be registered are as follows. [Search tag]#Q04 SCENE Input source Sound program…
-
Page 118: Selecting A Registered Scene
USEFUL FUNCTIONS > SCENE function Selecting a registered scene Press a numbered key on the remote control, and the input source and settings registered to the corresponding scene are directly selected. The unit turns on automatically when it is in standby mode. [Search tag]#Q04 SCENE ZONE A ZONE A…
-
Page 119: Registering A Scene
USEFUL FUNCTIONS > SCENE function Registering a scene You can change the default setting assigned to each SCENE key. [Search tag]#Q04 SCENE Prepare the unit’s settings you want to assign to a scene. Hold down the desired SCENE key on the remote control until the following message appears.
-
Page 120: Shortcut Function
USEFUL FUNCTIONS > Shortcut function Shortcut function Registering a favorite content as shortcut You can register favorite content (such as music stored on media servers and Internet radio stations) as shortcuts. Play back a song or a radio station to be registered. Hold down MEMORY for 3 seconds.
-
Page 121: Recalling A Registered Content As Shortcut
USEFUL FUNCTIONS > Shortcut function Recalling a registered content as shortcut Recall a registered content (such as music stored on media servers and Internet radio stations) by selecting the shortcut number. Press BLUETOOTH, NET or USB. ZONE A ZONE A ZONE A ZONE B ZONE B…
-
Page 122: Enjoying In Multiple Rooms (Zones) Preparing Zones
ENJOYING IN MULTIPLE ROOMS (ZONES) > Preparing zones ENJOYING IN MULTIPLE ROOMS (ZONES) Preparing zones Playback in multiple rooms (zone function) You can play back an input source in the room where the unit is installed (Zone A) and in another room (Zone B).
-
Page 123: Connecting Zone Speakers
ENJOYING IN MULTIPLE ROOMS (ZONES) > Preparing zones Connecting zone speakers Connect zone speakers to the unit with speaker cables. And the speaker configuration settings must be changed to “ZoneB”. NOTICE Unplug the unit’s power cable from an AC wall outlet before connecting the speakers. Connect Zone B speakers to the SURROUND/ZONE B/BI-AMP terminals.
-
Page 124: Operating Zones
ENJOYING IN MULTIPLE ROOMS (ZONES) > Operating zones Operating zones Turning on/off the power of zones Switch the power of each zone between on and off. Set the zone switch on the remote control to the zone that you want to operate. Press z.
-
Page 125: Basic Procedure In Zone
ENJOYING IN MULTIPLE ROOMS (ZONES) > Operating zones Basic procedure in zone Basic procedure for playback in zone is as follows. The zone selected by the zone switch can be operated. Turn on the zone. Turn on the external devices connected to the unit. Use the input selection keys to select an input source.
-
Page 126: Correcting Volume Difference Between Zones
ENJOYING IN MULTIPLE ROOMS (ZONES) > Operating zones Correcting volume difference between zones If you are bothered by volume difference between Zone A/B, perform the following procedure to adjust the volume for Zone B. Press OPTION. Select “Volume Trim”. Select “ZoneB Trim” and adjust the setting. This completes the settings.
-
Page 127: Adjusting The Volume For Zone Separately
ENJOYING IN MULTIPLE ROOMS (ZONES) > Operating zones Adjusting the volume for zone separately Even though the volume for Zone B is automatically adjusted according to the volume for Zone A at the factory, you can separately adjust the volume for Zone B with the following procedure. Press SETUP.
-
Page 128: Configurations
CONFIGURATIONS > Configuring the unit CONFIGURATIONS Configuring the unit Using the menu The unit is equipped with following menus. “Option” menu: You can configure playback settings according to the input source currently being played back. Operate this menu displayed on the TV with the remote control. “Setup”…
-
Page 129: Configuring Playback Settings For Different Playback Sources (Option Menu)
CONFIGURATIONS > Configuring playback settings for different playback sources (Option menu) Configuring playback settings for different playback sources (Option menu) Basic operation of the Option menu Perform the following basic procedure to operate the “Option” menu. Operate this menu displayed on the TV with the remote control.
-
Page 130
CONFIGURATIONS > Configuring playback settings for different playback sources (Option menu) Related links “Default settings of the Option menu” (p.318) -
Page 131: Option Menu Items
CONFIGURATIONS > Configuring playback settings for different playback sources (Option menu) Option menu items Use the following table to configure playback settings of the unit. Item Page Program p.132 Sur.Decode p.133 DSP/Surround DSP Level p.134 Adaptive DRC p.135 Enhancer p.136 Input Trim p.137 Volume Trim…
-
Page 132: Configuring Dsp/Surround
CONFIGURATIONS > Configuring playback settings for different playback sources (Option menu) Configuring DSP/Surround Selecting sound programs Selects the sound program. You can also use PROGRAM on the remote control to select it. Option menu “DSP/Surround” > “Program” Related links “Enjoying sound field effects optimized for the type of content” (p.80) “Basic operation of the Option menu” (p.129)
-
Page 133
CONFIGURATIONS > Configuring playback settings for different playback sources (Option menu) Selecting the surround decoder used in the program Selects a surround decoder. It is used when “SURROUND DECODE” is selected by PROGRAM on the remote control. Option menu “DSP/Surround” > “Sur.Decode” Settings Uses the Dolby Pro Logic II decoder. -
Page 134
CONFIGURATIONS > Configuring playback settings for different playback sources (Option menu) Adjusting the sound field effect level Adjusts the effect level of the sound program (to enhance or reduce the sound field effect). Option menu “DSP/Surround” > “DSP Level” Setting range -6 dB to +3 dB Related links “Enjoying sound field effects optimized for the type of content” (p.80) -
Page 135
CONFIGURATIONS > Configuring playback settings for different playback sources (Option menu) Adjusting the dynamic range automatically Selects whether to adjust the dynamic range (from maximum to minimum) to the volume automatically. If this function is set to “On”, it is useful for listening to playback at a low volume at night. Option menu “DSP/Surround”… -
Page 136
CONFIGURATIONS > Configuring playback settings for different playback sources (Option menu) Setting Compressed Music Enhancer Selects whether to use Compressed Music Enhancer. You can also use ENHANCER on the remote control to enable/disable Compressed Music Enhancer. Option menu “DSP/Surround” > “Enhancer” Settings Disables Compressed Music Enhancer. -
Page 137: Correcting Volume Differences During Playback
CONFIGURATIONS > Configuring playback settings for different playback sources (Option menu) Correcting volume differences during playback Correcting volume differences between input sources Corrects volume differences between input sources. If you are bothered by volume differences when switching between input sources, use this function to correct it. Option menu “Volume Trim”…
-
Page 138
CONFIGURATIONS > Configuring playback settings for different playback sources (Option menu) Adjusting the subwoofer volume Fine-adjusts the subwoofer volume. Option menu “Volume Trim” > “Subwoofer Trim” Setting range -6.0 dB to +6.0 dB Related links “Basic operation of the Option menu” (p.129) -
Page 139
CONFIGURATIONS > Configuring playback settings for different playback sources (Option menu) Correcting volume difference between Zone A and Zone B Adjusts the volume for Zone B when you are bothered by volume difference between Zone A/B. Option menu “Volume Trim” > “ZoneB Trim” Setting range -10.0 dB to +10.0 dB NOTE… -
Page 140: Enabling Lipsync Adjustment
CONFIGURATIONS > Configuring playback settings for different playback sources (Option menu) Enabling Lipsync adjustment Selects whether to use the adjustment configured in “Lipsync” in the “Setup” menu. Option menu “Lipsync” > “Lipsync” Settings Disables the “Lipsync” adjustment. Enables the “Lipsync” adjustment. NOTE This setting is applied separately to each input source.
-
Page 141: Checking The Audio Signal Information
CONFIGURATIONS > Configuring playback settings for different playback sources (Option menu) Checking the audio signal information Displays information about the audio signal. Option menu “Audio Signal Information” Format Audio format of the input signal The number of source channels in the input signal (front/surround/LFE) Channel For example, “3/2/0.1”…
-
Page 142: Checking The Video Signal Information
CONFIGURATIONS > Configuring playback settings for different playback sources (Option menu) Checking the video signal information Displays information about the video signals. Option menu “Video Signal Information” Video In Type and resolution of the input video signal Video Out Type and resolution of the output video signal Color Format Color format of the video signal Related links…
-
Page 143: Combining An Audio Input Jack With A Hdmi Input Jack
CONFIGURATIONS > Configuring playback settings for different playback sources (Option menu) Combining an audio input jack with a HDMI input jack Selects the audio input jack to play back together with a HDMI input jack. You can play back HDMI video with audio via an audio input jack except HDMI input jack.
-
Page 144: Selecting A Video Source To Be Displayed With The Selected Audio Source
CONFIGURATIONS > Configuring playback settings for different playback sources (Option menu) Selecting a video source to be displayed with the selected audio source Selects a video source to be displayed with the selected audio source. You can watch the video from a different source while listening to the radio and so on.
-
Page 145: Configuring The Shuffle Setting
CONFIGURATIONS > Configuring playback settings for different playback sources (Option menu) Configuring the shuffle setting Configures the shuffle setting for playback. Option menu “Shuffle” > “Shuffle” Settings Turns off the shuffle function. Plays back songs in the current album (folder) in random order. NOTE This setting is available only when “USB”…
-
Page 146: Configuring The Repeat Setting
CONFIGURATIONS > Configuring playback settings for different playback sources (Option menu) Configuring the repeat setting Configures the repeat setting for playback. Option menu “Repeat” > “Repeat” Settings Turns off the repeat function. Plays back the current song repeatedly. Plays back all songs in the current album (folder) repeatedly. NOTE This setting is available only when “USB”…
-
Page 147: Setting The Use Of Volume Control Via Airplay/Bluetooth
CONFIGURATIONS > Configuring playback settings for different playback sources (Option menu) Setting the use of volume control via AirPlay/Bluetooth Selects whether to use volume control from AirPlay devices and Bluetooth devices. If other than “Off” is set, you can adjust the unit’s volume from the AirPlay devices and Bluetooth devices. Option menu “Volume Interlock”…
-
Page 148: Adding A «Net Radio» Radio Station To The «Favorites» Folder
CONFIGURATIONS > Configuring playback settings for different playback sources (Option menu) Adding a “NET RADIO” radio station to the “Favorites” folder When you select “NET RADIO” as the input source, you can register the currently playing radio station to the “Favorites”…
-
Page 149: Removing A Radio Station From The «Favorites» Folder
CONFIGURATIONS > Configuring playback settings for different playback sources (Option menu) Removing a radio station from the “Favorites” folder Removes a radio station from the “Favorites” folder. On the browse screen, select the station to be removed in advance. Option menu “Remove from favorites”…
-
Page 150: Configuring Various Functions (Setup Menu)
CONFIGURATIONS > Configuring various functions (Setup menu) Configuring various functions (Setup menu) Basic operation of the Setup menu Perform the following basic procedure to operate the “Setup” menu. Operate this menu displayed on the TV with the remote control. Press SETUP. ZONE A ZONE A ZONE A…
-
Page 151
CONFIGURATIONS > Configuring various functions (Setup menu) NOTE If new firmware is available, the message screen appears. If new firmware is available, the envelope icon (p) appears in the “Setup” menu. Related links “Updating the unit’s firmware via the network” (p.242) “Default settings of the Setup menu” (p.319) -
Page 152: Setup Menu Items
CONFIGURATIONS > Configuring various functions (Setup menu) Setup menu items Speaker Settings Item Page Power Amp Assign p.160 Subwoofer p.161 Front p.162 Center p.162 Configuration Surround p.162 Crossover p.163 Subwoofer Phase p.164 Extra Bass p.165 Virtual CINEMA FRONT p.166 Distance p.167 Level p.168…
-
Page 153
CONFIGURATIONS > Configuring various functions (Setup menu) HDMI Settings Item Page HDMI Control p.172 Audio Output p.173 Standby Through p.174 4K Upscaling p.175 HDCP Version p.176 Standby Sync p.177 p.178 HDMI Video Format p.179… -
Page 154
CONFIGURATIONS > Configuring various functions (Setup menu) Sound Settings Item Page Tone Control p.180 Panorama p.181 Center Width p.182 Surround Decoder Dimension p.183 Center Image p.184 All-Channel Stereo Monaural Mix p.185 Select p.186 Lipsync Adjustment p.187 Dialogue Dialogue Level p.188 Dynamic Range p.189 Max Volume… -
Page 155
CONFIGURATIONS > Configuring various functions (Setup menu) Scene Settings Item Page HDMI Control Sync p.193 Scene Rename p.194… -
Page 156
CONFIGURATIONS > Configuring various functions (Setup menu) Function Settings Item Page Input Rename p.195 Input Setting Input Skip p.197 TV Audio Input p.198 Dimmer p.199 Volume p.200 Display Settings Short Message p.201 User Interface Position p.202 Touch Sound p.203 Remote Color Key p.204 Memory Guard p.205… -
Page 157
CONFIGURATIONS > Configuring various functions (Setup menu) Network Settings Item Page Information p.212 Network Connection p.213 IP Address p.215 DMC Control p.216 Network Standby p.217 Network Name p.218 MusicCast Link Power Interlock p.219… -
Page 158
CONFIGURATIONS > Configuring various functions (Setup menu) Bluetooth Settings Item Page Bluetooth p.220 Disconnect p.221 Audio Receive Bluetooth Standby p.222 Transmitter p.223 Audio Send Device Search p.224… -
Page 159
CONFIGURATIONS > Configuring various functions (Setup menu) Language Setting Item Page Language p.225… -
Page 160: Configuring The Speaker Settings
CONFIGURATIONS > Configuring various functions (Setup menu) Configuring the speaker settings Setting your speaker system Selects the setting according to the speakers that are connected. Setup menu “Speaker” > “Configuration” > “Power Amp Assign” Settings Surround A normal speaker system. BI-AMP Front speakers that support bi-amp connections.
-
Page 161
CONFIGURATIONS > Configuring various functions (Setup menu) Setting the use of a subwoofer Selects the setting according to the use of your subwoofer. Setup menu “Speaker” > “Configuration” > “Subwoofer” Settings One or two subwoofers are connected. The subwoofer will produce LFE (low-frequency effect) channel audio and low-frequency components from other channels. -
Page 162
CONFIGURATIONS > Configuring various functions (Setup menu) Setting the use of each speaker and its size Selects the setting according to the use and size of your speakers. Setup menu “Speaker” > “Configuration” > (speaker) Settings Small speakers. As a general guideline, the woofer diameter is smaller than 16 cm (6.1/4”). Small The subwoofer will produce low-frequency components (configurable in “Crossover”). -
Page 163
CONFIGURATIONS > Configuring various functions (Setup menu) Setting the crossover frequency of the low-frequency components Sets the lower limit of the low-frequency components that can be output from a speaker whose size is set to “Small”. A frequency sound lower than the specified value will be produced from the subwoofer or front speakers. Setup menu “Speaker”… -
Page 164
CONFIGURATIONS > Configuring various functions (Setup menu) Setting the phase of the subwoofer Sets the phase of the subwoofer. When the bass sound is lacking, switch the subwoofer phase. Setup menu “Speaker” > “Configuration” > “Subwoofer Phase” Settings Normal Does not reverse the subwoofer phase. Reverse Reverses the subwoofer phase. -
Page 165
CONFIGURATIONS > Configuring various functions (Setup menu) Setting the use of Extra Bass Uses Extra Bass to enhance bass sound. If this function is set to “On”, you can enjoy sufficient bass sounds, regardless of the size of the front speakers and the presence or absence of the subwoofer. Setup menu “Speaker”… -
Page 166
CONFIGURATIONS > Configuring various functions (Setup menu) Setting the use of Virtual CINEMA FRONT Selects whether to use Virtual CINEMA FRONT. Setup menu “Speaker” > “Configuration” > “Virtual CINEMA FRONT” Settings Disables Virtual CINEMA FRONT. Enables Virtual CINEMA FRONT. NOTE This setting is not available when “Surround”… -
Page 167
CONFIGURATIONS > Configuring various functions (Setup menu) Setting the distance between each speaker and the listening position Sets the distance so that sounds from the speakers reach the listening position at the same time. Setup menu “Speaker” > “Distance” > (speaker) Setting range 0.30 m to 24.00 m (1.0 ft to 80.0 ft) NOTE… -
Page 168
CONFIGURATIONS > Configuring various functions (Setup menu) Adjusting the volume of each speaker Adjusts the volume of each speaker to suit your listening position. Setup menu “Speaker” > “Level” > (speaker) Setting range -10.0 dB to +10.0 dB NOTE Test tone output helps you to adjust the speaker balance while confirming its effect. Related links “Setting the use of each speaker and its size” (p.162) “Outputting test tones” (p.171) -
Page 169
CONFIGURATIONS > Configuring various functions (Setup menu) Setting the equalizer Selects the type of equalizer to adjust the tone. Setup menu “Speaker” > “Equalizer” > “EQ Select” Settings Applies the parametric equalizer values obtained by the YPAO measurement. Adjusts the equalizer manually. Does not use the equalizer. -
Page 170
CONFIGURATIONS > Configuring various functions (Setup menu) Changing the speaker impedance setting Model For U.S.A. and Canada Sets the unit’s speaker impedance settings depending on the impedance of the speakers connected. Setup menu “Speaker” > “Speaker Impedance” Settings 6 Ω MIN For 6-ohm or higher speakers. -
Page 171
CONFIGURATIONS > Configuring various functions (Setup menu) Outputting test tones Outputs the test tone when you adjust the speaker balance or equalizer while confirming its effect. Setup menu “Speaker” > “Test Tone” Settings Does not output test tones. Outputs test tones. Related links “Basic operation of the Setup menu” (p.150) -
Page 172: Configuring The Hdmi Settings
CONFIGURATIONS > Configuring various functions (Setup menu) Configuring the HDMI settings Setting the use of HDMI Control Selects whether to use HDMI Control which operate HDMI Control-compatible devices. Setup menu “HDMI” > “HDMI Control” Settings Disables HDMI Control. Enables HDMI Control. The settings in “Standby Sync”…
-
Page 173
CONFIGURATIONS > Configuring various functions (Setup menu) Setting the output of HDMI audio to the TV’s speakers Selects whether to output HDMI audio to the speakers of a TV connected via the HDMI OUT jack. Setup menu “HDMI” > “Audio Output” Settings Disables audio output from the TV. -
Page 174
CONFIGURATIONS > Configuring various functions (Setup menu) Setting the use of HDMI Standby Through Selects whether to output video/audio, which is input through HDMI jacks, to the TV when the unit is in standby mode. Setup menu “HDMI” > “Standby Through” Settings Does not output video/audio to the TV. -
Page 175
CONFIGURATIONS > Configuring various functions (Setup menu) Setting the use of 4K upscaling of the HDMI video signal Selects whether to use 4K upscaling of the HDMI video signal. If this function is set to “On”, 1080p content is displayed at 4K resolution. Setup menu “HDMI”… -
Page 176
CONFIGURATIONS > Configuring various functions (Setup menu) Setting the version of HDCP used on the HDMI input jacks Selects the HDCP version of the HDMI input jacks. You can set this function for watching 4K video content if necessary. This setting is applied separately to each HDMI input jack. Setup menu “HDMI”… -
Page 177
CONFIGURATIONS > Configuring various functions (Setup menu) Linking the standby modes of the unit and the TV Selects whether to use HDMI control to link the unit’s standby mode to the TV’s power when “HDMI Control” in the “Setup” menu is set to “On”. Setup menu “HDMI”… -
Page 178
CONFIGURATIONS > Configuring various functions (Setup menu) Setting the use of ARC Selects whether to output TV audio to the speakers connected to the unit when “HDMI Control” in the “Setup” menu is set to “On”. Setup menu “HDMI” > “ARC” Settings Disables ARC. -
Page 179
CONFIGURATIONS > Configuring various functions (Setup menu) Setting the HDMI 4K signal format Selects the format of signals input/output at the unit when HDMI 4K compatible TV and playback device are connected to the unit. This setting is applied separately to each HDMI input jack. Setup menu “HDMI”… -
Page 180: Configuring The Sound Settings
CONFIGURATIONS > Configuring various functions (Setup menu) Configuring the sound settings Adjusting the tone of the audio output Adjusts the level of high-frequency range (Treble) and low-frequency range (Bass) individually. Setup menu “Sound” > “Tone Control” Setting range -6.0 dB to +6.0 dB NOTE When both “Treble”…
-
Page 181
CONFIGURATIONS > Configuring various functions (Setup menu) Setting the use of Panorama Selects whether to use Panorama (the broadening effect of the front sound field) when “DPL Music” is selected for the surround decoder. You can wrap front left/right channel sounds around the sound field and generate a spacious sound field in combination with the surround sound field. -
Page 182
CONFIGURATIONS > Configuring various functions (Setup menu) Adjusting the broadening effect of the center sound field Adjusts the broadening effect of the center sound field when “DPL Music” is selected for the surround decoder. Higher value enhances the broadening effect and lower value reduces it (closer to center). Setup menu “Sound”… -
Page 183
CONFIGURATIONS > Configuring various functions (Setup menu) Adjusting Dimension Adjusts the difference in level between the front and surround sound fields when “DPL Music” is selected for the surround decoder. Higher value strengthens the front sound field and lower value strengthens the surround sound field. -
Page 184
CONFIGURATIONS > Configuring various functions (Setup menu) Adjusting the center localization (broadening effect) of the front sound field Adjusts the center localization (broadening effect) of the front sound field when “Neo:6 Music” is selected for the surround decoder. Higher value strengthens the center localization (less broadening effect) and lower value weakens it (more broadening effect). -
Page 185
CONFIGURATIONS > Configuring various functions (Setup menu) Setting the use of Monaural Mix Outputs mixed monaural sound. This setting is effective when “All-Channel Stereo” is selected in the sound programs. Setup menu “Sound” > “All-Channel Stereo” > “Monaural Mix” Settings Disables monaural sound output. -
Page 186
CONFIGURATIONS > Configuring various functions (Setup menu) Setting the adjustment method of the Lipsync function Selects the method for adjusting the delay between video and audio output (Lipsync). Setup menu “Sound” > “Lipsync” > “Select” Settings Adjusts the delay between video and audio output manually. Manual The setting in “Adjustment”… -
Page 187
CONFIGURATIONS > Configuring various functions (Setup menu) Adjusting the delay of the Lipsync function Adjusts the delay between video and audio output (Lipsync) manually. Setup menu “Sound” > “Lipsync” > “Adjustment” Setting range 0 ms to 500 ms NOTE You can fine-adjust the audio output timing when “Select” in the «Setup» menu is set to “Auto”. Related links “Setting the adjustment method of the Lipsync function” (p.186) “Basic operation of the Setup menu” (p.150) -
Page 188
CONFIGURATIONS > Configuring various functions (Setup menu) Adjusting the volume of dialogue sound Adjusts the volume of dialogue sounds that are hardly heard. Higher value strengthens the dialogue sounds. Setup menu “Sound” > “Dialogue” > “Dialogue Level” Setting range 0 to 3 Related links “Basic operation of the Setup menu” (p.150) -
Page 189
CONFIGURATIONS > Configuring various functions (Setup menu) Setting the dynamic range adjustment method Selects the dynamic range (from maximum to minimum) adjustment method for Dolby Digital and DTS signals playback. Setup menu “Sound” > “Volume” > “Dynamic Range” Settings Maximum Produces audio without adjusting the dynamic range. -
Page 190
CONFIGURATIONS > Configuring various functions (Setup menu) Setting the limit value of the volume Sets the limit value of the volume adjusted by using such as VOLUME keys on the remote control. Setup menu “Sound” > “Volume” > “Max Volume” Setting range -60.0 dB to +15.0 dB, +16.5 dB [20.5 to 95.5, 97.0] Related links… -
Page 191
CONFIGURATIONS > Configuring various functions (Setup menu) Setting the initial volume for when the unit is turned on Sets the initial volume when the unit is turned on. Setup menu “Sound” > “Volume” > “Initial Volume” Settings Sets the volume level when it last entered standby mode. Mute Mutes the audio output. -
Page 192
CONFIGURATIONS > Configuring various functions (Setup menu) Adjusting the volume for Zone B synchronized with the volume for Zone A Selects whether to adjust the volume for Zone B synchronized with the volume for Zone A. Setup menu “Sound” > “Volume” > “ZoneB Volume” Settings Sync. -
Page 193: Configuring The Scene Settings
CONFIGURATIONS > Configuring various functions (Setup menu) Configuring the scene settings Setting HDMI Control synchronization for a scene Selects whether to synchronize a scene with HDMI Control. Setup menu “Scene” > “HDMI Control Sync” Settings Disables HDMI Control synchronization for the selected scene. Enables HDMI Control synchronization for the selected scene.
-
Page 194
CONFIGURATIONS > Configuring various functions (Setup menu) Renaming the SCENE name Changes the SCENE name displayed on the front display or on the TV. Setup menu “Scene” > “Scene Rename” Select the SCENE name and press ENTER to enter the name edit screen. Edit the name. -
Page 195: Configuring The Function Settings
CONFIGURATIONS > Configuring various functions (Setup menu) Configuring the function settings Automatically setting the input source names Automatically sets the input source names depending on the connected external device. Setup menu “Function” > “Input Setting” > “Input Rename” > (input) Select an input source to be renamed.
-
Page 196
CONFIGURATIONS > Configuring various functions (Setup menu) Manually setting the input source names Manually sets the input source names. Setup menu “Function” > “Input Setting” > “Input Rename” > (input) Select an input source to be renamed. Select “Manual”. Press ENTER. Edit the name. -
Page 197
CONFIGURATIONS > Configuring various functions (Setup menu) Setting input sources to be skipped when operating the INPUT key Sets which input sources are skipped when operating the INPUT key. You can select the desired input source quickly by using this function. Setup menu “Function”… -
Page 198
CONFIGURATIONS > Configuring various functions (Setup menu) Setting the audio input jack used for TV audio Selects an audio input jack, which connected to TV audio output, of the unit. When you switch the input source of the unit to “TV”, the playback of TV audio is as follows. Without eARC/ARC function: the TV audio is played back with the audio input jack set for TV audio in “TV Audio Input”. -
Page 199
CONFIGURATIONS > Configuring various functions (Setup menu) Adjusting the brightness of the front display Adjusts the brightness of the following on the front panel. Higher value brightens the front display. Front display Indicators (ZONE, PURE DIRECT) Setup menu “Function” > “User Interface” > “Display Settings” > “Dimmer” Front Display menu “Dimmer”… -
Page 200
CONFIGURATIONS > Configuring various functions (Setup menu) Setting the scale of the volume display Switches the scale of the volume display. Setup menu “Function” > “User Interface” > “Display Settings” > “Volume” Settings The “dB” unit 0-97 The numeric value (0-97) Related links “Basic operation of the Setup menu” (p.150) -
Page 201
CONFIGURATIONS > Configuring various functions (Setup menu) Setting the use of short messages on the TV Selects whether to display short messages on the TV when the unit is operated. Setup menu “Function” > “User Interface” > “Display Settings” > “Short Message” Settings Does not display short messages. -
Page 202
CONFIGURATIONS > Configuring various functions (Setup menu) Setting the position of short messages Sets the position of short messages on the TV screen. Setup menu “Function” > “User Interface” > “Display Settings” > “Position” Settings Bottom Displays short messages at the bottom of the TV screen. Displays short messages at the top of the TV screen. -
Page 203
CONFIGURATIONS > Configuring various functions (Setup menu) Setting the operation sound Selects whether to ring a sound when operating the touch key on the front panel. Setup menu “Function” > “User Interface” > “Touch Sound” Settings Does not output the operation sound. Outputs the operation sound. -
Page 204
CONFIGURATIONS > Configuring various functions (Setup menu) Setting the functions for the color keys on the remote control Sets the functions for the RED/GREEN/YELLOW/BLUE keys on the remote control. Setup menu “Function” > “User Interface” > “Remote Color Key” Settings Assigns the functions of devices connected to the unit with an HDMI cable. -
Page 205
CONFIGURATIONS > Configuring various functions (Setup menu) Preventing accidental changes to the settings Protects the settings to prevent accidental changes. Setup menu “Function” > “User Interface” > “Memory Guard” Settings Does not protect the settings. Protects the settings. Change in the setting is prohibited until “Off” is selected. The lock icon (o) is displayed on the menu screen. -
Page 206
CONFIGURATIONS > Configuring various functions (Setup menu) Setting the amount of time for the auto-standby function Sets the amount of time for setting the unit to standby mode automatically. Setup menu “Function” > “ECO” > “Auto Power Standby” Settings Does not set the unit to standby mode. Sets the unit to standby mode when you have not operated the unit and the unit has not 5 minutes, 20 minutes detected any input signal for the specified time. -
Page 207
CONFIGURATIONS > Configuring various functions (Setup menu) Setting the use of the eco mode Reduces the unit’s power consumption by setting the eco mode. If this function is set to “On”, be sure to restart the unit. New setting becomes effective after a restart. Setup menu “Function”… -
Page 208
CONFIGURATIONS > Configuring various functions (Setup menu) Changing the FM/AM tuning frequency setting Model For Asia, Taiwan, Brazil, General, and Central and South America Sets the FM/AM tuning frequency setting of the unit depending on your country or region. Setup menu “Function”… -
Page 209
CONFIGURATIONS > Configuring various functions (Setup menu) Restoring the default settings Restores the default settings for the unit (initialization). Setup menu “Function” > “Initialization” Choices Restores the default settings for the unit. Network Restores the default settings for network configurations. Select “All”… -
Page 210
CONFIGURATIONS > Configuring various functions (Setup menu) Backuping and restoring all the settings Informs the unit’s setting to a USB flash drive and restores it to the unit. Prepare a USB flash drive using FAT16 or FAT32 format in advance. Setup menu “Function”… -
Page 211
CONFIGURATIONS > Configuring various functions (Setup menu) Updating the firmware Updates the firmware. You can also check the firmware version and system ID. Setup menu “Function” > “Firmware Update” Choices Network Update Updates the firmware via the network. USB Update Updates the firmware using a USB flash drive. -
Page 212: Configuring The Network Settings
CONFIGURATIONS > Configuring various functions (Setup menu) Configuring the network settings Checking the network information of the unit Displays the network information of the unit. Setup menu “Network” > “Information” Status The connection status of the NETWORK jack Connection Connection method SSID The access point to which the unit is connected MusicCast Network…
-
Page 213
CONFIGURATIONS > Configuring various functions (Setup menu) Setting the network connection method (Wired/Wireless) Selects the network connection method. Setup menu “Network” > “Network Connection” Choices Wired Connects the unit to a network with a network cable. Wireless(Wi-Fi) Connects the unit to a network via the wireless router (Wi-Fi). Related links “Network connection of the unit” (p.61) “Selecting a wireless network connection method” (p.300) -
Page 214
CONFIGURATIONS > Configuring various functions (Setup menu) Setting the network parameters automatically (DHCP) Sets the network parameters (such as IP address, Subnet Mask, and Default Gateway) automatically using a DHCP server. Setup menu “Network” > “IP Address” > “DHCP” Settings Does not use a DHCP server. -
Page 215
CONFIGURATIONS > Configuring various functions (Setup menu) Setting the network parameters manually Sets the network parameters (such as IP address, Subnet Mask, and Default Gateway) manually. Setup menu “Network” > “IP Address” Set “DHCP” to “Off”. Select a parameter type. Set the network parameter. -
Page 216
CONFIGURATIONS > Configuring various functions (Setup menu) Setting the use of a Digital Media Controller Selects whether to allow a Digital Media Controller (DMC) to control playback. If this function is enabled, you can control playback of the unit from DMCs on the same network. Setup menu “Network”… -
Page 217
CONFIGURATIONS > Configuring various functions (Setup menu) Setting the use of the Network Standby function Selects whether the unit can be turned on from other network devices. Setup menu “Network” > “Network Standby” Settings Disables the network standby function. Enables the network standby function. The unit consumes more power than when “Off”… -
Page 218
CONFIGURATIONS > Configuring various functions (Setup menu) Setting the network name of the unit Edits the unit’s name on the network (the network name) displayed on other network devices. Setup menu “Network” > “Network Name” Press ENTER. Edit the name. Select “OK”. -
Page 219
CONFIGURATIONS > Configuring various functions (Setup menu) Setting the power interlock from the unit to MusicCast compatible devices Selects whether turning on the power of the unit (the master device) also turns on the power of other devices (the slave device) of the MusicCast network. Setup menu “Network”… -
Page 220: Configuring The Bluetooth® Settings
CONFIGURATIONS > Configuring various functions (Setup menu) Configuring the Bluetooth® settings Setting the use of Bluetooth® Selects whether to use the Bluetooth function. Setup menu “Bluetooth” > “Bluetooth” Settings Disables the Bluetooth function. Enables the Bluetooth function. Related links “Basic operation of the Setup menu” (p.150)
-
Page 221
CONFIGURATIONS > Configuring various functions (Setup menu) Terminating the connection between a Bluetooth® device and the unit Terminates the Bluetooth connection between a Bluetooth device (such as a smartphone) and the unit. Select “Disconnect” and press ENTER to terminate the Bluetooth connection. Setup menu “Bluetooth”… -
Page 222
CONFIGURATIONS > Configuring various functions (Setup menu) Setting the use of the Bluetooth® Standby function Selects whether to turn on the unit from Bluetooth devices. If this function is set to “On”, the unit automatically turns on when a connect operation is performed on the Bluetooth device. Setup menu “Bluetooth”… -
Page 223
CONFIGURATIONS > Configuring various functions (Setup menu) Setting the use of audio transmission to a Bluetooth® device Selects whether to transmit audio played back on the unit to Bluetooth devices (such as speakers and headphones). Setup menu “Bluetooth” > “Audio Send” > “Transmitter” Settings Disables the Bluetooth audio transmitter function. -
Page 224
CONFIGURATIONS > Configuring various functions (Setup menu) Connecting the unit to a Bluetooth® device that receives transmitted audio Establishes a connection between the unit and Bluetooth devices (such as speakers and headphones) that receive audio transmitted from the unit when «Transmitter» is set to «On» in the «Setup» menu. Setup menu “Bluetooth”… -
Page 225: Configuring The Language Settings
CONFIGURATIONS > Configuring various functions (Setup menu) Configuring the language settings Setting the menu language Selects the menu language such as the Setup menu. Setup menu “Language” Settings English English 日本語 Japanese Français French Deutsch German Español Spanish Русский Russian Italiano Italian 中文…
-
Page 226: Configuring The Unit’s Settings By Operation Of The Body Front Panel (Front Display Menu)
CONFIGURATIONS > Configuring the unit’s settings by operation of the body front panel (Front Display menu) Configuring the unit’s settings by operation of the body front panel (Front Display menu) Basic operation of the Front Display menu Perform the following basic procedure to operate the “Front Display” menu. Operate this menu displayed on the front display using the front panel.
-
Page 227: Front Display Menu Items
CONFIGURATIONS > Configuring the unit’s settings by operation of the body front panel (Front Display menu) Front Display menu items Use the following table to configure system settings of the unit. Item Page Dimmer Zone Power Volume Knob Lock Function Lock Input Selector Lock Scene Key Lock Touch Sound…
-
Page 228: Adjusting The Brightness Of The Front Display
CONFIGURATIONS > Configuring the unit’s settings by operation of the body front panel (Front Display menu) Adjusting the brightness of the front display Adjusts the brightness of the following on the front panel. Higher value brightens the front display. Front display Indicators (ZONE, PURE DIRECT) Setup menu “Function”…
-
Page 229: Setting The Power Of Each Zone To On/Standby
CONFIGURATIONS > Configuring the unit’s settings by operation of the body front panel (Front Display menu) Setting the power of each zone to on/standby Switches the power of the zone to be operated between on and off (standby). Front Display menu “Zone Power”…
-
Page 230: Setting The Use Of The Volume On The Front Panel
CONFIGURATIONS > Configuring the unit’s settings by operation of the body front panel (Front Display menu) Setting the use of the volume on the front panel This feature can be used if the firmware is updated. Selects whether to use the volume on the front panel. You can disable the volume operation on the unit to prevent the volume from being set unexpectedly loud by a child.
-
Page 231: Setting The Use Of The Input Selector On The Front Panel
CONFIGURATIONS > Configuring the unit’s settings by operation of the body front panel (Front Display menu) Setting the use of the input selector on the front panel This feature can be used if the firmware is updated. Selects whether to use SELECT/ENTER on the front panel as the input selector. Front Display menu “Settings”…
-
Page 232: Setting The Use Of The Scene Key On The Front Panel
CONFIGURATIONS > Configuring the unit’s settings by operation of the body front panel (Front Display menu) Setting the use of the scene key on the front panel This feature can be used if the firmware is updated. Selects whether to use SCENE (4 numbers) on the front panel. Front Display menu “Settings”…
-
Page 233: Setting The Use Of The Operation Sound
CONFIGURATIONS > Configuring the unit’s settings by operation of the body front panel (Front Display menu) Setting the use of the operation sound Selects whether to ring a sound when operating the touch key on the front panel. Front Display menu “Settings”…
-
Page 234: Setting The Use Of The Remote Control
CONFIGURATIONS > Configuring the unit’s settings by operation of the body front panel (Front Display menu) Setting the use of the remote control Selects whether to use the remote control sensor on the front panel. Front Display menu “Settings” > “Remote Sensor” Settings Turns off the remote control sensor.
-
Page 235: Selecting The Remote Control Id
CONFIGURATIONS > Configuring the unit’s settings by operation of the body front panel (Front Display menu) Selecting the remote control ID Sets the unit’s remote control ID so that it matches the remote control’s ID. When using multiple Yamaha AV receivers, set a unique remote control ID for its corresponding receiver.
-
Page 236: Setting Information Items To Be Skipped When Operating Select/Enter
CONFIGURATIONS > Configuring the unit’s settings by operation of the body front panel (Front Display menu) Setting information items to be skipped when operating SELECT/ENTER Sets which information items are skipped when operating SELECT/ENTER on the front panel. You can select the desired information quickly by using this function to skip the unnecessary information.
-
Page 237: Restoring The Default Settings
CONFIGURATIONS > Configuring the unit’s settings by operation of the body front panel (Front Display menu) Restoring the default settings Restores the default settings for the unit (initialization). Front Display menu “Settings” > “Initialization” Choices All Initialization Restores the default settings for the unit. Network Initialization Restores the default settings for network configurations.
-
Page 238: Backuping And Restoring All The Settings
CONFIGURATIONS > Configuring the unit’s settings by operation of the body front panel (Front Display menu) Backuping and restoring all the settings Informs the unit’s setting to a USB flash drive and restores it to the unit. Prepare a USB flash drive using FAT16 or FAT32 format in advance.
-
Page 239: Updating The Firmware
CONFIGURATIONS > Configuring the unit’s settings by operation of the body front panel (Front Display menu) Updating the firmware Updates the firmware that provides additional features or product improvements. New firmware can be downloaded from our website. For details, refer to the information supplied with updates.
-
Page 240: Setting The Use Of Retail Demo Mode
CONFIGURATIONS > Configuring the unit’s settings by operation of the body front panel (Front Display menu) Setting the use of Retail Demo Mode This feature can be used if the firmware is updated. Selects whether to use Retail Demo Mode of the front display. In Retail Demo Mode, the feature of the unit and QR code are displayed on the front display.
-
Page 241: Update
Firmware updates New firmware that provides additional features or product improvements will be released as needed. For details on firmware, visit the Yamaha website. The unit’s firmware can be updated via the network or using a USB flash drive. When the unit is connected to the Internet If a firmware update is ready, the firmware update indicator on the front display lights up.
-
Page 242: Updating The Unit’s Firmware Via The Network
Do not operate the unit or disconnect the power cable or network cable during firmware update. If the firmware update is interrupted, there is a possibility that the unit will malfunction. In this case, contact your nearest authorized Yamaha dealer or service center to request repair.
-
Page 243
UPDATE > Updating the unit’s firmware The procedure for reservation is as follows. Press not ENTER but the down cursor key in previous step 2. On the next screen, press ENTER. The firmware update is reserved. With an update reservation, the firmware update confirmation screen is displayed on the front display when you turn off the unit. -
Page 244: Updating The Unit’s Firmware Using A Usb Flash Drive
Do not operate the unit or disconnect the power cable or network cable during firmware update. If the firmware update is interrupted, there is a possibility that the unit will malfunction. In this case, contact your nearest authorized Yamaha dealer or service center to request repair.
-
Page 245: Troubleshooting
TROUBLESHOOTING > When any problem appears TROUBLESHOOTING When any problem appears If trouble occurs, first check the following: Make sure of the following when the unit does not function properly. The power cables of the unit, TV and playback devices (such as BD/DVD players) are connected to AC wall outlets securely.
-
Page 246: Power, System, Or Remote Control Trouble
If the standby indicator on the unit blinks when you try to turn on the power, it means that capability to turn on the power is disabled as a safety precaution. Contact your nearest Yamaha dealer or service center to request repair.
-
Page 247
TROUBLESHOOTING > When any problem appears The power does not turn on in synchronization with the TV HDMI Control on the unit is disabled. If turning off the unit is not synchronized to the TV either, check the setting of HDMI Control on the unit. For details on HDMI Control, see the following: “Setting the use of HDMI Control” (p.172) HDMI Control on the TV is disabled. -
Page 248
TROUBLESHOOTING > When any problem appears The power does not turn off The internal microcomputer has frozen, due to an external electric shock (such as lightning or excessive static electricity) or to a drop in the power supply voltage. Hold down z (power) on the front panel for more than 15 seconds to reboot the unit. If the problem persists, disconnect the power cable from the AC wall outlet and plug it again. -
Page 249
TROUBLESHOOTING > When any problem appears The power turns off (standby mode) immediately The unit was turned on while a speaker cable was shorted. Twist the bare wires of each speaker cable firmly and reconnect to the unit and speakers. For details, see the following: “Connecting the speaker” (p.50) -
Page 250
TROUBLESHOOTING > When any problem appears The unit enters standby mode automatically The sleep timer worked. Turn on the unit and start playback again. The auto-standby function activated because the unit was not used for the specified time. To disable the auto-standby function, set “Auto Power Standby” in the “Setup” menu to “Off”. For details, see the following: “Setting the amount of time for the auto-standby function” (p.206) The speaker impedance setting is incorrect. -
Page 251
TROUBLESHOOTING > When any problem appears The unit is not reacting The internal microcomputer is frozen, due to an external electric shock (such as lightning or excessive static electricity) or to a drop in the power supply voltage. Hold down z (power) on the front panel for more than 15 seconds to reboot the unit. If the problem persists, disconnect the power cable from the AC wall outlet and plug it again. -
Page 252
TROUBLESHOOTING > When any problem appears The unit cannot be controlled using the remote control The unit is out of the operating range. Use the remote control within the operating range. For details, see the following: “Operating range of the remote control” (p.13) The batteries are weak. -
Page 253
TROUBLESHOOTING > When any problem appears Cannot select the desired input source even if “INPUT” is pressed The function which skips some input sources is set. Set “Input Skip” of the desired input source in the “Setup” menu to “Off”. For details, see the following: “Setting input sources to be skipped when operating the INPUT key” (p.197) -
Page 254
TROUBLESHOOTING > When any problem appears The device connected to the unit via HDMI cannot be controlled using the RED/GREEN/YELLOW/BLUE keys of the remote control The device which is connected to the unit via HDMI does not support the operation of the RED/ GREEN/YELLOW/BLUE keys. -
Page 255
TROUBLESHOOTING > When any problem appears The front display is turned off The brightness of the front display is set to be turned off. Set “Dimmer” in the “Front Display” menu or “Setup” menu to bigger than “-5”. For details, see the following: “Adjusting the brightness of the front display” (p.199) -
Page 256: Audio Trouble
TROUBLESHOOTING > When any problem appears Audio trouble No sound Another input source is selected. Select an appropriate input source with the input selection keys. For details, see the following: “Basic procedure for playing back video and music” (p.93) Signals that the unit cannot reproduce are being input. Some digital audio formats cannot be played back on the unit.
-
Page 257
TROUBLESHOOTING > When any problem appears The volume cannot be increased The maximum volume is set too low. Use “Max Volume” in the “Setup” menu to adjust the maximum volume. For details, see the following: “Setting the limit value of the volume” (p.190) A device connected to the output jacks of the unit is not turned on. -
Page 258
TROUBLESHOOTING > When any problem appears No sound is coming from a specific speaker The playback source does not contain a signal for the channel. To check it, display information about the current audio signal on the TV. For details, see the following: “Checking the audio signal information” (p.141) The currently selected sound program/decoder does not use the speaker. -
Page 259
TROUBLESHOOTING > When any problem appears No sound is coming from the subwoofer The playback source does not contain Low Frequency Effect (LFE) or low-frequency signals. To check it, set “Extra Bass” in the “Setup” menu to “On”, in order to output the front channel low- frequency components from the subwoofer. -
Page 260
TROUBLESHOOTING > When any problem appears No sound from the playback device connected to the unit with HDMI The TV does not support HDCP (High-bandwidth Digital Content Protection). Refer to the instruction manuals for the TV and check the TV’s specifications. The number of devices connected to the HDMI OUT jack exceeds the limit. -
Page 261
TROUBLESHOOTING > When any problem appears No sound from the playback device when HDMI Control is used The TV is set to output audio from the TV speakers. Change the audio output setting on your TV so that the playback device audio is output from the speakers connected to the unit. -
Page 262
TROUBLESHOOTING > When any problem appears No sound from the TV when HDMI Control is used The TV is set to output audio from the TV speakers. Change the audio output setting on your TV so that the TV audio is output from the speakers connected to the unit. -
Page 263
TROUBLESHOOTING > When any problem appears Any other device’s audio is played back when you switch the input source of the unit to “TV” The eARC/ARC function is not used. Audio is played back with the audio input jack selected in “TV Audio Input” in the “Setup” menu unless the TV audio is played back with eARC/ARC function. -
Page 264
TROUBLESHOOTING > When any problem appears Only the front speakers work on multichannel audio The currently selected sound program is “2ch Stereo”. Select the sound program other than “2ch Stereo”. For details, see the following: “Enjoying sound field effects optimized for the type of content” (p.80) -
Page 265
TROUBLESHOOTING > When any problem appears Noise/hum is heard The unit is too close to another digital or radio frequency device. Move the unit further away from the device. The cable connecting the unit and playback device is broken. If there is no problem with the connection, replace with another cable. -
Page 266
TROUBLESHOOTING > When any problem appears The sound is distorted A device (such as an external power amplifier) connected to the unit’s audio output jacks is not turned on. Turn on all devices connected to the unit’s audio output jacks. The volume of the unit is too high. -
Page 267: Video Trouble
TROUBLESHOOTING > When any problem appears Video trouble No video Another input source is selected on the unit. Select an appropriate input source with the input selection keys. Another input source is selected on the TV. Switch the TV input to display the video from the unit. The video signal output from the unit is not supported by the TV.
-
Page 268
TROUBLESHOOTING > When any problem appears No video from the playback device connected to the unit with HDMI The input video signal (resolution) is not supported by the unit. To check the information about the current video signal (resolution) and video signals supported by the unit, see the following: “Checking the video signal information” (p.142) The TV does not support HDCP (High-bandwidth Digital Content Protection). -
Page 269
TROUBLESHOOTING > When any problem appears No image (contents required the HDCP 1.4/2.3 — compatible HDMI device) from the playback device The TV (HDMI input jack) does not support HDCP 1.4/2.3. Connect the unit to the TV (HDMI input jack) that supports HDCP 1.4/2.3. (The Warning message can be displayed on the TV screen.) -
Page 270
TROUBLESHOOTING > When any problem appears The “Option” menu or “Setup” menu is not displayed on the TV Another input source is selected on the TV. Switch the TV input to display the video from the unit (HDMI OUT jack). The Pure Direct is enabled. -
Page 271: Fm/Am Radio Trouble
TROUBLESHOOTING > When any problem appears FM/AM radio trouble FM radio reception is weak or noisy There is multi-path interference. Adjust the FM antenna height or orientation, or place it in a different location. Your area is too far from the FM station transmitter. Press MODE on the remote control to select monaural FM radio reception.
-
Page 272
TROUBLESHOOTING > When any problem appears AM radio reception is weak or noisy The noises may be caused by fluorescent lamps, motors, thermostats, or other electrical equipment. It is difficult to completely eliminate noise. It may be reduced by using an outdoor AM antenna. -
Page 273
TROUBLESHOOTING > When any problem appears Radio stations cannot be selected automatically Your area is too far from the FM station transmitter. Select the station manually. Or use an outdoor antenna. We recommend using a sensitive multi-element antenna. For details on selecting the station manually, see the following: “Listening to the radio” (p.102) The AM radio signal is weak. -
Page 274
TROUBLESHOOTING > When any problem appears AM radio stations cannot be registered as presets Auto Preset has been used. Auto Preset is for registering FM radio stations only. Register AM radio stations manually. For details, see the following: “Registering a radio station manually” (p.105) -
Page 275
TROUBLESHOOTING > When any problem appears Radio stations cannot be selected by pressing PRESET No radio stations are registered. When no radio stations are registered, “No Presets” appears on the front display by pressing PRESET. Register the radio station to the preset number. For details, see the following: “Registering a radio station manually” (p.105) You can also register FM radio stations with strong signals automatically (Auto Preset). -
Page 276: Dab Radio Trouble
TROUBLESHOOTING > When any problem appears DAB radio trouble No DAB radio reception An initial scan has not been performed. Perform an initial scan to receive DAB radio. For details, see the following: “Preparing the DAB tuning” (p.100)
-
Page 277
TROUBLESHOOTING > When any problem appears No DAB radio reception even after performing an initial scan Reception strength of DAB radio is poor. Check reception strength in Tune AID displayed on the front panel, and adjust the antenna height or orientation, or place it in a different location. -
Page 278
TROUBLESHOOTING > When any problem appears DAB radio reception is weak or noisy There is multi-path interference. Check reception strength in Tune AID displayed on the front panel, and adjust the antenna height or orientation, or place it in a different location. For details, see the following: “Preparing the DAB tuning” (p.100) Your area is too far from the DAB station transmitter. -
Page 279
TROUBLESHOOTING > When any problem appears DAB information is not available or is inaccurate The selected DAB radio station may be temporarily out of service or may not provide information. Contact the DAB broadcaster. -
Page 280
TROUBLESHOOTING > When any problem appears No DAB radio sound The selected DAB radio station may be temporarily out of service. Try the station later or select another station. -
Page 281: Usb Trouble
TROUBLESHOOTING > When any problem appears USB trouble The unit does not detect the USB flash drive The USB flash drive is not connected to the USB jack securely. Turn off the unit, reconnect your USB flash drive, and turn the unit on again. The file system of the USB flash drive is not FAT16 or FAT32.
-
Page 282
TROUBLESHOOTING > When any problem appears Folders and files in the USB flash drive cannot be viewed. The data in the USB flash drive is protected by the encryption. Use a USB flash drive without an encryption function. -
Page 283
TROUBLESHOOTING > When any problem appears The registered content in the USB flash drive cannot be recalled by pressing PRESET A USB flash drive different from registration is connected to the unit. Connect the USB flash drive which contains the registered content as shortcut to the unit. The registered content (file) has been moved to another location. -
Page 284
TROUBLESHOOTING > When any problem appears The unit does not perform continuous playback on files of USB flash drive When the unit detects a series of unsupported files during playback, playback stops automatically. Do not save unsupported files (such as images and hidden files) in folders for playback. Over 500 music files are in the selected folder. -
Page 285: Network Trouble
TROUBLESHOOTING > When any problem appears Network trouble The network feature does not function The network parameters (IP address) have not been obtained properly. Enable the DHCP server function on your router and set “DHCP” in the “Setup” menu to “On” on the unit. For details, see the following: “Setting the network parameters automatically (DHCP)” (p.214) If you want to configure the network parameters manually, check that you are using an IP address which…
-
Page 286
TROUBLESHOOTING > When any problem appears The unit cannot connect to the Internet via a wireless router (access point) The wireless router (access point) is turned off. Turn on the wireless router. The unit and the wireless router (access point) are too far apart. Place the unit and the wireless router (access point) closer to each other. -
Page 287
TROUBLESHOOTING > When any problem appears Wireless network is not found Microwave ovens or other wireless devices in your neighborhood might disturb the wireless communication. Turn off these devices or move the unit and the wireless router (access point) away from them. If your wireless router supports 5 GHz band, establish a new connection in 5 GHz band. -
Page 288
TROUBLESHOOTING > When any problem appears The unit does not detect the media server (PC/NAS) The media sharing setting is not correct. Configure the sharing setting and select the unit as a device to which music contents are shared. Some security software installed on your media server is blocking the access of the unit to your media server. -
Page 289
TROUBLESHOOTING > When any problem appears The files in the media server (PC/NAS) cannot be viewed or played back The files are not supported by the unit or the media server. Use the file format supported by both the unit and the media server. For information about the file formats supported by the unit, see the following: “Supported file formats” (p.308) -
Page 290
TROUBLESHOOTING > When any problem appears The registered content in the media server (PC/NAS) cannot be recalled by pressing PRESET The media server (PC/NAS) is turned off. Turn on the media server which contains the registered content. The media server (PC/NAS) is not connected to the network. Check the network connections and your router settings. -
Page 291
TROUBLESHOOTING > When any problem appears The Internet radio cannot be played The unit is not connected to the Internet. To use an Internet radio station, the unit must be connected to the Internet. Check whether the network parameters (such as the IP address) are properly assigned to the unit. For details, see the following: “Checking the network information of the unit” (p.212) The selected Internet radio station is currently not available. -
Page 292
TROUBLESHOOTING > When any problem appears The iPhone does not recognize the unit when using AirPlay The unit is connected to a multiple SSID router. Access to the unit might be restricted by the network separation function on the router. Connect the iPhone to the SSID which can access the unit. -
Page 293
TROUBLESHOOTING > When any problem appears Unable to play back music with AirPlay The unit cannot play back the songs stored on the iPhone. Check the song data. If it cannot be played on the iPhone itself, the song data or storage area may be broken. -
Page 294
TROUBLESHOOTING > When any problem appears The application for mobile devices does not detect the unit The unit and mobile device are not in the same network. Check the network connections and your router settings, and then connect the unit and mobile device to the same network. -
Page 295
TROUBLESHOOTING > When any problem appears Firmware update via the network is failed It may not be possible depending on the condition of the network. Update the firmware via the network again or use a USB flash drive. For details, see the following: “Updating the firmware” (p.211) -
Page 296: Bluetooth® Trouble
TROUBLESHOOTING > When any problem appears Bluetooth® trouble A Bluetooth® connection cannot be established The wireless antennas on the rear panel of the unit does not stand upright. Stand the wireless antennas upright for connecting to a Bluetooth device wirelessly. The Bluetooth function of the unit is disabled.
-
Page 297
TROUBLESHOOTING > When any problem appears No sound is produced, or the sound is interrupted during playback with Bluetooth® connection The volume of the Bluetooth device is set too low. Turn up the volume of the Bluetooth device. The Bluetooth device is not set to send audio signals to the unit. Switch the audio output of the Bluetooth device to the unit. -
Page 298: Error Indications On The Front Display
Turn off the unit and reconnect your USB device. If the USB device. problem persists, try another USB device. Overloaded Contact the nearest authorized Yamaha dealer or service Internal Error An internal error has occurred. center. Change the remote control ID of the unit or the remote…
-
Page 299: Appendix
APPENDIX > Care and cleaning APPENDIX Care and cleaning Care for the front panel The way of care for the front panel is as follows. Wipe the front panel with a soft dry cloth. Do not wipe the surface hard. Failure to observe this may cause damage to the surface.
-
Page 300: Connecting To A Network Wirelessly
APPENDIX > Connecting to a network wirelessly Connecting to a network wirelessly Selecting a wireless network connection method Select a wireless connection method according to your network environment. Press SETUP. Select “Network”. Select “Network Connection”. Select “Wireless(Wi-Fi)”. The following connection methods are available. “Setting up a wireless connection using the WPS button” (p.301) “Setting up a wireless connection using an iPhone” (p.302) “Setting up a wireless connection by selecting from the list of available access points” (p.303)
-
Page 301: Setting Up A Wireless Connection Using The Wps Button
APPENDIX > Connecting to a network wirelessly Setting up a wireless connection using the WPS button You can easily set up a wireless connection with one push of the WPS button on the wireless router. Setup menu “Network” > “Network Connection” > “Wireless(Wi-Fi)” Select “WPS Button”.
-
Page 302: Setting Up A Wireless Connection Using An Iphone
APPENDIX > Connecting to a network wirelessly Setting up a wireless connection using an iPhone You can set up a wireless connection by applying the connection settings on iPhone. Before proceeding, confirm that your iPhone is connected to a wireless router. NOTE You need iPhone with iOS 7 or later.
-
Page 303: Setting Up A Wireless Connection By Selecting From The List Of Available Access Points
APPENDIX > Connecting to a network wirelessly Setting up a wireless connection by selecting from the list of available access points You can set up a wireless connection by selecting an access point from the list of wireless LAN routers found by the unit.
-
Page 304: Setting Up A Wireless Connection Manually
APPENDIX > Connecting to a network wirelessly Setting up a wireless connection manually You can set up a wireless connection by entering the required information manually. You need to set up the SSID (network name), encryption method and security key for your network. Setup menu “Network”…
-
Page 305: Setting Up A Wireless Connection Using The Wps Pin Code
APPENDIX > Connecting to a network wirelessly Setting up a wireless connection using the WPS PIN code You can set up a wireless connection by entering the unit’s PIN code into the wireless router. The method is available if the wireless router supports the WPS PIN code method. Setup menu “Network”…
-
Page 306: Supported Devices And File Formats
APPENDIX > Supported devices and file formats Supported devices and file formats Supported Bluetooth® devices The following Bluetooth devices can be used by the unit. Bluetooth devices that support A2DP can be used. Operation of all Bluetooth devices cannot be guaranteed.
-
Page 307: Supported Usb Devices
APPENDIX > Supported devices and file formats Supported USB devices The following USB devices can be used by the unit. This unit is compatible with USB memory devices that are in FAT16 or FAT32 format. Do not connect any other type of USB devices. USB devices with encryption cannot be used.
-
Page 308: Supported File Formats
APPENDIX > Supported devices and file formats Supported file formats The following file formats can be used by the unit. Sampling Quantization bits Number of Support for File Bitrate (kbps) frequency (kHz) (bit) channels gapless playback 32/44.1/48/ WAV * 88.2/96/ 16/24/32 176.4/192 32/44.1/48…
-
Page 309: Trademarks
APPENDIX > Trademarks Trademarks Trademarks The trademarks used in this manual are as follows. Manufactured under license from Dolby Laboratories. Dolby, Dolby Audio, Pro Logic, Dolby Vision, and the double-D symbol are trademarks of Dolby Laboratories. For DTS patents, see http://patents.dts.com. Manufactured under license from DTS Licensing Limited.
-
Page 310
Wi-Fi, Wi-Fi CERTIFIED, Wi-Fi Protected Setup and WPA2 are registered trademarks of Wi-Fi Alliance®. The Bluetooth® word mark and logos are registered trademarks owned by Bluetooth SIG, Inc. and any use of such marks by Yamaha Corporation is under license. -
Page 311
APPENDIX > Specifications Specifications Specifications The specifications of this unit are as follows. Input jacks Analog Audio Audio x 3 Digital Audio Optical x 1 (Supported frequencies: 32 kHz to 96 kHz) Coaxial x 1 (Supported frequencies: 32 kHz to 192 kHz) HDMI Input HDMI x 4 Other jacks… -
Page 312
APPENDIX > Specifications Video Format (Repeater Mode) 480i/60 Hz 576i/50 Hz 480p/60 Hz 576p/50 Hz 720p/60 Hz, 50 Hz 1080i/60 Hz, 50 Hz 1080p/60 Hz, 50 Hz, 30 Hz, 25 Hz, 24 Hz 4K/60Hz, 50Hz, 30 Hz, 25 Hz, 24 Hz Audio Format Dolby TrueHD Dolby Digital Plus… -
Page 313
APPENDIX > Specifications Source Function AVR to Sink Device (ex. Bluetooth Headphone) Supported profile A2DP, AVRCP Supported codec Capable of Play/Stop Operation from Sink Device Bluetooth version Ver. 4.2 Wireless output Bluetooth Class 2 Maximum communication distance 10 m (33 ft) without interference Network PC Client Function AirPlay 2 supported… -
Page 314
APPENDIX > Specifications Audio Section Rated Power Output (2-channel driven) [Except for U.S.A. and Canada models] (20 Hz to 20 kHz, 0.06% THD, 6 Ω) Front L/R, Surround L/R 80 W/ch Center 80 W [U.S.A. and Canada models] (20 Hz to 20 kHz, 0.06% THD, 8 Ω) Front L/R, Surround L/R 80 W/ch Center… -
Page 315
APPENDIX > Specifications Total Harmonic Distortion [Except for U.S.A. and Canada models] AUDIO 3 etc. to Front (Pure Direct) (20 Hz to 20 kHz, 40 W, 6 Ω) 0.04% or less [U.S.A. and Canada models] AUDIO 3 etc. to Front (Pure Direct) (20 Hz to 20 kHz, 40 W, 8 Ω) 0.04% or less Signal to Noise Ratio (IHF-A Network) AUDIO 3 etc. -
Page 316
APPENDIX > Specifications Harmonic Distortion (IHF, 1 kHz) Monaural 0.5% Stereo 0.6% Antenna Input 75 Ω unbalanced AM Section (Except for U.K., Europe, Russia and Australia models) Tuning Range [U.S.A. and Canada models] 530 kHz to 1710 kHz [Asia, Taiwan, Brazil, Central and South America and General models] 530/531 kHz to 1710/1611 kHz [Other models] 531 kHz to 1611 kHz… -
Page 317
(17-1/8” x 9-5/8” x 14-7/8”) Weight 8.8 kg (19.4 lbs) * The contents of this manual apply to the latest specifications as of the publishing date. To obtain the latest manual, access the Yamaha website then download the manual file. -
Page 318: Default Settings
APPENDIX > Default settings Default settings Default settings of the Option menu The default settings of the “Option” menu are as follows. DSP/Surround Program Sur.Decode DSP Level 0 dB Adaptive DRC Enhancer HDMI 1-4, AUDIO 1-5, TV Others Volume Trim Input Trim 0.0 dB Subwoofer Trim…
-
Page 319: Default Settings Of The Setup Menu
APPENDIX > Default settings Default settings of the Setup menu The default settings of the “Setup” menu are as follows. Speaker Configuration Power Amp Assign Surround Subwoofer Front Small Center Small Surround Small Crossover 80 Hz Subwoofer Phase Normal Extra Bass Virtual CINEMA FRONT Distance 3.00 m (10.0 ft)
-
Page 320
APPENDIX > Default settings HDMI Video Format HDMI 1-4 Mode 1 Sound Treble, Bass Tone Control Bypass (0.0 dB) * When both “Treble” and “Bass” are 0.0 dB, “Bypass” appears. Surround Decoder Panorama Center Width Dimension Center Image All-Channel Stereo Monaural Mix Lipsync Select… -
Page 321
APPENDIX > Default settings Function Input Setting Input Rename HDMI 1-4 Auto Others Manual (For AUDIO 3-5, TUNER, TV, MusicCast Link, SERVER, NET RADIO, Bluetooth, USB only “Manual” can be selected.) Input Skip TV Audio Input AUDIO 1 User Interface Display Settings Dimmer Volume… -
Page 322
APPENDIX > Default settings Network Name MusicCast Link Power Interlock Bluetooth Bluetooth Audio Receive Disconnect Bluetooth Standby Audio Send Transmitter Device Search Language English… -
Page 323: Default Settings Of The Front Display Menu
APPENDIX > Default settings Default settings of the Front Display menu The default settings of the “Front Display” menu are as follows. Dimmer Zone Power Settings Function Lock Volume Knob Lock Input Selector Lock Scene Key Lock Touch Sound Remote Sensor Remote ID Information Skip Initialization…
-
Page 324
Yamaha Global Site https://www.yamaha.com/ Yamaha Downloads https://download.yamaha.com/ Manual Development Group © 2020 Yamaha Corporation Published 08/2020 NV-A0 AV19-0004…
4K /
Wi-Fi /
Bluetooth /
AirPlay /
HDR10+ /
Dolby Vision
Артикул: 54470-12 / AV-ресиверы
Самовывоз
Сегодня 28.11.23 с 16:00 до 19:00
Тульская
ул.Духовской переулок д.12
Доставка
По России — бесплатно
Ближайшая доставка по Москве — Сегодня 28.11.23
Технические характеристики AV ресивер Yamaha RX-V4A 5.2 black
Другие характеристики
Производитель
Yamaha (Япония)
Мощностные характеристики:
Мощность при 6 Ом (1 канал)
115 Вт/канал
Мощность при 6 Ом (2 канала)
80 Вт/канал
Звуковые характеристики:
Коэффициент THD (6Ом)
0.06 %
Кодеки и форматы
Аудиокодеки
PCM (192kHz/32-bit), DSD (256)
Входы/выходы:
Композитный (вход/выход)
1/-
Оптический (вход/выход)
1/-
Аналоговый аудио RCA (вход/выход)
3/-
Коаксиальный (вход/выход)
1/-
Выход на сабвуфер RCA
2 шт.
Калибровочный микрофон
есть
Коммуникации и интерфейсы:
Ethernet (LAN, RJ45)
есть
Система автокалибровки звука
YPAO-R.S.C
Сетевые и беспроводные возможности
Воспроизведение интернет-радио
есть
Сервисы потокового аудио
Spotify, Deezer, Tidal, Pandora, Napster, SiriusXM, Qobuz
Габариты и вес:
Габариты (Ш*В*Г)
435*171*377 мм
Инструкции и руководства для
-
PDF