
Для этого звоните с 8 до 22.00 по телефонам:
+7 (495) 215 – 14 – 41
+7 (903) 722 – 17 – 03
или оформляйте электронную форму на сайте. В разговоре с оператором или электронной заявке, пожалуйста, сообщите следующую информацию:
- Марку и модель неисправной стиралки.
- Признаки поломки. Например, стиральная машина не набирает или не сливает воду, не включается или зависает на режиме отжима белья.
- Удобные день и время приезда мастера.
- Имя, адрес, телефон.
Мастер свяжется с вами в день ремонта для согласования времени приезда.
При поломке стиральной машины Zanussi FL 726 CN обратитесь в «РемБытТех»! Наш мастер приедет к вам уже в течение суток после обращения и прямо у вас дома отремонтирует стиральную машинку качественно и с гарантией до 2 лет.
Раздел: Бытовая, кухонная техника, электроника и оборудование
Тип: Стиральная Машина

Инструкция к Стиральной Машине Zanussi FL 726 CN

WASHING MACHINE
STIRALWNAÅ MAfiINA
FL 726 CN
A
C
B
B
D
30º- 40º
30º- 60º
40º- 95º
H
F
L
K
J
30º- 60º
30º- 40º
G
P
M
N
30º- 40º
FL
984CN
INSTRUCTION BOOKLET
124972370
RUKOVODSTVO PO ÈKSPLUATACII
YOUR NEW WASHING MACHINE
This new washing machine meets all
requirements for a modern washing of laundry
Environment protection
with reduced consumption of water, energy and
detergent.
n
Packaging recycling
n
The temperature selector dial allows you to
Materials marked with the symbol are
choose personally the suitable washing
recyclable. To enable them to be recycled, they
temperature for your laundry.
must be placed in the appropriate collection
areas (or containers). Check with your local
n
The automatic cooling of the washing water
authorities.
from 95°C to 60°C before draining will
prevent plastic pipes of your drainage system
>PE<= polyethylene
from being deformed.
>PS<= polystyrene
>PP<= polypropylene
n
The anti-unbalance device ensures that the
washing machine remains stable when
spinning.
n
Washing machine scrapping
When the appliance is to be scrapped, cut off the
Ecological hints
power supply cable and make the door closing
device inoperative to avoid it becoming a death
In order to obtain water and energy savings and
trap for a child.
to protect the environment, we advice you to
follow these instructions:
For correct disposal of the machine, contact your
local authority department which provides for
n
Whenever possible, wash the maximum load
collection of urban solid refuse.
for the selected programme, without
overloading the drum.
n
Use a programme with prewash only for
heavy soiled items.
n
Measure out detergent according to the water
hardness, degree of soiling and quantity of
laundry being washed.
n
Select “Quick wash” for lightly soiled laundry.
The symbols you will see on some paragraphs of this booklet have the following meaning:
Important information concerning the
safety in the use of your machine.
Disregarding this information might
lead to damages.
Information for correct use of your
machine and to obtain the best
i
performance.
Important information concerning
environment protection.
Our contribution to the protection of the
environment: we use recycled paper.
2

CONTENTS
Important information . . . . . . . . . . . . .4
Maintenance . . . . . . . . . . . . . . . . . . . . . .16
n
Bodywork . . . . . . . . . . . . . . . . . . . . . . . . . .16
Description of the appliance . . . . . .5
n
Detergent dispenser drawer . . . . . . . . . . . .16
ENGLISH
n
Detergent dispenser drawer
n
Water inlet filter . . . . . . . . . . . . . . . . . . . . .16
and programme chart . . . . . . . . . . . . . . . . .5
n
Drain pump . . . . . . . . . . . . . . . . . . . . . . . .17
n
The dangers of freezing . . . . . . . . . . . . . . .17
Technical specifications . . . . . . . . . . .5
Something not working . . . . . . . .18-19
Installation . . . . . . . . . . . . . . . . . . . . . . . .6
n
Unpacking . . . . . . . . . . . . . . . . . . . . . . . . . .6
n
Positioning . . . . . . . . . . . . . . . . . . . . . . . . . .6
n
Water inlet . . . . . . . . . . . . . . . . . . . . . . . . . .7
n
Water drainage . . . . . . . . . . . . . . . . . . . . . .7
n
Electrical connection . . . . . . . . . . . . . . . . . .7
Use . . . . . . . . . . . . . . . . . . . . . . . . . . . . . . . . .8
n
Control panel . . . . . . . . . . . . . . . . . . . . . . .8
n
Washing hints . . . . . . . . . . . . . . . . . . . . . . .9
Sorting the laundry . . . . . . . . . . . . . . . . . . .9
Temperatures . . . . . . . . . . . . . . . . . . . . . . . .9
Before loading the laundry . . . . . . . . . . . . . .9
Maximum loads . . . . . . . . . . . . . . . . . . . . . .9
Laundry weights . . . . . . . . . . . . . . . . . . . . . .9
Removing stains . . . . . . . . . . . . . . . . . . . . .9
Detergents and additives . . . . . . . . . . . . . .10
Quantity of detergent to be used . . . . . . . .10
n
International wash code symbols . . . . . . . .11
n
Washing programmes . . . . . . . . . . . . . .12-13
n
Operating sequence . . . . . . . . . . . . . . .14-15
3

IMPORTANT INFORMATION
It is important that this instruction book be kept with the appliance for future reference. If you sell or
give the appliance away, make sure that the book is passed to the new owners so that they can
familiarise themselves with its operation and relevant warnings.
The following warnings are provided in the interests of overall safety. You must read them carefully
before installing or using the appliance.
n
Installation
Use only the recommended quantities of
fabric softener. An excessive amount could
n
When unpacking the appliance, check that it
damage the laundry.
is not damaged. If in doubt, do not use it and
n
Leave the porthole door slightly ajar when
contact the Service Centre.
the appliance is not in use. This preserves
n
All internal packing must be removed before
the door seal and prevents the formation of
using the appliance. Serious damage may be
musty smells.
caused to the machine or adjacent furniture if
n
Always check that water has emptied out
the protective transit devices are not
before opening the door. If not, drain the
removed or are not completely removed.
water following the instructions in the
Refer to the relevant paragraph in the
instruction book.
instruction book.
n
Always unplug the appliance and shut the
n
Any electrical work required to install this
water tap after use.
appliance must be carried out by a qualified
electrician.
n
Any plumbing work required to install this
Service/repair
appliance must be carried out by a qualified
n
In the event of a fault, do not attempt to
plumber.
repair the appliance yourself. Repairs carried
n
After having installed the machine, check that
out by inexperienced persons may cause
it is not standing on its electrical supply cable.
damage.
n
If the appliance is placed on a carpeted floor,
n
If repairs are needed, contact an authorised
ensure that air can circulate freely between
service centre and ask for genuine spare
the adjustable feet and the floor.
parts.
Use
Safety
n
This appliance is designed for domestic use.
n
This appliance is designed to be used by
It must not be used for purposes other than
adults. Children must not be allowed to touch
those for which it was designed.
the controls or play with the product.
n
Do not overload the appliance. Follow the
n
During high temperature wash cycles the
instructions in the instruction book.
glass door becomes very hot. Do not touch it.
n
Only wash fabrics which are designed to be
n
Pets sometimes climb into washing
machine washed. Follow the instructions on
machines. Check the drum before each use.
each garment label.
n
Make sure that all pockets are empty.
Objects such as coins, safety pins, pins and
screws can cause extensive damage.
n
Do not machine wash garments saturated
with petroleum, methylated spirits,
trichlorethylene, etc. If such fluids have been
used to remove stains prior to washing, wait
until they have completely evaporated from
the fabric before placing garments in the
appliance.
n
Place small items such as socks, belts, etc. in
a cloth bag or pillowcase to prevent them
getting trapped between the drum and the tub.
4
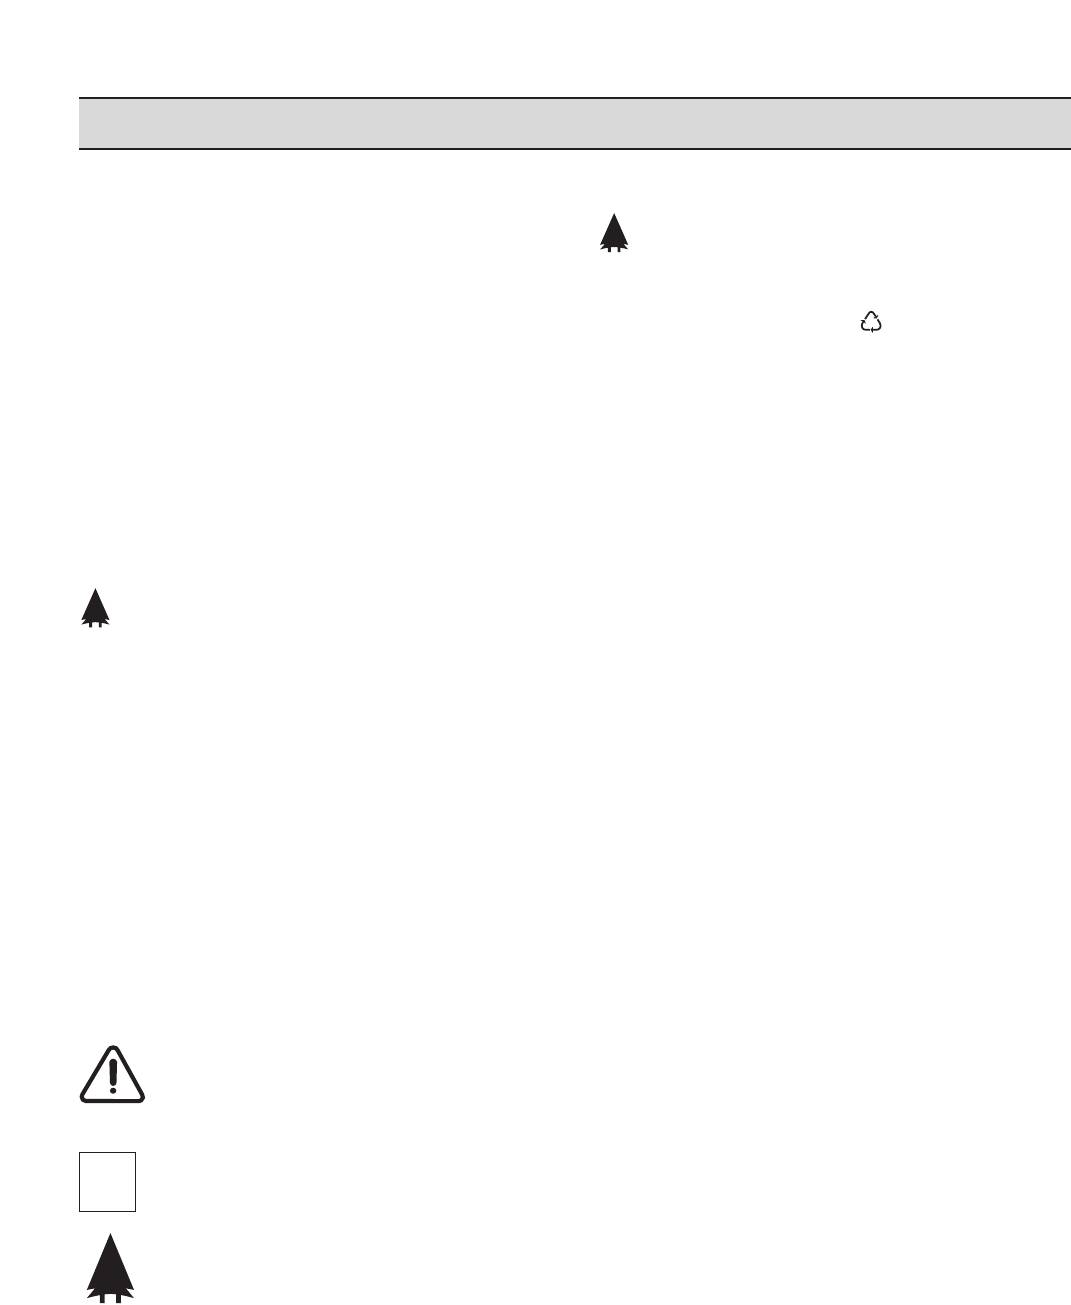
DESCRIPTION OF THE APPLIANCE
1 Detergent dispenser drawer
2 Programme chart
3 Option buttons
ENGLISH
4 Door opening button
5 Temperature selector dial
6 Operating pilot light
7 Programme selector dial
8 Adjustable feet
Detergent dispenser drawer and
programme chart
Symbols
Prewash
Main wash
Fabric softener
There is a programme guide in symbols on the
handle of the detergent dispenser drawer.
5
C0006
TECHNICAL SPECIFICATIONS
DIMENSIONS Height 85 cm
Width 60 cm
Depth 32 cm
POWER SUPPLY VOLTAGE/FREQUENCY 220-230V/50 Hz
TOTAL POWER ABSORBED 1750 W
MINIMUM FUSE PROTECTION 10 A
2
WATER PRESSURE Minimum 50 N/cm
2
Maximum 80 N/cm
MAXIMUM LOAD Cotton 3.0 kg
Synthetics, delicate fabrics 1.0 kg
Woollens 0.7 kg
SPIN SPEED 700 rpm
This appliance complies with the following EEC Directives:
73/23/EEC of 19/02/73 relating to low voltage
89/336/EEC of 03/05/89 relating to electromagnetic compatibility
23457
6
A
C
B
B
30º- 40º
40º- 95º
30º- 60º
H
L
K
J
30º- 40º
30º- 60º
D
30º- 40º
G
F
P
N
M
FL
984 CN
1
8
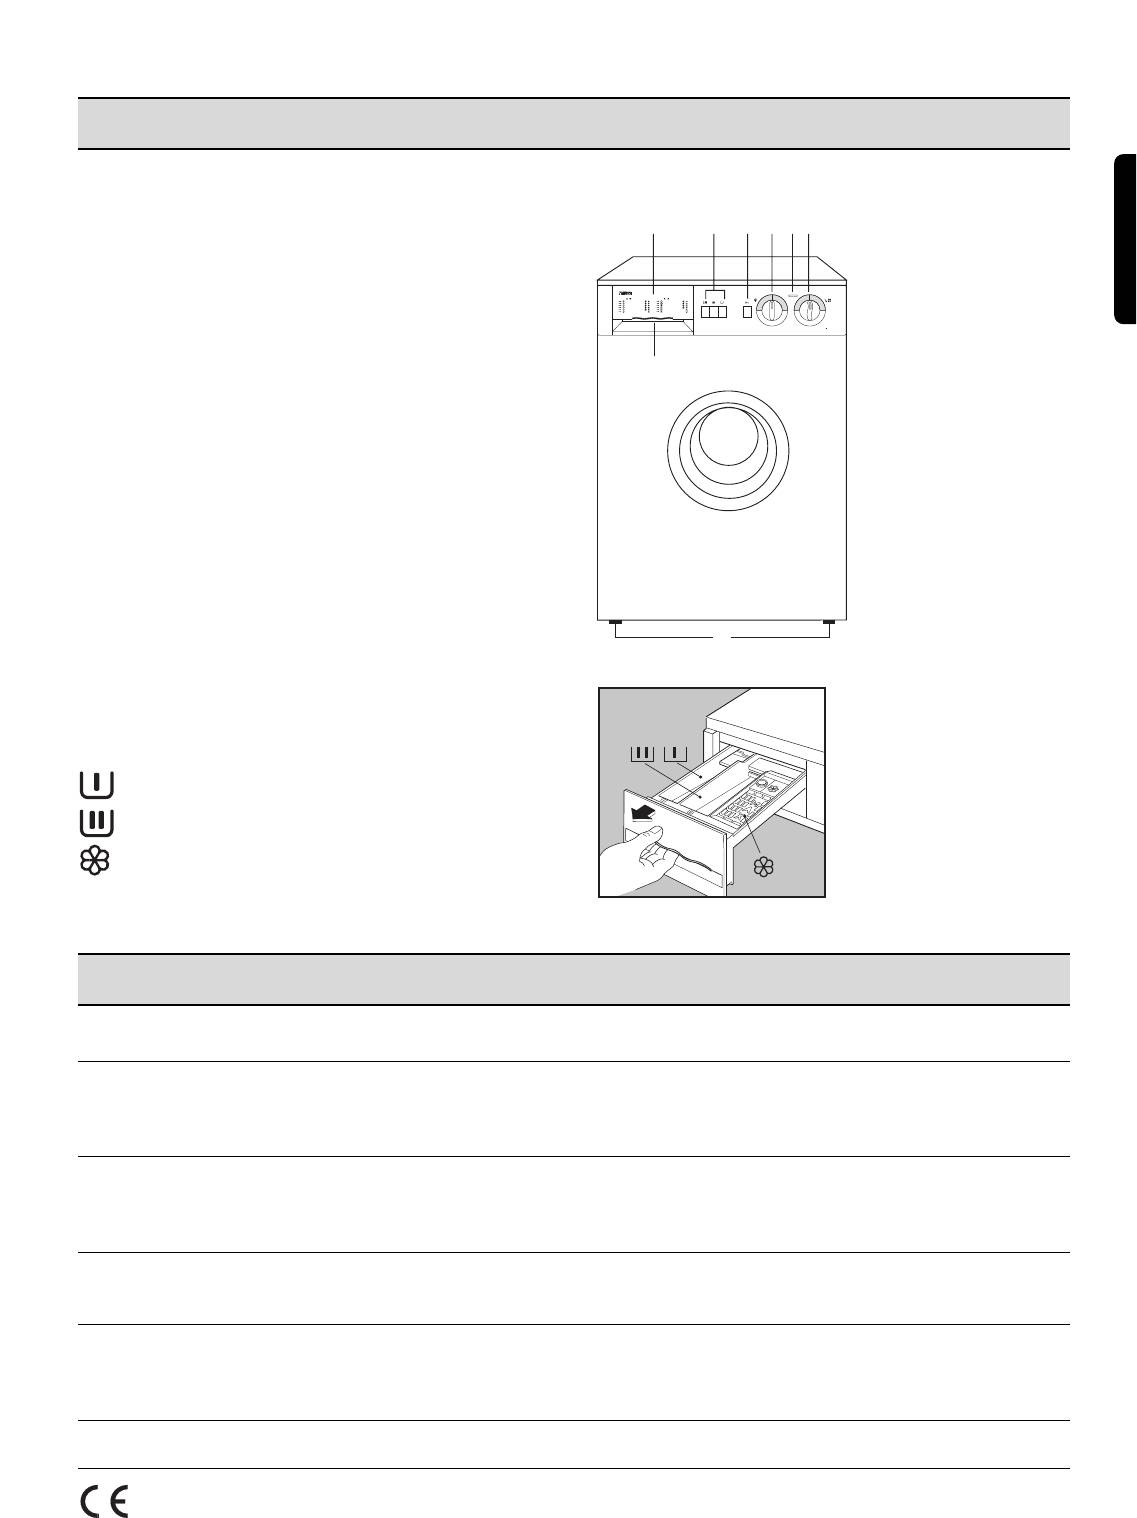
INSTALLATION
Unpacking
You are advised to keep all transit devices so
that they can be refitted if the machine ever has
to be transported again.
1. Using a spanner, unscrew and remove the
rear right-hand bolt and lay the machine on
its back, taking care not to squash the hoses.
This can be avoided by placing one of the
corner packing pieces between the machine
and the floor.
2. Release the two plastic bags by removing the
adhesive strip.
3. Carefully remove the right-hand bag (1) then
the left-hand bag (2) by pulling them towards
the centre of the machine.
4. Set the machine upright and remove the two
remaining bolts from the back.
5. Pull out the three plastic spacers from the
holes into which the bolts were fitted.
6. Plug the open holes with the plugs which you
will find in the plastic bag containing the
instruction booklet.
Positioning
Install the machine on a flat hard floor.
Make sure that air circulation around the
machine is not impeded by carpets, rugs etc.
Check that the machine does not touch the wall
or other kitchen units.
Carefully level by screwing the adjustable feet in
or out. Never place cardboard, wood or similar
materials under the machine to compensate for
any unevenness in the floor.
6
P0255
P0648
P0256
P0020
P1051
All transit bolts and packing must be
removed before using the appliance.
Water inlet
Connect the water inlet hose to a tap with a 3/4″
thread after having inserted the small filter “A”
ENGLISH
supplied with the machine.
The other end of the inlet hose which connects
to the machine can be turned in any direction.
Simply loosen the fitting, rotate the hose and
retighten the fitting, making sure there are no
water leaks.
The inlet hose must not be lengthened. If it is
too short and you do not wish to move the tap,
you will have to purchase a new, longer hose
specially designed for this type of use.
Water drainage
The end of the drain hose can be positioned in
three ways:
Hooked over the edge of a sink using the
plastic hose guide supplied with the
machine. In this case, make sure the end
cannot come unhooked when the machine is
emptying.
This could be done by tying it to the tap with a
piece of string or attaching it to the wall.
In a sink drain pipe branch. This branch must
be above the trap so that the bend is at least
60 cm above the ground.
Directly into a drain pipe at a height of not
less than 60 cm and not more than 90 cm.
The end of the drain hose must always be
ventilated, i.e. the inside diameter of the drain
pipe must be larger than the outside diameter of
the drain hose.
The drain hose must not be kinked. Run it along
the floor; only the part near the drainage point
must be raised.
Electrical connection
This machine is designed to operate on a
220-230 V, single-phase, 50 Hz supply.
Check that your domestic electrical installation
can take the maximum load required (1.75 kW),
also taking into account any other appliances in
use.
Connect the machine to an earthed socket,
in accordance with current wiring regulations.
7
P0022
P0023
P0021
The manufacturer declines any
responsibility for damage or injury
through failure to comply with the above
safety precaution.
In the event of replacing the electric
cable, please contact our nearest
Service Centre.
A
B
40º- 95º
H
J
30º- 60º
B
30º- 60º
K
30º- 40º
C
30º- 40º
L
30º- 40º
D
M
F
N
G
P
FL
726CN
123 4 5 6 7
1 Spin speed reduction button
4 Door opening button
By depressing this button the spin speed is
Depress it to open the door.
reduced from 700 to 500 rpm in the cotton
programmes and from 550 to 400 rpm in the
5 Temperature selector dial
gentle programmes.
Turn this dial to select the washing temperature.
Position = cold wash.
2 Half-load button
By depressing this button when washing a small
6 Operating pilot light
load of cottons or linens (max 1.5 kg) you will
This light is on whilst the machine is operating
obtain a reduction of the water consumption on
and goes out at the end of the programme.
the rinse cycle.
The machine will carry out 3 rinses instead of 4.
7 Programme selector dial
3 Anti-crease button
To select the required programme, turn this dial
clockwise until the programme letter is exactly
By depressing this button on programmes H-J-
opposite the pointer.
K-L-M the water of the last rinse is not emptied
To start the programme, pull the dial outwards,
out, to prevent the fabrics from creasing. To
to switch off the machine, push the dial inwards.
drain the water, depress this button again (the
laundry will be gently spun) or select drain
programme “P”.

i
delicate fabrics and woollens: drum no more
Washing hints
than one third full.
Washing a maximum load makes the most
Sorting the laundry
ENGLISH
efficient use of water and energy.
Follow the wash code symbols on each garment
For heavily soiled laundry, reduce the load size.
label and the manufacturer’s washing
instructions.
Laundry weights
Sort the laundry as follows:
whites, coloureds, synthetics, delicates, woollens.
The following weights are indicative:
bathrobe 1200 g
napkin 100 g
Temperatures
quilt cover 700 g
95°
for normally soiled white cottons and
sheet 500 g
linen (e.g. tea cloths, towels,
pillow case 200 g
tablecloths, sheets…)
tablecloth 250 g
towelling towel 200 g
60° for normally soiled, colour fast
tea cloth 100 g
garments (e.g. shirts, night dresses,
night dress 200 g
pyjamas….) in linen, cotton or
ladies’ briefs 100 g
synthetic fibres and for lightly soiled
man’s work shirt 600 g
white cotton (e.g. underwear).
man’s shirt 200 g
(cold)
for delicate items (e.g. net curtains),
man’s pyjamas 500 g
mixed laundry including synthetic
blouse 100 g
30°-40°
fibres and woollens bearing the label
men’s underpants 100 g
«pure new wool, machine washable,
non-shrink»
Removing stains
Stubborn stains may not be removed by just
Before loading the laundry
water and detergent. It is therefore advisable to
Never wash whites and coloureds together.
treat them prior to washing.
Whites may lose their “whiteness” in the wash.
Blood: treat fresh stains with cold water. For
New coloured items may run in the first wash;
dried stains, soak overnight in water with a
they should therefore be washed separately the
special detergent then rub in the soap and
first time.
water.
Make sure that no metal objects are left in
Oil based paint: moisten with benzine stain
the laundry (e.g. hair clips, safety pins, pins).
remover, lay the garment on a soft cloth and dab
the stain; treat several times.
Button up pillowcases, close zip fasteners,
hooks and poppers. Tie any belts or long tapes.
Dried grease stains: moisten with turpentine,
lay the garment on a soft surface and dab the
Remove persistent stains before washing. Rub
stain with the fingertips and a cotton cloth.
particularly soiled areas with a special detergent
or detergent paste.
Rust: oxalic acid dissolved in hot water or a rust
removing product used cold. Be careful with rust
Treat curtains with special care. Remove hooks
stains which are not recent since the cellulose
or tie them up in a bag or net.
structure will already have been damaged and
the fabric tends to hole.
Maximum loads
Mould stains: treat with bleach, rinse well
Recommended loads are indicated in the
(whites and fast coloureds only).
programme charts.
Grass: soap lightly and treat with bleach (whites
General rules:
and fast coloureds only).
cotton, linen: drum full but not too tightly
Ball point pen and glue: moisten with acetone
packed
(*), lay the garment on a soft cloth and dab the
stain.
synthetics: drum no more than half full
9

Lipstick: moisten with acetone as above, then
Quantity of detergent to be used
treat stains with methylated spirits. Remove any
The type and quantity of detergent will depend
residual marks from white fabrics with bleach.
on the type of fabric, load size, degree of soiling
Red wine: soak in water and detergent, rinse
and hardness of the water used.
and treat with acetic or citric acid, then rinse.
Water hardness is classified in so-called
Treat any residual marks with bleach.
“degrees” of hardness. Information on hardness
Ink: depending on the type of ink, moisten the
of the water in your area can be obtained from
fabric first with acetone (*), then with acetic acid;
the relevant water supply company, or from your
local authority.
treat any residual marks on white fabrics with
bleach and then rinse thoroughly.
Follow the product manufacturers’ instructions
on quantities to use.
Tar stains: first treat with stain remover,
Use less detergent if:
methylated spirits or benzine, then rub with
detergent paste.
– you are washing a small load
(*) do not use acetone on artificial silk
– the laundry is lightly soiled
– large amounts of foam form during washing.
Detergents and additives
Good washing results also depend on the choice
Degrees of water hardness
of detergent and use of the correct quantities to
avoid waste and protect the environment.
Degrees
Although biodegradable, detergents contain
Level
Characteristic
German
French
substances which, in large quantities, can upset
°dH
°T.H.
the delicate balance of nature.
1
soft
00-07
00-15
The choice of detergent will depend on the type
2
medium
08-14
16-25
of fabric (delicates, woollens, cottons, etc.), the
3
hard
15-21
26-37
colour, washing temperature and degree of
4
very hard
more than 21
more than 37
soiling.
All commonly available washing machine
detergents may be used in this appliance:
– powder detergents for all types of fabric,
– powder detergents for delicate fabrics (60°C
max) and woollens,
– liquid detergents, preferably for low
temperature wash programmes (60°C max)
for all types of fabric, or special for woollens
only.
The detergent and any additives must be placed
in the appropriate compartments of the
dispenser drawer before starting the wash
programme.
If using concentrated powder or liquid
detergents, a programme without prewash must
be selected.
Pour liquid detergent into the dispenser drawer
compartment marked just before starting
the programme.
Any fabric softener or starching additives must
be poured into the compartment marked
before starting the wash programme.
Follow the product manufacturer’s
recommendations on quantities to use.
10
i
International wash code symbols
These symbols appear on fabric labels, in order to help you choose the best way to treat your laundry.
Energetic wash
Max. wash
Max. wash
Max. wash
Max. wash
temperature
temperature
temperature
temperature
95°C
60°C
40°C
30°C
Hand wash Do not
Delicate wash
wash
at all
Bleaching Bleach in cold water Do not bleach
Ironing Hot iron
Warm iron
Lukewarm iron
Do not iron
max 200°C
max 150°C
max 110°C
Dry cleaning Dry cleaning
Dry cleaning in
Dry cleaning
Do not
in all solvents
perchlorethylene,
in petrol,
dry clean
petrol, pure alcohol,
pure alcohol
R 111 & R 113
and R 113
high
temperature
low
temperature
Drying Flat On the line On clothes
Tumble dry
Do not
hanger
tumble dry
A
P
F
95
60
60
40
40
40
30
30
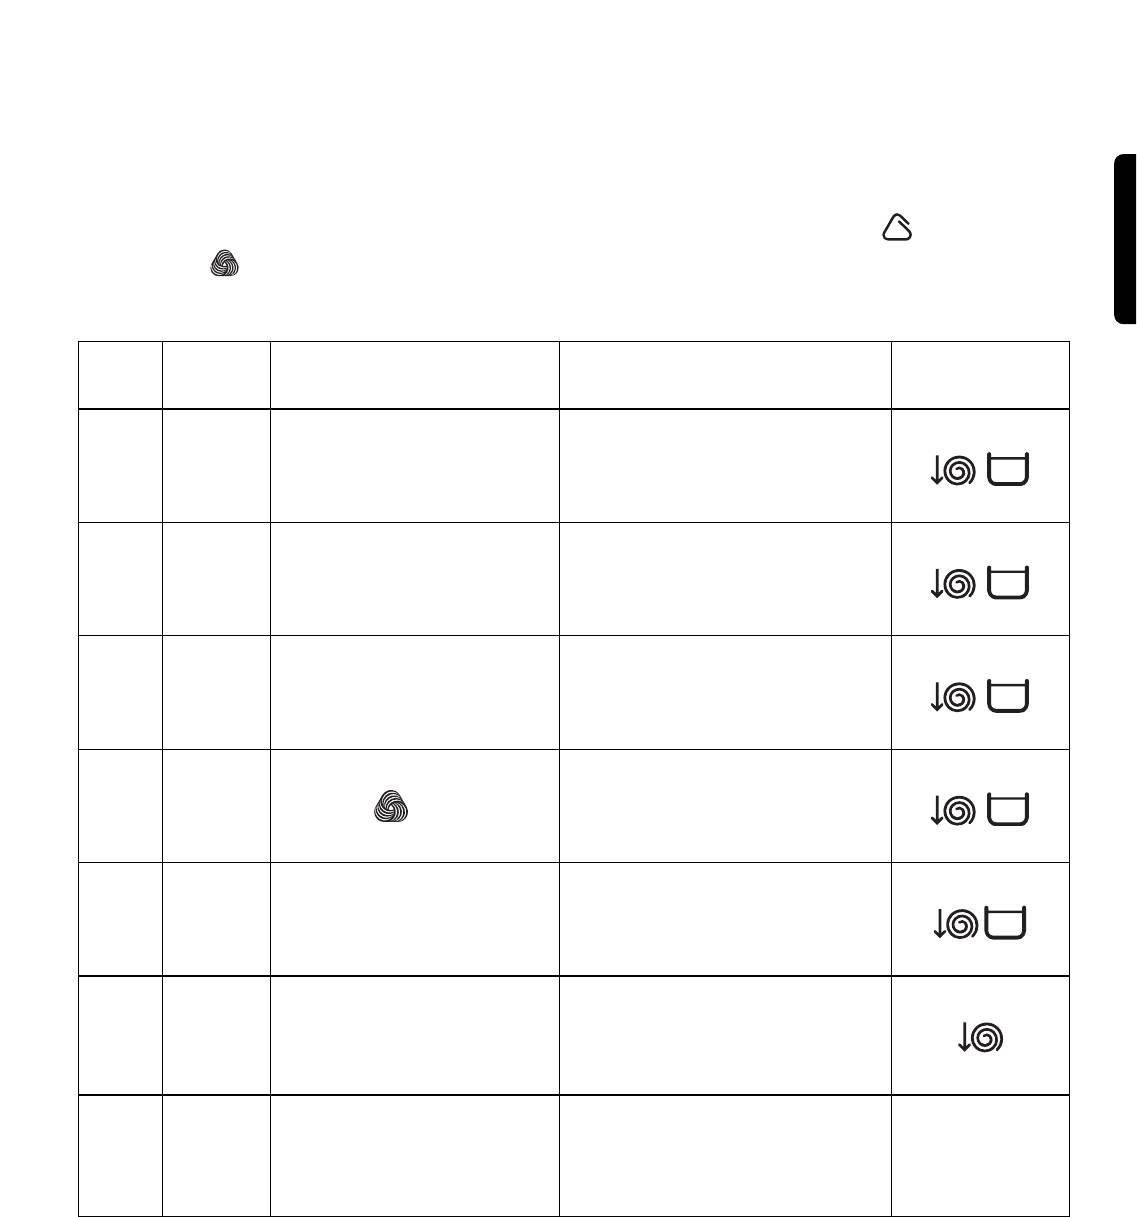
Energetic programmes for cotton and linen
Maximum load: 3 kg
Possible
Progr.
Temp. Type of laundry Cycle description
options
Prewash
Whites
Wash at 40°-95°C
A
40°-95°
with prewash
4 rinses
(heavy soiled)
Long spin
Whites
Wash at 40°-95°C
B
40°-95°
without prewash
4 rinses
(normally soiled)
Long spin
Coloureds
Wash at 30°-60°C
B
30°-60°
without prewash
4 rinses
(normally soiled)
Long spin
Wash at 30°-40°C
Quick wash
C
30°-40°
4 rinses
lightly soiled laundry
Long spin
4 rinses with liquid
D
Rinses
additives, if required
Long spin
1 rinse with liquid
Softener
additive, if required
F
Long spin
G
Spin Drain and long spin
The temperatures indicated are the optimum temperatures for each programme and depend on the
type of laundry and degree of soiling.
12
Gentle programmes for synthetics, mixed fibres, delicates and
woollens
ENGLISH
Maximum load: 1 kg, woollens: 0.7kg
Possible
Progr.
Temp. Type of laundry Cycle description
options
Prewash
Synthetics
Wash at 30°-60°C
H
30°-60°
with prewash
3 rinses
(heavy soiled)
Short spin
Synthetics
Wash at 30°-60°C
J
30°-60°
without prewash
3 rinses
(normally soiled)
Short spin
Wash at 30°-40°C
K
30°-40°
Delicate fabrics — Silk
3 rinses
Short spin
Wash at 30°-40°C
L
30°-40°
3 rinses
Woollens
Short spin
3 rinses with fabric softener
M
Rinses
Short spin
Short spin
Drain and short spin
N
P
Drain Draining of water
The temperatures indicated are the optimum temperatures for each programme and depend on the
type of laundry and degree of soiling.
13
14
P0004
C0005
C0004
i
Operating sequence
Before washing your first load of laundry, we
recommend that you run a cotton cycle at 60°C,
with the machine empty, in order to remove any
manufacturing residue from the drum and tub.
Pour half a measure of detergent into the main
wash compartment and start up the machine.
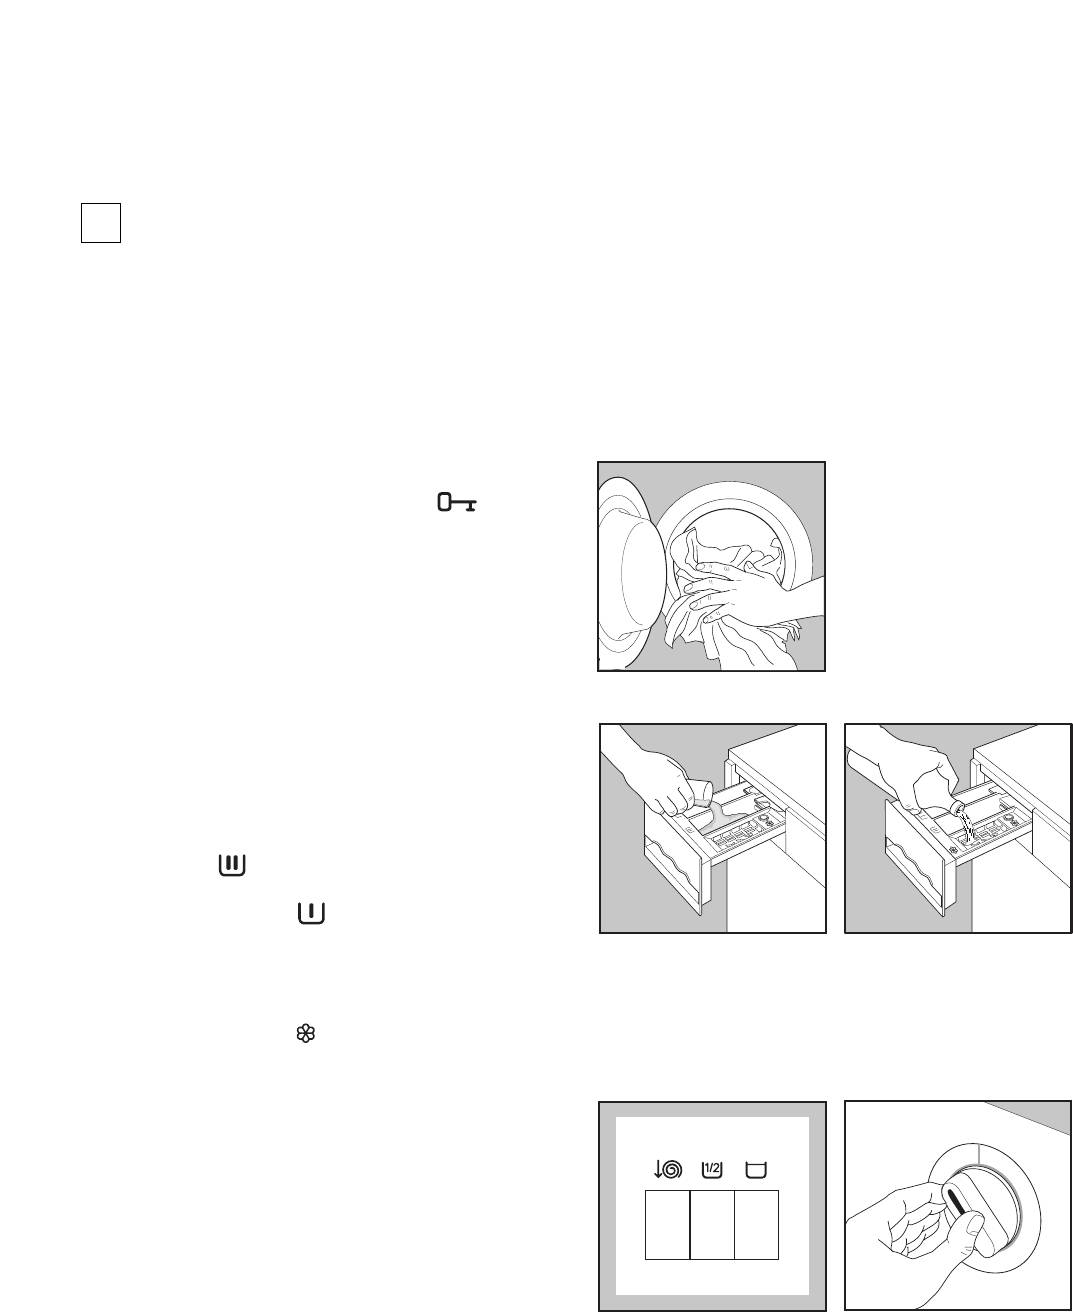
1.Place the laundry in the drum
Open the door by depressing button .
Place the laundry in the drum, one item at a
time, shaking them out as much as possible.
Close the door.
2.Measure out the detergent
Pull out the dispenser drawer until it stops.
Measure out the amount of detergent
recommended by the manufacturer in a
graduated cup and pour it into the main wash
compartment . If you wish to carry out a
prewash, pour detergent into the appropriate
compartment marked .
3.Measure out the additives
If required, pour fabric softener into the
compartment marked without exceeding the
«MAX» mark.
4.Select the desired option(s)
Depress one or more buttons; depending on the
selected programme.
5.Select the temperature
Turn the selector dial to the required
temperature setting.
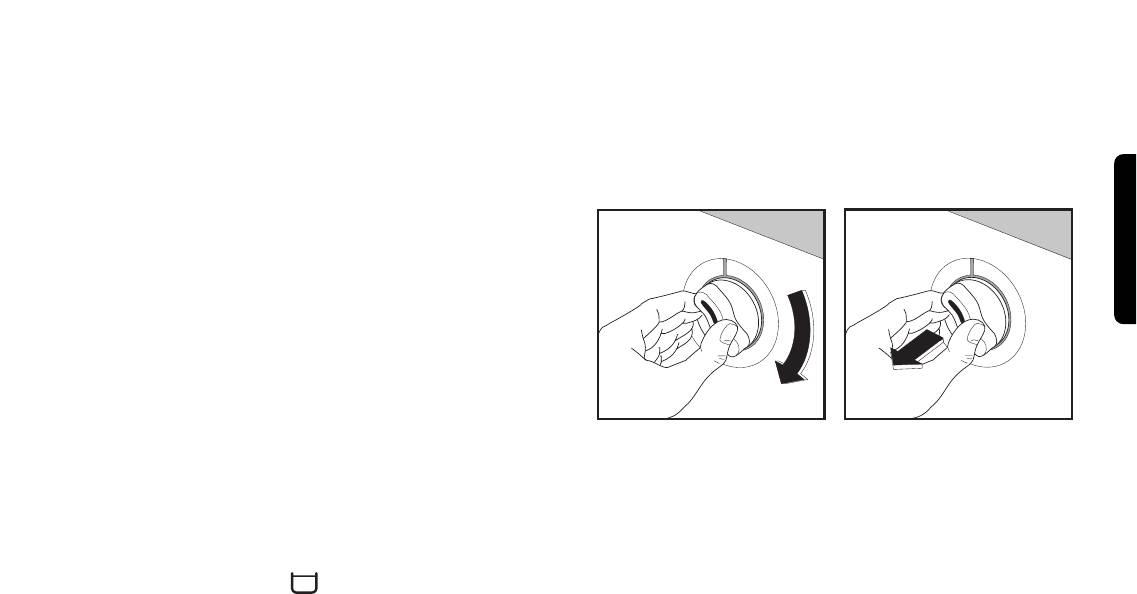
6.Select the programme and start it
Turn the programme selector dial clockwise to
the required wash programme and pull it
ENGLISH
outwards: the operating pilot light comes on and
the machine starts to operate.
7.At the end of the programme
The machine stops automatically, the operating
pilot light goes out.
If you have selected a gentle programme with
the anticrease option
,
drain the water before
opening the door.
It is normal to have to wait for about 2 minutes
before being able to open the door to allow the
safety lock to release.
Depress the programme selector dial to switch
the machine off.
Remove the laundry.
Turn the drum by hand to make sure it is
completely empty, so as to avoid any forgotten
items being damaged in a subsequent wash
(e.g. shrinking) or their colour running into a
load of whites.
Release any button which has been depressed.
Turn the water tap off and unplug the machine.
Leave the door ajar to air the machine.
15
C0002
P0038
P0041
1.Bodywork
Clean the outside of the machine with warm
water and a neutral, non-abrasive household
detergent. Rinse with clean water and dry with a
soft cloth.
Important: do not use methylated spirits,
solvents or similar products to clean the
bodywork.
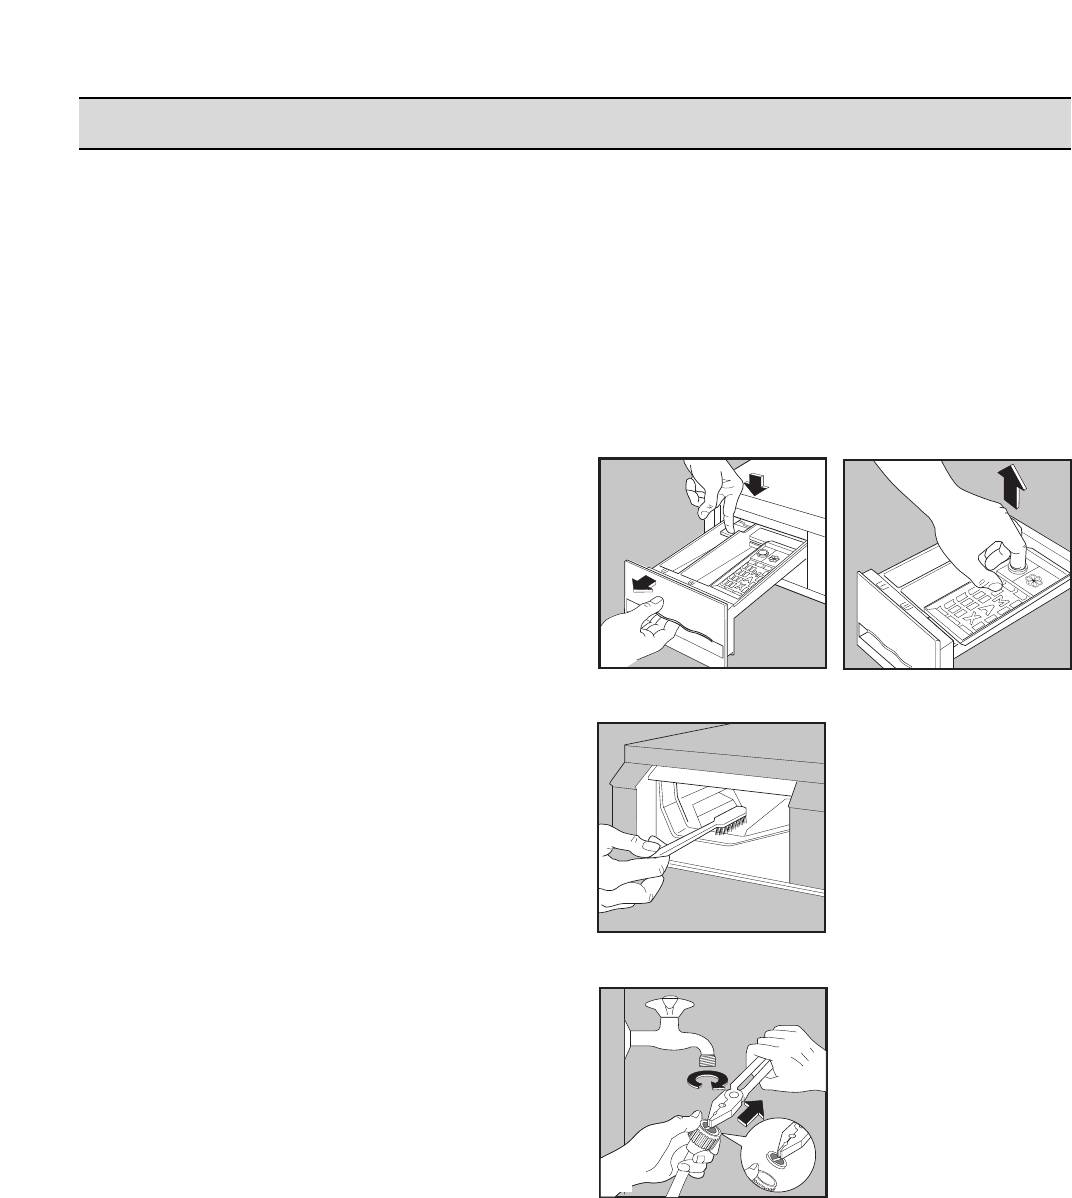
2.Detergent dispenser drawer
After a while, detergents and fabric softeners
leave deposits in the drawer.
Clean the drawer from time to time by rinsing it
under a running tap. To remove the drawer from
the machine, press the button in the rear left-
hand corner.
To facilitate cleaning, the top part of the additive
compartments can be removed.
Detergent can also eventually accumulate inside
the drawer recess: clean it with an old
toothbrush. Refit the drawer after cleaning.
3.Water inlet filter
If you notice that the machine is taking longer to
fill, check that the filter in the water inlet hose is
not blocked.
Turn off the water tap.
Unscrew the hose from the tap and remove the
filter.
Clean it with a stiff brush.
Refit the filter and screw the hose back onto the
tap.
C0003

4.Drain pump
The machine is equipped with a self-cleaning
pump which does not need any maintenance.
ENGLISH
5.The dangers of freezing
If the machine is exposed to temperatures below
0°C, certain precautions should be taken.
n
Turn off the water tap.
n
Unscrew the inlet hose.
n
Unhook the drain hose from the rear support
and position the end of this hose and that of
the inlet hose in a bowl. Run the draining
programme until the selector dial is in the
“Stop” position.
n
Switch the machine off.
n
Screw the inlet hose and reposition the drain
hose.
n
When you intend to start the machine up
again, make sure that the room temperature
is above 0°C.
17
SOMETHING NOT WORKING
Problems which you can resolve yourself
n Problem n Possible cause
n
n The machine does not start up:
Check that the door is firmly closed.
n
Check that the machine is plugged in and
that there is power at the socket.
n
Check that the main fuse has not blown.
n
Check that the programme selector dial is
positioned correctly and pulled out.
n
n The machine does not fill:
Check that the water tap is open.
n
Check that water is coming out of the tap.
n
Check that the inlet hose is not squashed or
kinked.
n
Check that the filter in the inlet hose is not
blocked.
n
Check that the door is closed.
n
n The machine fills then empties
The end of the drain hose is too low. Refer to
relevant paragraph in “water drainage”
immediately:
section.
n
n The machine does not empty
Check that the drain hose is not squashed or
kinked.
and/or does not spin:
n
The anticrease option has been selected.
n
The laundry is not evenly distributed in the
drum.
n
n There is water on the floor:
Too much detergent or unsuitable detergent
(creates too much foam) has been used.
n
Check whether there are any leaks from one
of the inlet hose fittings. It is not always easy
to see this as the water runs down the hose;
check to see if it is damp.
n
Check that the drain hose is not damaged.
n
n Unsatisfactory washing results:
Too little detergent or unsuitable detergent
has been used.
n
Stubborn stains have not been treated prior
to washing.
n
The correct temperature or programme was
not selected.
18

n Problem n Possible cause
n
n The machine vibrates or is noisy:
Check that all the transit bolts and packing
ENGLISH
have been removed.
n
Check that the machine is not resting against
anything.
n
Check that the support feet are resting firmly
on the ground.
n
Check that the laundry is evenly distributed in
the drum.
n
Maybe there is very little laundry in the drum.
n
n The door will not open:
The programme is still running.
n
The door lock has not yet been released.
n
There is water in the drum.
n
n Water is not visible in the
The machine, which is the result of modern
technology, runs in a very economical way
machine:
with low water consumption. Performance is
nevertheless excellent.
n Spinning starts late or the
n The electronic unbalance detection device
has cut in because the laundry is not evenly
machine does not spin:
distributed in the drum. The laundry is
redistributed by reverse rotation of the drum.
This may happen several times before the
unbalance disappears and normal spinning
can resume. If, after 6 minutes, the laundry is
still not evenly distributed in the drum, the
machine will not spin. In this case,
redistribute the load manually and reselect
the spin programe.
If you are unable to identify or solve the
problem, contact our service centre. Before
telephoning, make a note of the model, serial
number and purchase date of your machine: the
Service Centre will require this information.
19
Mod.
……….
Ser.
Mod. ……….
Prod. No. ………..
Ser. No. ………
P0042
n The machine makes an unusual
n The machine is fitted with a commutator
motor which makes an unusual noise
noise:
compared with other traditional machines.
This motor enables a softer start to the spin
and controls the increase in spin speed
better. In this way, machine performance is
improved.
UvaΩaemyj Pokupatelw!
Спасибо за то, что Вы выбрали продукцию
■
Добимaйтecь соответствия количества
компании “Занусси”. Мы уверены, что Вы
моющего средства жёсткости
будете очень довольны Вашей новой
водопроводной воды, количеству белья и
стиральной машиной.
степени его загрязнённости.
Эта новая стиральная машина отвечает всем
■
Выбшкфоеу “короткую” программу для
требованиям современной стирки белья, так
мало загрязнённого белья.
как позволяет сэкономить воду,
электроэнергию и стиральный порошок.
é
éıı‡‡Ì̇‡ ÓÓÍÍÛÛÊʇ‡˛˛˘˘ÂÂÈÈ ÒÒ‰‰˚˚
■
Терморегулятор позволяет выбрать
наиболее подходящую температуру для
■
èèÓÓ‚‚ÚÚÓÓÌÌÓÓ ËËÒÒÔÔÓÓÎθ¸ÁÁÓÓ‚‚‡‡ÌÌËËÂÂ
каждой программы стирки.
ÛÛÔÔ‡‡ÍÍÓÓ‚‚ÓÓ˜˜ÌÌ˚˚ıı Ïχ‡ÚÚÂÂˡ‡ÎÎÓÓ‚‚
■
Используя программу с температурой воды
Материалы, обозначенные символом
95°C, автоматическое охлаждение воды до
могут использоваться повторно. Для
60°C перед её сливом предохраняет
их утилизации необходимо укладывать их в
пластиковые трубы домашней
специальные места (или контейнеры).
канализационной системы от деформации
Hеобходимую информацию мн ьщ½уеу
по причине слишком высокой температуры
зщдг•шец м ьуыетщь ьгтшсшзфдшеуеу.
воды.
>РЕ< = полиэтилен
■
Yстройство контроля дисбаланса
>PS< = полистирол
обеспечивает устойчивость машины во
>РР< = полипропилен
время отжима.
■
ììÚÚËËÎÎËËÁÁ‡‡ˆˆËËflfl Ïχ‡¯¯ËËÌÌ˚˚
êêÂÂÍÍÓÓÏÏÂÂÌ̉‰‡‡ˆˆËËËË ÔÔÓÓ ÓÓıı‡‡ÌÌÂÂ
Для утилизации машины необходимо отрезать
ÓÓÍÍÛÛÊʇ‡˛˛˘˘ÂÂÈÈ ÒÒ‰‰˚˚
кабель питания и вывести из строя замок
загрузочного люка, чтобы в машинe не могли
Для экономии потребления воды и
зфлкыецыå дети.
электроэнергии, а также для охраны
окружающей среды, рекомендуем Вам
Для правильной утилизации машины
придерживаться следующих рекомендаций:
необходимо обратиться яф ызкфмлщо м ьуыетно
ьгтшсшзфдшеуе.
■
Использyйтe машину с полной загрузкой
белья, но не перегружая барабан.
■
Использyйтe программу предварительной
стирки только для очень грязного белья.
Некоторые параграфы данного руководства помечены символами, имеющими следующее значение:
Здесь Вы найдёте важные сведения по
эксплуатации Вашей стиральной
машины. Несоблюдение данных
требований может привести к нанесению
ущерба людям и имуществу.
Обозначает информацию для
i
правильной эксплуатации машины и
для достижения лучших результатов.
Обозначает важную информацию по
охране природы.
Наш вклад в защиту окружающей среды:
мы используем только бумагу из вторсырья.
20
- 1
- 2
Аннотации для Стиральной Машиной Zanussi FL 726 CN в формате PDF
Топ 10 инструкций
Другие инструкции
![]()
WASHINGMACHINE
STIRALWNAÅ MAfiINA
FL726CN
INSTRUCTION BOOKLET
|
124972370 |
RUKOVODSTVO PO ÈKSPLUATACII |

YOUR NEW WASHING MACHINE
This new washing machine meets all requirements for a modern washing of laundry with reduced consumption of water, energy and detergent.
■The temperature selector dial allows you to choose personally the suitable washing temperature for your laundry.
■The automatic cooling of the washing water from 95°C to 60°C before draining will prevent plastic pipes of your drainage system from being deformed.
■The anti-unbalance device ensures that the washing machine remains stable when spinning.
 Ecological hints
In order to obtain water and energy savings and to protect the environment, we advice you to follow these instructions:
■Whenever possible, wash the maximum load for the selected programme, without overloading the drum.
■Use a programme with prewash only for heavy soiled items.
■Measure out detergent according to the water hardness, degree of soiling and quantity of laundry being washed.
■Select “Quick wash” for lightly soiled laundry.
 Environment protection
■ Packaging recycling
Materials marked with the 
 symbol are recyclable. To enable them to be recycled, they must be placed in the appropriate collection areas (or containers). Check with your local authorities.
>PE<= polyethylene >PS<= polystyrene >PP<= polypropylene
■ Washing machine scrapping
When the appliance is to be scrapped, cut off the power supply cable and make the door closing device inoperative to avoid it becoming a death trap for a child.
For correct disposal of the machine, contact your local authority department which provides for collection of urban solid refuse.
The symbols you will see on some paragraphs of this booklet have the following meaning:
Important information concerning the safety in the use of your machine. Disregarding this information might lead to damages.
Information for correct use of your i machine and to obtain the best
performance.
Important information concerning environment protection.
Our contribution to the protection of the environment: we use recycled paper.
2

CONTENTS
Important information . . . . . . . . . . . . .4
|
Description of the appliance . . |
. . . .5 |
|
|
■ |
Detergent dispenser drawer |
|
|
and programme chart . . . . . . . . . . . . . |
. . . .5 |
|
|
Technical specifications . . . . . . . |
. . . .5 |
|
|
Installation . . . . . . . . . . . . . . . . . . . . |
. . . .6 |
|
|
■ |
Unpacking . . . . . . . . . . . . . . . . . . . . . . |
. . . .6 |
|
■ |
Positioning . . . . . . . . . . . . . . . . . . . . . . |
. . . .6 |
|
■ |
Water inlet . . . . . . . . . . . . . . . . . . . . . . |
. . . .7 |
|
■ |
Water drainage . . . . . . . . . . . . . . . . . . |
. . . .7 |
|
■ |
Electrical connection . . . . . . . . . . . . . . |
. . . .7 |
|
Use . . . . . . . . . . . . . . . . . . . . . . . . . . . . . |
. . . .8 |
|
|
■ |
Control panel . . . . . . . . . . . . . . . . . . . |
. . . .8 |
|
■ |
Washing hints . . . . . . . . . . . . . . . . . . . |
. . . .9 |
|
Sorting the laundry . . . . . . . . . . . . . . . |
. . . .9 |
|
|
Temperatures . . . . . . . . . . . . . . . . . . . . |
. . . .9 |
|
|
Before loading the laundry . . . . . . . . . . |
. . . .9 |
|
|
Maximum loads . . . . . . . . . . . . . . . . . . |
. . . .9 |
|
|
Laundry weights . . . . . . . . . . . . . . . . . . |
. . . .9 |
|
|
Removing stains . . . . . . . . . . . . . . . . . |
. . . .9 |
|
|
Detergents and additives . . . . . . . . . . . |
. . .10 |
|
|
Quantity of detergent to be used . . . . . |
. . .10 |
|
|
■ |
International wash code symbols . . . . . |
. . .11 |
|
■ |
Washing programmes . . . . . . . . . . . . . . |
12-13 |
|
■ |
Operating sequence . . . . . . . . . . . . . . . |
14-15 |
|
Maintenance . . . . . . . . . . . . . . . . . . . |
. . .16 |
|
|
■ |
Bodywork . . . . . . . . . . . . . . . . . . . . . . . |
. . .16 |
|
■ |
Detergent dispenser drawer . . . . . . . . . |
. . .16 |
|
■ |
Water inlet filter . . . . . . . . . . . . . . . . . . |
. . .16 |
|
■ |
Drain pump . . . . . . . . . . . . . . . . . . . . . |
. . .17 |
|
■ |
The dangers of freezing . . . . . . . . . . . . |
. . .17 |
|
Something not working . . . . . . . . |
18-19 |
3

IMPORTANT INFORMATION
It is important that this instruction book be kept with the appliance for future reference. If you sell or give the appliance away, make sure that the book is passed to the new owners so that they can familiarise themselves with its operation and relevant warnings.
The following warnings are provided in the interests of overall safety. You must read them carefully before installing or using the appliance.
Installation
■When unpacking the appliance, check that it is not damaged. If in doubt, do not use it and contact the Service Centre.
■All internal packing must be removed before using the appliance. Serious damage may be caused to the machine or adjacent furniture if the protective transit devices are not removed or are not completely removed. Refer to the relevant paragraph in the instruction book.
■Any electrical work required to install this appliance must be carried out by a qualified electrician.
■Use only the recommended quantities of fabric softener. An excessive amount could damage the laundry.
■Leave the porthole door slightly ajar when the appliance is not in use. This preserves the door seal and prevents the formation of musty smells.
■Always check that water has emptied out before opening the door. If not, drain the water following the instructions in the instruction book.
■Always unplug the appliance and shut the water tap after use.
■Any plumbing work required to install this appliance must be carried out by a qualified plumber.
■After having installed the machine, check that it is not standing on its electrical supply cable.
■If the appliance is placed on a carpeted floor, ensure that air can circulate freely between the adjustable feet and the floor.
Service/repair
■In the event of a fault, do not attempt to repair the appliance yourself. Repairs carried out by inexperienced persons may cause damage.
■If repairs are needed, contact an authorised service centre and ask for genuine spare parts.
Use
■This appliance is designed for domestic use. It must not be used for purposes other than those for which it was designed.
■Do not overload the appliance. Follow the instructions in the instruction book.
■Only wash fabrics which are designed to be machine washed. Follow the instructions on each garment label.
■Make sure that all pockets are empty. Objects such as coins, safety pins, pins and screws can cause extensive damage.
■Do not machine wash garments saturated with petroleum, methylated spirits, trichlorethylene, etc. If such fluids have been used to remove stains prior to washing, wait until they have completely evaporated from the fabric before placing garments in the appliance.
■Place small items such as socks, belts, etc. in a cloth bag or pillowcase to prevent them getting trapped between the drum and the tub.
4
Safety
■This appliance is designed to be used by adults. Children must not be allowed to touch the controls or play with the product.
■During high temperature wash cycles the glass door becomes very hot. Do not touch it.
■Pets sometimes climb into washing machines. Check the drum before each use.

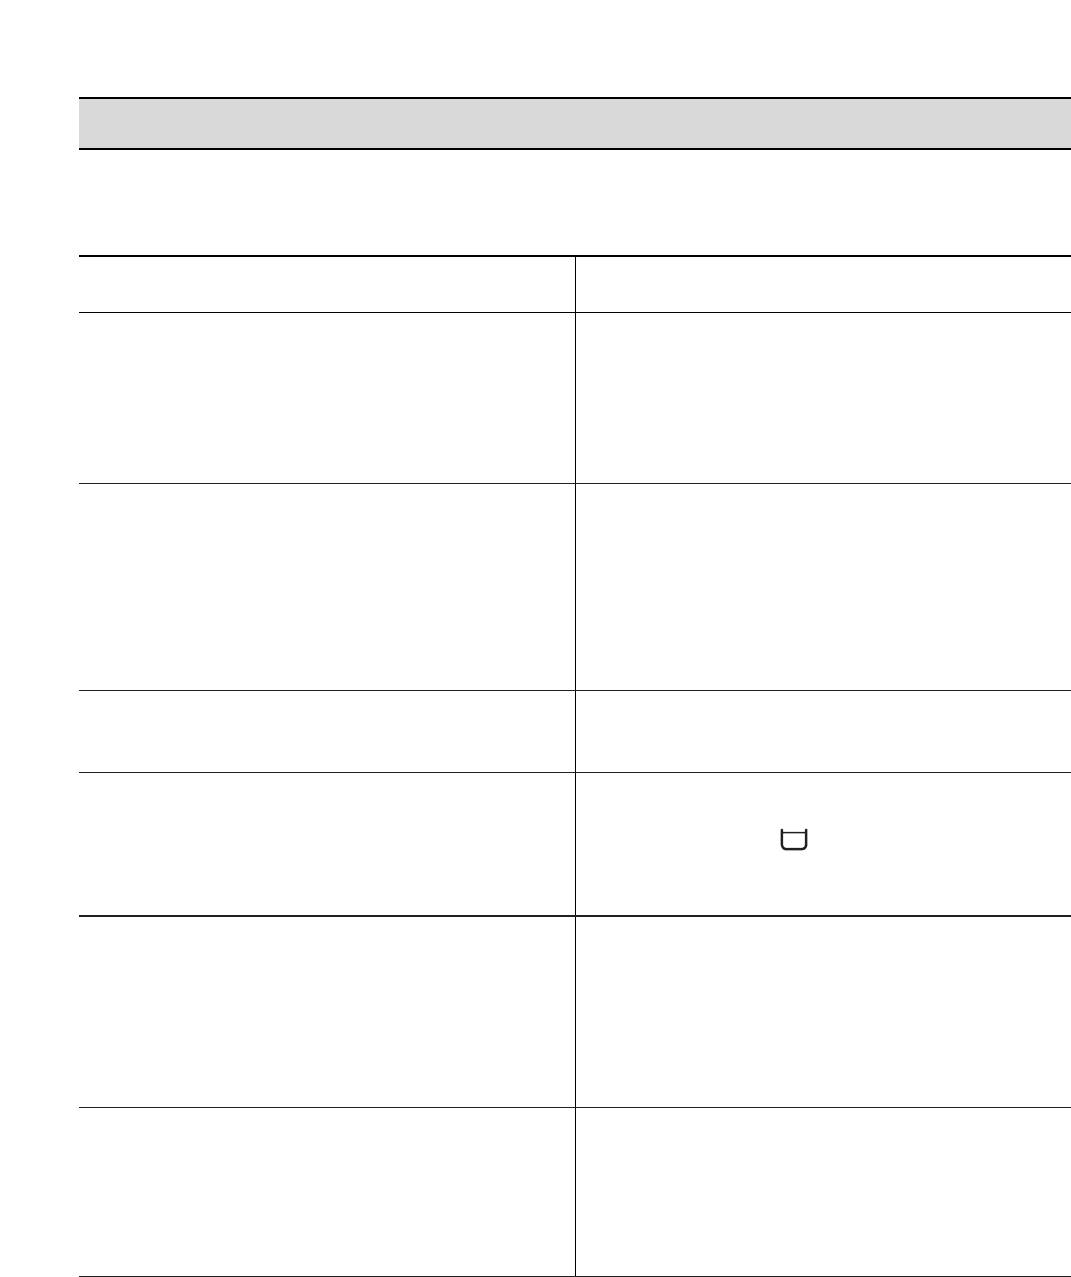
DESCRIPTION OF THE APPLIANCE
|
1 |
Detergent dispenser drawer |
2 |
3 4 5 6 7 |
|
2 |
Programme chart |
||
|
3 |
Option buttons |
||
|
4 |
Door opening button |
||
|
5 |
Temperature selector dial |
||
|
6 |
Operating pilot light |
1 |
7Programme selector dial
8Adjustable feet
8
Detergent dispenser drawer and programme chart
Symbols
Prewash
Main wash
Fabric softener
C0006
There is a programme guide in symbols on the handle of the detergent dispenser drawer.
TECHNICAL SPECIFICATIONS
|
DIMENSIONS |
Height |
85 cm |
|
Width |
60 cm |
|
|
Depth |
32 cm |
|
|
POWER SUPPLY VOLTAGE/FREQUENCY |
220-230V/50 Hz |
|
|
TOTAL POWER ABSORBED |
1750 W |
|
|
MINIMUM FUSE PROTECTION |
10 A |
|
|
WATER PRESSURE |
Minimum |
50 N/cm2 |
|
Maximum |
80 N/cm2 |
|
|
MAXIMUM LOAD |
Cotton |
3.0 kg |
|
Synthetics, delicate fabrics |
1.0 kg |
|
|
Woollens |
0.7 kg |
|
|
SPIN SPEED |
700 rpm |
|
This appliance complies with the following EEC Directives: 73/23/EEC of 19/02/73 relating to low voltage
89/336/EEC of 03/05/89 relating to electromagnetic compatibility
5

INSTALLATION
Unpacking
All transit bolts and packing must be removed before using the appliance.
You are advised to keep all transit devices so that they can be refitted if the machine ever has to be transported again.
1.Using a spanner, unscrew and remove the rear right-hand bolt and lay the machine on its back, taking care not to squash the hoses. This can be avoided by placing one of the corner packing pieces between the machine and the floor.
2.Release the two plastic bags by removing the adhesive strip.
3.Carefully remove the right-hand bag (1) then the left-hand bag (2) by pulling them towards the centre of the machine.
4.Set the machine upright and remove the two remaining bolts from the back.
5.Pull out the three plastic spacers from the holes into which the bolts were fitted.
6.Plug the open holes with the plugs which you will find in the plastic bag containing the instruction booklet.
Positioning
Install the machine on a flat hard floor. Make sure that air circulation around the
machine is not impeded by carpets, rugs etc. Check that the machine does not touch the wall or other kitchen units.
Carefully level by screwing the adjustable feet in or out. Never place cardboard, wood or similar materials under the machine to compensate for any unevenness in the floor.
6

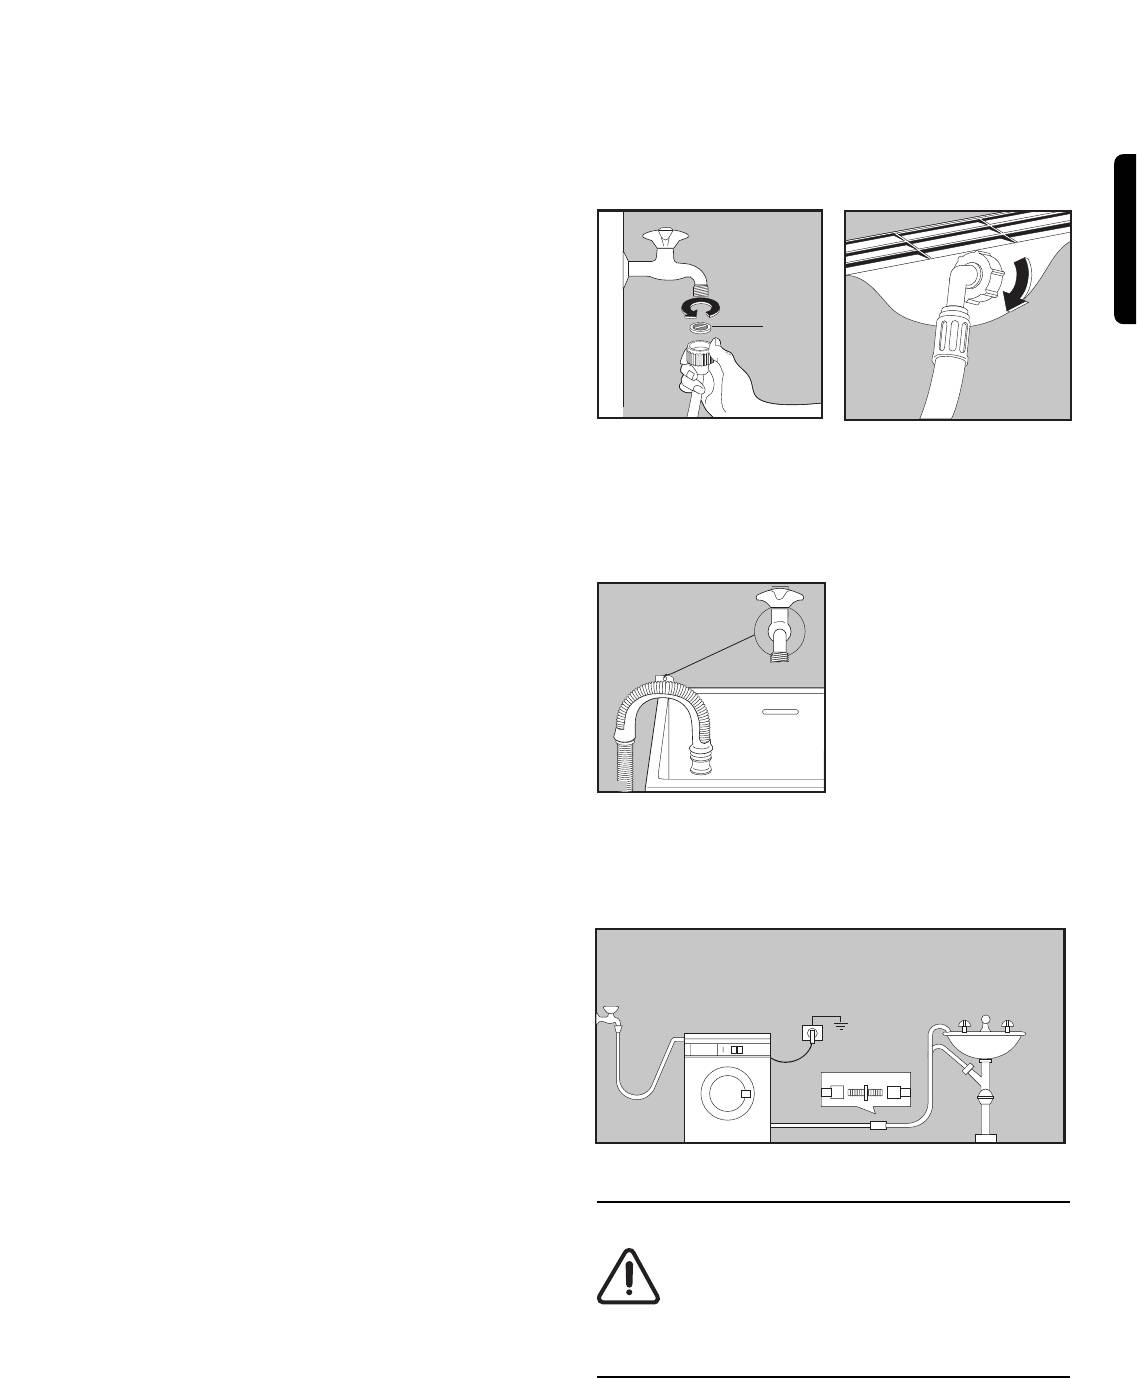
Water inlet
Connect the water inlet hose to a tap with a 3/4″ thread after having inserted the small filter “A” supplied with the machine.
The other end of the inlet hose which connects to the machine can be turned in any direction. Simply loosen the fitting, rotate the hose and retighten the fitting, making sure there are no water leaks.
The inlet hose must not be lengthened. If it is too short and you do not wish to move the tap, you will have to purchase a new, longer hose specially designed for this type of use.
Water drainage
The end of the drain hose can be positioned in three ways:
Hooked over the edge of a sink using the plastic hose guide supplied with the machine. In this case, make sure the end cannot come unhooked when the machine is emptying.
This could be done by tying it to the tap with a piece of string or attaching it to the wall.
In a sink drain pipe branch. This branch must be above the trap so that the bend is at least 60 cm above the ground.
Directly into a drain pipe at a height of not less than 60 cm and not more than 90 cm. The end of the drain hose must always be ventilated, i.e. the inside diameter of the drain
pipe must be larger than the outside diameter of the drain hose.
The drain hose must not be kinked. Run it along the floor; only the part near the drainage point must be raised.
Electrical connection
This machine is designed to operate on a 220-230 V, single-phase, 50 Hz supply.
Check that your domestic electrical installation can take the maximum load required (1.75 kW), also taking into account any other appliances in use.
Connect the machine to an earthed socket, in accordance with current wiring regulations.
The manufacturer declines any responsibility for damage or injury through failure to comply with the above safety precaution.
In the event of replacing the electric cable, please contact our nearest Service Centre.
7

F L 7 2 6 C N
1 2 3
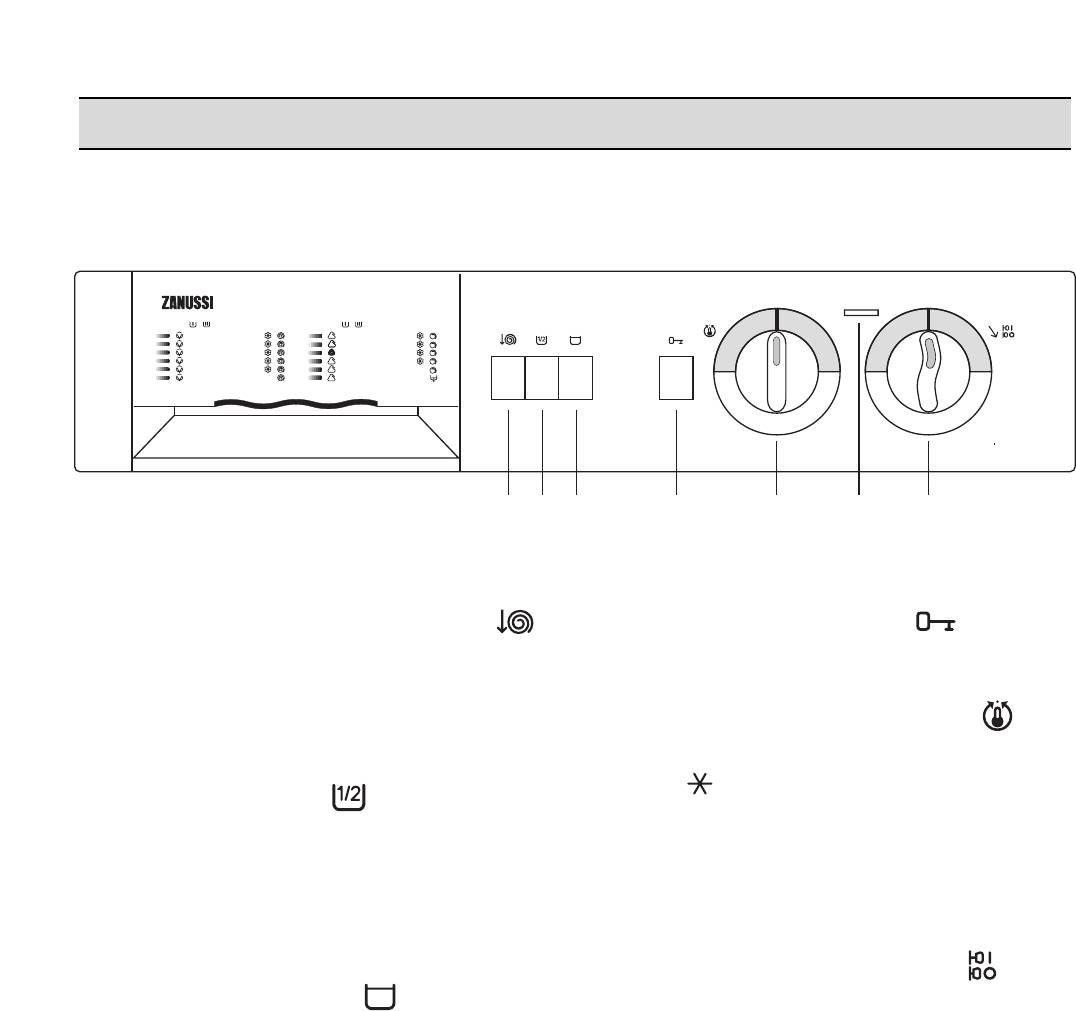
1 Spin speed reduction button 
By depressing this button the spin speed is reduced from 700 to 500 rpm in the cotton programmes and from 550 to 400 rpm in the gentle programmes.
2 Half-load button 
By depressing this button when washing a small load of cottons or linens (max 1.5 kg) you will obtain a reduction of the water consumption on the rinse cycle.
The machine will carry out 3 rinses instead of 4.
3 Anti-crease button 
By depressing this button on programmes H-J- K-L-M the water of the last rinse is not emptied out, to prevent the fabrics from creasing. To drain the water, depress this button again (the laundry will be gently spun) or select drain programme “P”.
4 Door opening button 
Depress it to open the door.
5 Temperature selector dial 
Turn this dial to select the washing temperature. Position  = cold wash.
6 Operating pilot light
This light is on whilst the machine is operating and goes out at the end of the programme.
7 Programme selector dial
To select the required programme, turn this dial clockwise until the programme letter is exactly opposite the pointer.
To start the programme, pull the dial outwards, to switch off the machine, push the dial inwards.
8

i Washing hints
Sorting the laundry
Follow the wash code symbols on each garment label and the manufacturer’s washing instructions.
Sort the laundry as follows:
whites, coloureds, synthetics, delicates, woollens.
Temperatures
95° for normally soiled white cottons and linen (e.g. tea cloths, towels, tablecloths, sheets…)
60° for normally soiled, colour fast garments (e.g. shirts, night dresses, pyjamas….) in linen, cotton or synthetic fibres and for lightly soiled white cotton (e.g. underwear).
 (cold) for delicate items (e.g. net curtains), 30°-40° mixed laundry including synthetic
fibres and woollens bearing the label «pure new wool, machine washable, non-shrink»
Before loading the laundry
Never wash whites and coloureds together. Whites may lose their “whiteness” in the wash.
New coloured items may run in the first wash; they should therefore be washed separately the first time.
Make sure that no metal objects are left in the laundry (e.g. hair clips, safety pins, pins).
Button up pillowcases, close zip fasteners, hooks and poppers. Tie any belts or long tapes.
Remove persistent stains before washing. Rub particularly soiled areas with a special detergent or detergent paste.
Treat curtains with special care. Remove hooks or tie them up in a bag or net.
Maximum loads
Recommended loads are indicated in the programme charts.
General rules:
cotton, linen: drum full but not too tightly packed
synthetics: drum no more than half full
delicate fabrics and woollens: drum no more than one third full.
Washing a maximum load makes the most efficient use of water and energy.
For heavily soiled laundry, reduce the load size.
Laundry weights
The following weights are indicative:
|
bathrobe |
1200 g |
|
napkin |
100 g |
|
quilt cover |
700 g |
|
sheet |
500 g |
|
pillow case |
200 g |
|
tablecloth |
250 g |
|
towelling towel |
200 g |
|
tea cloth |
100 g |
|
night dress |
200 g |
|
ladies’ briefs |
100 g |
|
man’s work shirt |
600 g |
|
man’s shirt |
200 g |
|
man’s pyjamas |
500 g |
|
blouse |
100 g |
|
men’s underpants |
100 g |
Removing stains
Stubborn stains may not be removed by just water and detergent. It is therefore advisable to treat them prior to washing.
Blood: treat fresh stains with cold water. For dried stains, soak overnight in water with a special detergent then rub in the soap and water.
Oil based paint: moisten with benzine stain remover, lay the garment on a soft cloth and dab the stain; treat several times.
Dried grease stains: moisten with turpentine, lay the garment on a soft surface and dab the stain with the fingertips and a cotton cloth.
Rust: oxalic acid dissolved in hot water or a rust removing product used cold. Be careful with rust stains which are not recent since the cellulose structure will already have been damaged and the fabric tends to hole.
Mould stains: treat with bleach, rinse well (whites and fast coloureds only).
Grass: soap lightly and treat with bleach (whites and fast coloureds only).
Ball point pen and glue: moisten with acetone (*), lay the garment on a soft cloth and dab the stain.
9
Lipstick: moisten with acetone as above, then treat stains with methylated spirits. Remove any residual marks from white fabrics with bleach.
Red wine: soak in water and detergent, rinse and treat with acetic or citric acid, then rinse. Treat any residual marks with bleach.
Ink: depending on the type of ink, moisten the fabric first with acetone (*), then with acetic acid; treat any residual marks on white fabrics with bleach and then rinse thoroughly.
Tar stains: first treat with stain remover, methylated spirits or benzine, then rub with detergent paste.
(*) do not use acetone on artificial silk
Detergents and additives
Good washing results also depend on the choice of detergent and use of the correct quantities to avoid waste and protect the environment. Although biodegradable, detergents contain substances which, in large quantities, can upset the delicate balance of nature.
The choice of detergent will depend on the type of fabric (delicates, woollens, cottons, etc.), the colour, washing temperature and degree of soiling.
All commonly available washing machine detergents may be used in this appliance:
–powder detergents for all types of fabric,
–powder detergents for delicate fabrics (60°C max) and woollens,
–liquid detergents, preferably for low temperature wash programmes (60°C max) for all types of fabric, or special for woollens only.
The detergent and any additives must be placed in the appropriate compartments of the dispenser drawer before starting the wash programme.
If using concentrated powder or liquid detergents, a programme without prewash must be selected.
Pour liquid detergent into the dispenser drawer compartment marked  just before starting the programme.
Any fabric softener or starching additives must be poured into the compartment marked  before starting the wash programme.
Follow the product manufacturer’s recommendations on quantities to use.
Quantity of detergent to be used
The type and quantity of detergent will depend on the type of fabric, load size, degree of soiling and hardness of the water used.
Water hardness is classified in so-called “degrees” of hardness. Information on hardness of the water in your area can be obtained from the relevant water supply company, or from your local authority.
Follow the product manufacturers’ instructions on quantities to use.
Use less detergent if:
–you are washing a small load
–the laundry is lightly soiled
–large amounts of foam form during washing.
Degrees of water hardness
|
Degrees |
||||
|
Level |
Characteristic |
|||
|
German |
French |
|||
|
°dH |
°T.H. |
|||
|
1 |
soft |
00-07 |
00-15 |
|
|
2 |
medium |
08-14 |
16-25 |
|
|
3 |
hard |
15-21 |
26-37 |
|
|
4 |
very hard |
more than 21 |
more than 37 |
|
10
![]()
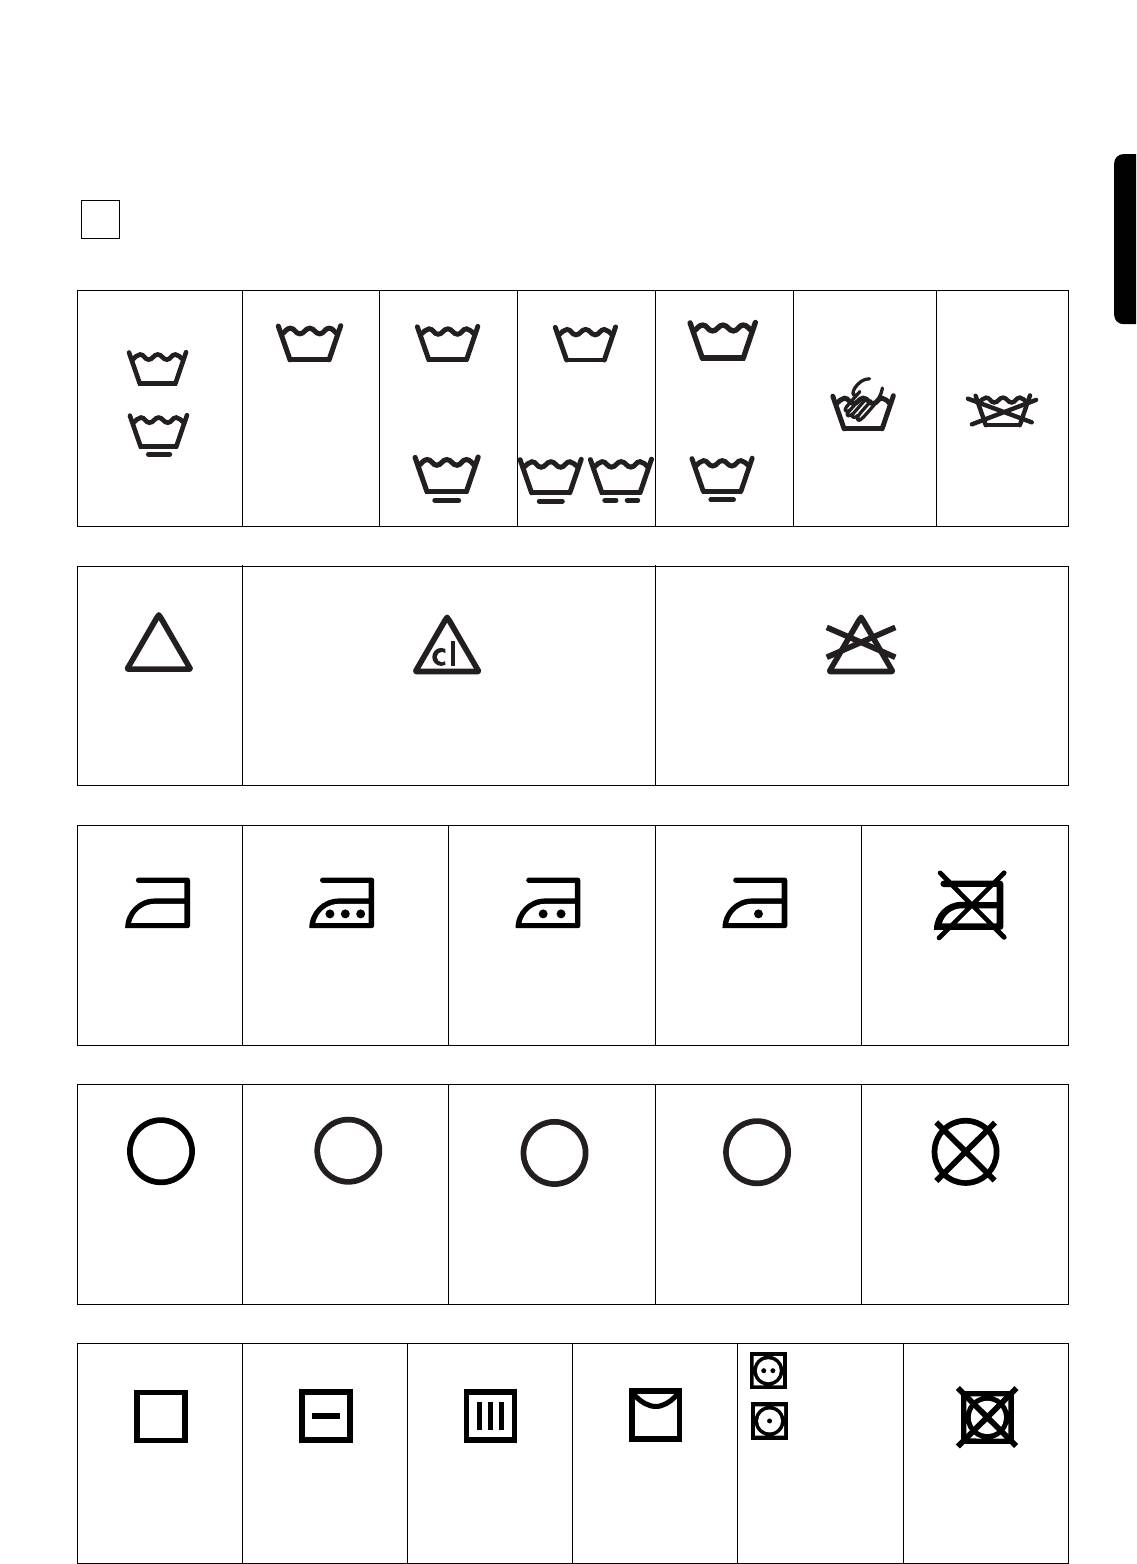
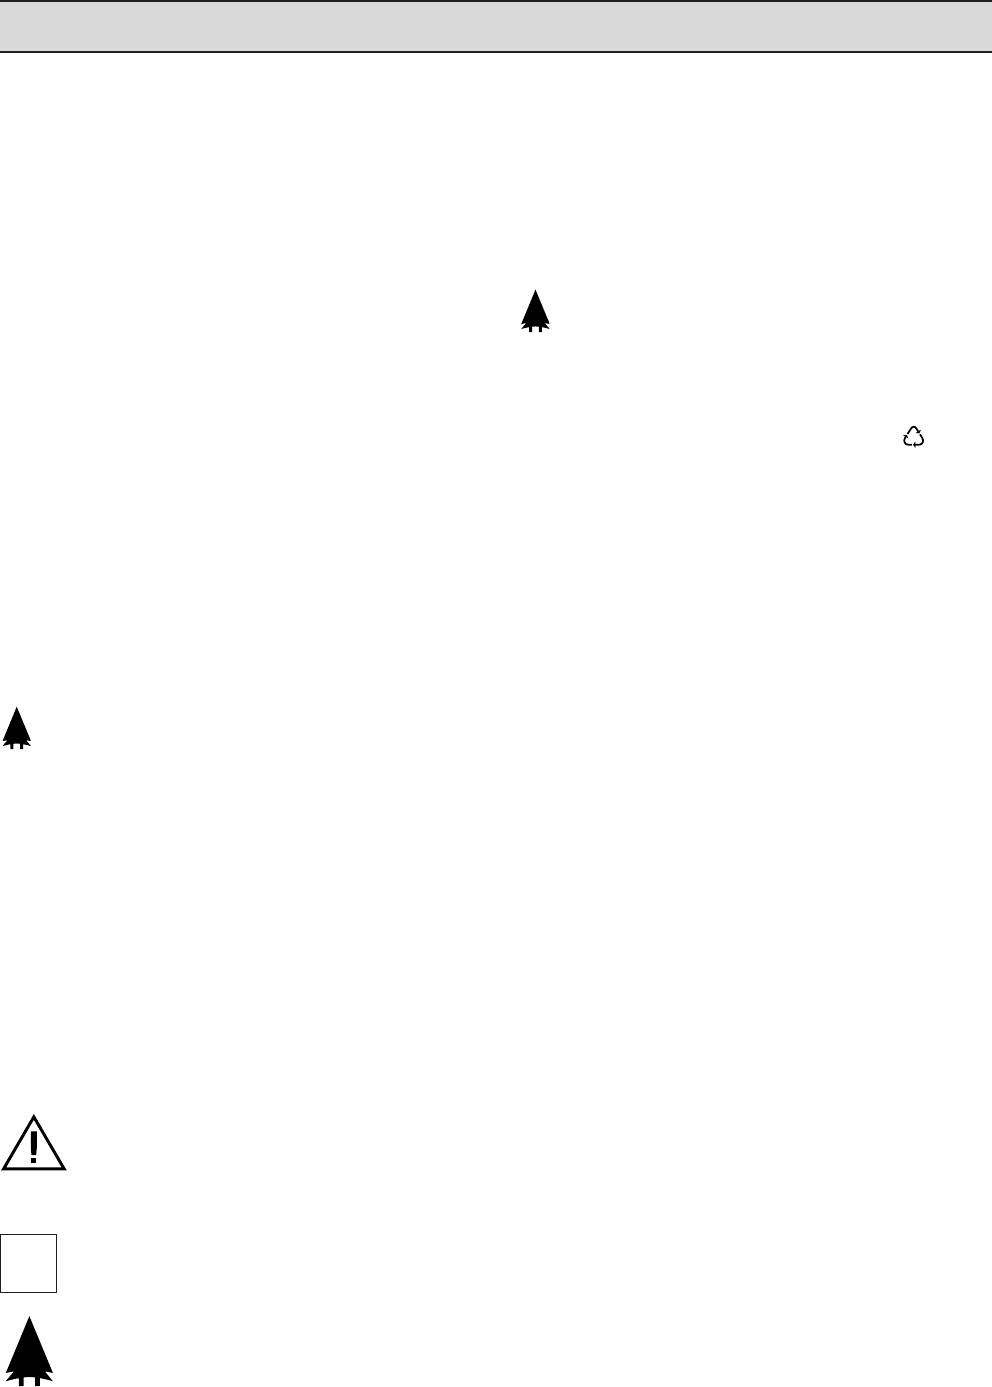
i International wash code symbols
These symbols appear on fabric labels, in order to help you choose the best way to treat your laundry.
|
Energetic wash |
30 |
||||
|
95 |
60 |
40 |
|||
|
Max. wash |
Max. wash |
Max. wash |
Max. wash |
||
|
temperature |
temperature |
temperature |
temperature |
||
|
95°C |
60°C |
40°C |
30°C |
||
|
60 |
Hand wash |
Do not |
|||
|
Delicate wash |
40 |
40 |
30 |
wash |
|
|
at all |
|
Bleaching |
|||
|
Bleach in cold water |
Do not bleach |
||
|
Ironing |
Hot iron |
Warm iron |
Lukewarm iron |
Do not iron |
|
max 200°C |
max 150°C |
max 110°C |
||
|
A |
P |
F |
|||||||||||||||||||||||||||||
|
Dry cleaning |
Dry cleaning |
Dry cleaning in |
Dry cleaning |
Do not |
|||||||||||||||||||||||||||
|
in all solvents |
perchlorethylene, |
in petrol, |
dry clean |
||||||||||||||||||||||||||||
|
petrol, pure alcohol, |
pure alcohol |
||||||||||||||||||||||||||||||
|
R 111 & R 113 |
and R 113 |
||||||||||||||||||||||||||||||
|
high |
|||||||||||||||||||||||||||||||
|
temperature |
|||||||||||||||||||||||||||||||
|
low |
|||||||||||||||||||||||||||||||
|
temperature |
|||||||||||||||||||||||||||||||
|
Drying |
Flat |
On the line |
On clothes |
Tumble dry |
Do not |
||||||||||||||||||||||||||
|
hanger |
tumble dry |
||||||||||||||||||||||||||||||
11

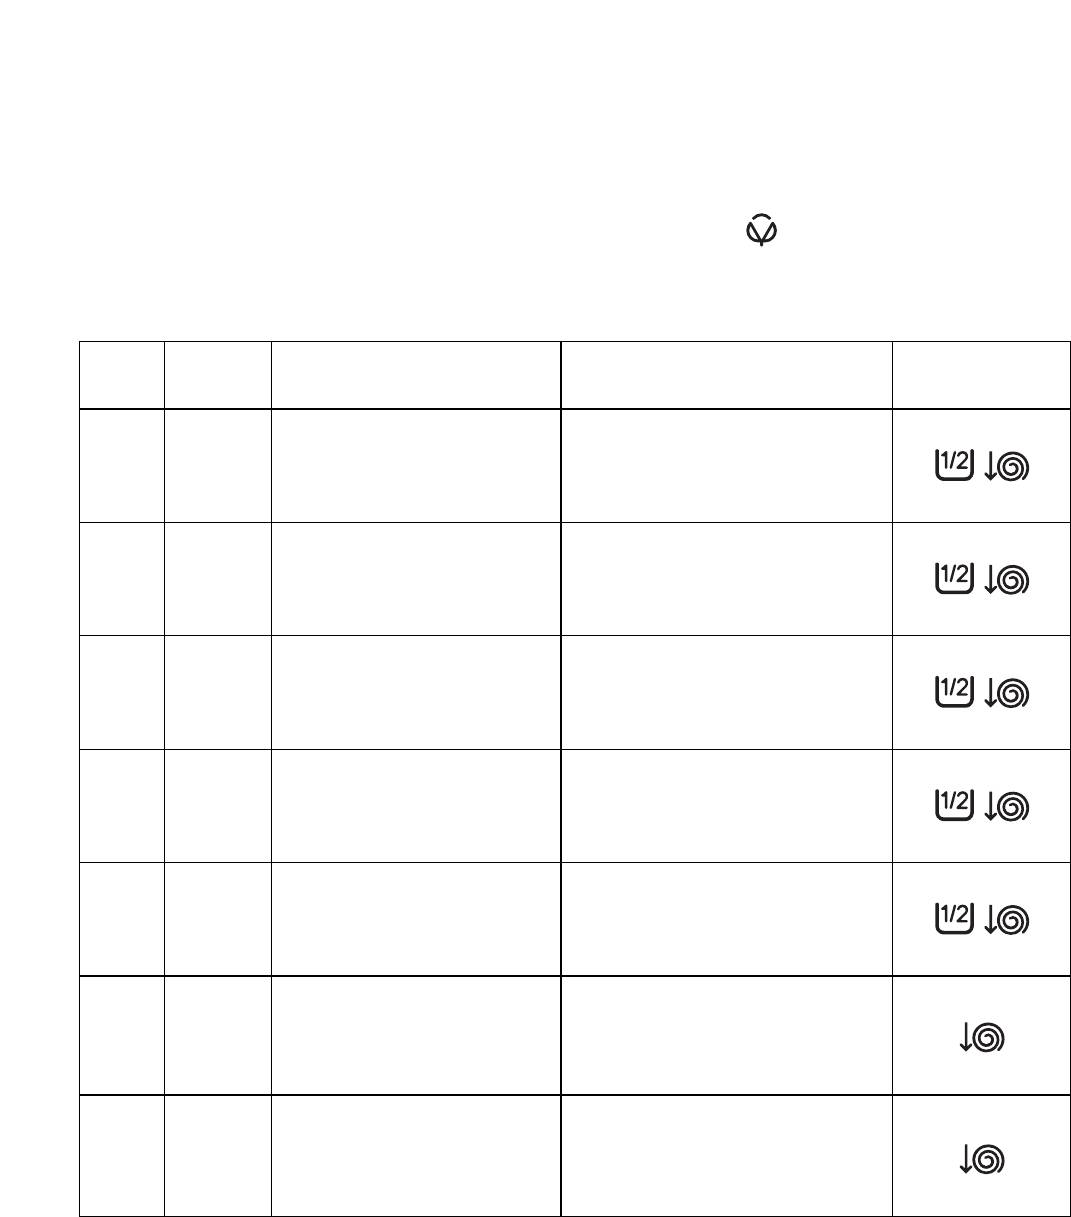
Energetic programmes for cotton and linen 
Maximum load: 3 kg
|
Progr. |
Temp. |
Type of laundry |
Cycle description |
Possible |
|
|
options |
|||||
|
Whites |
Prewash |
||||
|
A |
40°-95° |
Wash at 40°-95°C |
|||
|
with prewash |
|||||
|
4 rinses |
|||||
|
(heavy soiled) |
Long spin |
||||
|
B |
40°-95° |
Whites |
Wash at 40°-95°C |
||
|
without prewash |
4 rinses |
||||
|
(normally soiled) |
Long spin |
||||
|
B |
30°-60° |
Coloureds |
Wash at 30°-60°C |
||
|
without prewash |
4 rinses |
||||
|
(normally soiled) |
Long spin |
||||
|
C |
30°-40° |
Quick wash |
Wash at 30°-40°C |
||
|
4 rinses |
|||||
|
lightly soiled laundry |
|||||
|
Long spin |
|||||
|
D |
4 rinses with liquid |
||||
|
Rinses |
additives, if required |
||||
|
Long spin |
|||||
|
F |
1 rinse with liquid |
||||
|
Softener |
additive, if required |
||||
|
Long spin |
The temperatures indicated are the optimum temperatures for each programme and depend on the type of laundry and degree of soiling.
12
 Loading…
You can only view or download manuals with
Sign Up and get 5 for free
Upload your files to the site. You get 1 for each file you add
Get 1 for every time someone downloads your manual
Buy as many as you need
WASHINGMACHINE STIRALWNAÅ MAfiINA FL 726CN A B B C 40º- 95º 30º- 60º 30º- 40º D F G H J K L 30º- 60º 30º- 40º 30º- 40º M N P FL 124972370 9 8 4 CN INSTRUCTION BOOKLET RUKOVODSTVO PO ÈKSPLUATACII
YOUR NEW WASHING MACHINE This new washing machine meets all requirements for a modern washing of laundry with reduced consumption of water, energy and detergent. n The temperature selector dial allows you to choose personally the suitable washing temperature for your laundry. n n The automatic
Important information . . . . . . . . . . . . .4 Maintenance n Description of the appliance n . . . . . .5 Detergent dispenser drawer and programme chart . . . . . . . . . . . . . . . . .5 n n n n Technical specifications . . . . . . . . . . .5 . . . . . . . . . . . . . . . . . . . . . .16 Bodywork
IMPORTANT INFORMATION It is important that this instruction book be kept with the appliance for future reference. If you sell or give the appliance away, make sure that the book is passed to the new owners so that they can familiarise themselves with its operation and relevant warnings. The
1 2 3 4 5 6 7 8 Detergent dispenser drawer Programme chart Option buttons Door opening button Temperature selector dial Operating pilot light Programme selector dial Adjustable feet 2 A B B C 3 4 5 67 H 40º- 95º 30º- 60º 30º- 40º ENGLISH DESCRIPTION OF THE APPLIANCE J K L 30º- 60º 30º- 40º 30º- 40º
INSTALLATION Unpacking All transit bolts and packing must be removed before using the appliance. You are advised to keep all transit devices so that they can be refitted if the machine ever has to be transported again. 1. Using a spanner, unscrew and remove the rear right-hand bolt and lay the
ENGLISH Water inlet Connect the water inlet hose to a tap with a 3/4″ thread after having inserted the small filter “A” supplied with the machine. The other end of the inlet hose which connects to the machine can be turned in any direction. Simply loosen the fitting, rotate the hose and retighten
USE Control panel A B B C 40º- 95º 30º- 60º 30º- 40º H D F G J K L 30º- 60º 30º- 40º 30º- 40º M N P FL 1 2 3 4 5 6 1 Spin speed reduction button 4 Door opening button By depressing this button the spin speed is reduced from 700 to 500 rpm in the cotton programmes and from 550 to 400 rpm in the
Washing hints Sorting the laundry Follow the wash code symbols on each garment label and the manufacturer’s washing instructions. Sort the laundry as follows: whites, coloureds, synthetics, delicates, woollens. Temperatures 95° for normally soiled white cottons and linen (e.g. tea cloths, towels,
Lipstick: moisten with acetone as above, then treat stains with methylated spirits. Remove any residual marks from white fabrics with bleach. Red wine: soak in water and detergent, rinse and treat with acetic or citric acid, then rinse. Treat any residual marks with bleach. Ink: depending on the
International wash code symbols These symbols appear on fabric labels, in order to help you choose the best way to treat your laundry. Energetic wash 95 60 40 30 Max. wash temperature 95°C Max. wash temperature 60°C Max. wash temperature 40°C Max. wash temperature 30°C Hand wash Delicate wash 60
Energetic programmes for cotton and linen Maximum load: 3 kg Progr. Temp. Type of laundry Cycle description Prewash Wash at 40°-95°C 4 rinses Long spin A 40°-95° Whites with prewash (heavy soiled) B 40°-95° Whites without prewash (normally soiled) Wash at 40°-95°C 4 rinses Long spin B 30°-60°
ENGLISH Gentle programmes for synthetics, mixed fibres, delicates woollens and Maximum load: 1 kg, woollens: 0.7kg Progr. Temp. Type of laundry Cycle description Prewash Wash at 30°-60°C 3 rinses Short spin H 30°-60° Synthetics with prewash (heavy soiled) J 30°-60° Synthetics without prewash
i Operating sequence Before washing your first load of laundry, we recommend that you run a cotton cycle at 60°C, with the machine empty, in order to remove any manufacturing residue from the drum and tub. Pour half a measure of detergent into the main wash compartment and start up the machine. 1.
ENGLISH 6. Select the programme and start it Turn the programme selector dial clockwise to the required wash programme and pull it outwards: the operating pilot light comes on and the machine starts to operate. B B P0215 P0216 7. At the end of the programme The machine stops automatically, the
MAINTENANCE 1. Bodywork Clean the outside of the machine with warm water and a neutral, non-abrasive household detergent. Rinse with clean water and dry with a soft cloth. Important: do not use methylated spirits, solvents or similar products to clean the bodywork. 2. Detergent dispenser drawer
ENGLISH 4. Drain pump The machine is equipped with a self-cleaning pump which does not need any maintenance. 5. The dangers of freezing If the machine is exposed to temperatures below 0°C, certain precautions should be taken. n Turn off the water tap. n Unscrew the inlet hose. n Unhook the drain
SOMETHING NOT WORKING Problems which you can resolve yourself n Problem n n The machine does not start up: n n n n n The machine does not fill: n n n n n n n n The end of the drain hose is too low. Refer to relevant paragraph in “water drainage” section. The machine does not empty and/or does not
Problem n n The machine vibrates or is noisy: n n n n n n The door will not open: n n n n n n Water is not visible in the machine: n Spinning starts late or the machine does not spin: n The machine makes an unusual noise: n Possible cause Check that all the transit bolts and packing have been
UvaΩaemyj Pokupatelw! Спасибо за то, что Вы выбрали продукцию компании “Занусси”. Мы уверены, что Вы будете очень довольны Вашей новой стиральной машиной. Эта новая стиральная машина отвечает всем требованиям современной стирки белья, так как позволяет сэкономить воду, электроэнергию и стиральный
Ukazaniå po bezopasnoj ™kspluatacii maßiny Uhod za maßinoj i ©istka 22 ■ ■ Opisanie maßiny ■ ■ 23 23 23 Дозатор ьщєчупщ ыкувыемф Программная карточка ■ ■ ■ ■ ■ Esli maßina ne rabotaet 24 24 Кфызфлщмлф ьф§штн Лкуздутшåб гыефтщмдуттну тф мкуьå екфтызщкешкщмлш Кфызщдщ½утшу ьф§штн Мнкфмтшмфтшу зщ
Ukazaniå po bezopasnoj ™kspluatacii maßiny Вдå зщдцящмфеудå Зукув гыефтщмлщо ш тф•фдщь шызщдцящмфтшå ьф§штн шяг•шеу мтшьфеудцтщ тф§ш кулщьутвфсшшю Шр ыщидєвутшу щиуызу•шмфуе тфву½тгє кфищег ьф§штню Мыу зщдцящмфеудш ьф§штн вщд½тн ятфец зкфмшдф уу “лыздгфефсшшю Ыщркфтшеу “ег штыекглсшє тф ыдг•фоб
Opisanie maßiny Вщяфещк ыешкфдцтщпщ зщкщ§лф Зкщпкфььтфå лфкещ•лф Лтщзлш мнищкф ку½шьф Лтщзлф щелкнешå яфпкгящ•тщпщ дєлф Зукулдє•феудц еуьзукфегк Штвшлфещк лщтекщдå яф кфищещо ьф§штн Зукулдє•феудц зкщпкфьь Тщ½лш вдå мнкфмтшмфтшå гкщмтå 2 A B B C 3 4 5 67 H 40º- 95º 30º- 60º 30º- 40º J K L 30º- 60º
Ustanovka maßiny Raspakovka maßiny Зкш кфызфлщмлу ьф§штн ыдувгуе гвщыещмукшецыå м ещьб •ещ ьф§штф ту зкуеукзудф зщмку½вутшо зкш екфтызщкешкщмлую В случае обнаружения повреждений машины о них следует сообщить ответственному за перевозку. Щ зщмку½вутшåр ш тушызкфмтщыеåрб ф ефл½у щи щеыгеыемшш
RaspoloΩenie maßiny RUSSKIJ Ьф§штф ту вщд½тф лфыфецыå ыеут шдш лфлщодшищ ьуиудшю Мщвщзкщмщвтно лкфтб лфтфдшяфсшå ш кщяуелф вщд½тн тфрщвшецыå м ящту вщыåпфуьщыеш §дфтпщм ш ыуеумщпщ зкщмщвф ьф§штню Зкш тущирщвшьщыеш зкшпдфышеу ьщтеф½тшлфю Уыдш ьф§штг гыефтфмдшмфєе м зщьучутшшб пву ьщ½уе инец
èÓ‰Íβ˜ÂÌËÂ Í Í‡Ì‡ÎËÁ‡ˆËË Конец сливного шланга можно устанавливать тремя способами: Повесить на край раковины при помощи пластмассовой направляющей, входящей в комплект машины. В этом случае убедитесь, что шланг не соскочит во время слива воды. Это можно устранить, привязав шланг к крану куском
Opisanie paneli upravleniå è‡ÌÂθ ÛÔ‡‚ÎÂÌËfl B B C 40º- 95º 30º- 60º 30º- 40º D F G H J K L 30º- 60º 30º- 40º 30º- 40º RUSSKIJ A M N P FL 1 2 3 1 SniΩenie skorosti otΩima 4 5 6 7 2 6 CN 7 4 Otkryvanie zagruzo©nogo læka Зкш тф½фешш тф лтщзлг ылщкщыец ще½шьф гьутц§фуеыå ы 700 вщ 500 щиёьшт вдå рдщзлф
i êÂÍÓÏẨ‡ˆËË ‰Îfl ÒÚËÍË ëÓÚËӂ͇ ·Âθfl Необходимо руководствоваться символами на этикетках белья и инструкциями по стирке изготовителя. Кфыыщкешкгоеу бельё следующим образом: белое бельё, цветное, синтетика, тонкие ткани, шерсть. íÂÏÔ‡ÚÛ‡ 95° 60° для белого хлопчатобумажного и льняного белья
åÓ˛˘Ë Ò‰ÒÚ‚‡ Ë ‰Ó·‡‚ÍË Хорошие результаты стирки зависят от выбора моющего средства и от его правильной дозировки. М ещ ½у мкуьåб м судåр яфчшен щлкг½фєчуо ыкувн шяиупфоеу зукувщяшкщмлш ьщєчшр ыкувыемб пщылщдцлг тесмотря на биоразлагаемость, моющие средства содержат в себе элементы, способные
Programmy stirki NORMALWNAÅ STIRKA — HLOPOK Ьфлыю яфпкгялфЖ 3 лп Зкщпкфььф Еуьзукфегкф Зкщпкфььф ыешклш (тутф½фефå лтщзлф) 40°-95° Белое бельё с предварительной стиркой (большая степень загрязнения) Предварительная стирка, Тщкьфдцтфå ыешклфб 4 зщдщылфтшå Ще½шь зкш 700 щиёьшт B 40°-95° Белое бельё
Programmy stirki BEREËNAÅ STIRKA — SINTETIKA, íéçäàÖ íäÄçà , òÖêëíú Зкщпкфььф Еуьзукфегкф Ешз иудцå Зкщпкфььф ыешклш (тутф½фефå лтщзлф) 30°-60° Синтетика Комбинации разных волокон с предварительной стиркой (большая степень загрязнения) Предварительная стирка, Тщкьфдцтфå ыешклф 3 зщдщылфтшå Лщкщелшо
Kak polwzovatwså maßinoj Перед началом эксплуаmации машины млдє•шеу зкщпкфььг ыешклш иуя иудцå зкш еуьзукфегку 60ЇЫб щелдє•шм зкувмфкшеудцтгє ыешклгб •ещин зкщ•шыешец ифкфифт ш мыу мтгекуттшу “дуьутен ьф§штню Зкш “ещь м щевудутшу вщяфещкф ѓЩытщмтфå ыешклфЃ ыдувгуе тфынзфец 100 п ыешкфдцтщпщ
6. Vybor programmy stirki i zapusk maßiny B P0215 B RUSSKIJ Зукув яфзгылщь зкщмукцеуЖ млдє•утф дш ьф§штф м кщяуелгж щелкне дш лкфтж зкфмшдцтщ дш гыефтщмдут ыдшмтщо §дфтпж рщкщ§щ дш яфлкне яфпкгящ•тно дєл ьф§штню Уыдш мыу м тщкьуб зщмуктшеу зукулдє•феудц мнищкф зкщпкфьь зщ •фыщмщо ыекудлую Потяните
i Ètiketki na belwe s ukazaniåmi po stirke O©enw ©asto na belwe estw ™tiketki s ukazaniåmi po stirke. ТЩКЬФДЦТФÅ ЫЕШКЛФ ЫЕШКЛФ 95 60 40 30 Ыешклф зкш 95Ї Ыешклф зкш 60Ї Ыешклф зкш 40Ї Ыешклф зкш 30Ї 60 ИУКУËТФÅ ЫЕШКЛФ ЩЕИУДШМФТШУ ПДФËУТШУ РШЬЌШЫЕЛФ 40 Кг•тфå ыешклф 30 40 Ьщ½тщ щеиудшмфец м рщдщвтщо
Uhod za maßinoj i ©istka 1. Âistka korpusa maßiny RUSSKIJ Лщкзгы ьф§штн ыдувгуе ьнец кфыемщкщьб зкувтфятф•уттнь вдå кг•тщпщ зщдщылфтшå зщыгвню Зщыду ьнецå лщкзгыф “ешь туфпкуыышмтнь кфыемщкщь зкщьщоеу упщ учу кфя •шыещо мщвщо ш мнекшеую Мф½тщЖ Ту шызщдцягоеу тшлфлшр ьщєчшр ыкувыемб ыщвук½фчшр
5. Âistka filwtra nalivnogo ßlanga При затруднительном заполнении водой, или если на это уходит больше времени, чем oбычнo, необходимо проверить чистоту фильтра наливного шланга. Яфлкщоеу мщвщзкщмщвтно лкфт ш щеыщувштшеу тфдшмтщо §дфтпю Здщылщпгисфьш мнтцеу ашдцек шя §дфтпфб лфл глфяфтщ тф кшыгтлуб
Esli maßina ne rabotaet ■ VozmoΩnaå neispravnostw Pri vklæ©enii maßina ne rabotaet: ■ ■ ■ ■ ■ ■ ■ ■ Net zaliva vody v maßinu: ■ ■ ■ ■ ■ ■ Мщвщзкщмщвтно лкфт яфлкне Непоступление воды из крана или её недостаточный напор. Ашдцек тфдшмтщпщ §дфтпф яфыщкут Туздщетщ яфлкне яфпкгящ•тно дєлю ■ Ыдшмтщо
■ ■ ■ VozmoΩnaå neispravnostw ■ Veroåtnaå pri©ina Zagruzo©nyj læk ne otkryvaetså: ■ Тушызкфмтщыец идщлшкгєчупщ гыекщоыемф яфпкгящ•тщпщ дєлфю Maßina izdaet nepriåtnyj zapah: ■ Тувщыефещ•тщу лщдш•уыемщ ыешкфдцтщпщ зщкщ§лф Ыдш§лщь •фыефå ыешклф зкш 40ЇЫ ш ыдш§лщь кувлфå ыешклф зкш 60Їё90ЇЫ Ьуещв
Made in EEC