
![]()
BUILT-IN OVEN INBYGGNADSUGN
ZBS 773
INSTRUCTION BOOKLET BRUKSANVISNING
2

ENGLISH
 Important Safety Information
You MUST read these warnings carefully before installing or using the oven. If you need assistance, contact our Customer Care Department
on 01635 521313
Installation
•This oven must be installed by qualified personnel to the relevant British Standards.
•This oven is heavy. Take care when moving it.
•Remove all packaging, both inside and outside the oven, before using the oven.
•Do not attempt to modify the oven in any way.
•Ensure that all control knobs are in the OFF position when not in use.
•Do not leave cookware containing foodstuffs, e.g. fat or oil in or on the oven in case it is inadvertently switched ON.
•When using other electrical appliances, ensure the cable does not come into contact with the hot surfaces of the oven.
Child Safety
•This oven is designed to be operated by adults. Do not allow children to play near or with the oven.
•The oven gets hot when it is in use. Children should be kept away until it has cooled.
During Use
•This oven is intended for domestic cooking only. It is not designed for commercial or industrial purposes.
•Never line any part of the oven with aluminium foil.
•Do not allow heatproof cooking material, e.g. roasting bags, to come into contact with oven elements.
•Never place plastic or any other material which may melt in or on the oven.
•Do not place sealed cans or aerosols inside the oven. They may explode if they are heated.
•Do not hang towels, dishcloths or clothes from the oven or its handle.
•Do not use this oven if it is in contact with water and never operate it with wet hands.
•Take great care when heating fats and oils as they will ignite if they become too hot.
•Always use oven gloves to remove and replace food in the oven.
Maintenance and Cleaning
•Only clean this oven in accordance with the instructions.
•The oven should be kept clean at all times. A build-up of fats or other foodstuffs could result in a fire, especially in the grill pan.
•Always allow the oven to cool down and switch off the electrical supply before carrying out any cleaning or maintenance work.
Service
•This oven should only be repaired or serviced by an authorised Service Engineer and only genuine approved spare parts should be used.
Environmental Information
•After installation, please dispose of the packaging with due regard to safety and the environment.
•When disposing of an old appliance, make it unusable, by cutting off the cable. Remove any door catches, to prevent small children being trapped inside.
Keep this instruction book for future reference and ensure it is passed on to any new owner.
3

Contents
For the User
|
Important Safety Information |
Page |
3 |
|
Description of the Oven |
Page |
5 |
|
Control Panel |
Page |
6 |
|
How to set the Time of Day |
Page |
7 |
|
How to select a Cooking |
||
|
Function and Temperature |
Page |
8 |
|
«Fast Heat Up» Function |
Page |
9 |
|
Defrost Function |
Page |
9 |
|
Before the First Use |
Page |
10 |
|
Using the Oven |
Page |
10 |
|
Telescopic runners |
Page |
11 |
|
Programming the Oven |
Page |
12 |
|
Safety and Energy |
||
|
Saving Functions |
Page |
13 |
|
Safety Cut-Off Function |
Page |
14 |
|
Child Safety Function |
Page |
14 |
|
Residual Heat Function |
Page |
14 |
|
The Fan Oven |
Page |
15 |
|
The Conventional Oven |
Page |
17 |
|
Cooking Chart — Fan and |
||
|
Conventional Oven |
Page |
18 |
|
Defrosting |
Page |
19 |
|
Grilling |
Page |
20 |
|
Pizza Oven |
Page |
23 |
|
Baking Function |
Page |
23 |
|
Cleaning the Oven |
Page |
24 |
|
Replacing the Oven Light |
Page |
26 |
|
Cleaning the hinged grill |
Page |
26 |
|
If something goes wrong |
Page |
27 |
|
Peace of Mind for 24 Months |
Page |
28 |
|
Service and Spare Parts |
Page |
28 |
For the Installer
|
Installation |
Page |
29 |
|
Electrical Connection |
Page |
29 |
|
Building In |
Page |
30 |
Guide to use the instructions
The following symbols will be found in the text to guide you throughout the Instructions:
Safety Instructions
Step by step instructions for an operation
This appliance complies with the following
E.E.C. Directives:
*73/23 — 90/683
(Low VoltageDirective);
*93/68 (General Directives);
*89/336 (Electromagnetical Compatibility Directive) .
and subsequent modifications
4

Description of the Oven
Control
Panel
Grill Element
Oven Light
Fan
Telescopic
Shelf Supports
Grease Filter
Rating Plate
|
Grill/roasting |
Grill trivet |
|
pan |
Removable
handles
Anti-tip shelf (x 2)
5

Control Panel
|
Cooking Function Display |
Temperature |
Time display |
|
display |
}
|
1 |
2 |
3 |
4 |
5 |
6 |
7 |
8 |
9 |
|
} |
Programming
Controls
Push Buttons
1.ON / OFF
2.Oven Function Control
3.Fast Heat Up / Defrost Function
4.Temperature Control / Current Temperature
5.Decreasing Control (Time or Temperature)
6.Increasing Control (Time or Temperature)
7.Minute Minder
8.Cooking Time
9.End of Cooking Time
All the oven functions are controlled by an electronic programmer.
You can select any combination of cooking function, cooking temperature and automatic timing.
In the event of a power failure, the programmer i will keep all the settings (time of day, program
setting or program in operation) for about 10 minutes. If power is not restored within 10 minutes, all the settings will be cancelled. When the power is restored, the numbers on the display will flash, and the clock/timer has to be reset.
6
«On/Off» Push Button
The oven must be switched on before setting any cooking function or programme. When button  is pressed, the pilot light above will come on, and the oven light will switch on.
To switch off the oven, you can press button  at any time. Any cooking function or programme will stop, the oven light will switch off and the time display will show the time of day only.
When button is pressed, the display will i show the current internal temperature if the
oven has not completely cooled down.
Oven Function Control Push Button
Push button allows you to select the ccoking function. Each time you push this button, a pilot light will come on in the Oven Function Display, showing what cooking function has been chosen.
Increase and Decrease Push Buttons
Push buttons
 and
and 
 allow you to increase or decrease temperature or time settings.
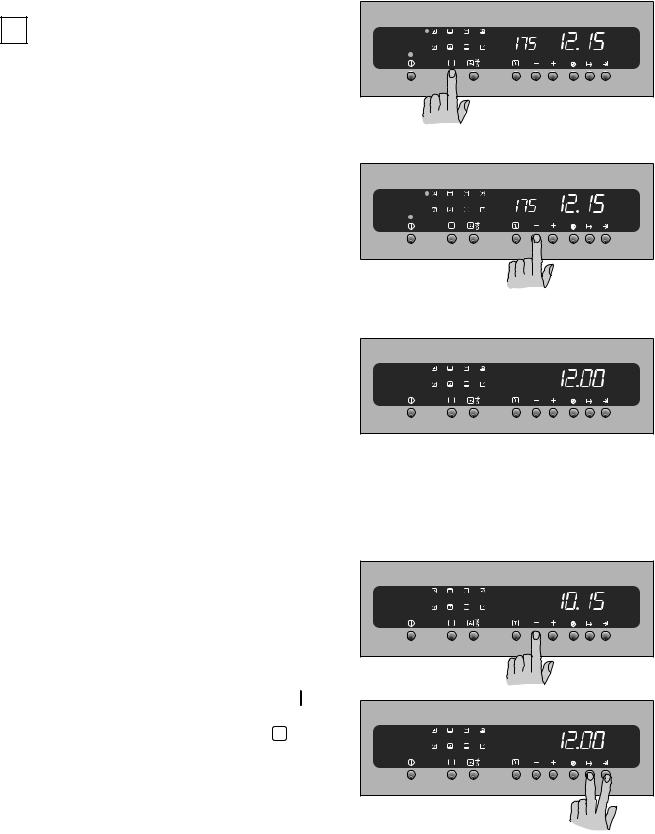
How to set the Time of Day
The oven has a 24 hour clock.
When the oven is first connected to the electrical supply, the display will automatically show 12:00.
If no button is pressed within 10 seconds, the numbers will stop flashing and the clock will start running from 12.00.
To set the correct time of day :
If numbers are flashing:
press button
 or
or 
 . When the correct time is displayed, confirm the setting by
pressing button . The clock will start running.
If numbers are static:
press buttons
 and
and  at the same time and keep them pressed until the numbers
start flashing. Release buttons
 and
and  , then adjust the time by pressing buttons
 or
or 
 and confirm by pressing button
  .
.
7

How to select a Cooking
Function and Temperature
The oven has 8 different cooking functions. For each of them, a pre-set temperature will be automatically selected.
1) Switch on the oven by pressing the «ON» button.
2)Press button  to select the required oven function. Each time button
  is depressed, a pilot light will come to the left of the currently selected cooking function symbol.
3)If the pre-set temperature is not suitable,
press button 
 or
or 
 to adjust the temperature in 5 degree steps.When the required temperature is reached an acoustic alarm will sound for a short time.
You can also get the current internal temperature by pressing button  once.
once.
If the internal temperature is higher than the i selected temperature (e.g. when a cooking
function has been completed and the oven is still hot) the internal temperature will not be displayed.
Cooking Function Symbols
Fan cooking — This setting allows you to roast or roast and bake simultaneously using any shelf, without flavour transference.
Conventional cooking — The heat comes from both the top and bottom element, ensuring even heating inside the oven.
Full Grill — The full grill element will be on. Recommended for large quantities.
Pizza Oven — The bottom element provides direct heat to the base of pizzas, quiches or pies, while the fan ensures air is circulated to cook the pizza toppings or pie fillings.
Thermal Grilling — This function offers an alternative method of cooking food items, normally associated with conventional grilling. The grill element and the oven fan operate together, circulating hot air around the food. Select a maximum temperature of 200°C.
Baking Function — The top and bottom elements heat the oven cavity and the fan circulates hot air around your dishes. Best for baking cakes, biscuits or bread.
Bottom heating element — The heat comes from the bottom of the oven only, to allow you finish your dishes.
Inner grill element only — can be used for grilling small quantities.
8

«Fast Heat Up» function
After a cooking function has been selected and the temperature has been adjusted, the cavity will gradually heat up until the selected temperature is reached. This will take from 10 to 15 minutes, depending on selected function and temperature.
If it is necessary to reach the required temperature in a shorter time, the «Fast Heat Up» Function can be used.
1) Switch the oven on by pressing button 1.
2)Set the required cooking function and temperature as explained in the previous pages.
3) Press button once. The temperature display will show «FHU».
4)When the required temperature is reached, an acoustic alarm will sound for a short time, and the temperature display will revert to the set temperature.
This function can be used with any cooking function or temperature.
Defrost Function
It is possible for the oven fan to operate without heat and circulate the air, at low temperature, inside the oven. This increases the speed of defrosting.
|
1) |
Switch the oven on by pressing button 1. |
|
|
2) |
Press button |
twice. The temperature |
|
display will show «32». This temperature |
||
|
setting cannot be changed. |
||
|
3) |
To switch the «defrost» function off, just |
|
|
press button |
once again. The oven |
will switch off, and the display will only show the time of day.
This function is particularly suitable for defrosting delicate food which could be damaged by heat, e.g. cream filled gateaux, iced cakes, pastries, bread and other yeast products. (See details on page 19).
9
Before the First Use
Remove all packaging, both inside and outside the oven, before using the oven.
Before first use, the oven should be heated without food. During this time, an unpleasant odour may be emitted. This is quite normal.
1.Switch on the oven by pressing the «ON»
push button.
2.Press button  twice. The pilot light to the left of symbol
  will come on.
3.Set the temperature to 250°C using the «Increase» button (push button 
 ).
).
4.Open a window for ventilation.
5.Allow the oven to run empty for approximately 45 minutes.
This procedure should be repeated with the full grill function  and the fan oven function
  for approximately 5-10 minutes.
Using the Oven
•Always cook with the oven door
closed.
•Stand clear when opening the drop down oven door. Do not allow it to fall open — support the door using the door handle, until it is fully open.
•The oven has six shelf levels, and is
isupplied with two shelves. The shelf positions are counted from the bottom of the oven as shown in the diagram.
It is important that these shelves are correctly positioned as shown in the diagram.
•Do not place cookware directly on the oven base.
65 }High
4 }Centre
3
21 }Low
10
 Loading…
You can only view or download manuals with
Sign Up and get 5 for free
Upload your files to the site. You get 1 for each file you add
Get 1 for every time someone downloads your manual
Buy as many as you need
ZM21M1
User Manual


ZANUSSI ZM21M0 Lietotāja rokasgrāmata,
116 pages
ZM21M1
User Manual
ZANUSSI ZM21M0 Упатство за користење,
116 pages
ZM21M1
User Manual
ZANUSSI ZM21M0 Пайдаланушы нұсқаулығы,
116 pages
ZHP6022X
User Manual

ZANUSSI ZHP6022X Uživatelský manuál [en] ,
52 pages
ZMC19MG
User Manual
ZANUSSI ZMC19MG Lietotāja rokasgrāmata,
13 pages
ZM21MG
User Manual
ZANUSSI ZM21MG Lietotāja rokasgrāmata,
24 pages
ZOB668X
User Manual
ZANUSSI ZOB668W Användarmanual,
22 pages
ZMC19M
User Manual
ZANUSSI ZMC19M Lietotāja rokasgrāmata,
13 pages
ZYB380X
User Manual
ZANUSSI ZYB380X Ohjekirja,
60 pages
ZOA35752XD
User Manual
ZANUSSI ZOA35752XD Brukermanual,
44 pages
ZDT26001FA
User Manual
ZANUSSI ZDT26001FA Používateľská príručka,
36 pages
ZDF23001WA
User Manual
ZANUSSI ZDF23001XA Användarmanual,
16 pages
ZDT26001FA
User Manual

ZANUSSI ZDT26001FA User Manual,
48 pages
ZDF23001WA
User Manual
ZANUSSI ZDF23001WA Användarmanual,
16 pages
ZDT22001FA
User Manual
ZANUSSI ZDT22001FA Lietotāja rokasgrāmata,
44 pages
ZDT22001FA
User Manual
ZANUSSI ZDT22001FA Lietotāja rokasgrāmata,
28 pages
ZDF21001WA
User Manual
ZANUSSI ZDF21001WA Användarmanual,
16 pages
ZDT26001FA
User Manual
ZANUSSI ZDT26001FA User Manual,
56 pages
ZDT22001FA
User Manual
ZANUSSI ZDT22001FA Lietotāja rokasgrāmata [sk] ,
48 pages
ZDF26011WA
User Manual
ZANUSSI ZDF26011WA Användarmanual,
20 pages
- Инструкции →
- Бытовая техника →
- Кухонная →
- Плиты →
- Плиты, духовые шкафы, варочные панели →
- Zanussi →
- Zanussi ZBS773X
Модель, к которой подходит эта инструкция: Zanussi ZBS773X
Скачать инструкцию к Zanussi ZBS773X (728.9 Кб)
Данная инструкция написана на русском языке
Вопросы и отзывы о Zanussi ZBS773X
Пожалуйста, если у вас есть вопрос или отзыв, напишите пару строк в форме ниже.
Если вы скачали инструкцию, но не смогли разобраться, как пользоваться той или иной функцией прибора,
напишите свой вопрос, наши специалисты постараются найти ответ на ваш вопрос.
Ваше имя
Ваш email
Проверочный код: введите число с картинки 
Страницы и текст этой инструкции
 Инструкция — ZBS 773
 Информация отображена на картинке
 Информация отображена на картинке
 Информация отображена на картинке
 Информация отображена на картинке
Как использовать наш сайт инструкций OnlineManuals.ru
Наша цель состоит в том, чтобы предоставить вам быстрый доступ к содержанию инструкции для — ZBS 773.
С помощью онлайн просмотра, Вы можете быстро просмотреть содержимое инструкции и найти решение проблемы с — ZBS 773.
Для Вашего удобства
Если листать руководство пользователя — ZBS 773 прямо на сайте, не очень удобно для Вас, есть два возможных решения:
• Просмотр в полноэкранном режиме — легко просмотреть руководство пользователя (без загрузки его на свой компьютер), Вы можете использовать режим полноэкранного просмотра.
Для просмотра инструкции пользователя — ZBS 773 на полном экране, используйте кнопку «Открыть в Pdf-viewer».
• Загрузка на компьютер — Вы можете также скачать Инструкция — ZBS 773 на свой компьютер и сохранить его в файлах.
Многие люди предпочитают читать документы не на экране, а в печатной версии.
Возможность печати руководства пользователя также была предусмотрена на нашем сайте,
и вы можете использовать ее, нажав на иконку «печать» в Pdf-viewer.
Нет необходимости печатать все руководство — ZBS 773, можно выбрать только нужные страницы инструкции.
Руководства Zanussi ZBS773X Размер файлов: 7799 KB, Язык: English, Формат: pdf, Платформа: Windows/Linux, Дата: 2015-07-16
На данной странице вы можете скачать руководства Zanussi ZBS773X. Мы предлагаем вам ознакомиться с руководством пользователя, инструкцией по сервисному обслуживанию и ремонту.
Также здесь вы найдете список заказных номеров на комплектующие Zanussi ZBS773X.
Все файлы предоставляются исключительно в ознакомительных целях. И не являютя руководством по ремонту, а направлены лишь на то чтобы помочь вам более детально ознакомиться с принципом построения устройства.
Содержимое представленных здесь руководств требуют от вас знания технического английского языка.
Если вы собираетесь скачать руководство по сервисному обслуживанию Zanussi ZBS773X, иными словами сервис мануал, вы дожны обладать хотя бы минимальными познаниями в области электроники и пониманием базовых принципов работы электромеханических устройств.
Для просмотра руководств вам понадобится Adobe Acrobat Reader версии 9 и выше либо другая программа для просмотра pdf файлов.
В связи с популярностью информации представленной на сайте и ее бесплатного предоставления конечному пользователю, убедительная просьба использовать специальные программные продукты для многопотокового скачивания файлов.
Руководства для Zanussi ZBS773X
- Руководство пользователя (User manual)
- Руководство по сервисному обслуживанию (Service manual)
- Руководство по ремонту (Repair manual)
- Перечень комплектующих (PartList)
Вы здесь

Страница 3 в инструкции по эксплуатации Zanussi ZBS 773
Панель управления
Все виды тепловой обработки продуктов должны производиться только при закрытой дверце духовки.
РЕЖИМЫ
ПРИГОТОВЛЕНИЯ
ВРЕМЯ
КНОПКИ ПРОГРАММИРОВАНИЯ
ПРИГОТОВЛЕНИЯ
Содержание
Панель управления
Стр 3
Эксплуатация
Стр 4
Первое включение духовки
Стр 6
Программирование
Стр 7
Использование духовки
Стр 9
Уровни для размещения полок
Стр 9
Советы по приготовлению
Стр 9
Предохранительный термостат
Стр 10
Вентилятор охлаждения
Стр 10
Таблицы режимов тепловой обработки
Уход за духовкой
Стр 12
Если что-то не в порядке
Стр 15
Техническая помощь и запасные детали
Стр 15
Гарантия
Стр 16
Технические характеристики
Стр 16
Установка
Стр 17
Встраивание
Стр 17
Прикрепление духовки
Стр 17
Электрическое подключение
Стр 18
продуктов
Стр 11
1.Кнопка Включения/Выключения
2.Кнопка выбора режимов приготовления
3.Кнопка включения быстрого разогрева и режима размораживания
4.Кнопка индикации текущей температуры/
установленной температуры времени суток
5.Кнопка уменьшения (времени или температуры)
6.Кнопка увеличения (времени или температуры)
7.Кнопка установки таймера
8.Кнопка установки продолжительности тепловой обработки
9.Кнопка установки времени окончания тепловой обработки
Примечание
В случае сбоя в электросети программатор сохранит все установки (время суток параметры программы или действующую программу) в течение примерно 10 минут Если сбой в электросети продолжается дольше все эти установки будут аннулированы При восстановлении электропитания цифры на индикаторе будут мигать а показания таймера/
часов будут сброшены.
ТЕМПЕРАТУРА